yolo学习
一、letterbox机制
该机制背景是:保持原尺寸的比例
在深度学习中,模型的输入size通常是正方形尺寸的,比如300 x 300这样.直接resize的话,会把图像拉的变形.通常我们希望resize以后仍然保持图片的宽高比.
我这里给出参考链接:
opencv resize图片为正方形尺寸 - core! - 博客园 (cnblogs.com)
python 图像等比例缩放_giganticpower的博客-CSDN博客_pytorch 图像缩放
等比例缩放c++ opencv 实现 - 知乎 (zhihu.com)
深度学习图像预处理 保持原尺寸比例_老光头_ME2CS的博客-CSDN博客
数据集预处理:图像等比例缩放并填充_我是大黄同学呀的博客-CSDN博客_图片等比例填充
例子代码1:
def ResziePadding(img, fixed_side=128):

        h, w = img.shape[0], img.shape[1]
        scale = max(w, h)/float(fixed_side)   # 获取缩放比例
        new_w, new_h = int(w/scale), int(h/scale)
        resize_img = cv2.resize(img, (new_w, new_h))    # 按比例缩放

        # 计算需要填充的像素长度
        if new_w % 2 != 0 and new_h % 2 == 0:
            top, bottom, left, right = (fixed_side - new_h) // 2, (fixed_side - new_h) // 2, (fixed_side - new_w) // 2 + 1, (
                fixed_side - new_w) // 2
        elif new_w % 2 == 0 and new_h % 2 != 0:
            top, bottom, left, right = (fixed_side - new_h) // 2 + 1, (fixed_side - new_h) // 2, (fixed_side - new_w) // 2, (
                fixed_side - new_w) // 2
        elif new_w % 2 == 0 and new_h % 2 == 0:
            top, bottom, left, right = (fixed_side - new_h) // 2, (fixed_side - new_h) // 2, (fixed_side - new_w) // 2, (
                fixed_side - new_w) // 2
        else:
            top, bottom, left, right = (fixed_side - new_h) // 2 + 1, (fixed_side - new_h) // 2, (fixed_side - new_w) // 2 + 1, (
                fixed_side - new_w) // 2

        # 填充图像
        pad_img = cv2.copyMakeBorder(resize_img, top, bottom, left, right, cv2.BORDER_CONSTANT, value=[0, 0, 0])

        return pad_img
再给出一个链接:
【图片resize】图片三种缩放方式/letterbox_image实现_寻找永不遗憾的博客-CSDN博客_图片的resize
这个链接整体说的蛮好的,就是有一处不太严谨如下:
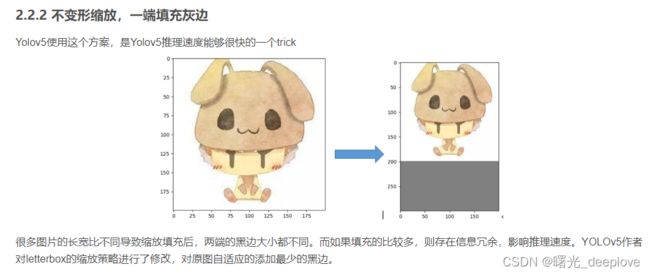
这个作者应该说明清楚,yolov5在训练时(非rect情况下)采用的还是“不变形缩放,两端填充灰边114”,而在推理阶段时,为了提速采用的是“填充最少的灰度边,不变形缩放,一端填充灰度边”,这点可以从yolov5的源码中看到:
def letterbox(im, new_shape=(640, 640), color=(114, 114, 114), auto=True, scaleFill=False, scaleup=True, stride=32):
    # Resize and pad image while meeting stride-multiple constraints
    shape = im.shape[:2]  # current shape [height, width]
    if isinstance(new_shape, int):
        new_shape = (new_shape, new_shape)

    # Scale ratio (new / old)
    r = min(new_shape[0] / shape[0], new_shape[1] / shape[1])
    if not scaleup:  # only scale down, do not scale up (for better val mAP)
        r = min(r, 1.0)

    # Compute padding
    ratio = r, r  # width, height ratios
    new_unpad = int(round(shape[1] * r)), int(round(shape[0] * r))
    dw, dh = new_shape[1] - new_unpad[0], new_shape[0] - new_unpad[1]  # wh padding
    if auto:  # minimum rectangle
        dw, dh = np.mod(dw, stride), np.mod(dh, stride)  # wh padding
    elif scaleFill:  # stretch
        dw, dh = 0.0, 0.0
        new_unpad = (new_shape[1], new_shape[0])
        ratio = new_shape[1] / shape[1], new_shape[0] / shape[0]  # width, height ratios

    dw /= 2  # divide padding into 2 sides
    dh /= 2

    if shape[::-1] != new_unpad:  # resize
        im = cv2.resize(im, new_unpad, interpolation=cv2.INTER_LINEAR)
    top, bottom = int(round(dh - 0.1)), int(round(dh + 0.1))
    left, right = int(round(dw - 0.1)), int(round(dw + 0.1))
    im = cv2.copyMakeBorder(im, top, bottom, left, right, cv2.BORDER_CONSTANT, value=color)  # add border
    return im, ratio, (dw, dh)
从中也可以看出:当auto为true,为minimum rectangle时,也并不是单独一端填充灰色,而是两端填充,只是此时是“minimum rectangle”,这样就不用填充成训练时的那种正方形(如2016*2016),只用变为矩形(如1216*2016)。这样就达到了推理加速的目的!
最后给出步骤:
-
等比例缩放,然后用灰色边缘填充
step1: 计算宽高缩放比例,选择较小的那个缩放系数;
step2: 计算缩放后的尺寸: 原始图片的长宽都乘以较小的缩放系数;
step3:计算短边需要填充的灰边数,将短边的两边各自填充一半的灰行即可。
import matplotlib.pyplot as plt
from PIL import Image

# ------------------------------------------------------------------------#
#   对输入图像进行resize,他人测试发现,不用letterbox_image直接resize的效果更好
# ------------------------------------------------------------------------#
def resize_image(image, size, letterbox_image):
    iw, ih  = image.size
    w, h    = size      # w=200, h=300
    if letterbox_image:
        scale   = min(w/iw, h/ih)
        nw      = int(iw*scale)
        nh      = int(ih*scale)

        image   = image.resize((nw,nh), Image.BICUBIC)
        # 新建一张image,第二个参数表示尺寸,第三个参数表示颜色
        new_image = Image.new('RGB', size, (128,128,128))

        # --------------------------------------------------------------#
        # 	不变形resize,两端填充灰边
        #   image.paste函数表示将一张图片覆盖到另一张图片的指定位置去
        #   a.paste(b, (50,50))   将b的左上顶点贴到a的坐标为(50,50)的位置,
        #	左上顶点为(0,0), b超出a的部分会被自动舍弃
        # --------------------------------------------------------------#
        # new_image.paste(image, ((w-nw)//2, (h-nh)//2))

        # ---------------------------------------------------#
        # 	不变形resize,一端填充灰边
        # ---------------------------------------------------#
        new_image.paste(image, (0, 0))
    else:
        new_image = image.resize((w, h), Image.BICUBIC)
    return new_image


img_PIL = Image.open("Avatar.jpg")
# ---------------------------------------------------#
# 第二参数表示目标尺寸,第三参数表示是否使用letterbox
# ---------------------------------------------------#
img = resize_image(img_PIL, (200, 300), True)

plt.imshow(img)
plt.show()
二、yolo的数据集cache机制
(1)
支持的数据格式
yolov5支持直接将图片或者视频的数据转换到dataloader当中去.
文件类型包括:
‘bmp’, ‘jpg’, ‘jpeg’, ‘png’, ‘tif’, ‘tiff’, ‘dng’, ‘webp’, ‘mpo’
‘mov’, ‘avi’, ‘mp4’, ‘mpg’, ‘mpeg’, ‘m4v’, ‘wmv’, ‘mkv’快速加载数据集标签的技巧
通常情况下,目标检测数据集都会非常大,同时,yolo采用的是txt格式保存的标签数据,那么加载数据可能会很慢,对于一个10万级别的数据集,可能花费1小时左右的时间,如果多次训练此数据集,显然是一笔很大的时间开销.因此,yolov5用来一种相当巧妙的方式,只会在第一次读取数据集的时候,将标签文件处理成一个cache文件,这样,再重新读取数据集的时候,直接搜索数据集中是否存在cache文件即可。
同时,相对于原始的txt标签文件,cache还可以保存很多的额外信息,比如说,数据集的大小,未找到标签文件对应的图片数量…
当然,细心的人会发现,如果使用一个损坏的cache文件存放到数据集中,yolov5会不会读取异常? 答案是不会,因为对于每一个数据集的cache文件中,会生成一个Hash Code,这个code是通过数据集的大小计算得到的,因此在读取cache之前会检查Hash Code是否匹配在detect实际场景中数据加载的技巧
yolov5为我们提供了一个很完善的数据加载解决方案,它蕴含这很多的技巧,同时,核心代码数量只在1000行左右,便于使用者阅读.
对于train和test数据的加载,那么显然是需要从数据集中加载得到.yolov5提供了一个create_dataloader函数,可以在其参数中指定使用哪些加载技巧.然后只需要拿到加载数据集的迭代器就可以了
在检测阶段,如果你需要检测某一个文件夹中所有的图片,或者是从摄像头里面拉取视屏流,亦或者是从http协议中拉取视频流,yolov5都提供了一整套解决方案.相比于其他检测器的代码,你会发现,yolov5对于实际场景的检测做了很多的支持,不需要我们再单独部署模型.同时如果我们想将其部署到C++中,也可以参考其加载数据的代码技巧
参考:Yolov5系列(4)-dataloader模块
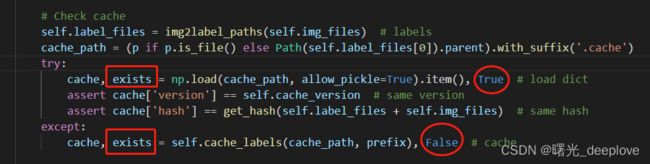
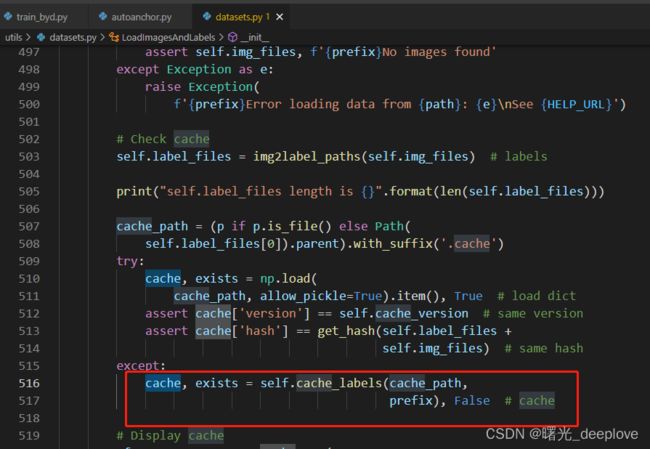
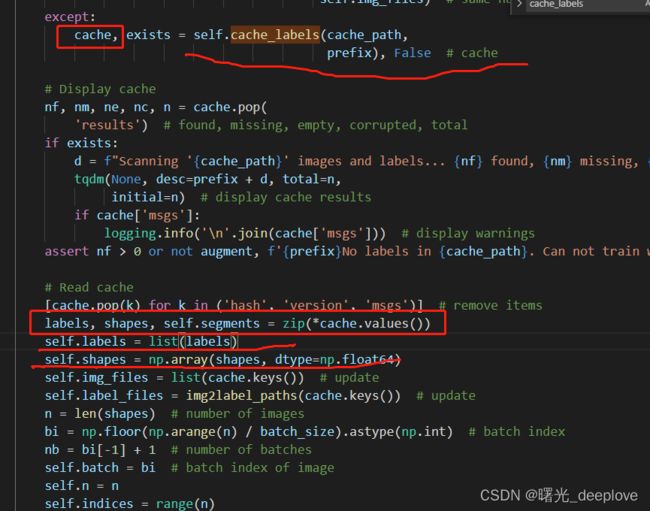
从这个图中也可以看到:try中的两个assert,不满足这两个assert,那么就会跳入except中。
步骤是:先判断数据集有无对应的cache文件路径存在(上图前两行),
然后在try中的两个assert分别是判断当cache文件存在时,cache的版本是否是6.0的版本;以及在读取cache之前会检查Hash Code是否匹配。如果两个assert中有一个不成立,则进入except中,重新生成标签文件的cache。
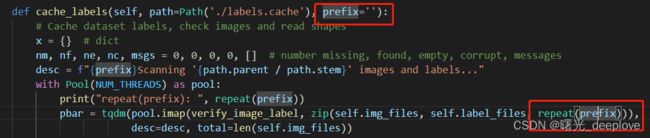
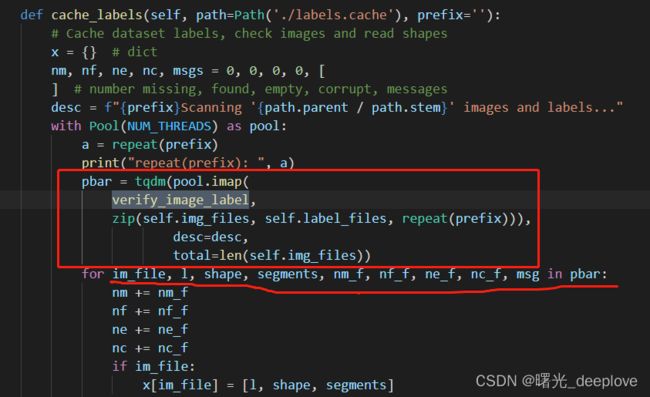
def cache_labels(self, path=Path('./labels.cache'), prefix=''):
# Cache dataset labels, check images and read shapes
x = {} # dict
nm, nf, ne, nc, msgs = 0, 0, 0, 0, [] # number missing, found, empty, corrupt, messages
desc = f"{prefix}Scanning '{path.parent / path.stem}' images and labels..."
with Pool(NUM_THREADS) as pool:
pbar = tqdm(pool.imap(verify_image_label, zip(self.img_files, self.label_files, repeat(prefix))),
desc=desc, total=len(self.img_files))
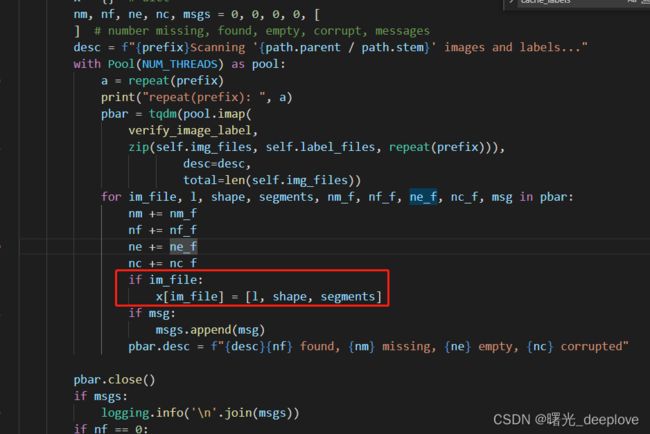
for im_file, l, shape, segments, nm_f, nf_f, ne_f, nc_f, msg in pbar:
nm += nm_f
nf += nf_f
ne += ne_f
nc += nc_f
if im_file:
x[im_file] = [l, shape, segments]
if msg:
msgs.append(msg)
pbar.desc = f"{desc}{nf} found, {nm} missing, {ne} empty, {nc} corrupted"
pbar.close()
if msgs:
logging.info('\n'.join(msgs))
if nf == 0:
logging.info(f'{prefix}WARNING: No labels found in {path}. See {HELP_URL}')
x['hash'] = get_hash(self.label_files + self.img_files)
x['results'] = nf, nm, ne, nc, len(self.img_files)
x['msgs'] = msgs # warnings
x['version'] = self.cache_version # cache version
try:
np.save(path, x) # save cache for next time
path.with_suffix('.cache.npy').rename(path) # remove .npy suffix
logging.info(f'{prefix}New cache created: {path}')
except Exception as e:
logging.info(f'{prefix}WARNING: Cache directory {path.parent} is not writeable: {e}') # path not writeable
return x注:上图中有些代码的语法我觉得很有必要记录一下。
语法一:
 with Pool(NUM_THREADS) as pool:
            pbar = tqdm(pool.imap(verify_image_label, zip(self.img_files, self.label_files, repeat(prefix))),
                        desc=desc, total=len(self.img_files))
这个是两个函数:pool.imap()以及tqdm()嵌套的。我们先看pool.imap
进程池Pool的imap方法解析 - 简书 (jianshu.com)
pool.imap_梦否的博客-CSDN博客_pool.imap

首先明白了imap返回是一个iter(迭代器),其次看出使用with方式,方便在不用imap进程时自动退出,最后我们明白repeat(prefix)就是chunksize。
再看tqdm:
python进度条库tqdm详解 - 知乎 (zhihu.com)
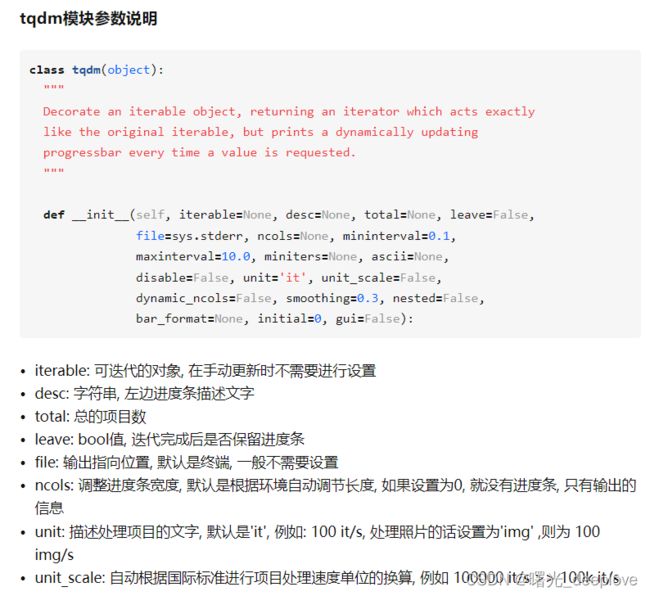
我们明白了:
iterable: 可迭代的对象,这里就是imap的返回的迭代器
desc:字符串, 左边进度条描述文字,在v5代码中即:desc = f"{prefix}Scanning '{path.parent / path.stem}' images and labels..."
total:总的项目数,在这里是len(self.img_files),即训练或者验证图像的总数目
(2)
此外,这里我对下面代码中的zip(self.img_files, self.label_files, repeat(prefix))有必要解释说明一下
with Pool(NUM_THREADS) as pool:
pbar = tqdm(pool.imap(verify_image_label, zip(self.img_files, self.label_files, repeat(prefix))),
desc=desc, total=len(self.img_files))
具体地,我们可以看到zip(self.img_files, self.label_files, repeat(prefix))这里的zip在python3.x中是打包为一个元组的列表对象,可以通过*zip进行解压,获取二维矩阵式(链接)
最为关键的是这个repeat(prefix)我一直没搞明白,那我们先看prefix来源:
我画了一个追踪路径如下:

我在下面代码中打印一下:
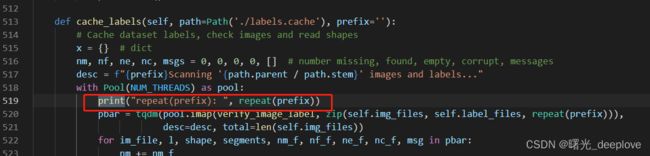
结果显示:

我看到这个结果我是一脸蒙圈的,看不懂这个repeat(prefix)的结果。
print("repeat(prefix): ", repeat(prefix))
repeat(prefix): repeat('\x1b[34m\x1b[1mtrain: \x1b[0m')
因此才有了前面的追朔这个结果的由来:

echo命令_Linux echo命令:显示文字并给文字添加颜色 (biancheng.net)
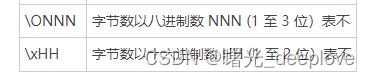
明显\033是八进制的,那么如何转为16进制呢,根据以下链接:
八进制转换成二进制_百度知道 (baidu.com)
八进制转十进制| 8进制转10进制 | 在线进制转换 (sojson.com)
二进制与十六进制在线转换器,在线计算,在线计算器,计算器在线计算 (osgeo.cn)
二进制转十六进制算法(举例)_百度知道 (baidu.com)
二进制数与十六进制数之间如何互相转换-百度经验 (baidu.com)
二进制、八进制、十进制、十六进制的互相转换 - 活着的虫子 - 博客园 (cnblogs.com)
8进制和16进制怎么转换_百度知道 (baidu.com)
因此这里就可以看到\033是八进制的,那么转为16进制就是\x1b

因此
''.join(colors[x] for x in args) + f'{string}' + colors['end']
结果就是:
'\x1b[34m\x1b[1mtrain: \x1b[0m'
三、anchor聚类
(1)
好了,现在先让我们回到v5的自动聚类上面,

上面说明:当bpr小于0.98的时候才会重新计算anchor。
那么就进去看看如何计算的anchor:kmean_anchors(...)
def kmean_anchors(dataset='./data/coco128.yaml',
                  n=9,
                  img_size=640,
                  thr=4.0,
                  gen=1000,
                  verbose=True):
    """ Creates kmeans-evolved anchors from training dataset

        Arguments:
            dataset: path to data.yaml, or a loaded dataset
            n: number of anchors
            img_size: image size used for training
            thr: anchor-label wh ratio threshold hyperparameter hyp['anchor_t'] used for training, default=4.0
            gen: generations to evolve anchors using genetic algorithm
            verbose: print all results

        Return:
            k: kmeans evolved anchors

        Usage:
            from utils.autoanchor import *; _ = kmean_anchors()
    """
    from scipy.cluster.vq import kmeans

    thr = 1. / thr
    prefix = colorstr('autoanchor: ')

    def metric(k, wh):  # compute metrics
        r = wh[:, None] / k[None]
        x = torch.min(r, 1. / r).min(2)[0]  # ratio metric
        # x = wh_iou(wh, torch.tensor(k))  # iou metric
        return x, x.max(1)[0]  # x, best_x

    def anchor_fitness(k):  # mutation fitness
        _, best = metric(torch.tensor(k, dtype=torch.float32), wh)
        return (best * (best > thr).float()).mean()  # fitness

    def print_results(k):
        k = k[np.argsort(k.prod(1))]  # sort small to large
        x, best = metric(k, wh0)
        bpr, aat = (best > thr).float().mean(), (
            x > thr).float().mean() * n  # best possible recall, anch > thr
        print(
            f'{prefix}thr={thr:.2f}: {bpr:.4f} best possible recall, {aat:.2f} anchors past thr'
        )
        print(
            f'{prefix}n={n}, img_size={img_size}, metric_all={x.mean():.3f}/{best.mean():.3f}-mean/best, '
            f'past_thr={x[x > thr].mean():.3f}-mean: ',
            end='')
        for i, x in enumerate(k):
            print('%i,%i' % (round(x[0]), round(x[1])),
                  end=',  ' if i < len(k) - 1 else '\n')  # use in *.cfg
        return k

    if isinstance(dataset, str):  # *.yaml file
        with open(dataset, errors='ignore') as f:
            data_dict = yaml.safe_load(f)  # model dict
        from utils.datasets import LoadImagesAndLabels
        dataset = LoadImagesAndLabels(data_dict['train'],
                                      augment=True,
                                      rect=True)

    # Get label wh
    print(dataset.shapes)
    shapes = img_size * dataset.shapes / dataset.shapes.max(1, keepdims=True)
    wh0 = np.concatenate(
        [l[:, 3:5] * s for s, l in zip(shapes, dataset.labels)])  # wh

    # Filter,即过滤
    i = (wh0 < 3.0).any(1).sum()  #统计有多少个面积w或者h长度小于3个像素的
    if i:
        print(
            f'{prefix}WARNING: Extremely small objects found. {i} of {len(wh0)} labels are < 3 pixels in size.'
        )
    wh = wh0[(wh0 >= 2.0).any(1)]  # filter > 2 pixels,过滤大于2个像素的
    # wh = wh * (np.random.rand(wh.shape[0], 1) * 0.9 + 0.1)  # multiply by random scale 0-1

    # Kmeans calculation
    print(f'{prefix}Running kmeans for {n} anchors on {len(wh)} points...')
    s = wh.std(0)  # sigmas for whitening
    k, dist = kmeans(wh / s, n, iter=30)  # points, mean distance
    assert len(
        k
    ) == n, f'{prefix}ERROR: scipy.cluster.vq.kmeans requested {n} points but returned only {len(k)}'
    k *= s
    wh = torch.tensor(wh, dtype=torch.float32)  # filtered
    wh0 = torch.tensor(wh0, dtype=torch.float32)  # unfiltered
    k = print_results(k)

    # Plot
    # k, d = [None] * 20, [None] * 20
    # for i in tqdm(range(1, 21)):
    #     k[i-1], d[i-1] = kmeans(wh / s, i)  # points, mean distance
    # fig, ax = plt.subplots(1, 2, figsize=(14, 7), tight_layout=True)
    # ax = ax.ravel()
    # ax[0].plot(np.arange(1, 21), np.array(d) ** 2, marker='.')
    # fig, ax = plt.subplots(1, 2, figsize=(14, 7))  # plot wh
    # ax[0].hist(wh[wh[:, 0]<100, 0],400)
    # ax[1].hist(wh[wh[:, 1]<100, 1],400)
    # fig.savefig('wh.png', dpi=200)

    # Evolve
    npr = np.random
    f, sh, mp, s = anchor_fitness(
        k), k.shape, 0.9, 0.1  # fitness, generations, mutation prob, sigma
    pbar = tqdm(range(gen),
                desc=f'{prefix}Evolving anchors with Genetic Algorithm:'
                )  # progress bar
    for _ in pbar:
        v = np.ones(sh)
        while (v == 1
               ).all():  # mutate until a change occurs (prevent duplicates)
            v = ((npr.random(sh) < mp) * random.random() * npr.randn(*sh) * s +
                 1).clip(0.3, 3.0)
        kg = (k.copy() * v).clip(min=2.0)
        fg = anchor_fitness(kg)
        if fg > f:
            f, k = fg, kg.copy()
            pbar.desc = f'{prefix}Evolving anchors with Genetic Algorithm: fitness = {f:.4f}'
            if verbose:
                print_results(k)

    return print_results(k)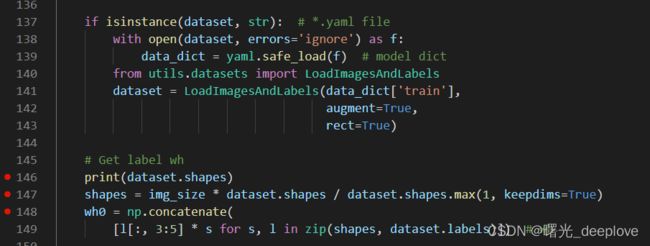
那我们可以看到一个关键的类的实例对象dataset,
我们通过调试,发现如下dataset的属性如下:
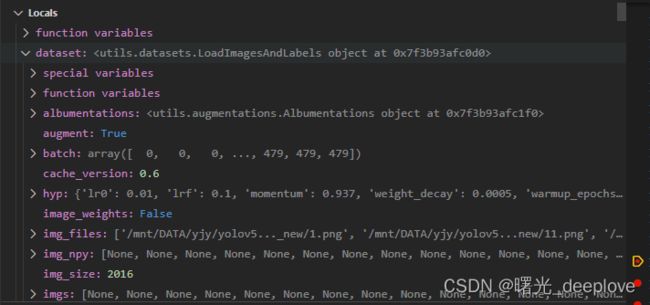

我们发现信息如下:
信息1):dataset的labels为(nums, 5),比如(7668, 5)。可以看到分别是yolo格式,即归一化后的(类别id,cx,cy, w, h)
dataset的shapes为(nums, 2),比如(7668, 2)
信息2):我们看到有的居然是空的,我自己猜测是它是按照图片路径加载的相应的标签文件,而有的ok图是没有对应标签的,因此自然就是对应的标签numpy array就是空的。
为了想探究这些空的是怎么来的,因此要向上追朔dataset了,首先我们看到dataset是哪来的:

因此我们再进入LoadImagesAndLabels这个类中:
我们主要关注这个cache_label函数:
def cache_labels(self, path=Path('./labels.cache'), prefix=''):
        # Cache dataset labels, check images and read shapes
        x = {}  # dict
        nm, nf, ne, nc, msgs = 0, 0, 0, 0, [
        ]  # number missing, found, empty, corrupt, messages
        desc = f"{prefix}Scanning '{path.parent / path.stem}' images and labels..."
        with Pool(NUM_THREADS) as pool:
            a = repeat(prefix)
            print("repeat(prefix): ", a)
            pbar = tqdm(pool.imap(
                verify_image_label,
                zip(self.img_files, self.label_files, repeat(prefix))),
                        desc=desc,
                        total=len(self.img_files))
            for im_file, l, shape, segments, nm_f, nf_f, ne_f, nc_f, msg in pbar:
                nm += nm_f
                nf += nf_f
                ne += ne_f
                nc += nc_f
                if im_file:
                    x[im_file] = [l, shape, segments]
                if msg:
                    msgs.append(msg)
                pbar.desc = f"{desc}{nf} found, {nm} missing, {ne} empty, {nc} corrupted"

        pbar.close()
        if msgs:
            logging.info('\n'.join(msgs))
        if nf == 0:
            logging.info(
                f'{prefix}WARNING: No labels found in {path}. See {HELP_URL}')
        x['hash'] = get_hash(self.label_files + self.img_files)
        x['results'] = nf, nm, ne, nc, len(self.img_files)
        x['msgs'] = msgs  # warnings
        x['version'] = self.cache_version  # cache version
        try:
            np.save(path, x)  # save cache for next time
            path.with_suffix('.cache.npy').rename(path)  # remove .npy suffix
            logging.info(f'{prefix}New cache created: {path}')
        except Exception as e:
            logging.info(
                f'{prefix}WARNING: Cache directory {path.parent} is not writeable: {e}'
            )  # path not writeable
        return x
接下来我们要再进入verify_image_label函数看看:
def verify_image_label(args):
    # Verify one image-label pair
    im_file, lb_file, prefix = args
    nm, nf, ne, nc, msg, segments = 0, 0, 0, 0, '', [
    ]  # number (missing, found, empty, corrupt), message, segments
    try:
        # verify images
        im = Image.open(im_file)
        im.verify()  # PIL verify
        shape = exif_size(im)  # image size
        assert (shape[0] > 9) & (shape[1] >
                                 9), f'image size {shape} <10 pixels'
        assert im.format.lower(
        ) in IMG_FORMATS, f'invalid image format {im.format}'
        if im.format.lower() in ('jpg', 'jpeg'):
            with open(im_file, 'rb') as f:
                f.seek(-2, 2)
                if f.read() != b'\xff\xd9':  # corrupt JPEG
                    Image.open(im_file).save(im_file,
                                             format='JPEG',
                                             subsampling=0,
                                             quality=100)  # re-save image
                    msg = f'{prefix}WARNING: {im_file}: corrupt JPEG restored and saved'

        # verify labels
        if os.path.isfile(lb_file):
            nf = 1  # label found
            with open(lb_file, 'r') as f:
                l = [
                    x.split() for x in f.read().strip().splitlines() if len(x)
                ]
                if any([len(x) > 8 for x in l]):  # is segment
                    classes = np.array([x[0] for x in l], dtype=np.float32)
                    segments = [
                        np.array(x[1:], dtype=np.float32).reshape(-1, 2)
                        for x in l
                    ]  # (cls, xy1...)
                    l = np.concatenate(
                        (classes.reshape(-1, 1), segments2boxes(segments)),
                        1)  # (cls, xywh)
                l = np.array(l, dtype=np.float32)
            nl = len(l)
            if nl:
                assert l.shape[
                    1] == 5, f'labels require 5 columns, {l.shape[1]} columns detected'
                assert (l >= 0).all(), f'negative label values {l[l < 0]}'
                assert (l[:, 1:] <= 1).all(
                ), f'non-normalized or out of bounds coordinates {l[:, 1:][l[:, 1:] > 1]}'
                l = np.unique(l, axis=0)  # remove duplicate rows
                if len(l) < nl:
                    segments = np.unique(segments, axis=0)
                    msg = f'{prefix}WARNING: {im_file}: {nl - len(l)} duplicate labels removed'
            else:
                ne = 1  # label empty
                l = np.zeros((0, 5), dtype=np.float32)
        else:
            nm = 1  # label missing
            l = np.zeros((0, 5), dtype=np.float32)
        return im_file, l, shape, segments, nm, nf, ne, nc, msg
    except Exception as e:
        nc = 1
        msg = f'{prefix}WARNING: {im_file}: ignoring corrupt image/label: {e}'
        return [None, None, None, None, nm, nf, ne, nc, msg]
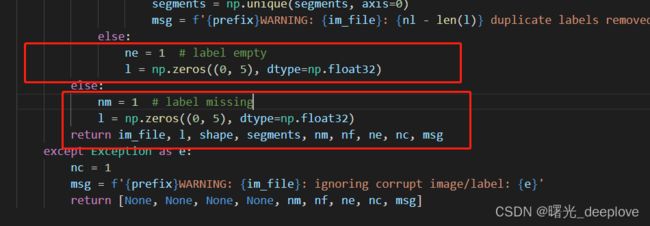
这里就可以看到了上面提到的空标签(空的numpy array)是从这里来的:
l = np.zeros((0, 5), dtype=np.float32)
此外这里也看出来了,pool.imap返回的pbar这个迭代器,每次迭代返回的是:
for im_file, l, shape, segments, nm_f, nf_f, ne_f, nc_f, msg in pbar:
这样也就明白了!

从而就可以在autoanchor.py文件中看到:
shapes = img_size * dataset.shapes / dataset.shapes.max(1, keepdims=True)
是怎么计算的:
dataset.shapes的size为:(7668,2),即有7668张图,2列特征(分别为归一化的w和h),
那么dataset.shapes.max(1, keepdims=True)表示的是按列(即轴1)进行求取一行中两列之间的最大值,且保持维度,因此dataset.shapes.max(1, keepdims=True)的如果的size为:
(7668,1)而不是(7668)。
举列子:
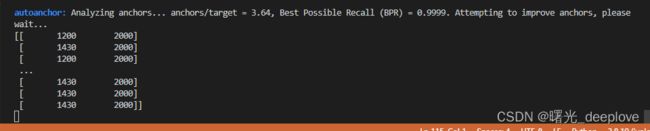
dataset.shapes
([[1189,2000],
  [1189,2000],
  [1200,2000],
])
dataset.shapes.max(1, keepdims=True)的结果为:
([[2000],
  [2000],
  [2000],
])
那假如dataset.shapes.max(1, keepdims=False),那么其结果为:
([2000,2000,2000])那么回过头来看shapes = img_size * dataset.shapes / dataset.shapes.max(1, keepdims=True)
表示啥意思呢?
答:这个其实就是letterbox中的等比例缩放。
我们推导理一下:假设现在我们原始图像宽高为1189*2000,而我们训练入口大小为:2016*2016
1)那么按照letterbox步骤2,其等比缩放后的宽高计算步骤:
ratio1 = 2016/1189
ratio2 = 2016/2000
选择较小的:ratio2 = 2016/2000
new_w = 1189 * ratio2 = 1189 * (2016/2000) = 1198.5
new_h = 2000*ratio2 = 2000 * (2016*2000) = 2016.0
2)那么按照shapes = img_size * dataset.shapes / dataset.shapes.max(1, keepdims=True)计算过程为:
dataset.shapes:(1189,2000)
img_size : (2016, 2016)
dataset.shapes.max(1, keepdims=True)的结果为(2000)
dataset.shapes / dataset.shapes.max(1, keepdims=True) = 1189/ 2000, 2000/2000
img_size * dataset.shapes / dataset.shapes.max(1, keepdims=True) = 2016 * (1189/2000),
2016*(2000/2000) = 1189 * (2016/2000), 2000 * (2016*2000) = 1189.5, 2016.0
从上面的1)和2)明显可以看到:二者计算结果是相同的,验证了:
shapes = img_size * dataset.shapes / dataset.shapes.max(1, keepdims=True)就是letterbox中的等比例缩放!
(4)接下来就可以分析以下图中的代码了:

实际是在进行聚类之前做的一些预处理:
具体地:
1)第一:
wh0 = np.concatenate([l[:, 3:5] * s for s, l in zip(shapes, dataset.labels)]) # wh取labels(classid,cx,cy, w, h)中的w和h出来,然后分别乘上上面经过:
shapes = img_size * dataset.shapes / dataset.shapes.max(1, keepdims=True)这个等比例缩放后的结果,也就是要将原来在1189*2000图上归一化的w和h,现在映射到2016*2016的图上,且不进行归一化的w和h:
从下面的图中就可以看到都不是归一化后的那种小数点:
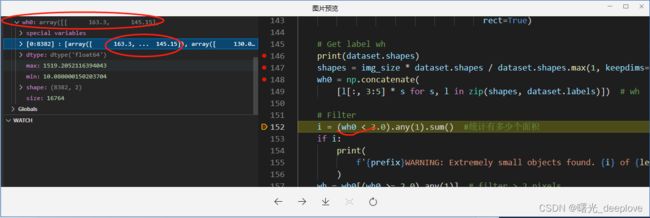
2)第二:
# Filter,即过滤
    i = (wh0 < 3.0).any(1).sum()  #统计有多少个面积w或者h长度小于3个像素的
    if i:
        print(
            f'{prefix}WARNING: Extremely small objects found. {i} of {len(wh0)} labels are < 3 pixels in size.'
        )
    wh = wh0[(wh0 >= 2.0).any(1)]  # filter > 2 pixels,过滤大于2个像素的
这两句话其实都是用于过滤(Filter)作用的,
i = (wh0 < 3.0).any(1).sum() #统计有多少个面积w或者h长度小于3个像素的
wh = wh0[(wh0 >= 2.0).any(1)] # filter > 2 pixels,过滤大于2个像素的
也就是当一个gt框box的宽或者高任意有小于3个像素长度的,就统计出来,打印出来给使用者warning告知
只取一个gt框box的宽或者高任意大于或等于2个像素长度的,才进入,否则小于2个像素的直接被过滤掉,不会放入后续的聚类中!
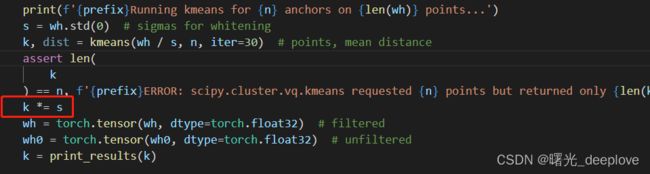
3)第三:
# Kmeans calculation
    print(f'{prefix}Running kmeans for {n} anchors on {len(wh)} points...')
    s = wh.std(0)  # sigmas for whitening
    k, dist = kmeans(wh / s, n, iter=30)  # points, mean distance
这步就是k均值聚类,可以看到yolov5的作者还是使用的欧式距离作为距离度量值。并没有使用d = 1-iou这种方式!
对每一个数据做一个标准差归一化处理(除以标准差)。scipy.cluster.vq.kmeans() 函数输入的数据就是必须是白化后的数据。相应的输出的anchor k也是白化后的anchor,所以需要将anchor k 都乘以标准差恢复。如下:
参考:
(1条消息) YOLOV5 修改K-means聚类方法并生成anchors_Lucky dog123的博客-CSDN博客_yolov5 聚类
(1条消息) 使用k-means聚类anchors_太阳花的小绿豆的博客-CSDN博客_anchor kmeans聚类

(1条消息) 【YOLOV5-5.x 源码解读】autoanchor.py_满船清梦压星河HK的博客-CSDN博客