ROS2经验:OAK-D深度图像转2d激光数据
OAK-D 深度图像转2D激光数据
在调试OAK-D相机在ROS2 galactic上运行的时候,使用官方提供的depthai_ros源码运行发布点云数据。

使用RVIZ查看的点云效果。
发现点云的帧率非常低,而且干扰数据很多(纯双目相机的弊端?),整个效果相当不理想,几乎就是完全无法应用的状态。
下文将介绍使用depthimage_to_laserscan软件包将深度图像转成伪2D激光雷达数据,由于转换后的数据量小,帧率与深度图的相同(将近30Hz),实时性相当不错。
开发环境:
操作系统:ubuntu 20.04
ROS版本:ROS2 Galactic
硬件:OAK-D
1. 安装depthimage_to_laserscan
ROS2的depthimage_to_laserscan可以到github上下载源码编译:https://github.com/ros-perception/depthimage_to_laserscan/tree/ros2
也可以直接用apt安装,省去编译中可能会遇到的兼容问题。
sudo apt install ros-galactic-depthimage-to-laserscan
2. 修改相机的launch file
我们直接使用depthai-ros-example提供的例程进行修改。
找到depthai-ros-examples/depthai_examples/launch/stereo.launch.py,复制改名为depthimage.launch.py。
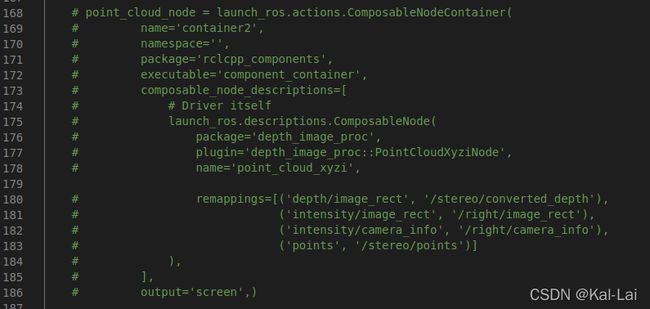
打开launch file,去掉点云的节点:
3. 创建depthimage_to_laserscan的launch file
在自己的工作空间下新建一个depthimage_to_laserscan的launch file。代码如下:
from launch import LaunchDescription
from launch_ros.actions import Node

def generate_launch_description():
    return LaunchDescription([
        Node(
            package='depthimage_to_laserscan',
            executable='depthimage_to_laserscan_node',
            name='depthimage_to_laserscan_node',
            remappings=[('depth','/stereo/depth'),
                        ('depth_camera_info', '/stereo/camera_info'),
                        ('scan', '/oak_scan')],
            parameters=[{
                'scan_time': 0.033,
                'range_min': 0.45,   #投影点的最小距离单位(米),更近的被丢弃
                'range_max': 5.0,   #投影点的最大距离单位(米),更远的被丢弃
                'scan_height': 5,    #depthimage中用于转成laserscan的行
                'output_frame': 'camera_depth_optical_frame'  #发布的帧 ID
            }]
        ),
        Node(
            package='tf2_ros',
            executable='static_transform_publisher',
            name='depthimage_to_laserscan_tf',
            arguments=['0','0','0','0','0','0','1','oak-d_frame','camera_depth_optical_frame']
        )
    ])
在launch file下运行了两个节点。
depthimage_to_laserscan节点重映射订阅的depth话题为oak-d发布的/stereo/depth。重映射订阅的depth_camera_info话题为oak-d发布的/stereo/camera_info。然后将发布的scan重映射为/oak_scan。参数部分,主要注意scan_height,设置越大就有越多的行数转成激光,也就是高度范围会更大,但由于oak-d的干扰数据太多,设大了效果不好。
另外还需运行静态tf变换,将camera_depth_optical_frame变换到oak-d_frame。
这样就可以正常运行了。
4. 运行效果
先运行相机的launch file,再运行depthimage_to_laserscan的launch file。打开RVIZ,将/oak_scan加入显示。
为了让显示更明显,我将相机对准天花板,可以看到下图中的效果:
接下去就可以拿它做其它应用了。


