人脸检测之Retinaface算法:论文阅读及源码解析
文章目录
- 前言
-
- 一、Retinaface论文
-
-
- 1.1 论文信息
- 1.2 论文摘要翻译
-
- 二、论文实现源码解析
-
-
- 2.1 网络框架结构
- 2.2 主干网络(Backbone)
-
- 1) 普通卷积
- 2) 深度可分离卷积
- 3) mobilenet0.25主干网络
- 2.3 FPN网络(特征金字塔网络)
- 2.4 SSH网络
- 2.5 分类、预测框、关键点特征提取(ClassHead/BoxHead/LandmarkHead)
- 2.6 decode(解码进行预测结果修正)
- 2.7 NMS(非极大抑制)
- 2.8 Retinaface网络结构
- 2.9 图像人脸检测
-
前言
RetinaFace 是2019年5月份出现的人脸检测算法,当时取得了state-of-the-art,作者也开源了代码。本篇讲述内容包含两个部分:Retinaface论文的核心要点以及github上运用Pytorch框架复现的源码。
本系列所有代码是用python3编写,可在平台Anaconda中运行实现,在使用代码时,默认你已经安装相关的python库。本篇对源码的解析完全是基于我的个人理解,如有问题,欢迎指出。
一、Retinaface论文
1.1 论文信息
- 论文名称:《RetinaFace: Single-stage Dense Face Localisation in the Wild》
- 发表时间:2019年5月
- 作者来自:帝国理工学院、InsightFace、Middlesex University London、FaceSoft
- 下载地址:https://arxiv.org/ftp/arxiv/papers/1604/1604.02878.pdf
1.2 论文摘要翻译
虽然在不受控条件下的人脸检测已经取得了非常显著的进展,在自然环境下准确有效的人脸检测依然具有挑战。本文提出了一种单步(single-stage)人脸检测器,取名RetinaFace,通过联合外监督(extra-supervised)和自监督(self-supervised)的多任务学习,RetinaFace对各种尺度条件下的人脸可以做到像素级别的定位(localisation)。尤其是,本文作了以下5个方面的贡献:
- (1)我们在WIDER FACE数据集上手动注释五个人脸关键点,并在外监督信号的帮助下获得难人脸检测的提升。
- (2)我们进一步添加自监督网格解码器分支,用于与现有监督分支并行地预测一个逐像素的3D人脸信息。
- (3) 在WIDER FACE测试集上,RetinaFace的性能优于最好模型的AP1.1%,达到91.4%。
- (4)在IJB-C测试集上,RetinaFace使最先进的人脸认证(ArcFace)能够改善他们在面部验证中的结果(FAR = 1e-6,TAR = 89.59%)。
- (5)通过采用轻量级骨干网络,RetinaFace可以在单个CPU对VGA分辨率的图像实时运行。
二、论文实现源码解析
2.1 网络框架结构
整个源码的讲解以对一张(719,1283,3)尺寸的图片为检测示例,该图如下所示:
我们使用Retinaface对该图片进行检测时,检测的每层网络主要干了什么事、输出什么样的结果如下图所示:

下面我们对每层网络结构源码做分析:
2.2 主干网络(Backbone)
Retinaface在第一阶段训练的时候要通过主干特征网络Backbone,实际训练的时候会提供两种主干网络mobilenet0.25和Resnet50(https://github.com/keras-team/keras-applications)。使用Resnet50检测具有更高精度,而使用轻量级神经网络mobilenet0.25可以在cpu上进行实时检测。
本文以mobilenet0.25作为主干特征网络。MobileNets是为移动和嵌入式设备提出的高效模型。MobileNets基于流线型架构(streamlined),使用深度可分离卷积(depthwise separable convolutions)来构建轻量级深度神经网络。由下参数计算个数可见,深度可分离卷积计算参数量更小。
1) 普通卷积
普通卷积采用kernel=3x3,paddind=1。其参数计算公式如下:假设输入通道为16、输出通道为32,所需参数为16x3x3x32=4608个。
def conv_bn(inp, oup, stride = 1, leaky = 0.1):
    return nn.Sequential(
        nn.Conv2d(inp, oup, 3, stride, 1, bias=False),
        nn.BatchNorm2d(oup),
        nn.LeakyReLU(negative_slope=leaky, inplace=True)
    )
2) 深度可分离卷积
深度可分离卷积由kernel=3x3进行逐通道卷积depthwise conv和kernel=1x1进行逐点卷积pointwise conv两部分组合。与常规卷积相比,其参数数量和运算成本比较低。其参数计算公式如下:假设输入通道为16,输出通道为32,则逐通道卷积参数:16x3x3=144;逐点卷积参数:16x1x1*32=512,共144+512=656个。
# 深度可分离卷积块depthwise separable convolution(depthwise conv + pointwise conv)
def conv_dw(inp, oup, stride = 1, leaky=0.1):
    return nn.Sequential(
        # depthwise conv 逐通道卷积,用groups=inp
        nn.Conv2d(inp, inp, 3, stride, 1, groups=inp, bias=False),
        nn.BatchNorm2d(inp),
        nn.LeakyReLU(negative_slope= leaky,inplace=True),

        # pointwise conv 逐点卷积
        nn.Conv2d(inp, oup, 1, 1, 0, bias=False),
        nn.BatchNorm2d(oup),
        nn.LeakyReLU(negative_slope= leaky,inplace=True),
    )
3) mobilenet0.25主干网络
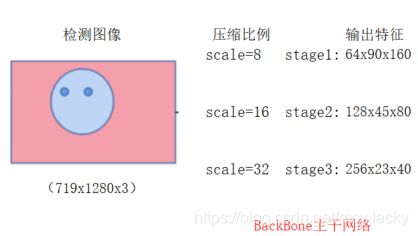
主干网络对输入的检测图像,进行三个步骤stage1、stage2和stage3的卷积:
class MobileNetV1(nn.Module):
    def __init__(self):
        super(MobileNetV1, self).__init__()
        # 640,640,3 -> 80,80,64
        self.stage1 = nn.Sequential(
            # 640,640,3 -> 320,320,8
            conv_bn(3, 8, 2, leaky = 0.1),    # 3
            # 320,320,8 -> 320,320,16
            conv_dw(8, 16, 1),   # 7

            # 320,320,16 -> 160,160,32
            conv_dw(16, 32, 2),  # 11
            conv_dw(32, 32, 1),  # 19

            # 160,160,32 -> 80,80,64
            conv_dw(32, 64, 2),  # 27
            conv_dw(64, 64, 1),  # 43
        )
            # 80,80,64 -> 40,40,128
        self.stage2 = nn.Sequential(
            conv_dw(64, 128, 2),  # 43 + 16 = 59
            conv_dw(128, 128, 1), # 59 + 32 = 91
            conv_dw(128, 128, 1), # 91 + 32 = 123
            conv_dw(128, 128, 1), # 123 + 32 = 155
            conv_dw(128, 128, 1), # 155 + 32 = 187
            conv_dw(128, 128, 1), # 187 + 32 = 219
        )
            # 40,40,128 -> 20,20,256
        self.stage3 = nn.Sequential(
            conv_dw(128, 256, 2), # 219 +3 2 = 241
            conv_dw(256, 256, 1), # 241 + 64 = 301
        )
        self.avg = nn.AdaptiveAvgPool2d((1,1))
        self.fc = nn.Linear(256, 1000)

    def forward(self, x):
        x = self.stage1(x)
        x = self.stage2(x)
        x = self.stage3(x)
        x = self.avg(x)
        # x = self.model(x)
        x = x.view(-1, 256)
        x = self.fc(x)
        return x
图像通过主干特征网络进行三阶段特征提取示意图如下2.2所示:

2.3 FPN网络(特征金字塔网络)
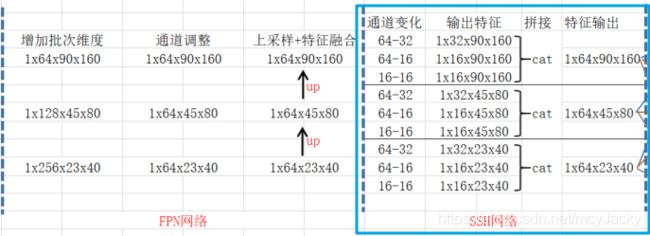
FPN(Feature pyramid network)特征金字塔网络会对主干网络输出的特征层进行1x1卷积后的通道数调整以及上采样+特征融合来进行特征加强提取。其中普通卷积和1x1卷积如下:
def conv_bn(inp, oup, stride = 1, leaky = 0):
    return nn.Sequential(
        nn.Conv2d(inp, oup, 3, stride, 1, bias=False),
        nn.BatchNorm2d(oup),
        nn.LeakyReLU(negative_slope=leaky, inplace=True)
    )

def conv_bn_no_relu(inp, oup, stride):
    return nn.Sequential(
        nn.Conv2d(inp, oup, 3, stride, 1, bias=False),
        nn.BatchNorm2d(oup),
    )

def conv_bn1X1(inp, oup, stride, leaky=0):
    return nn.Sequential(
        nn.Conv2d(inp, oup, 1, stride, padding=0, bias=False),
        nn.BatchNorm2d(oup),
        nn.LeakyReLU(negative_slope=leaky, inplace=True)
    )
特征金字塔网络结构如下:
class FPN(nn.Module):
    def __init__(self, in_channels_list, out_channels):
        super(FPN,self).__init__()
        leaky = 0
        if (out_channels <= 64):
            leaky = 0.1
        #通道数调整
        self.output1 = conv_bn1X1(in_channels_list[0], out_channels, stride = 1, leaky = leaky)
        self.output2 = conv_bn1X1(in_channels_list[1], out_channels, stride = 1, leaky = leaky)
        self.output3 = conv_bn1X1(in_channels_list[2], out_channels, stride = 1, leaky = leaky)

        self.merge1 = conv_bn(out_channels, out_channels, leaky = leaky)
        self.merge2 = conv_bn(out_channels, out_channels, leaky = leaky)

    def forward(self, inputs):
        # names = list(inputs.keys())
        inputs = list(inputs.values())

        output1 = self.output1(inputs[0])
        output2 = self.output2(inputs[1])
        output3 = self.output3(inputs[2])

        #上采样+特征融合
        up3 = F.interpolate(output3, size=[output2.size(2), output2.size(3)], mode="nearest")
        output2 = output2 + up3
        output2 = self.merge2(output2)

        #上采样+特征融合
        up2 = F.interpolate(output2, size=[output1.size(2), output1.size(3)], mode="nearest")
        output1 = output1 + up2
        output1 = self.merge1(output1)

        out = [output1, output2, output3]
        return out
2.4 SSH网络
SSH(Single Stage Headless)网络对特征层继续进一步加强特征提取。SSH使用并行的三个卷积:第一个是3x3卷积,第二个是用两次3x3卷积代替5x5卷积,第三个是用3次3x3卷积代替5x5卷积。源码如下:
# single stage headless
class SSH(nn.Module):
    def __init__(self, in_channel, out_channel):
        super(SSH, self).__init__()
        assert out_channel % 4 == 0
        leaky = 0
        if (out_channel <= 64):
            leaky = 0.1
        self.conv3X3 = conv_bn_no_relu(in_channel, out_channel//2, stride=1)

        self.conv5X5_1 = conv_bn(in_channel, out_channel//4, stride=1, leaky = leaky)
        self.conv5X5_2 = conv_bn_no_relu(out_channel//4, out_channel//4, stride=1)

        self.conv7X7_2 = conv_bn(out_channel//4, out_channel//4, stride=1, leaky = leaky)
        self.conv7x7_3 = conv_bn_no_relu(out_channel//4, out_channel//4, stride=1)

    def forward(self, inputs):
        conv3X3 = self.conv3X3(inputs)

        conv5X5_1 = self.conv5X5_1(inputs)
        conv5X5 = self.conv5X5_2(conv5X5_1)

        conv7X7_2 = self.conv7X7_2(conv5X5_1)
        conv7X7 = self.conv7x7_3(conv7X7_2)

        out = torch.cat([conv3X3, conv5X5, conv7X7], dim=1)
        out = F.relu(out)
        return out
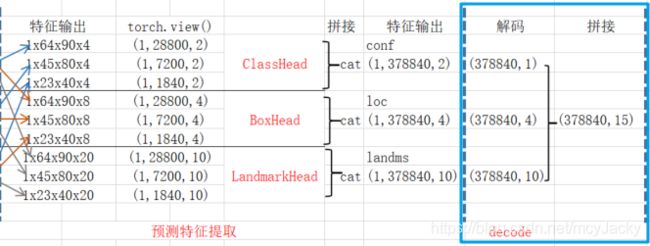
2.5 分类、预测框、关键点特征提取(ClassHead/BoxHead/LandmarkHead)
ClassHead是提取先验框是否包含人脸,BoxHead是先验位置检测、LandmarkHead是人脸关键点位置检测。
# 先验框是否包含人脸num_anchorx2
class ClassHead(nn.Module):
    def __init__(self,inchannels=512,num_anchors=2):
        super(ClassHead,self).__init__()
        self.num_anchors = num_anchors
        self.conv1x1 = nn.Conv2d(inchannels,self.num_anchors*2,kernel_size=(1,1),stride=1,padding=0)

    def forward(self,x):
        out = self.conv1x1(x)
        out = out.permute(0,2,3,1).contiguous() #维度转换

        return out.view(out.shape[0], -1, 2)

# 先验框的box,num_anchorx4
class BboxHead(nn.Module):
    def __init__(self,inchannels=512,num_anchors=2):
        super(BboxHead,self).__init__()
        self.conv1x1 = nn.Conv2d(inchannels,num_anchors*4,kernel_size=(1,1),stride=1,padding=0)

    def forward(self,x):
        out = self.conv1x1(x)
        out = out.permute(0,2,3,1).contiguous()

        return out.view(out.shape[0], -1, 4)

# 人脸关键点, num_anchorx10
class LandmarkHead(nn.Module):
    def __init__(self,inchannels=512,num_anchors=2):
        super(LandmarkHead,self).__init__()
        self.conv1x1 = nn.Conv2d(inchannels,num_anchors*10,kernel_size=(1,1),stride=1,padding=0)

    def forward(self,x):
        out = self.conv1x1(x)
        out = out.permute(0,2,3,1).contiguous()

        return out.view(out.shape[0], -1, 10)
通过ClassHead/BoxHead/LandmarkHead特征提取示意图如下2.5所示:

2.6 decode(解码进行预测结果修正)
通过上一步的预测我们获得的是三个有效的特征层,
我们需要对预测框和人脸关键点检测进行位置调整。根据encode的公式可以反推出decode解码公式,如下图2.6所示:
对先验框进行调整源码如下:
# 对先验框进行调整,获得中心预测框
def decode(loc, priors, variances):
    # @loc:location predictions for loc layers,[37840, 4]
    # @priors:先验框 [37840, 4]
    # @variances:方差[0.1, 0.2]
    boxes = torch.cat((priors[:, :2] + loc[:, :2] * variances[0] * priors[:, 2:], #中心调整按公式
              priors[:, 2:] * torch.exp(variances[1] * loc[:, 2:])), dim=1) #长宽调整按公式

    # 转换坐标为左上角和右下角
    boxes[:, :2] -= boxes[:, 2:] / 2
    boxes[:, 2:] += boxes[:, :2]
    return boxes

# 对先验框进行调整,获得人脸关键点
def decode_landm(pre, priors, variances):
    # @pre: [37840, 10]
    landms = torch.cat((priors[:, :2] + priors[:, 2:] * variances[0] * pre[:, :2],
                        priors[:, :2] + priors[:, 2:] * variances[0] * pre[:, 2:4],
                        priors[:, :2] + priors[:, 2:] * variances[0] * pre[:, 4:6],
                        priors[:, :2] + priors[:, 2:] * variances[0] * pre[:, 6:8],
                        priors[:, :2] + priors[:, 2:] * variances[0] * pre[:, 8:10],
                       ), dim=1)

    return landms
对先验框进行调整后,拼接分类、预测框和人脸关键点检测结果如下示意图2.7所示:

2.7 NMS(非极大抑制)
最后通过非极大抑制对解码结果去除重合度较高的预测框:
# 非极大抑制
def non_max_suppression(boxes, conf_thres=0.5, nms_thres=0.3):
    detection = boxes
    # 取阈值大于置信度的框
    mask = detection[:, 4] >= conf_thres
    detection = detection[mask]
    if not np.shape(detection)[0]:
        return []

    best_box = []
    # 对置信度从高至低排序
    scores = detection[:,4]
    arg_sort = np.argsort(scores)[::-1]
    detection = detection[arg_sort]

    # 去除重合度比较大的框
    while np.shape(detection)[0] > 0:
        best_box.append(detection[0])
        if len(detection) == 1:
            break
        ious = iou(best_box[-1], detection[1:])
        detection = detection[1:][ious < nms_thres]

    return np.array(best_box)

# 交并比计算
def iou(b1, b2):
    b1_x1, b1_y1, b1_x2, b1_y2 = b1[0], b1[1], b1[2], b1[3]
    b2_x1, b2_y1, b2_x2, b2_y2 = b2[:, 0], b2[:, 1], b2[:, 2], b2[:, 3]

    inter_rect_x1 = np.maximum(b1_x1, b2_x1)
    inter_rect_y1 = np.maximum(b1_y1, b2_y1)
    inter_rect_x2 = np.minimum(b1_x2, b2_x2)
    inter_rect_y2 = np.minimum(b1_y2, b2_y2)

    inter_area = np.maximum(inter_rect_x2 - inter_rect_x1, 0) * np.maximum(inter_rect_y2 - inter_rect_y1, 0)

    area_b1 = (b1_x2 - b1_x1) * (b1_y2 - b1_y1)
    area_b2 = (b2_x2 - b2_x1) * (b2_y2 - b2_y1)

    iou = inter_area / np.maximum((area_b1 + area_b2 - inter_area), 1e-6)
    return iou
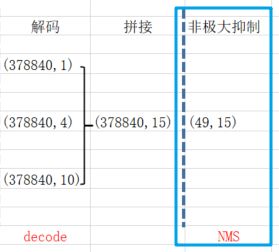
通过非极大抑制将原先37840个预测结果缩减为49个。如下示意图2.8所示:

2.8 Retinaface网络结构
Retinaface的整个网络即时将之前的各层网络进行组合:
class RetinaFace(nn.Module):
    def __init__(self, cfg = None, pretrained = False, phase = 'train'):
        """
        :param cfg:  Network related settings.
        :param phase: train or test.
        """
        super(RetinaFace,self).__init__()
        self.phase = phase
        backbone = None
        if cfg['name'] == 'mobilenet0.25':
            backbone = MobileNetV1()
            if pretrained:
                checkpoint = torch.load("./model_data/mobilenetV1X0.25_pretrain.tar", map_location=torch.device('cpu'))
                from collections import OrderedDict
                new_state_dict = OrderedDict()
                for k, v in checkpoint['state_dict'].items():
                    name = k[7:]  # remove module.
                    new_state_dict[name] = v
                # load params
                backbone.load_state_dict(new_state_dict)
        elif cfg['name'] == 'Resnet50':
            backbone = models.resnet50(pretrained=pretrained)

        # 'return_layers': {'stage1': 1, 'stage2': 2, 'stage3': 3}
        self.body = _utils.IntermediateLayerGetter(backbone, cfg['return_layers'])

        in_channels_stage2 = cfg['in_channel']
        in_channels_list = [
            in_channels_stage2 * 2,
            in_channels_stage2 * 4,
            in_channels_stage2 * 8,
        ]
        out_channels = cfg['out_channel']
        self.fpn = FPN(in_channels_list,out_channels)
        self.ssh1 = SSH(out_channels, out_channels)
        self.ssh2 = SSH(out_channels, out_channels)
        self.ssh3 = SSH(out_channels, out_channels)

        self.ClassHead = self._make_class_head(fpn_num=3, inchannels=cfg['out_channel'])
        self.BboxHead = self._make_bbox_head(fpn_num=3, inchannels=cfg['out_channel'])
        self.LandmarkHead = self._make_landmark_head(fpn_num=3, inchannels=cfg['out_channel'])

    def _make_class_head(self,fpn_num=3,inchannels=64,anchor_num=2):
        classhead = nn.ModuleList()
        for i in range(fpn_num):
            classhead.append(ClassHead(inchannels,anchor_num))
        return classhead

    def _make_bbox_head(self,fpn_num=3,inchannels=64,anchor_num=2):
        bboxhead = nn.ModuleList()
        for i in range(fpn_num):
            bboxhead.append(BboxHead(inchannels,anchor_num))
        return bboxhead

    def _make_landmark_head(self,fpn_num=3,inchannels=64,anchor_num=2):
        landmarkhead = nn.ModuleList()
        for i in range(fpn_num):
            landmarkhead.append(LandmarkHead(inchannels,anchor_num))
        return landmarkhead

    def forward(self,inputs):
        out = self.body(inputs)

        # FPN
        fpn = self.fpn(out)

        # SSH
        feature1 = self.ssh1(fpn[0])
        feature2 = self.ssh2(fpn[1])
        feature3 = self.ssh3(fpn[2])
        features = [feature1, feature2, feature3]

        bbox_regressions = torch.cat([self.BboxHead[i](feature) for i, feature in enumerate(features)], dim=1)
        classifications = torch.cat([self.ClassHead[i](feature) for i, feature in enumerate(features)], dim=1)
        ldm_regressions = torch.cat([self.LandmarkHead[i](feature) for i, feature in enumerate(features)], dim=1)

        if self.phase == 'train':
            output = (bbox_regressions, classifications, ldm_regressions)
        else:
            output = (bbox_regressions, F.softmax(classifications, dim=-1), ldm_regressions)
        return output
2.9 图像人脸检测
通过载入已经训练好的模型,对图像进行人脸检测,并绘制出检测框和人脸关键点,检测过程源码如下:
class RetinafaceEx(object):
    _defaults = {
        "model_path": 'model_data/Retinaface_mobilenet0.25.pth',
        "confidence": 0.5,
        "backbone": "mobilenet",
        "cuda": False
    }

    def __init__(self, **kwargs):
        self.__dict__.update(self._defaults)
        self.device = torch.device("cuda:0" if torch.cuda.is_available() else "cpu")
        self.cfg = cfg_mnet
        self.generate()

    def generate(self):
        self.net = RetinaFace(cfg=self.cfg, phase='eval').eval() #测试模型时在前面使用,不启用 BatchNormalization 和 Dropout
        print('Loading weights into state dict...')
        state_dict = torch.load(self.model_path, map_location=self.device)
        self.net.load_state_dict(state_dict)
        print("finish!")

    def detect_image(self, image):
        # 绘制人脸框
        old_image = image.copy()

        image = np.array(image, np.float32)
        print("image.shape:", image.shape) #(719, 1280, 3)
        im_height, im_width, _ = np.shape(image)

        # 将归一化后的框坐标转换成原图的大小
        scale = torch.Tensor([np.shape(image)[1], np.shape(image)[0], np.shape(image)[1], np.shape(image)[0]])
        print("scale:", scale) # tensor([1280.,  719., 1280.,  719.])
        scale_for_landmarks = torch.Tensor([np.shape(image)[1], np.shape(image)[0], np.shape(image)[1], np.shape(image)[0],
                                            np.shape(image)[1], np.shape(image)[0], np.shape(image)[1], np.shape(image)[0],
                                            np.shape(image)[1], np.shape(image)[0]])
        print("scale_for_landmarks:", scale_for_landmarks) #tensor([1280.,  719., 1280.,  719., 1280.,  719., 1280.,  719., 1280.,  719.])

        # 预处理
        image = preprocess_input(image).transpose(2, 0, 1) #(3,719, 1280)
        # 增加batch_size维度
        image = torch.from_numpy(image).unsqueeze(0)
        print("batch.image:", image.shape) #(1, 3, 719, 1280)
        # 计算先验框
        anchors = Anchors(self.cfg, image_size=(im_height, im_width)).get_anchors()
        print("anchors.shape:", anchors.shape) # torch.Size([37840, 4])

        with torch.no_grad():
            loc, conf, landms = self.net(image)  # forward pass: boxHead, classHead, landmarkHead
            print("loc.shape:", loc.shape) # bbox torch.Size([1, 37840, 4])
            print("conf.shape:", conf.shape) # classification torch.Size([1, 37840, 2])
            print("landms.shape:", landms.shape, "\n") # landmark torch.Size([1, 37840, 10])

            # 预测框(解码)
            boxes = decode(loc.data.squeeze(0), anchors, self.cfg['variance'])
            boxes = boxes * scale
            boxes = boxes.cpu().numpy()
            print("type(boxes):", type(boxes), boxes.shape)
            print("boxes:", boxes) # (37840, 4)

            # 置信度
            conf = conf.data.squeeze(0)[:, 1:2].cpu().numpy()
            print("conf.shape:", conf.shape) #(37840, 1)

            # 人脸关键点解码
            landms = decode_landm(landms.data.squeeze(0), anchors, self.cfg['variance'])
            landms = landms * scale_for_landmarks
            landms = landms.cpu().numpy()
            print("landms.shape:", landms.shape) #(37840, 10)

            # 非极大抑制
            boxes_conf_landms = np.concatenate([boxes, conf, landms], -1)
            print("boxes_conf_landms1.shape:", boxes_conf_landms.shape) #(37840, 15)
            boxes_conf_landms = non_max_suppression(boxes_conf_landms, self.confidence)
            print("boxes_conf_landms2.shape:", boxes_conf_landms.shape) #(49, 15)

        for b in boxes_conf_landms:
            text = "{:.4f}".format(b[4])
            b = list(map(int, b)) #转换为整数
            # 人脸框绘制
            cv2.rectangle(old_image, (b[0], b[1]), (b[2], b[3]), (0,0,255), 2)
            cx = b[0]
            cy = b[1] + 12
            cv2.putText(old_image, text, (cx, cy), cv2.FONT_HERSHEY_DUPLEX, 0.5, (255,255,255))

            # 关键点绘制
            cv2.circle(old_image, (b[5], b[6]), 1, (0,0,255), 4)
            cv2.circle(old_image, (b[7], b[8]), 1, (0,255,255), 4)
            cv2.circle(old_image, (b[9], b[10]), 1, (255,0,255), 4)
            cv2.circle(old_image, (b[11], b[12]), 1, (0,255,0), 4)
            cv2.circle(old_image, (b[13], b[14]), 1, (255,0,0), 4)

        return old_image

##### ####################
# 人脸检测测试
imgPath = "img/timg.jpg"
image = cv2.imread(imgPath)
print("image.shape:", image.shape) #(719, 1280, 3)
image = cv2.cvtColor(image, cv2.COLOR_BGR2RGB)
retinaface = RetinafaceEx()
r_image = retinaface.detect_image(image)

r_image = cv2.cvtColor(r_image, cv2.COLOR_RGB2BGR)
cv2.imshow("result", r_image)
cv2.waitKey(0)
cv2.destroyAllWindows()
通过对测试图像进行检测,我们可以得到检测结果如下图2.9所示:
转载声明:
版权声明:非商用自由转载-保持署名-注明出处
署名 :mcyJacky
文章出处:https://blog.csdn.net/mcyJacky


