VGG Convolutional Neural Network Practical
系列文章目录
VGG Image Classification Practical
Convolutional Neural Network Practical
- 系列文章目录
- 前言
- 一、准备工作
-
- 1.环境
- 2.加载准备模块
- 二、CNN的构建
-
- 1.卷积
- 2.非线性激活函数
- 3.池化
- 4.归一化
- 二、反向传播和导数
-
-
- 2020/12/01接更
- 开始作业
- 2.1 应用反向传播
-
- 三 、小型tiny CNN
-
- 3.1训练数据和标签
- 3.2图像预处理
- 3.3 梯度下降学习
- 3.4解释性
- 4.学习一个特征网络
-
- 4.1 数据预处理
- 4.2 初始化CNN架构
- 4.3 训练并验证CNN网络
- 4.5 可视化卷积核
- 4.6 应用模型
- 5.使用训练好的模型
-
- 5.1加载预训练模型
- 5.2应用
- 总结
前言
根据VGG教程里的简介,我们可以很清楚的知道关于CNN的以下知识:
卷积神经网络是一类重要的深度学习网络,适用于许多计算机视觉问题。特别是,深度CNN由几个处理层组成,每个处理层涉及线性和非线性操作符,它们是以端到端的方式共同学习的,以解决特定的任务。这些方法现在是从视听和文本数据中提取特征的主要方法。
这一实践探索了学习(深度)CNN的基本知识。
- 介绍了典型的cnn模块,如relu单元和线性滤波器,特别强调了对反向传播的理解。
- 研究学习两个基本的CNN。第一个是捕获特定图像结构的简单非线性滤波器,第二个是识别打字机字符的网络(使用各种不同的字体)。这些例子说明了具有动量的随机梯度下降的使用,目标函数的定义,小批量数据的构造,以及数据抖动。
- 最后一部分展示了如何现成下载cnn模型和以及它的直接应用。

提示:以下是本篇文章正文内容,下面案例可供参考
一、准备工作
1.环境
VGG作业的python版本的运行平台是anaconda,可以用jupyter运行,里面的的readme文档会很清楚教你怎么设置环境。
2.加载准备模块
%load_ext autoreload
%autoreload 2
%matplotlib inline
二、CNN的构建
1.卷积
卷积这里,有基础知识的都差不多看得懂,我就简要说一下,不是很难的知识。
()=(…2(1(;1);2)…),).
前向传播公式
X数据,你原始的图像等一些列数据
W参数,在数据中学习得到
通过公式得到了目标函数
- Cnn的第二个性质是函数具有卷积结构。这意味着应用于输入映射,该运算符是一个局部和平移不变的运算符。卷积算子的例子是将一组线性滤波器应用于。
- 第一种是滤波器组的正则线性卷积。
- :ℝ××→ℝ××,↦.
代码:
import lab
from matplotlib import pyplot as plt

# Read an image as a PyTorch tensor
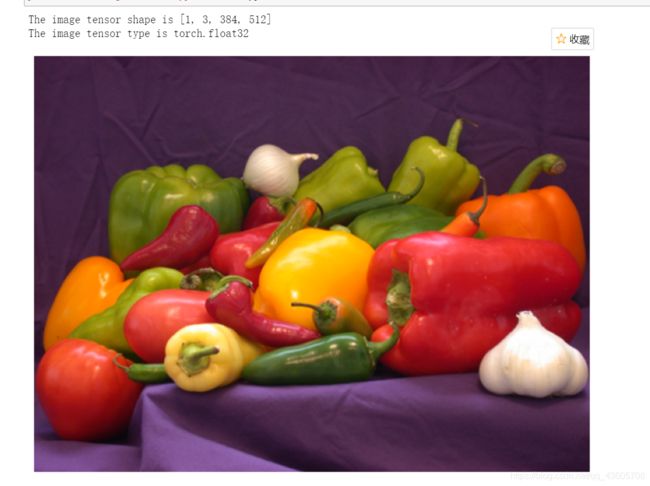
x = lab.imread('data/peppers.png')

# Visualize the input x
plt.figure(1, figsize=(12,12))
lab.imarraysc(x)

# Show the shape of the tensor
print(f"The image tensor shape is {list(x.shape)}")

# Show the data type of the tensor
print(f"The image tensor type is {x.dtype}")
- 使用x.form获取张量x和x.dtype的形状,以获得其数据类型。注意,张量x被转换为单精度格式。这是因为底层PyTorch假设数据在大多数情况下都是单精度的。问题。X的第一维是3,为什么?
- RGB三通道
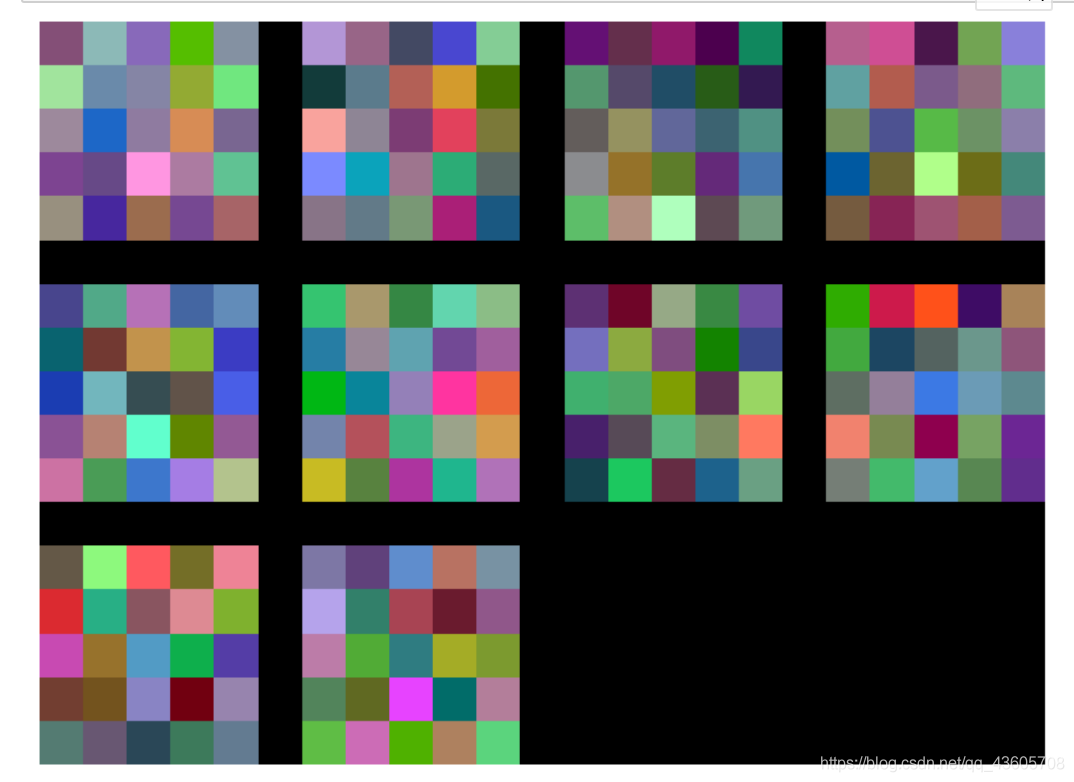
接下来,我们创建一个由10个滤波器组成的组,每个滤波器的维数为3×5×53×5×5,随机初始化它们的系数:
import torch

# Create a bank of linear filters
w = torch.randn(10,3,5,5)

# Visualize the filters
plt.figure(1, figsize=(12,12))
lab.imarraysc(w, spacing=1) ;

下一步是将过滤器应用于图像。这使用torch.n.function中的卷积2d函数:
import torch.nn.functional as F

# Apply the convolution operator
y = F.conv2d(x, w)

# Visualize the convolution result
print(f"The output shape is {y.shape}")
我们现在可以想象出卷积的输出y。为此,使用所提供的lab.imarraysc函数为y中的每个特征通道显示图像:
# Visualize the output y, one channel per image
fig = plt.figure(figsize=(15, 10))
lab.imarraysc(lab.t2im(y)) ;
- Question: Study the feature channels obtained. Most will likely contain a strong response in correspondences of edges in the input image x. Recall that w was obtained by drawing random numbers from a Gaussian distribution. Can you explain this phenomenon?
- 卷积处理操作,对噪声有平滑作用,边缘响应强烈。是因为其在滑动求积的过程中对,其算法是将一块区域内像素值进行求积,而边界处两边的像素值差异明显,导致卷积后的结果差异也很明显,所以才会有边缘检测响应强烈地后果。
过滤器保持输入特征映射的分辨率。然而,降低输出样本通常是有用的。这可以通过在卷积2d中使用STRDED选项来实现:
# Try again, downsampling the output
y_ds = F.conv2d(x, w, stride=16)

plt.figure(figsize=(15, 10))
lab.imarraysc(lab.t2im(y_ds)) ;
增大stride,即增大步长,让输出分辨率降低,有利于后期计算

正如您在上面的问题中应该注意到的,对图像或特征映射应用过滤器与边界交互,使输出映射与过滤器的大小成正比。如果这是不可取的,则可以通过使用填充选项将输入数组填充为零:
# Try again, downsampling the output
y_ds = F.conv2d(x, w, padding=4)

plt.figure(figsize=(15, 10))
lab.imarraysc(lab.t2im(y_ds)) ;
- Convince yourself that the previous code’s output has different boundaries compared to the code that does not use padding. Can you explain the result?
- 通过填充,弥补了因为步长原因导致的细节丢失。确保原来的每一处像素都能被下采样。
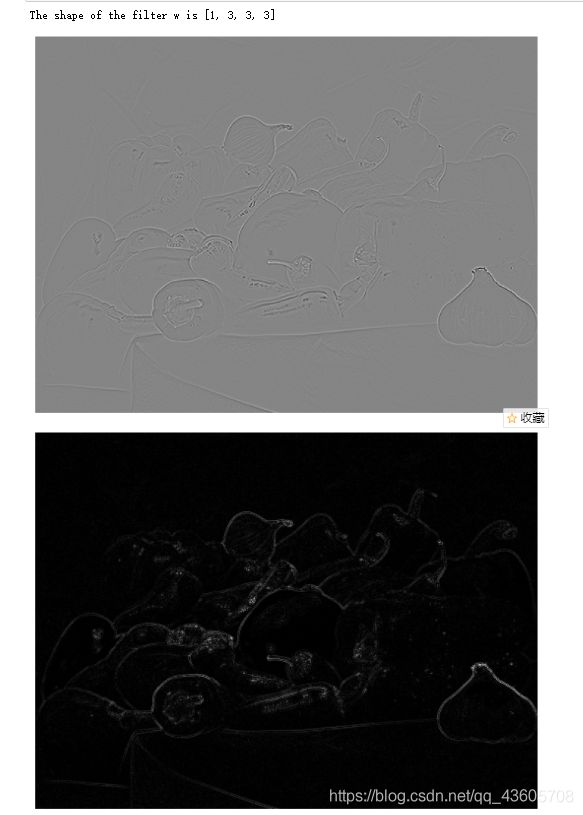
现在随意设置一个过滤器:
# Initialize a filter
w = torch.Tensor([
    [0,  1, 0 ],
    [1, -4, 1 ],
    [0,  1, 0 ]
])[None,None,:,:].expand(1,3,3,3)

print(f"The shape of the filter w is {list(w.shape)}")

# Apply convolution
y_lap = F.conv2d(x, w) ;

# Show the output
plt.figure(1,figsize=(12,12))
lab.imsc(y_lap[0])

# Show the output absolute value
plt.figure(2,figsize=(12,12))
lab.imsc(abs(y_lap)[0]) ;
- questions:
What filter have we implemented?
How are the RGB colour channels processed by this filter?
What image structures are detected? - 单通道过滤器,将RGB颜色通道转变成灰度图像,检测到了图像边缘框架
2.非线性激活函数
CNN是通过组合几种不同的功能来获得的。除了前面部分所示的线性滤波器外,还有几个非线性算子。
- Some of the functions in a CNN must be non-linear. Why?
- 卷积也是一种线性运算,因此需要增加非线性映射,多层线性操作等于单层线性操作。
最简单的非线性是通过一个非线性激活函数跟随一个线性滤波器得到的,它同样地应用于一个特征映射的每个分量(即点方向)。最简单的这类函数是修正的线性单位(Relu)。
=max{0,}.
这个函数是由relu实现的;让我们来尝试一下:
# Initialize a filter
w = torch.Tensor([1,  0, -1])[None,None,:].expand(1,3,3,3)

# Convolution
y = F.conv2d(x, w) ;

# ReLU
z = F.relu(y) ;

plt.figure(1,figsize=(12,12))
lab.imsc(y[0])

plt.figure(2,figsize=(12,12))
lab.imsc(z[0]) ;
3.池化
=max{:≤<+}.
池化操作想象的比喻就是,一个规定的框内的像素,我按照一定算术法则,用一个数来表征这个框,这个数可以是这里面最大的,也可以是平均数。这里是最大数。
MAX池由max_pool 2d函数实现。
y = F.max_pool2d(x, 15)

plt.figure(1, figsize=(12,12))
lab.imarraysc(lab.t2im(y)) ;
- Question: look at the resulting image. Can you interpret the result?
- 池子内多个像素值只保留最大的那个,导致细节信息丢失
- The function max_pool2d supports subsampling and padding just like conv2d. However, for max-pooling feature maps are padded with the value −∞ instead of 0. Why?
- 负无穷最小,
4.归一化
=/(+∑∈()^2/p)
可以在下面的代码里调整,,的值。
# LRN with some specially-chosen parameters
y_nrm = F.local_response_norm(x, 5, alpha=5, beta=0.5, k=0)

plt.figure(1,figsize=(12,12))
lab.imarraysc(lab.t2im(y_nrm)) ;

归一化数据意思就是缩放大的数据的权重,扩大小的数据权重,,让他们统一到一个量级,使之影响力不会有太大偏差。
L2范数是指向量各元素的平方和然后求平方根,将 κ=0、 α=5、β =1/2可以得到L2范数。
这里默认的设置就是L2规范化参数
因为下面你会发现不改动参数,两者的不同0.0%,也就是基本一致。
import math

# Another implementation of the same
y_nrm_alt = x / torch.sqrt((x**2).sum(1))

plt.figure(1,figsize=(12,12))
lab.imarraysc(lab.t2im(y_nrm_alt))

# Check that they indeed match
def compare(x,y):
    with torch.no_grad():
        a2 = torch.mean((x - y)**2)
        b2 = torch.mean(x**2)
        c2 = torch.mean(y**2)
        return 200 * math.sqrt(a2.item()) / math.sqrt(b2.item() + c2.item())

print(f"The difference between y_nrm and y_nrm_alt is {compare(y_nrm,y_nrm_alt):.1f}%")
二、反向传播和导数
强烈建议初学者不要通过VGG学关于神经网络的基础知识,因为他这里讲的不清楚,不适合初学者了解概念,建议去李宏毅老师机器学习课程,吴恩达老师机器学习课程,CS231n。VGG更注重整体框架流程,基础知识不是其侧重点。
2020/12/01接更
鉴于博客上不好写公式,一般公式就用图片代替。

上图是CNN的经验损失函数
前面我们学到了梯度下降算法

- 梯度下降算法是用来通过更新梯度来更新损失,让损失逐渐降低,也就是拟合过程。
- 那怎么样求梯度呢
- 那就引出了反向传播算法
依靠链式求导法则
正向求梯度,会重复求共同神经元的梯度
反向传播则不会
在计算梯度时前面的单元是依赖后面的单元的计算,而“从后向前”的计算顺序正好“解耦”了这种依赖关系,先算后面的单元,并且记住后面单元的梯度值,计算前面单元之就能充分利用已经计算出来的结果,避免了重复计算。
再看这一段,我想到了一句话
有大智慧的人,不会把问题复杂化,而是把问题简单化。同样的问题,解决的方法越简单说明这个方法越好。
开始作业
这里先求y值,然后通过调用现成的算法算法算出dx,dw.
y = F.conv2d(x,w) # forward mode (get output y)
p = torch.randn(y.shape) # get a random tensor with the same size as y

# Directly call backward functions for demonstration
dx = torch.nn.grad.conv2d_input(x.shape, w, p)
dw = torch.nn.grad.conv2d_weight(x, w.shape, p)

print(f"The shape of x is {list(x.shape)} and that of dx is {list(dx.shape)}")
print(f"The shape of w is {list(x.shape)} and that of dw is {list(dx.shape)}")
print(f"The shape of y is {list(y.shape)} and that of  p is {list(p.shape)}")
x.requires_grad_(True)
w.requires_grad_(True)
if x.grad is not None:
    x.grad.zero_()
if w.grad is not None:
    w.grad.zero_()
y = F.conv2d(x,w)
y.backward(p)
dx_ = x.grad
dw_ = w.grad

print(f"The difference between dx and dx_ is {compare(dx,dx_):.1f}%")
print(f"The difference between dw and dw_ is {compare(dw,dw_):.1f}%")
- 我们发现手写的与调用的算的梯度基本无差别。
在这里还有知识点:
需要渐变的变量必须用Required_grad_()标记。这使得PyTorch知道要计算哪个梯度。每个变量x都有一个字段x.grad存储其梯度。在计算梯度之前,必须清除它(设置为零)。这是因为梯度计算是累积的。梯度是通过调用输出张量上的y.back§来自动计算的。如果输出是标量,则可以省略参数p,在这种情况下,参数p的默认值为1。
2.1 应用反向传播
# Read an example image
x = lab.imread('data/peppers.png')
x.requires_grad_(True)

# Create a bank of linear filters
w = torch.randn(10,3,5,5)
w.requires_grad_(True)

# Forward
y = F.conv2d(x, w)

# Set the derivative dz to a randmo value
dzdy = torch.randn(y.shape)

# Backward
y.backward(dzdy)
dzdx = x.grad
dzdw = w.grad

print(f"Size of dzdx = {list(dzdx.shape)}")
print(f"Size of dzdw = {list(dzdw.shape)}")
# Check the derivative numerically
with torch.no_grad():
    delta = torch.randn(x.shape)
    step = 0.0001
    xp = x + step * delta
    yp = F.conv2d(xp, w)
    dzdx_numerical = torch.sum(dzdy * (yp - y) / step)
    dzdx_analytical = torch.sum(dzdx * delta)
    err = compare(dzdx_numerical,dzdx_analytical)

print(f"dzdx_numerical: {dzdx_numerical}")
print(f"dzdx_analytical: {dzdx_analytical}")
print(f"numerical vs analytical rel. error: {err:.3f}%")

从这里我们可以看到数值梯度和解析梯度并不完全相同,所以还需要修正。
后面还有类似的就不说了。/、
三 、小型tiny CNN
在这一部分,我们将学习一个非常简单的CNN。CNN由两层组成:一层是卷积层,另一层是平均池层:
包含一个3×3平方滤波器,使得是一个标量,输入图像=1有一个单通道。
- 先定义下
def tinycnn(x, w, b):
    pad1 = (w.shape[2] - 1) // 2
    rho2 = 3
    pad2 = (rho2 - 1) // 2
    x = F.conv2d(x, w, b, padding=pad1)
    x = F.avg_pool2d(x, rho2, padding=pad2, stride=1)
    return x
3.1训练数据和标签
# Load a training image and convert to gray-scale
im0 = lab.imread('data/dots.jpg')
im0 = im0.mean(dim=1)[None,:,:,:]

# Compute the location of black blobs in the image
pos, neg, indices = lab.extract_black_blobs(im0)
pos = pos / pos.sum()
neg = neg / neg.sum()
# Display the training data
plt.figure(1, figsize=(8,8))
lab.imsc(im0[0])
plt.plot(indices[1], indices[0],'go', markersize=8, mfc='none')

plt.figure(2, figsize=(8,8))
lab.imsc(pos[0])

plt.figure(3, figsize=(8,8))
lab.imsc(neg[0]) ;
在这里插入图片描述
3.2图像预处理
通过减去图像的平均值对图像进行预处理
# Preprocess the image by subtracting its mean
im = im0 - im0.mean()
im = lab.imsmooth(im, 3)
3.3 梯度下降学习
import torch

num_iterations = 501
rate = 10
momentum = 0.9
shrinkage = 0.01
plot_period = 200

with torch.no_grad():
    w = torch.randn(1,1,3,3)
    w = w - w.mean()
    b = torch.Tensor(1)
    b.zero_()

E = []
w.requires_grad_(True)
b.requires_grad_(True)
w_momentum = torch.zeros(w.shape)
b_momentum = torch.zeros(b.shape)

for t in range(num_iterations):

    # Evaluate the CNN and the loss
    y = tinycnn(im, w, b)
    z = (pos * (1 - y).relu() + neg * y.relu()).sum()

    # Track energy
    E.append(z.item() + 0.5 * shrinkage * (w**2).sum().item())

    # Backpropagation
    z.backward()

    # Gradient descent
    with torch.no_grad():
        w_momentum = momentum * w_momentum + (1 - momentum) * (w.grad + shrinkage * w)
        b_momentum = momentum * b_momentum + (1 - momentum) * b.grad
        w -= rate * w_momentum
        b -= 0.1 * rate * b_momentum
        w.grad.zero_()
        b.grad.zero_()

    # Plotting
    if t % plot_period == 0:
        plt.figure(1,figsize=(12,4))
        plt.clf()
        fig = plt.gcf()
        ax1 = fig.add_subplot(1, 3, 1)
        plt.plot(E)
        ax2 = fig.add_subplot(1, 3, 2)
        lab.imsc(w.detach()[0])
        ax3 = fig.add_subplot(1, 3, 3)
        lab.imsc(y.detach()[0])
3.4解释性
- n this part we will experiment with several variants of the network just learned. First, we study the effect of the image smoothing:
Task: Train again the tiny CNN without smoothing the input image in preprocessing. Answer the following questions:
Is the learned filter very different from the one learned before?
If so, can you figure out what “went wrong”?
Look carefully at the output of the first layer, magnifying with the loupe tool. Is the maximal filter response attained in the middle of each blob?未处理和处理后的卷积核明显不同,未预处理的话,斑点中间达不到最大滤波器响应
Hint: The Laplacian of Gaussian operator responds maximally at the centre of a blob only if the latter matches the blob size. Relate this fact to the combination of pre-smoothing the image and applying the learned 3×3 filter.
Now restore the smoothing but adding instead of subtracting the median from the input image.
Task: Train again the tiny CNN by adding instead of subtracting the median value in preprocessing. Answer the following questions:
Does the algorithm converge?
Reduce a hundred-fold the learning rate and increase the maximum number of iterations by an equal amount. Does it get better?
Explain why adding a constant to the input image can have such a dramatic effect on the performance of the optimisation. 并不收敛,增加数值,不能起到归一化处理效果
Hint: What constraint should the filter satisfy if the filter output should be zero when (i) the input image is zero or (ii) the input image is a large constant? Do you think that it would be easy for gradient descent to enforce (ii) at all times?
What you have just witnessed is actually a fairly general principle: centring the data usually makes learning problems much better conditioned.
Now we will explore several parameters in the algorithms:
Task: Restore the preprocessing as given originally. Try the following:
Try increasing the learning rate rate. Can you achieve a better value of the energy in the 501 iterations?
Disable momentum by setting momentum = 0. Now try to beat the result obtained above by choosing rate. Can you succeed?
动量设置为0来禁用动量,在501次之内不能获得更好的能量值。最佳的学习率rate应该在6左右,损失降到0.4左右,其余就不太行了
Finally, consider the regularisation effect of shrinking:
Task: Restore the learning rate and momentum as given originally. Then increase the shrinkage factor tenfold and a hundred-fold.
What is the effect on the convergence speed?
What is the effect on the final value of the total objective function and of the average loss part of it?
收敛速度加快,但是会影响目标函数和平均损失的优化,导致结果变差,
4.学习一个特征网络
4.1 数据预处理
-
老规矩先处理处理数据
-
加载数据
加载一个IMDb结构,其中包含使用从Google字体项目下载的29,094个字体呈现的字符a、b、.、z的图像。
# Load data
imdb = torch.load('data/charsdb.pth')
print(f"imdb['images'] has shape {list(imdb['images'].shape)}")
print(f"imdb['labels'] has shape {list(imdb['labels'].shape)}")
print(f"imdb['sets'] has shape {list(imdb['sets'].shape)}")
# Plot the training data for 'a'
plt.figure(1,figsize=(15,15))
plt.clf()
plt.title('Training data')
sel = (imdb['sets'] == 0) & (imdb['labels'] == 0)
lab.imarraysc(imdb['images'][sel,:,:,:])

# Plot the validation data for 'a'
plt.figure(2,figsize=(12,12))
plt.clf()
plt.title('Validation data')
sel = (imdb['sets'] == 1) & (imdb['labels'] == 0)
lab.imarraysc(imdb['images'][sel,:,:,:]) ;
4.2 初始化CNN架构
import torch.nn as nn

def new_model():
    return nn.Sequential(
        nn.Conv2d(1,20,5),
        nn.MaxPool2d(2,stride=2),
        nn.Conv2d(20,50,5),
        nn.MaxPool2d(2,stride=2),
        nn.Conv2d(50,500,4),
        nn.ReLU(),
        nn.Conv2d(500,26,2),
    )

model = new_model()
Task: By inspecting the code above, get a sense of the architecture that will be trained. How many layers are there? How big are the filters? 四层卷积层,两层最大池化层,一层relu非线性优化, 卷积核大小5,5,4,2
网络定义了一个层序列。卷积层隐式包含参数张量(滤波权值和偏差),使用随机数预先初始化.这意味着,尽管输出将是随机的,但我们已经可以将网络应用于字符,如下所示:
# Evaluate the network on three images
y = model(imdb['images'].narrow(0,0,3))
print(f"The size of the network output is {list(y.shape)}")
- 倒数第二层的维数为3×26×1×13×26×1×1×1×1,这是因为这批图像中有=3N=3,=26C=26预测分数,每个可能的字符各有一个,空间分辨率为1×11×1,因为网络对整个字符图像进行全局决策。这种类型的网络有时被称为“完全卷积”,因为它只使用类似卷积的运算符;一个优点是网络可以应用于任意范围的图像,稍后我们将使用这些图像来识别字符串。然而,最后两个维度在这里是一个麻烦,所以我们消除它们。
# Preserves only the first two dimensions
y = y.reshape(*y.shape[:2])
print(f"The size of the network output is now {list(y.shape)}")
# Evaluate the cross-entropy loss on the network output assuming that 'a', 'b', 'c' are the ground-truth chars
loss = nn.CrossEntropyLoss()
c = torch.LongTensor([ord('a'), ord('b'), ord('c')]) - ord('a')
z = loss(y, c)

print(f"The loss value is {z.item():.3f}")
4.3 训练并验证CNN网络
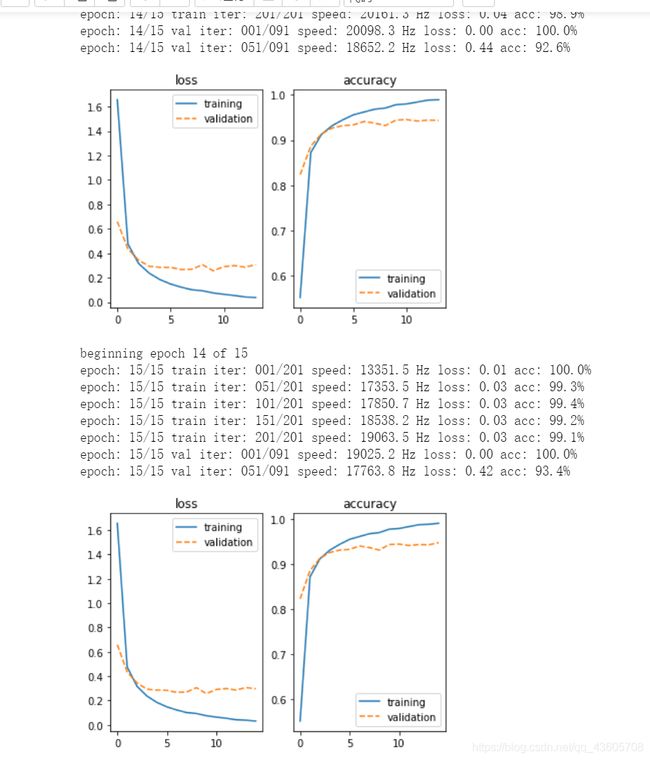
我们现在已经准备好训练CNN了。为此,我们将使用与实际代码一起提供的lab.trianmodel()函数。此函数在提供的LabPython模块中定义,该模块可以在编辑器中打开。该函数被定义为:DEF TRANS_MODEL(Model,IMDb,Batch_Size=100,NUM_EILCHS=15,USE_GPU=false,USE_Jitter=false),在默认情况下,训练将使用100个元素的小批处理大小,运行15次(通过数据),不使用GPU,它将使用0.001的学习速率。在训练开始之前,像以前一样减去平均图像值。我们保持不变,以备日后使用。
# Remove average intensity from input images
im_mean = imdb['images'].mean()
imdb['images'].sub_(im_mean) ;
原文件中代码不兼容
lab.py文件line233,265,296中time.clock()是python3.8之前的用法,3.3废弃,3.8移除 python3.8改用time.perf_counter()
# Initialize the model
model = new_model()

# Run SGD to train the model
model = lab.train_model(model, imdb, num_epochs=15, use_gpu=True)
- 这里我们可以发现随着训练的代次增加,损失在不断降低,正确率在不断增加。
is the training taking too long? If you have access to a GPU you could go to the next part to train the model for the full 15 epochs. Otherwise, you need to restart the CPU training set for 15 epochs, and wait until the training finishes.
Task: Run the learning code and examine the plots that are produced. As training completes answer the following questions:
How many images per second can you process? (Look at the rate of output on the screen)
There are two sets of curves: energy and prediction error. What do you think is the difference? What is the “loss” and the “accuracy”?
Some curves are labelled “training” and some other “validation”. Should they be equal? Which one should be lower than the other?
初始设置训练代次只有两次确实太少了,导致验证集准确率不高,随着设置10次,15次,在验证集上的准确率有不断地提高。 误差在不断降低,准确率在不断提高,验证集的准确率一般都是低于训练集的准确率。
Once training is finished, the model object contains the trained parameters.
4.5 可视化卷积核
# Visualize the filters in the first layer
plt.figure(1, figsize=(12,12))
plt.title('filters in the first layer')
lab.imarraysc(model[0].weight, spacing=1) ;
4.6 应用模型
We now apply the model to a whole sequence of characters. This is the image data/sentence-lato.png:
# Load a pre-trained model. Do this in a pinch, otherwise train your own.
#model = new_model()
#model.load_state_dict(torch.load('data/charscnn.pth'))
#model.load_state_dict(torch.load('data/charscnn_jitter.pth'))
#这里我缺jitter.pth文件做不了
# Load sentence
im = lab.imread('data/sentence-lato.png')
im.sub_(im_mean)

# Apply the CNN to the larger image
y = model(im)

# Show the string
chars = lab.decode_predicted_string(y)
print(f"Predicted string '{''.join(chars)}'")
这里我缺这个文件所以没做
# Visualize the predicted string
plt.figure(1, figsize=(12,8))
lab.plot_predicted_string(im, y) ;

Tasks: inspect the output of the lab.plot_predicted_string() function and answer the following:
Is the quality of the recognition any good?
Does this match your expectation given the recognition rate in your validation set (as reported by lab.train_model() during training)? 识别验证率好,符合期望
5.使用训练好的模型
5.1加载预训练模型
# Show the file
!ls -lh data/alexnet.pth

# Import the model
#pip install --no-deps torchvision可以直接装上torch对应的vision
#pip install torchvision或者pip3则不行,会报错
import torchvision
alexnet = torchvision.models.alexnet(pretrained=False)
alexnet.load_state_dict(torch.load('data/alexnet.pth'))

# Display the model structure
print(alexnet)
5.2应用
from PIL import Image

# Obtain and preprocess an image
im = Image.open('data/peppers.png')

preprocess = torchvision.transforms.Compose([
    torchvision.transforms.Resize((224,224),),
    torchvision.transforms.ToTensor(),
    torchvision.transforms.Normalize(
        mean=[0.485, 0.456, 0.406],
        std=[0.229, 0.224, 0.225])
])

im_normalized = preprocess(im)[None,:]
print(f"The shape of AlexNet input is {list(im_normalized.shape)}")
# Put the model in evaluation mode
alexnet.eval()

# Run the CNN
y = alexnet(im_normalized)

print(f"The shape of AlexNet output is {list(y.shape)}")
import json

# Get the best class index and score
best, bestk = y.max(dim=1)

# Get the corresponding class name
with open('data/imnet_classes.json') as f:
    classes = json.load(f)
name = classes[str(bestk.item())][1]

# Plot the results
plt.figure(1, figsize=(8,8))
lab.imsc(im_normalized[0])
plt.title(f"{name} ({bestk.item()}), score {best.item():.3f}") ;
鉴于下面的实验还有很多,暂时自己时间不多,有时间再更。
希望有问题的可以和我多多讨论。


