【深度学习入门】Linux服务器安装Anaconda + Pytorch + 本地VS Code + 本地Pycharm + Tensorflow
目录
- 一、前言
- 二、安装Anaconda
-
- 1、查看系统
- 2、下载Anaconda
- 3、安装Xftp
- 4、安装Anaconda
- 5、添加镜像
- 三、离线安装Pytorch
-
- 1、下载Pytorch
- 2、安装
- 3、测试
- 四、安装VS Code
-
- 1、下载
- 2、安装
- 3、连接服务器
- 4、更改默认调试的虚拟环境
- 五、安装Pycharm
-
- 1、下载安装包
- 2、解压
- 3、安装
- 4、通过VNC viewer远程工具安装Pycharm
- 六、安装Tensorflow
一、前言
今天开一个专栏,主要是从在服务器上安装Anaconda + Pycharm + Tensorflow + Pytorch开始,然后看【目标检测】相关的论文,相应地介绍详细的原理和实现,最后有时间的话再写一篇综述吧。目前主要是看Faster RCNN和YOLO v3-v5。
二、安装Anaconda
1、查看系统
查看服务器是32还是64位系统:
getconf LONG_BIT
结果返回64,则说明是64位的;返回32, 则说明是32位的。
2、下载Anaconda
从Anaconda官网上下载对应的安装包,例如:Anaconda3-2020.07-Linux-x86_64.sh。
3、安装Xftp
打开360软件管家,下载安装Xftp,登录到服务器,将Anaconda安装包上传至服务器中。

4、安装Anaconda
在服务器上输入命令“bash filepath+安装包名称”,即可开始安装,例如:
bash ./programfiles/Anaconda3-2020.07-Linux-x86_64.sh
回车:
Please, press ENTER to continue
>>>
输入yes,回车
Do you accept the license terms? [yes|no]
[no] >>>yes
选择安装路径,若默认路径,则直接回车;否则,输入安装路径,回车。例如:
Anaconda3 will now be installed into this location:
/home/anaconda3
  - Press ENTER to confirm the location
  - Press CTRL-C to abort the installation
  - Or specify a different location below
[/home/anaconda3] >>> /home/programfiles/anaconda3
等待一段时间后,输入yes,回车:
Preparing transaction: done
Executing transaction: done
installation finished.
Do you wish the installer to initialize Anaconda3
by running conda init? [yes|no]
[no] >>> yes
退出服务器重新链接。
==> For changes to take effect, close and re-open your current shell. <==

If you'd prefer that conda's base environment not be activated on startup,
   set the auto_activate_base parameter to false:

conda config --set auto_activate_base false

Thank you for installing Anaconda3!

===========================================================================

Working with Python and Jupyter notebooks is a breeze with PyCharm
Professional! Code completion, Notebook debugger, VCS support, SSH, Docker,
Databases, and more!

Get a free trial at: https://www.anaconda.com/pycharm
输入python,回车,验证是否安装成功。
(base) AD\xxxx@xxxxxx:~$ python
安装成功!
Python 3.8.3 (default, Jul  2 2020, 16:21:59)
[GCC 7.3.0] :: Anaconda, Inc. on linux
Type "help", "copyright", "credits" or "license" for more information.
>>>
5、添加镜像
由于很多的python下的工具包的安装包在国外的服务器上,会影响国内的下载与使用,所以我们可以添加镜像:
conda config --add channels https://mirrors.tuna.tsinghua.edu.cn/anaconda/cloud/conda-forge/
conda config --add channels https://mirrors.tuna.tsinghua.edu.cn/anaconda/pkgs/free/
conda config --add channels https://mirrors.tuna.tsinghua.edu.cn/anaconda/pkgs/main/
conda config --append channels https://mirrors.tuna.tsinghua.edu.cn/anaconda/cloud/fastai/
conda config --append channels https://mirrors.tuna.tsinghua.edu.cn/anaconda/cloud/pytorch/
conda config --append channels https://mirrors.tuna.tsinghua.edu.cn/anaconda/cloud/bioconda/

# 搜索时显示通道地址
conda config --set show_channel_urls yes
可选操作,激活安装:
source ~/.bashrc # 设置环境变量
查看安装的python包:
conda list
三、离线安装Pytorch
1、下载Pytorch
在Pytorch官网下载Pytorch和torchvision,并通过Xftp,例如:
![]()
2、安装
创建虚拟环境:
conda create -n pytorch python=3.8
激活虚拟环境:
conda activate pytorch
升级pip:
python -m pip install --upgrade pip
升级conda:
conda update --all
cd到安装包所在的路径,例如:
cd /home/software/
通过豆瓣源安装numpy、pandas和matplotlib:
pip install numpy pandas matplotlib -i https://pypi.doubanio.com/simple
安装Pytorch和torchvision:
pip install torch-1.5.1-cp38-cp38-linux_x86_64.whl torchvision-0.6.1-cp38-cp38-linux_x86_64.whl
3、测试
测试Pytorch是否安装成功,先输入python,回车,进入python环境:
python
输入import torch,回车:
import torch
如果没有报错,说明安装成功!
Ctrl + D 退出python环境,回到Pytorch虚拟环境。
安装jupyter notebook:
conda install nb_conda
四、安装VS Code
1、下载
从官网上下载Windows版本的VS Code,通过Xftp上传至Linux服务器。
2、安装
一直狂点“下一步”和“确认”即可。
3、连接服务器
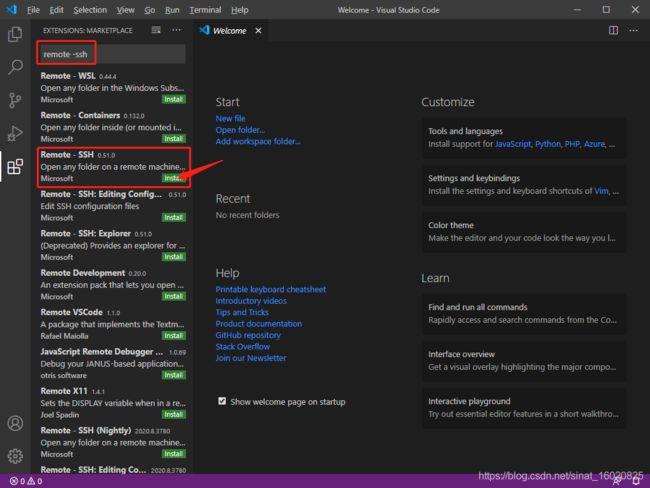
安装后,打开VS Code,点击View→Extensions:

输入remote -ssh,安装Remote -SSH:
点击VS Code左下角齿轮,选择Command Paletten:
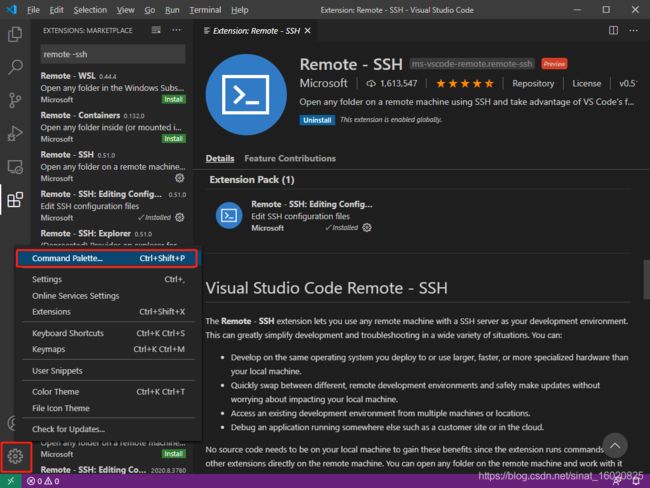
在顶部弹窗中输入Remote - SSH:
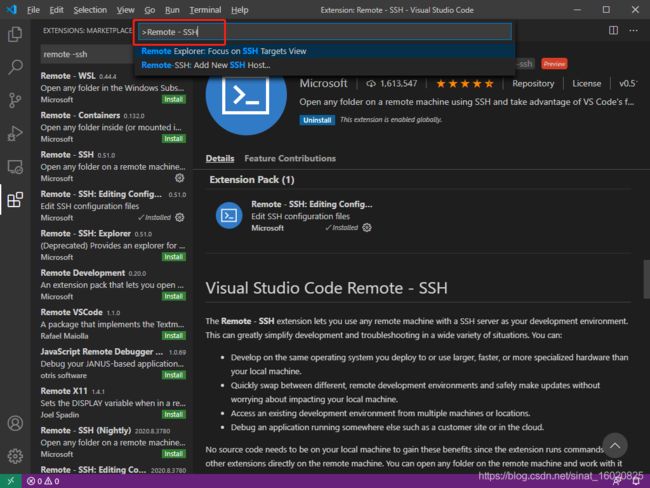
输入"ssh 用户名@服务器地址",回车,例如:“ssh [email protected]”。其中,hello是用户名,若服务器需要账号密码登录,则用户名为账号名;10.168.1.1是服务器地址。

点击右下角弹窗的Open Config可以修改config文件信息:
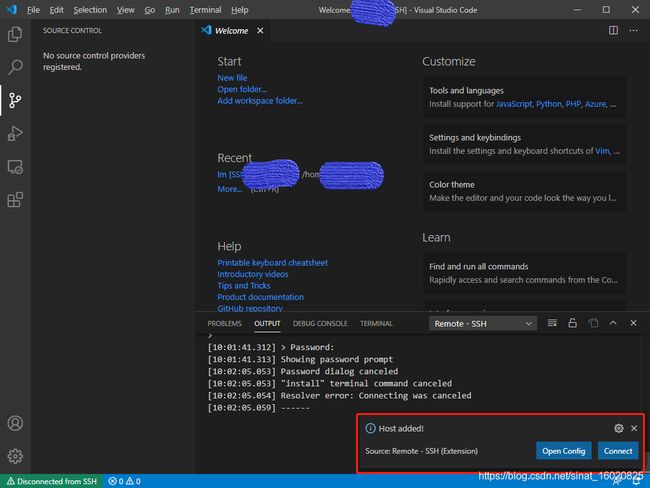
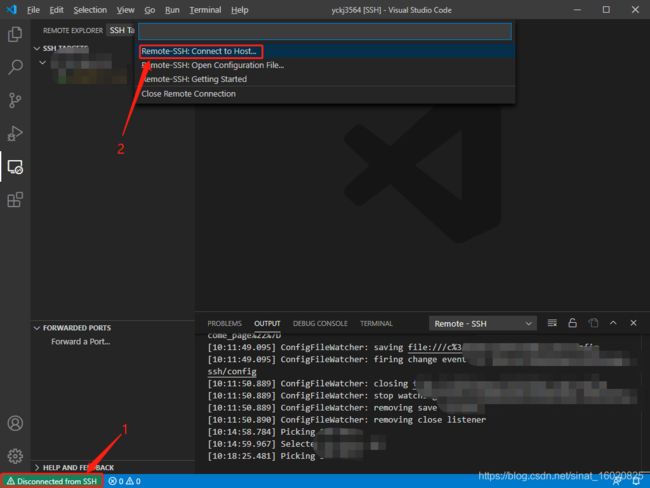
点击左下角绿色的条,在顶部弹框中选择Connect to Host,之后在顶部弹框中选择刚才添加的服务器:
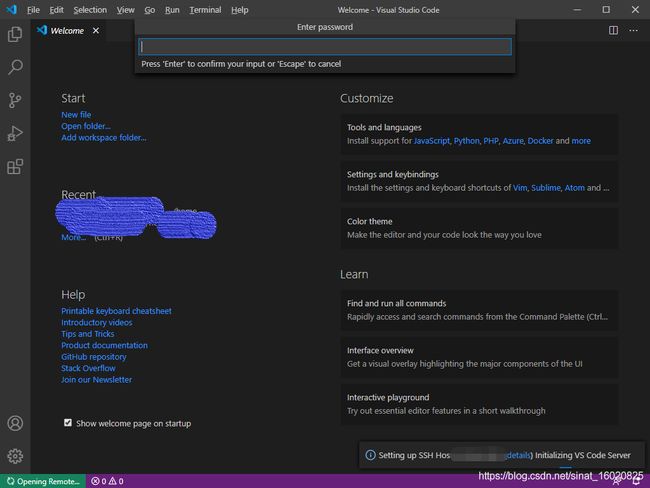
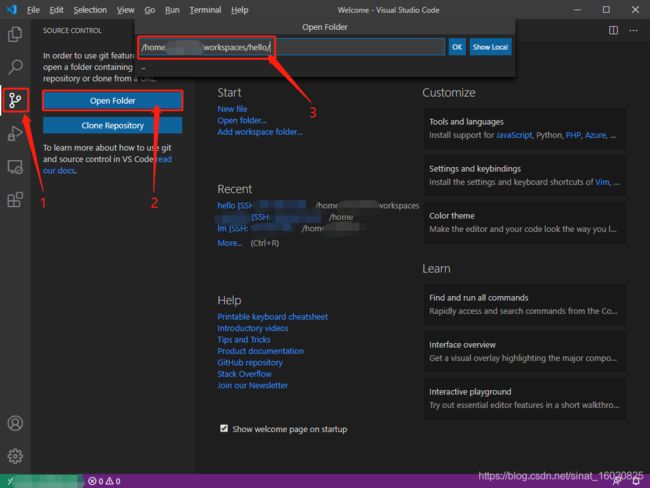
点击左侧工具栏的连接按钮,点击Open Folder,选择你要保存的文件夹路径,点击OK后,需要再次输入服务器密码:
安装Anaconda扩展包:
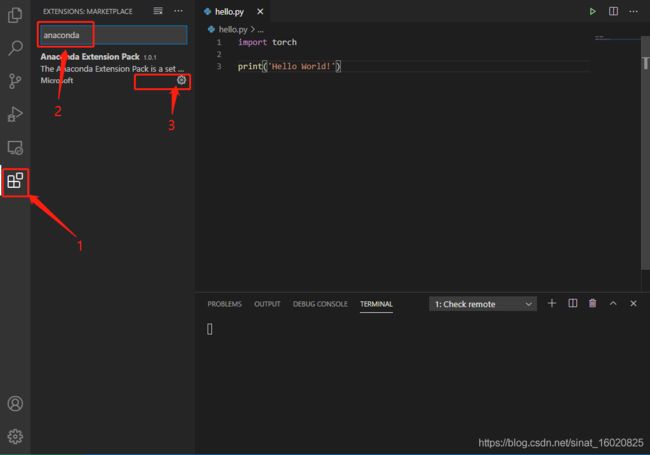
新建hello.py文件,输入:
import torch
print('Hello World!')
选择Anaconda pack:
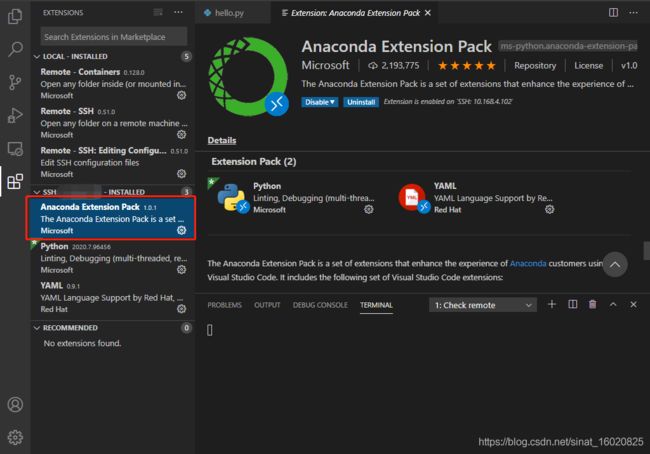
Debug:

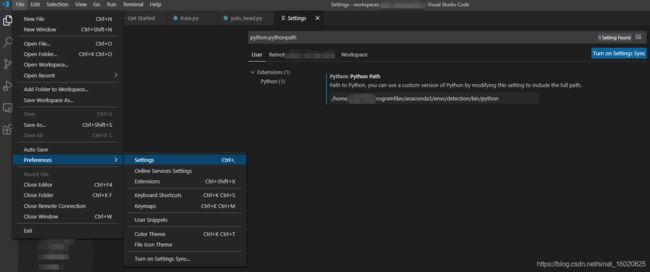
点击顶部弹窗的“find”,找到Pytorch虚拟环境下的python,一般在以下路径:
~/anaconda3/envs/pytorch/bin/
4、更改默认调试的虚拟环境
五、安装Pycharm
1、下载安装包
到Pycharm官网下载安装包。
![]()
通过Xftp上传至服务器。
2、解压
将安装包解压至指定路径,tar -zxvf 压缩包名称 -C 路径,例如:
tar -zxvf pycharm-professional-2020.2.tar.gz -C /home/programfiles/
3、安装
解压完成后,programfiles文件夹里多出一个pycharm-2020.2的文件夹,进入该文件夹中的bin文件夹:
cd /home/yckj3564/programfiles/pycharm-2020.2/bin
回车并运行安装程序:
./pycharm.sh
安装出错!!
OpenJDK 64-Bit Server VM warning: Option UseConcMarkSweepGC was deprecated in version 9.0 and will likely be removed in a future release.
Start Failed: Internal error. Please refer to http://jb.gg/ide/critical-startup-errors
com.intellij.ide.plugins.StartupAbortedException: UI initialization failed
        at com.intellij.idea.StartupUtil.lambda$prepareApp$3(StartupUtil.java:193)
        at java.base/java.util.concurrent.CompletableFuture.uniExceptionally(CompletableFuture.java:986)
        at java.base/java.util.concurrent.CompletableFuture$UniExceptionally.tryFire(CompletableFuture.java:970)
        at java.base/java.util.concurrent.CompletableFuture.postComplete(CompletableFuture.java:506)
        at java.base/java.util.concurrent.CompletableFuture.completeExceptionally(CompletableFuture.java:2088)
        at com.intellij.idea.StartupUtil.lambda$scheduleInitUi$9(StartupUtil.java:374)
        at java.base/java.util.concurrent.ThreadPoolExecutor.runWorker(ThreadPoolExecutor.java:1128)
        at java.base/java.util.concurrent.ThreadPoolExecutor$Worker.run(ThreadPoolExecutor.java:628)
        at java.base/java.util.concurrent.Executors$PrivilegedThreadFactory$1$1.run(Executors.java:668)
        at java.base/java.util.concurrent.Executors$PrivilegedThreadFactory$1$1.run(Executors.java:665)
        at java.base/java.security.AccessController.doPrivileged(Native Method)
        at java.base/java.util.concurrent.Executors$PrivilegedThreadFactory$1.run(Executors.java:665)
        at java.base/java.lang.Thread.run(Thread.java:834)
Caused by: java.util.concurrent.CompletionException: java.lang.UnsatisfiedLinkError: /home/yckj3564/programfiles/pycharm-2020.2/jbr/lib/libawt_xawt.so: libXtst.so.6: cannot open shared object file: No such file or directory
        at java.base/java.util.concurrent.CompletableFuture.encodeThrowable(CompletableFuture.java:331)
        at java.base/java.util.concurrent.CompletableFuture.completeThrowable(CompletableFuture.java:346)
        at java.base/java.util.concurrent.CompletableFuture$BiRelay.tryFire(CompletableFuture.java:1423)
        ... 10 more
安装失败!
原因:Pycharm只能安装在Linux系统下,不能直接安装在Linux服务器上。
4、通过VNC viewer远程工具安装Pycharm
在VNC官网上下载VNC server(Linux)和VNC viewer(Windows)。VNC server安装在Linux服务器上,VNC viewer安装在Windows系统上。
![]()
通过Xftp将VNC-Server-6.7.2-Linux-x64.rpm安装包上传至服务器。
安装VNC-Server到指定路径/home/programfiles:
rpm -ivh -relocate /=/home/programfiles VNC-Server-6.7.2-Linux-x64.deb
rpm参数说明:
| 参数 | 说明 |
|---|---|
| -relocate | 指定安装路径,后面需要加上安装的路径 |
| -i | 安装软件 |
| -t | 测试安装,不是真的安装 |
| -p | 显示安装进度 |
| -f | 忽略任何错误 |
| -U | 升级安装 |
| -v | 检测套件是否正确安装 |
这些参数可以同时使用。
安装失败!!
rpm: RPM should not be used directly install RPM packages, use Alien instead!
rpm: However assuming you know what you are doing...
rpm: arguments to --root (-r) must begin with a /
先进行下一步安装Pytorch,后续再找时间安装Pycharm。

