OpenCV-py学习笔记(三)—— 图像处理(上)
文章目录
-
- 改变颜色空间
-
- 1. 转换颜色空间 cv2.cvtColor()
- 2. 物体跟踪 cv2.inRange()
- 图像的阈值处理
-
- 1. 简单阈值处理 cv2.threshold()
- 2. 自适应阈值处理 cv2.adaptiveThreshold()
- 平滑处理
-
- 1. 添加椒盐噪音
- 2. 去噪
- 形态转变
-
- 1. 腐蚀操作
- 2.扩张操作
- 3. 腐蚀+扩张(opening操作)
- 4. 扩张+腐蚀(closing操作)
- 5. 梯度运算
- 6. OpenCV内置函数生成structuring element
改变颜色空间
1. 转换颜色空间 cv2.cvtColor()
OpenCV中提供了100多种颜色空间,其实我们常用的也就那么三个,RGB、HSV、灰度图,HSV其实是一个用来描述颜色的很好的颜色空间,具体的原理请百度,转换颜色空间的方法就是cv2.cvtColor(),代码如下:
# 所有的颜色空间
# color_space = [i for i in dir(cv2) if i.startswith("COLOR_")]
# print(color_space)

img = cv2.imread("bear.jpg")
img_hsv = cv2.cvtColor(img, cv2.COLOR_RGB2HSV)
2. 物体跟踪 cv2.inRange()
OpenCV官方教程中提供了以下的例子,用来在视频中实时地追踪指定颜色的物体(代码里是蓝色),方法就是上面讲到的HSV颜色空间,首先你需要找到你要追踪的颜色的下界和上界,然后利用cv2.inRange()方法得到一张mask图片,再用mask和每一帧进行按位与操作即可,代码如下:
def object_tracking():
	"""
		跟踪视频中的蓝色物体(其他颜色均可)
	:return:
	"""

	cap = cv2.VideoCapture(0)
	while True:
		# get each frame
		ret, frame = cap.read()
		if not ret:
			break
		if ret:
			# convert each BGR frame to HSV
			hsv = cv2.cvtColor(frame, cv2.COLOR_RGB2HSV)

			# define range of blue color in HSV
			lower_blue = np.array([110, 50, 50])
			upper_blue = np.array([130, 255, 255])

			# generate a mask img w.r.t the color defined above
			# hence, we only get some blue colors
			mask = cv2.inRange(hsv, lower_blue, upper_blue)

			res = cv2.bitwise_and(frame, frame, mask=mask)

			cv2.imshow('frame', frame)
			cv2.imshow('mask', mask)
			cv2.imshow('res', res)
			k = cv2.waitKey(5) & 0xFF
			if k == 27:
				break

	cv2.destroyAllWindows()
效果如下:

当然,你也可以换一个颜色,需要注意的是,OpenCV中HSV空间三个量依次对应的范围是0-179,0-255,0-255,如果用其他工具转换时需要变换到该范围下对应的值,也可以通过下列的示例代码进行转换:
green = np.uint8([[[0,255,0 ]]])
hsv_green = cv2.cvtColor(green,cv2.COLOR_BGR2HSV)
print(hsv_green)
[[[ 60 255 255]]]
图像的阈值处理
1. 简单阈值处理 cv2.threshold()
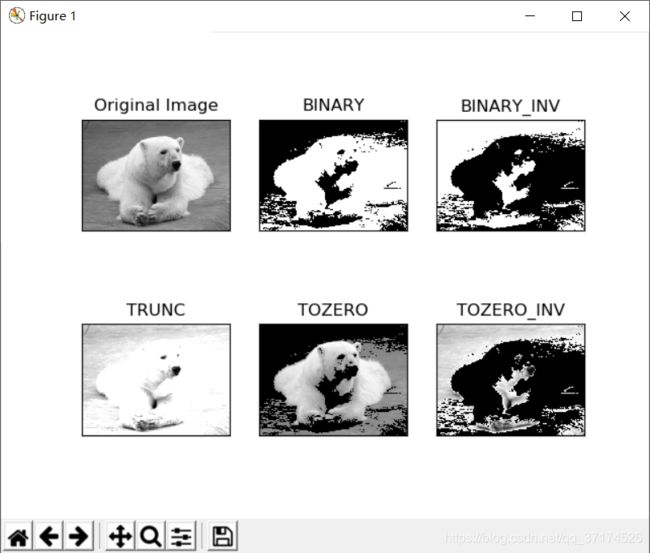
所谓阈值处理,就是给定一个阈值,当像素值比指定阈值大或小时做相关的操作。这个字念yu,不是fa,方法签名为:cv2.threshold(src,thresh,maxval,type,dst=None),需要将的是OpenCV中提供的几种type:
- cv2.THRESH_BINARY:若像素值大于阈值,则置为maxval;否则置0
- cv2.THRESH_BINARY_INV:THRESH_BINARY的反转
- cv2.THRESH_TRUNC:若像素值大于阈值,则置为阈值;否则不变
- cv2.THRESH_TOZERO:小于阈值的部分置为0;其他不变
- cv2.THRESH_TOZERO_INV:THRESH_TOZERO的反转
示例代码如下:
def thresh_ops():
	img = cv2.cvtColor(cv2.imread("bear.jpg"), cv2.COLOR_BGR2GRAY)
	_, thresh1 = cv2.threshold(img, 127, 255, type=cv2.THRESH_BINARY)
	_, thresh2 = cv2.threshold(img, 127, 255, type=cv2.THRESH_BINARY_INV)
	_, thresh3 = cv2.threshold(img, 127, 255, type=cv2.THRESH_TRUNC)
	_, thresh4 = cv2.threshold(img, 127, 255, type=cv2.THRESH_TOZERO)
	_, thresh5 = cv2.threshold(img, 127, 255, type=cv2.THRESH_TOZERO_INV)

	titles = ['Original Image', 'BINARY', 'BINARY_INV', 'TRUNC', 'TOZERO', 'TOZERO_INV']
	images = [img, thresh1, thresh2, thresh3, thresh4, thresh5]

	for i in range(6):
		plt.subplot(2, 3, i + 1), plt.imshow(images[i], 'gray')
		plt.title(titles[i])
		plt.xticks([]), plt.yticks([])

	plt.show()
- mat is not a numerical tuple
出现这个问题的原因是 cv2.threshold()返回2个参数,我开始想当然的认为只返回一个,于是最开始直接用cv2.imshow(“winName”,thresh1)的时候就报错了。添加一个占位返回参数即可。
2. 自适应阈值处理 cv2.adaptiveThreshold()
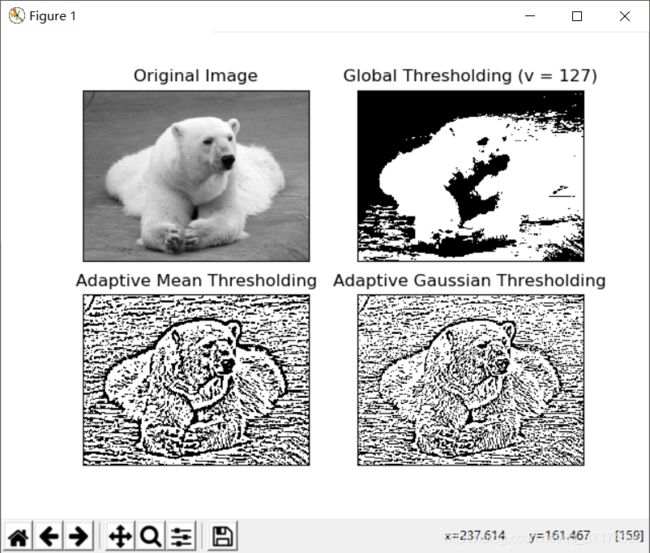
自适应阈值处理和简单处理略有不同,该方法会在一定的区域内(比如5*5)进行一次阈值计算,计算的方法可以是直接求均值、weighted mean,然后再根据该阈值在指定的区域内进行简答阈值化操作。方法签名为:cv2.adaptiveThreshold(src, maxValue, adaptiveMethod, thresholdType, blockSize, C, dst=None)。
- Adaptive Method :处理方法
- cv2.ADAPTIVE_THRESH_MEAN_C : 阈值为邻域内像素的均值
- cv2.ADAPTIVE_THRESH_GAUSSIAN_C : 阈值为邻域内像素的权重均值,权重是一个高斯窗口
- Block Size :邻域大小
- C - 计算阈值后固定减去的值
代码如下:
def adaptive_thresh_ops():
	img = cv2.cvtColor(cv2.imread("bear.jpg"), cv2.COLOR_BGR2GRAY)
	ret, th1 = cv2.threshold(img, 127, 255, cv2.THRESH_BINARY)
	th2 = cv2.adaptiveThreshold(img, 255, cv2.ADAPTIVE_THRESH_MEAN_C, \
								cv2.THRESH_BINARY, 11, 2)
	th3 = cv2.adaptiveThreshold(img, 255, cv2.ADAPTIVE_THRESH_GAUSSIAN_C, \
								cv2.THRESH_BINARY, 11, 2)

	titles = ['Original Image', 'Global Thresholding (v = 127)',
			  'Adaptive Mean Thresholding', 'Adaptive Gaussian Thresholding']
	images = [img, th1, th2, th3]

	for i in range(4):
		plt.subplot(2, 2, i + 1), plt.imshow(images[i], 'gray')
		plt.title(titles[i])
		plt.xticks([]), plt.yticks([])
	plt.show()
效果如下:
平滑处理
1. 添加椒盐噪音
椒盐噪声也称为脉冲噪声,是图像中经常见到的一种噪声,它是一种随机出现的白点或者黑点,可能是亮的区域有黑色像素或是在暗的区域有白色像素。椒盐噪声的成因可能是影像讯号受到突如其来的强烈干扰而产生、模数转换器或位元传输错误等。例如失效的感应器导致像素值为最小值,饱和的感应器导致像素值为最大值。
说直白一点,就是会出现一些随机的黑白点,即所谓的salt&pepper noise。
def add_salt_and_pepper_nosie(image, num):
	"""
		给图片添加椒盐噪音,num是噪声点的个数
	:param image:
	:param num:
	:return:
	"""
	img = copy.deepcopy(image)
	if len(img.shape) == 3:
		rows, cols = img.shape[:2]
	else:
		rows, cols = img.shape

	# add pepper noise
	for n in range(num):
		i = random.randint(0, rows - 1)
		j = random.randint(0, cols - 1)

		if len(img.shape) == 3:
			img[i, j, :] = [255, 255, 255]
		else:
			img[i, j] = 255

	# add salt noise
	for n in range(num):
		i = random.randint(0, rows - 1)
		j = random.randint(0, cols - 1)

		if len(img.shape) == 3:
			img[i, j, :] = [0, 0, 0]
		else:
			img[i, j] = 0
	return img
2. 去噪
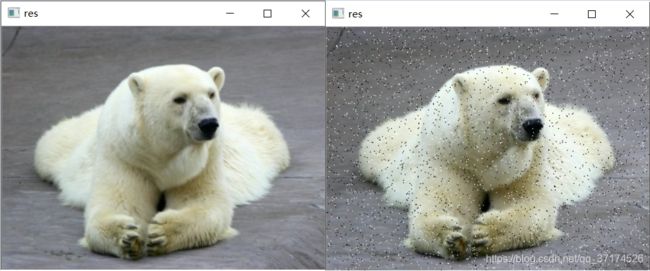
主要是用OpenCV提供的各种滤波器在图像上进行卷积运算,以下分别是一些常用滤波器对椒盐噪音图像滤波的效果:
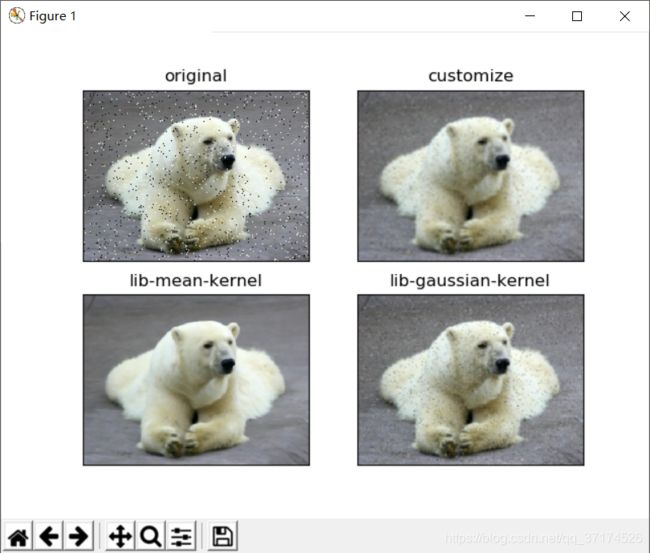
代码:
def smoothing_ops(img):
	"""自定义卷积"""
	avg_kernel = np.ones((5, 5), dtype=np.float32) / 25
	laplacian_kernel = np.array([[0, 1, 0], [1, -4, 1], [0, 1, 0]], dtype=np.float32)

	# 其中ddepth表示目标图像的所需深度,它包含有关图像中存储的数据类型的信息
	# 可以是unsigned char(CV_8U),signed char(CV_8S),unsigned short(CV_16U)等等...
	# 当ddepth = -1时,表示输出图像与原图像有相同的深度。
	dst1 = cv2.filter2D(img, -1, avg_kernel)

	"""使用OpenCV封装的blur库函数"""
	# dst2 = cv2.blur(img, (5, 5))
	dst2 = cv2.medianBlur(img, 5)
	dst3 = cv2.GaussianBlur(img, (5, 5), 0)

	plt.subplot(221), plt.imshow(img[:, :, ::-1]), plt.title('original')
	plt.xticks([]), plt.yticks([])
	plt.subplot(222), plt.imshow(dst1[:, :, ::-1]), plt.title('customize')
	plt.xticks([]), plt.yticks([])
	plt.subplot(223), plt.imshow(dst2[:, :, ::-1]), plt.title('lib-mean-kernel')
	plt.xticks([]), plt.yticks([])
	plt.subplot(224), plt.imshow(dst3[:, :, ::-1]), plt.title('lib-gaussian-kernel')
	plt.xticks([]), plt.yticks([])
	plt.show()
形态转变
形态转变一般用在二值图上,需要两个输入,①待处理的图像 ②处理图片的kernel (在OpenCV中被称为 structuring element )
1. 腐蚀操作
腐蚀操作的原理如下:
有一个slide window(类似卷积核的概念)在原图像上进行滑动,如果该滑动窗口中所有的像素值都为1,则生成的图像在此处的像素点为1;否则为0。更清楚的英文解释如下:
The kernel slides through the image (as in 2D convolution). A pixel in the original image (either 1 or 0) will be considered 1 only if all the pixels under the kernel is 1, otherwise it is eroded (made to zero).
2.扩张操作
扩张操作则和腐蚀操作相反,在腐蚀中,必须所有在滑动窗口在像素全为1才为1,而在扩张中,则是至少有一个像素在滑动窗口中是1.
It is just opposite of erosion. Here, a pixel element is ‘1’ if atleast one pixel under the kernel is ‘1’. So it increases the white region in the image or size of foreground object increases.
在二值图中,我们假定前景全为白色(取值为1),一种直观的理解是,腐蚀操作相当于把白色的像素减少了,一定程度上达到了去噪的效果;扩张操作则是增加了白色的像素,相当于恢复了边缘像素的信息。
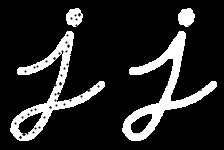
试想,如果在图片的某些区域内有一些白色的噪点,通过腐蚀操作就可以消除他们,可腐蚀操作又可能把边缘的一些白色像素抹去,请看下面这张图,像这些边界上的白色像素就会被腐蚀掉。

于是,我们先腐蚀,再扩张,一定程度上也可以达到去噪的效果。这也就是所谓的Opening操作
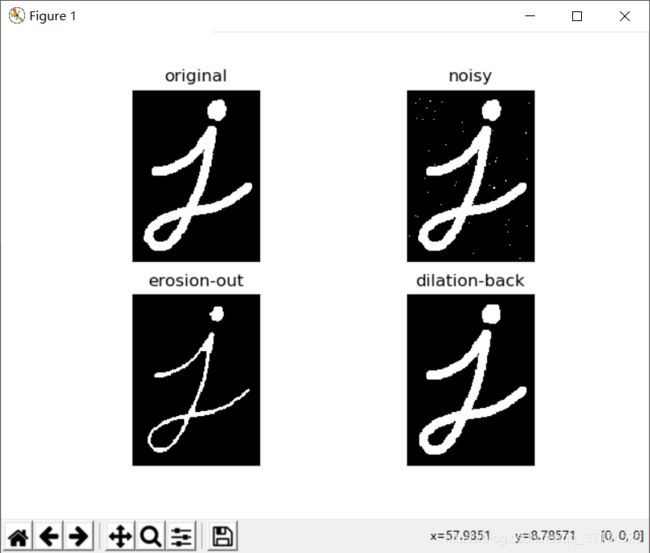
代码如下:
def morphological_ops():
	img = cv2.imread("i.png")
	img_noise = copy.deepcopy(img)
	# add some noise to original image
	rows, cols = img_noise.shape[:2]
	for n in range(50):
		i = random.randint(0, rows - 1)
		j = random.randint(0, cols - 1)
		img_noise[i, j] = 255

	kernel = np.ones((5, 5), dtype=np.uint8)
	erosion = cv2.erode(img_noise, kernel)
	dilation = cv2.dilate(erosion, kernel)

	plt.subplot(221), plt.imshow(img[:, :, ::-1])
	plt.xticks([]), plt.yticks([]), plt.title("original")

	plt.subplot(222), plt.imshow(img_noise[:, :, ::-1])
	plt.xticks([]), plt.yticks([]), plt.title("noisy")

	plt.subplot(223), plt.imshow(erosion[:, :, ::-1])
	plt.xticks([]), plt.yticks([]), plt.title("erosion-out")

	plt.subplot(224), plt.imshow(dilation[:, :, ::-1])
	plt.xticks([]), plt.yticks([]), plt.title("dilation-back")

	plt.show()
3. 腐蚀+扩张(opening操作)
直接用下面这行代码,效果和先腐蚀,再膨胀一样。
opening = cv2.morphologyEx(img, cv2.MORPH_OPEN, kernel)
4. 扩张+腐蚀(closing操作)
opening的逆操作,可以用来消除图像中的一些黑点噪声。
closing = cv2.morphologyEx(img, cv2.MORPH_CLOSE, kernel)
5. 梯度运算
gradient = cv2.morphologyEx(img, cv2.MORPH_GRADIENT, kernel)
6. OpenCV内置函数生成structuring element
上述都是我们手动用numpy生成了一个5*5的kernel,有时候我们可能需要多种类型的kernel,也可以用内置函数cv2.getStructuringElement().来生成kernel,OpenCV中的术语为structuring element 。
# Rectangular Kernel
>>> cv2.getStructuringElement(cv2.MORPH_RECT,(5,5))
array([[1, 1, 1, 1, 1],
       [1, 1, 1, 1, 1],
       [1, 1, 1, 1, 1],
       [1, 1, 1, 1, 1],
       [1, 1, 1, 1, 1]], dtype=uint8)

# Elliptical Kernel
>>> cv2.getStructuringElement(cv2.MORPH_ELLIPSE,(5,5))
array([[0, 0, 1, 0, 0],
       [1, 1, 1, 1, 1],
       [1, 1, 1, 1, 1],
       [1, 1, 1, 1, 1],
       [0, 0, 1, 0, 0]], dtype=uint8)

# Cross-shaped Kernel
>>> cv2.getStructuringElement(cv2.MORPH_CROSS,(5,5))
array([[0, 0, 1, 0, 0],
       [0, 0, 1, 0, 0],
       [1, 1, 1, 1, 1],
       [0, 0, 1, 0, 0],
       [0, 0, 1, 0, 0]], dtype=uint8)
