Python中测试paddle框架、onnxruntime与TensorRT的推理速度
Python中测试paddle框架、onnxruntime与TensorRT的推理速度
- 项目在Ubuntu20.04上进行实验,显卡为3070,其余环境如下文所示;
- 本项目完整代码:Python中测试paddle框架、onnxruntime与TensorRT的推理速度。
1. 安装相关环境
包括paddlepaddle、paddle2onnx、onnxruntime、tensorRT和pycuda等等。
每次安装前查看版本,否则很多坑:
cuda版本查看指令
# 方法一
nvidia-smi  # tx2中没有这个指令

# 方法二
nvcc -V
cudann查看版本
# 老版本
cat /usr/local/cuda/include/cudnn.h | grep CUDNN_MAJOR -A 2

# 新版本
cat /usr/local/cuda/include/cudnn_version.h | grep CUDNN_MAJOR -A 2
TensorRT查看版本
# 方法一:
dpkg -l | grep TensorRT
# 这个方法没用

#方法二
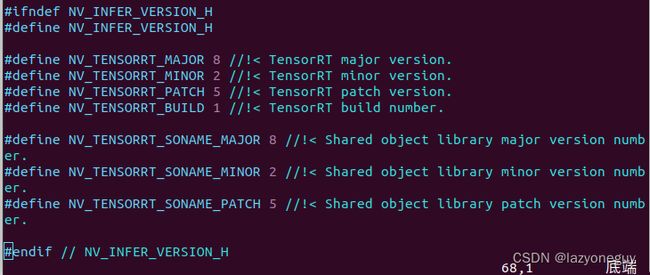
$ cd /usr/local/tensorrt/include/
$ vim NvInferVersion.h

# 查看头文件中的版本信息
万事俱备,安装paddlepaddle
进入官网https://www.paddlepaddle.org.cn/,找到相关版本安装
参考:https://www.paddlepaddle.org.cn/documentation/docs/zh/install/conda/linux-conda.html#anchor-0
这里安装指令
python -m pip install paddlepaddle-gpu==2.3.2.post116 -f https://www.paddlepaddle.org.cn/whl/linux/mkl/avx/stable.html
# 检查安装正确
import paddle
paddle.utils.run_check()
安装paddle2onnx
github 官网:https://github.com/PaddlePaddle/Paddle2ONNX
pip install paddle2onnx # 这个好像没版本要求
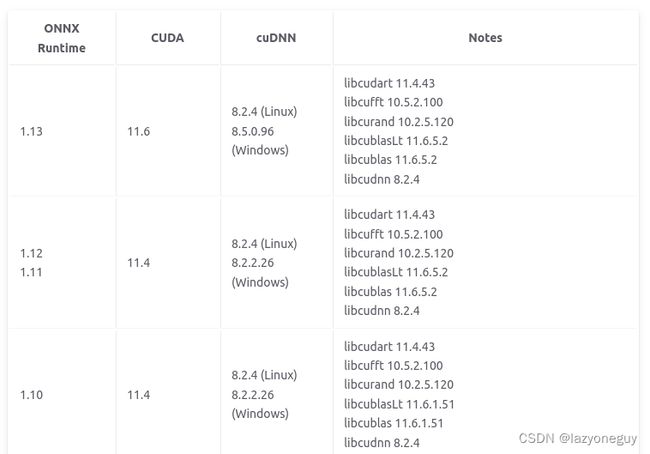
安装onnxruntime
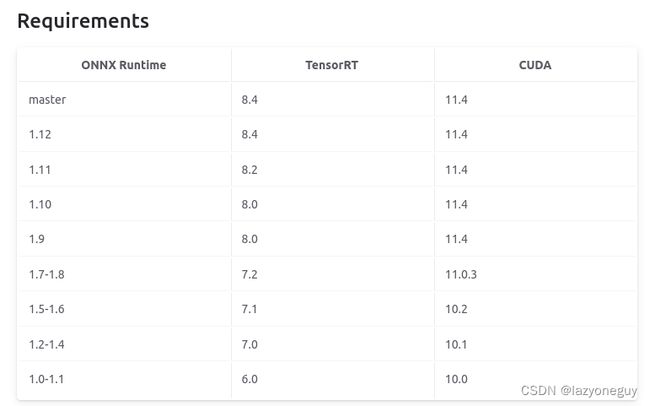
onnx文档:https://onnxruntime.ai/docs/execution-providers/TensorRT-ExecutionProvider.html
一定要查相关版本,如果有tensorRT,就按照tensorRT支持的版本安装,否则安装cuda和cudann版本安装


之前只看了cuda版本,安装onnxruntime1.13.1,运行时报错
错误:
# 出现这种错误就是版本不正确
# https://github.com/microsoft/onnxruntime/issues/12766
RuntimeError: /onnxruntime_src/onnxruntime/core/session/provider_bridge_ort.cc:1069 onnxruntime::Provider& onnxruntime::ProviderLibrary::Get() [ONNXRuntimeError] : 1 : FAIL : Failed to load library libonnxruntime_providers_tensorrt.so with error: /home/b236/miniconda3/envs/medical/lib/python3.8/site-packages/onnxruntime/capi/libonnxruntime_providers_tensorrt.so: undefined symbol: getBuilderPluginRegistry
后改成1.11.0就可以了
pip install onnxruntime-gpu==1.11

# CPU版本与GPU版本不能同时存在
# 卸载直接uninstall
安装tensorRT
参考:https://blog.csdn.net/qq_27370437/article/details/124945605?spm=1001.2014.3001.5506
验证tensorRT是否成功
cd /usr/local/tensorrt/samples/sampleMNIST
sudo make clean && sudo make

# 运行
../../bin/sample_mnist
安装pycuda(Python中使用tensorRT)
参考:https://blog.csdn.net/qq_41910905/article/details/109650182
其他相关库直接pip就行
2. 准备数据
本人做医学分割的,因此用医学数据与自己的搭建的网络做下部署。这里做了下数据读取与归一化。
import paddle
import nibabel
import os
import numpy as np

flair_name = "_flair.nii.gz"
t2_name = "_t2.nii.gz"
t1_name = "_t1.nii.gz"
t1ce_name = "_t1ce.nii.gz"
seg_name = "_seg.nii.gz"

# %%
# 数据路径
filepath = "/home/b236/workspace/paddle/Brats18_2013_7_1"
fileNames = []

for root, dirs, files in os.walk(filepath):
    if len(files):
        for name in files:
            # 列表中添加每个文件的路径
            fileNames.append(os.path.join(root, name))

for i in range(len(fileNames)):
    # 打印查看下
    print(fileNames[i])
# %%    预处理操作
def normalize(slice, bottom=99, down=1):
    """
    normalize image with mean and std for regionnonzero,and clip the value into range
    :param slice:
    :param bottom:
    :param down:
    :return:
    """
    #有点像“去掉最低分去掉最高分”的意思,使得数据集更加“公平”
    b = np.percentile(slice, bottom)
    t = np.percentile(slice, down)
    slice = np.clip(slice, t, b)#限定范围numpy.clip(a, a_min, a_max, out=None)

    #除了黑色背景外的区域要进行标准化
    image_nonzero = slice[np.nonzero(slice)]
    if np.std(slice) == 0 or np.std(image_nonzero) == 0:
        return slice
    else:
        tmp = (slice - np.mean(image_nonzero)) / np.std(image_nonzero)
        # since the range of intensities is between 0 and 5000 ,
        # the min in the normalized slice corresponds to 0 intensity in unnormalized slice
        # the min is replaced with -9 just to keep track of 0 intensities
        # so that we can discard those intensities afterwards when sampling random patches
        tmp[tmp == tmp.min()] = -9 #黑色背景区域
        return tmp
# %%    数据准备操作
for fileName in fileNames:
    if flair_name in fileName:
        flair_nii_image = nibabel.load(fileName)
        flair_np_image = flair_nii_image.get_fdata()
        flair_nor_image = normalize(flair_np_image)
    elif t2_name in fileName:
        t2_nii_image = nibabel.load(fileName)
        t2_np_image = t2_nii_image.get_fdata()
        t2_nor_image = normalize(t2_np_image)
    elif t1_name in fileName:
        t1_nii_image = nibabel.load(fileName)
        t1_np_image = t1_nii_image.get_fdata()
        t1_nor_image = normalize(t1_np_image)
    elif t1ce_name in fileName:
        t1ce_nii_image = nibabel.load(fileName)
        t1ce_np_image = t1ce_nii_image.get_fdata()
        t1ce_nor_image = normalize(t1ce_np_image)
    elif seg_name in fileNames:
        seg_nii_image = nibabel.load(fileName)
        seg_np_image = seg_nii_image.get_fdata()

four_pre_images = np.zeros((155,4,240,240))
for i in range(155):
    __sflairsliceimage = flair_nor_image[:,:,i]
    __st2sliceimage = t2_nor_image[:,:,i]
    __st1sliceimage = t1_nor_image[:,:,i]
    __st1cesliceimage = t1ce_nor_image[:,:,i]
    # 合并每个切片的数据为一个
    Fournpimage = np.array((__sflairsliceimage, __st1sliceimage, __st1cesliceimage, __st2sliceimage))
    four_pre_images[i,:,:,:] = Fournpimage

# %%
# 查看下数据
four_pre_images = four_pre_images.astype(np.float32)
print(four_pre_images[0].shape)
type(four_pre_images)
3.准备相关的模型
导出onnx文件,paddle内置paddle.onnx.export函数,直接导出文件,函数API可去官网查看。
·layer (Layer) - 导出的 Layer 对象。
·path (str) - 存储模型的路径前缀。格式为 dirname/file_prefix 或者 file_prefix,导出后``ONNX``模型自动添加后缀 .onnx 。
·input_spec (list[InputSpec|Tensor],可选) - 描述存储模型 forward 方法的输入,可以通过 InputSpec 或者示例 Tensor 进行描述。如果为 None,所有原 Layer forward 方法的输入变量将都会被配置为存储模型的输入变量。默认为 None。
·opset_version (int,可选) - 导出 ONNX 模型的 Opset 版本,目前稳定支持导出的版本为 9、10 和 11。默认为 9。
·**configs (dict,可选) - 其他用于兼容的存储配置选项。这些选项将来可能被移除,如果不是必须使用,不推荐使用这些配置选项。默认为 None。目前支持以下配置选项:(1) output_spec (list[Tensor]) - 选择存储模型的输出目标。默认情况下,所有原 Layer forward 方法的返回值均会作为存储模型的输出。如果传入的 output_spec 列表不是所有的输出变量,存储的模型将会根据 output_spec 所包含的结果被裁剪。
'''
    这里用的paddlepaddle模型
    ResUnet与DouPyResUnet为作者做实验构建的文件与网络
'''
# https://aistudio.baidu.com/aistudio/projectdetail/1461212
from ResUnet import DouPyResUnet

model = DouPyResUnet(4,3)
# 加载以训练好的参数
checkpoint = paddle.load('/home/b236/workspace/paddle/src/latest.pth')  # 加载断点
model.set_state_dict(checkpoint['net'])  # 加载模型可学习参数
model.eval()

input_spec = paddle.static.InputSpec(shape=[None, 4, 240, 240], dtype='float32', name='image')
paddle.onnx.export(model, 'DouPyResUnet', input_spec=[input_spec], opset_version=12, enable_onnx_checker=True)
4.测试onnxruntime
onnxruntime推理过程可以参考:https://zhuanlan.zhihu.com/p/346544539
第一次推理时因为要构造模型,所以速度较慢,需要warm up一下
import onnxruntime
import time

sess = onnxruntime.InferenceSession('/home/b236/workspace/paddle/src/DouPyResUnet.onnx',providers=onnxruntime.get_available_providers())

# 准备输入
# x = np.expand_dims(four_pre_images[100],axis=0)
x = four_pre_images[92:100,:,:,:]
# 模型预热一下
print("Warming up...")
ort_outs = sess.run(output_names=None, input_feed={'image': x})
print("Done warming up!")

# 计时
start = time.time()
ort_outs = sess.run(output_names=None, input_feed={'image': x})
end = time.time()

print("Exported model has been predicted by ONNXRuntime!")
print('ONNXRuntime predict time: %.04f s' % (end - start))
5. 测试飞浆框架的速度
这里就直接生成模型加载权重就好了,之后对比下预测的精度。
# 对比ONNX Runtime 和 飞桨的结果
paddle_x = paddle.to_tensor(x)
print(paddle_x.shape)
start = time.time()
paddle_outs = model(paddle_x)
end = time.time()
print('Paddlepaddle predict time: %.04f s' % (end - start))
diff = ort_outs[0] - paddle_outs.numpy()
max_abs_diff = np.fabs(diff).max()
if max_abs_diff < 1e-05:
    print("The difference of results between ONNXRuntime and Paddle looks good!")
else:
    relative_diff = max_abs_diff / np.fabs(paddle_outs.numpy()).max()
    if relative_diff < 1e-05:
        print("The difference of results between ONNXRuntime and Paddle looks good!")
    else:
        print("The difference of results between ONNXRuntime and Paddle looks bad!")

print('relative_diff: ', relative_diff)
print('max_abs_diff: ', max_abs_diff)
6. 查看onnx信息
可以通过onnx库查看onnx文件信息,详情可以参考博客:https://blog.csdn.net/u011622208/article/details/122260965
import onnx
import numpy as np
import logging

logging.basicConfig(level=logging.INFO)

def onnx_datatype_to_npType(data_type):
    if data_type == 1:
        return np.float32
    else:
        raise TypeError("don't support data type")


def parser_initializer(initializer):
    name = initializer.name
    logging.info(f"initializer name: {name}")

    dims = initializer.dims
    shape = [x for x in dims]
    logging.info(f"initializer with shape:{shape}")

    dtype = initializer.data_type
    logging.info(f"initializer with type: {onnx_datatype_to_npType(dtype)} ")

    # print tenth buffer
    weights = np.frombuffer(initializer.raw_data, dtype=onnx_datatype_to_npType(dtype))
    logging.info(f"initializer first 10 wights:{weights[:10]}")


def parser_tensor(tensor, use='normal'):
    name = tensor.name
    logging.info(f"{use} tensor name: {name}")

    data_type = tensor.type.tensor_type.elem_type
    logging.info(f"{use} tensor data type: {data_type}")

    dims = tensor.type.tensor_type.shape.dim
    shape = []
    for i, dim in enumerate(dims):
        shape.append(dim.dim_value)
    logging.info(f"{use} tensor with shape:{shape} ")


def parser_node(node):
    def attri_value(attri):
        if attri.type == 1:
            return attri.i
        elif attri.type == 7:
            return list(attri.ints)

    name = node.name
    logging.info(f"node name:{name}")

    opType = node.op_type
    logging.info(f"node op type:{opType}")

    inputs = list(node.input)
    logging.info(f"node with {len(inputs)} inputs:{inputs}")

    outputs = list(node.output)
    logging.info(f"node with {len(outputs)} outputs:{outputs}")

    attributes = node.attribute
    for attri in attributes:
        name = attri.name
        value = attri_value(attri)
        logging.info(f"{name} with value:{value}")


def parser_info(onnx_model):
    ir_version = onnx_model.ir_version
    producer_name = onnx_model.producer_name
    producer_version = onnx_model.producer_version
    for info in [ir_version, producer_name, producer_version]:
        logging.info("onnx model with info:{}".format(info))

def parser_inputs(onnx_graph):
    inputs = onnx_graph.input
    for input in inputs:
        parser_tensor(input, 'input')

def parser_outputs(onnx_graph):
    outputs = onnx_graph.output
    for output in outputs:
        parser_tensor(output, 'output')

def parser_graph_initializers(onnx_graph):
    initializers = onnx_graph.initializer
    for initializer in initializers:
        parser_initializer(initializer)


def parser_graph_nodes(onnx_graph):
    nodes = onnx_graph.node
    for node in nodes:
        parser_node(node)
        t = 1

def onnx_parser():
    model_path = '/home/b236/workspace/paddle/src/DouPyResUnet.onnx'
    model = onnx.load(model_path)

    # 0.
    parser_info(model)

    graph = model.graph

    # 1.
    parser_inputs(graph)

    # 2.
    parser_outputs(graph)

    # 3.
    parser_graph_initializers(graph)

    # 4.
    parser_graph_nodes(graph)
7.onnx到trt模型
可以查看官网给的文档:https://docs.nvidia.com/deeplearning/tensorrt/developer-guide/index.html#import_model_python
两种方式,一是通过代码实现,其次就是使用TensorRT自带的命令行工具——trtexec,它位于tensorrt/bin目录下(完整的路径通常是:/usr/src/tensorrt/bin)
详情可以参考:https://blog.csdn.net/qq_43673118/article/details/123547503
import numpy as np
import tensorrt as trt
import pycuda.driver as cuda
import pycuda.autoinit
import time

# 1. 确定batch size大小,与导出的trt模型保持一致
BATCH_SIZE = 1

# 2. 选择是否采用FP16精度,与导出的trt模型保持一致
USE_FP16 = True

target_dtype = np.float16 if USE_FP16 else np.float32

# 3. 创建Runtime,加载TRT引擎

with open("/home/b236/workspace/paddle/src/PyResUnet_engine.trt", "rb") as f, trt.Runtime(trt.Logger(trt.Logger.WARNING)) as runtime:
    engine = runtime.deserialize_cuda_engine(f.read())      # 从文件中加载trt引擎
print("eng",type(engine))
context = engine.create_execution_context()             # 创建context

# 4. 分配input和output内存
input_batch = np.random.randn(BATCH_SIZE, 4, 240, 240).astype(target_dtype)
output = np.empty([BATCH_SIZE, 3, 240 ,240], dtype = target_dtype)

d_input = cuda.mem_alloc(1 * input_batch.nbytes)        # nbytes属性是数组中的所有数据消耗掉的字节数。
d_output = cuda.mem_alloc(1 * output.nbytes)

bindings = [int(d_input), int(d_output)]

stream = cuda.Stream()

# 5. 创建predict函数
def predict(batch): # result gets copied into output
    # transfer input data to device
    cuda.memcpy_htod_async(d_input, batch, stream)
    # execute model
    context.execute_async_v2(bindings, stream.handle, None)  # 此处采用异步推理。如果想要同步推理,需将execute_async_v2替换成execute_v2
    # transfer predictions back
    cuda.memcpy_dtoh_async(output, d_output, stream)
    # syncronize threads
    stream.synchronize()

    return output


x = np.expand_dims(four_pre_images[100],axis=0)
# x = np.expand_dims(four_pre_images[100],axis=0)
preprocessed_inputs = np.array(x,dtype=target_dtype)
print(x.shape)
print(x.dtype)

print("Warming up...")
pred = predict(preprocessed_inputs)
print("Done warming up!")

t0 = time.time()
pred = predict(preprocessed_inputs)
t = time.time() - t0
print("Prediction cost {:.4f}s".format(t))
8. 实验结果
通过5次实验可以看出tensorRT的加速能力还是可以的,onnxruntime就不大行,实验比较随意,可能有些东西没考虑进去,有兴趣的可以自己试试不同batchsize的实验,这里就不做了。
| 实验次数 | paddle | onnxruntime | tensorRT | batch size |
|---|---|---|---|---|
| 1 | 0.0500 s | 0.0620 s | 0.0052 s | 4 |
| 2 | 0.0301 s | 0.0575 s | 0.0052 s | 4 |
| 3 | 0.0362 s | 0.0566 s | 0.0053 s | 4 |
| 4 | 0.0326 s | 0.0609 s | 0.0055 s | 4 |
| 5 | 0.0230 s | 0.0587 s | 0.0053 s | 4 |
| 平均值 | 0.03438 | 0.05914 | 0.0053 s | - |
精度损失
执行代码比较onnxruntime和paddle,tensorRT与paddle的精度损失
diff = pred - paddle_outs.numpy()   # 两个矩阵相减
max_abs_diff = np.fabs(diff).max()  # 返回绝对值中最大值

if max_abs_diff < 1e-05:
    print("The difference of results between TRT and Paddle looks good!")
else:
    relative_diff = max_abs_diff / np.fabs(paddle_outs.numpy()).max()   #
    if relative_diff < 1e-05:
        print("The difference of results between TRT and Paddle looks good!")
    else:
        print("The difference of results between TRT and Paddle looks bad!")

print('relative_diff: ', relative_diff)
print('max_abs_diff: ', max_abs_diff)
onnx与paddle结果显示
The difference of results between ONNXRuntime and Paddle looks bad!
relative_diff:  0.0032302602
max_abs_diff:  0.22960281
tensorRT与paddle结果显示
The difference of results between TRT and Paddle looks bad!
relative_diff:  0.9868896
max_abs_diff:  70.146866
实验结果出来差距有点多(但在tx2的板子上运行差距还挺好的=-=)。
将预测数据经过可视化处理后,发现三者的差距并不多。
通过scipy中stats,查看下矩阵信息发现,onnx与paddle的结果相差不大,但tensorRT的精度变小了,结果也相差较大。
# 具体查看下数据信息
from scipy import stats
stats.describe(paddle_outs.numpy())
# %%
stats.describe(ort_outs)
# %%
stats.describe(pred)

# 结果
paddle数据:
 minmax=(array([[[-18.138184, -23.291552, -20.6842  , ..., -17.745247,
         -25.41252 , -20.164583],
        [-20.328375, -26.894402, -25.679909, ..., -22.779709,
         -21.964071, -26.566772],
        [-22.547255, -22.530375, -25.813732, ..., -26.924955,
         -26.459589, -23.326784],
onnx数据:
 minmax=(array([[[[-18.13041 , -23.28231 , -20.679657, ..., -17.739494,
          -25.407112, -20.16186 ],
         [-20.332561, -26.877296, -25.667913, ..., -22.772226,
          -21.949253, -26.565367],
         [-22.515867, -22.512861, -25.74257 , ..., -26.918493,
          -26.45582 , -23.311512],
tensorRT数据:
minmax=(array([[-26.05, -29.12, -27.02, ..., -24.89, -35.22, -30.73],
       [-21.88, -26.88, -25.67, ..., -22.81, -26.14, -34.88],
       [-22.53, -22.6 , -25.84, ..., -27.05, -26.52, -28.86],
       ...,
       [-25.58, -21.44, -23.83, ..., -26.  , -27.  , -25.16],
       [-33.6 , -18.69, -25.77, ..., -21.92, -24.77, -25.08],
       [-29.78, -23.02, -29.08, ..., -25.7 , -28.56, -26.95]],
总结
搭建相关环境真的挺烦人的,有些东西不能共存,有些库版本有限制,诸位安装库前一定要确定好自己相关依赖的版本。后期可能会研究C++的部署。


