LSTM+Self-Attention情感分类
目录
- 一、开发环境和数据集
-
- 1、开发环境
- 2、数据集
- 二、使用torchtext处理数据集
-
- 1、导入必要的库
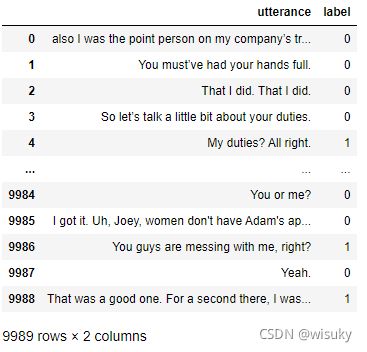
- 2、导入并查看数据集
- 3、使用torchtext处理数据集
-
- 3.1、定义Field
- 3.2、创建Dataset
- 3.3、构建词表、加载预训练词向量
- 3.4、构建迭代器
- 三、搭建LSTM+Self-Attention网络模型
-
- 1、网络模型结构
- 2、Self-Attention
- 3、利用pytorch搭建模型
- 四、模型训练及结果
-
- 1、定义训练函数、优化器和损失函数等参数
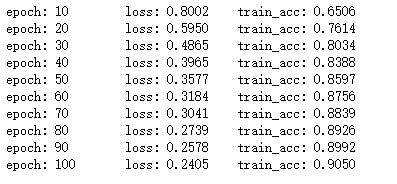
- 2、进行训练
- 3、可视化结果
- 五、总结
本文所用的数据是一个三分类的英文数据集,利用torchtext处理了数据,构建了Dataset和迭代器,搭建的网络模型是LSTM+Self-Attention,将数据用搭建的模型进行训练,并得到了训练结果。本文没有使用验证集对模型进行评估。
一、开发环境和数据集
1、开发环境
Ubuntu 16.04.6
python:3.7
pytorch:1.7.1
torchtext:0.8.0
2、数据集
数据集:train_data_sentiment
提取码:gw77
二、使用torchtext处理数据集
1、导入必要的库
#导入常用库
import math
import torch
import pandas as pd
import matplotlib.pyplot as plt
import torch.nn as nn
import torch.optim as optim
import torch.utils.data as Data
import torch.nn.functional as F
import torchtext
from torchtext.vocab import Vectors
#比较新版本的需要使用torchtext.legacy.data,旧版本的torchtext使用torchtex.data
from torchtext.data import TabularDataset
import warnings
warnings.filterwarnings("ignore")
device = torch.device("cuda" if torch.cuda.is_available() else "cpu")
2、导入并查看数据集
#导入数据集
train_data = pd.read_csv('train_data_sentiment.csv')
train_data
3、使用torchtext处理数据集
torchtext处理数据的步骤主要是:
- 定义Field
- 创建Dataset
- 创建迭代器
torchtext可以很方便的对文本数据进行分词、截断补长、构建词表等。对torchtext不熟悉的可以学习官方文档或者讲解博客。
3.1、定义Field
#定义Field
TEXT = torchtext.data.Field(sequential=True,lower=True,fix_length=30)  #这里使用默认分词器split(),按照空格进行分词
LABEL = torchtext.data.Field(sequential=False,use_vocab=False)
- sequential:是否把数据表示成序列,如果是False, 则不能使用分词。默认值:True。
- lower:是否把数据转化为小写。默认值:False。
- fix_length:在构建迭代器时,将每条文本数据的长度修改为该值,进行截断补长,用pad_token补全。默认值:None。
- use_vocab:是否使用词典对象. 如果是False,数据的类型必须已经是数值类型。默认值:True。
3.2、创建Dataset
train_x = TabularDataset(path = 'train_data_sentiment.csv',
                        format = 'csv',skip_header=True,
                        fields = [('utterance',TEXT),('label',LABEL)])
- skip_header = True,将列名不作为数据处理。
- fields的顺序要与原数据列的顺序相同。
3.3、构建词表、加载预训练词向量
#构建词表
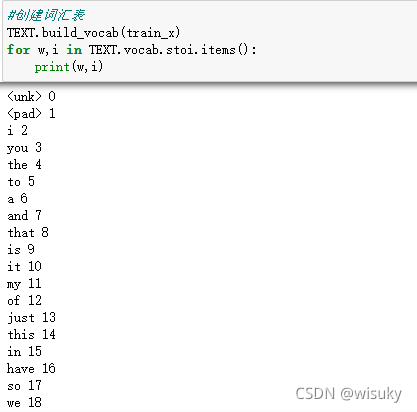
TEXT.build_vocab(train_x)  #构建了10440个词,从0-10439
for w,i in TEXT.vocab.stoi.items():
    print(w,i)
#加载glove词向量,第一次使用会自动下载,也可以自己下载好该词向量,我这里用的是400000词,每个词由100维向量表示
TEXT.vocab.load_vectors('glove.6B.100d',unk_init=torch.Tensor.normal_) #将数据中有但glove词向量中不存在的词进行随机初始化分配100维向量
我们可以查看一下构建的词嵌入矩阵维度大小,也就是我们构建的词表中的每个词被100维向量表示,所以词嵌入矩阵维度为[10440,100]
print(TEXT.vocab.vectors.shape) #torch.Size([10440, 100])
3.4、构建迭代器
迭代器有Iterator和BucketIterator
- Iterator:跟原始数据顺序相同,构建批数据。
- BucketIterator:将长度类似的数据构建成一批数据,这样就会减少截断补长操作时的填充。
一般在进行训练网络时,每一次我们都会输入一个batch的数据,我设置了batch_size=64,那么就有9989//64+1=157个batch,因为我们总共有9989条数据,每个batch有64条数据,而9989/64=156余5,那么余下的5条数据就会组成一个batch。
#创建迭代器
batch_size = 64
train_iter = torchtext.data.Iterator(dataset = train_x,batch_size=64,shuffle=True,sort_within_batch=False,repeat=False,device=device)
len(train_iter) #157
- shuffle:是否打乱数据
- sort_within_batch:是否对每个批数据内进行排序
- repeat:是否在不同的epoch中重复迭代批数据
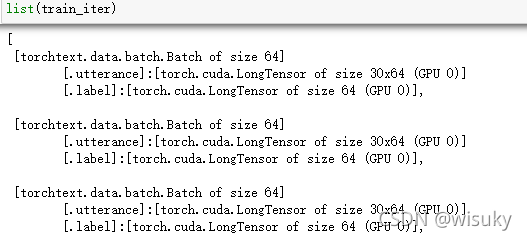
查看构建的迭代器以及内部数据表示:
#查看构建的迭代器
list(train_iter)
#查看批数据的大小
for batch in train_iter:
    print(batch.utterance.shape)
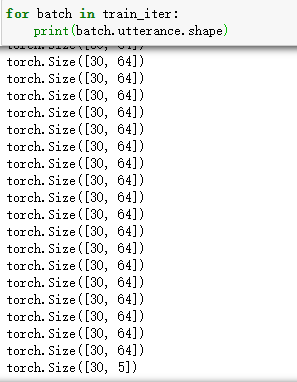
可以看到每批数据为64条(除了最后一批数据),即batch_size=64,每条数据由30个词组成,我们也能看到最后剩下的5条数据组成了一个batch。
#查看第一条数据
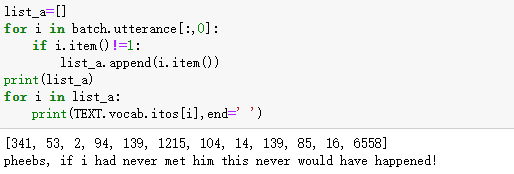
batch.utterance[:,0]#我们取的是第1列,因为第1列表示第一条数据,即第64列表示第64条数据。每条数据由30个词组成,下面非1部分表示第一条数据中的词在词表中的索引,剩下的1表示补长的部分。
#查看第一条数据中的词所对应的索引值
list_a=[]
for i in batch.utterance[:,0]:
    if i.item()!=1:
        list_a.append(i.item())
print(list_a)
for i in list_a:
    print(TEXT.vocab.itos[i],end=' ')
#查看迭代器中的数据及其对应的文本
l =[]
for batch in list(train_iter)[:1]:
    for i in batch.utterance:
        l.append(i[0].item())
    print(l)
    print(' '.join([TEXT.vocab.itos[i] for  i in l]))
至此,我们就把数据处理完了,接下来就是搭建网络了。
三、搭建LSTM+Self-Attention网络模型
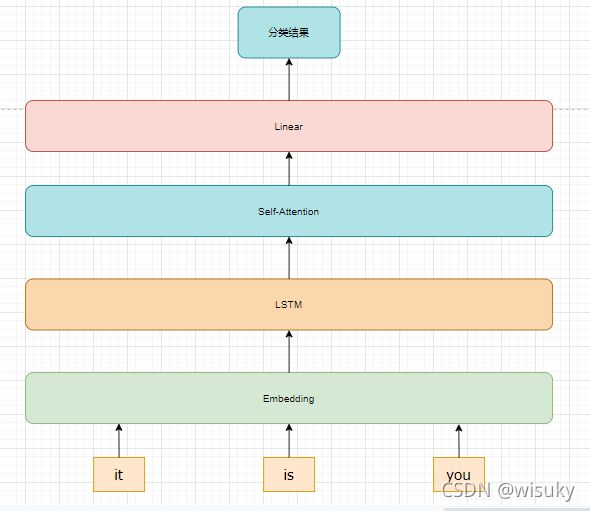
1、网络模型结构
2、Self-Attention
本文的模型结构是比较简单的,采用了transformer中计算注意力的方法,我就只简单的解释一下Self-Attention这一部分。
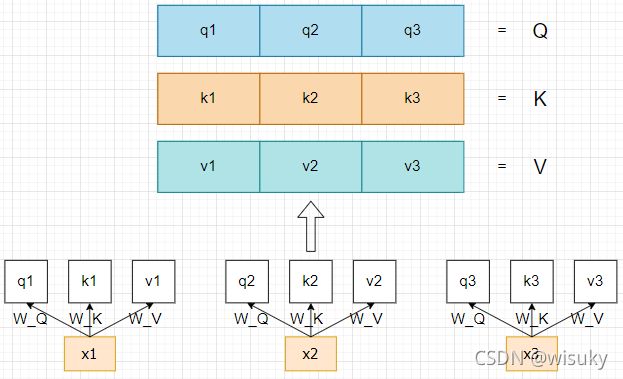
首先,使用了LSTM输出层中的输出(记为X1,X2,X3)作为Self-Attention的输入,将这些输入通过Linear层(也就是下图中的W_Q,W_K,W_V)得到了每个输出的q,k,v,然后将得到的每个q,k,v组合到一起用于下面计算attention。这里补充一下,代码中没有将得到的每个q,k,v进行组合,是因为下面x1,x2,x3在得到自己的q时,用的线性层W_Q是一样的,所以我们可以将x1,x2和x3组合起来直接通过线性层W_Q就能的到组合之后的Q。(K和V在代码中也是这样操作的)
其次,根据公式
A t t e n t i o n ( Q , K , V ) = s o f t m a x ( Q . ∗ K T / d k ) V Attention(Q,K,V) = softmax(Q.*K^T/\sqrt[]d_k)V Attention(Q,K,V)=softmax(Q.∗KT/dk)V
就能得到通过注意力机制后的向量表示了。
3、利用pytorch搭建模型
网络模型中的参数说明:
- vocab_size: 构建的词表中的词数
- embedding_size: 每个词的词向量维度
- hidden_dim:LSTM中隐藏层的单元个数
- n_layers:LSTM中的隐藏层数量
- num_class:类别数
vocab_size = 10440
embedding_size = 100
hidden_dim = 128
n_layers = 1
num_class = 3
class LSTM_Attention(nn.Module):
    def __init__(self,vocab_size,embedding_dim,hidden_dim,n_layers,num_class):
        super(LSTM_Attention,self).__init__()

        #从LSTM得到output之后,将output通过下面的linear层,然后就得到了Q,K,V
        #这里我是用的attention_size是等于hidden_dim的,这里可以自己换成别的attention_size
        self.W_Q = nn.Linear(hidden_dim,hidden_dim,bias =False)
        self.W_K = nn.Linear(hidden_dim,hidden_dim,bias =False)
        self.W_V = nn.Linear(hidden_dim,hidden_dim,bias =False)

        #embedding层
        self.embedding = nn.Embedding(vocab_size,embedding_dim)
        #LSTM
        self.rnn = nn.LSTM(input_size = embedding_dim,hidden_size = hidden_dim,num_layers = n_layers)
        #Linear层,因为是三分类,所以后面的维度为3
        self.fc = nn.Linear(hidden_dim,num_class)
        #dropout
        self.dropout = nn.Dropout(0.5)

    #用来计算attention
    def attention(self,Q,K,V):

        d_k = K.size(-1)
        scores = torch.matmul(Q,K.transpose(1,2)) / math.sqrt(d_k)
        alpha_n = F.softmax(scores,dim=-1)
        context = torch.matmul(alpha_n,V)

        #这里都是组合之后的矩阵之间的计算,所以.sum之后,得到的output维度就是[batch_size,hidden_dim],并且每一行向量就表示一句话,所以总共会有batch_size行
        output = context.sum(1)

        return output,alpha_n
    def forward(self,x):
        #x.shape = [seq_len,batch_size] = [30,64]

        embedding = self.dropout(self.embedding(x))    #embedding.shape = [seq_len,batch_size,embedding_dim = 100]
        embedding = embedding.transpose(0,1)           #embedding.shape = [batch_size,seq_len,embedding_dim]
        #进行LSTM
        output,(h_n,c) = self.rnn(embedding)           #out.shape = [batch_size,seq_len,hidden_dim=128]

        Q = self.W_Q(output)                           #[batch_size,seq_len,hidden_dim]
        K = self.W_K(output)
        V = self.W_V(output)

        #将得到的Q,K,V送入attention函数进行运算
        attn_output,alpha_n = self.attention(Q,K,V)
        #attn_output.shape = [batch_size,hidden_dim=128]
        #alpha_n.shape = [batch_size,seq_len,seq_len]

        out = self.fc(attn_output)                      #out.shape = [batch_size,num_class]
        return out
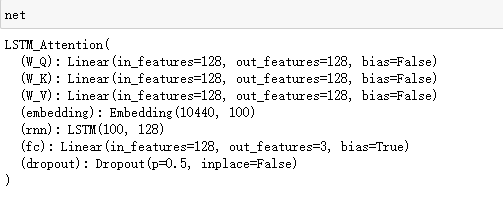
#看一下我们搭建的网络模型
net = LSTM_Attention(vocab_size=vocab_size, embedding_dim=embedding_size,hidden_dim=hidden_dim,n_layers=n_layers,num_class=num_class).to(device)
net
四、模型训练及结果
1、定义训练函数、优化器和损失函数等参数
一般我是定义好训练函数,再调用进行模型训练,大家可以随意操作。
net.embedding.weight.data.copy_(TEXT.vocab.vectors)       #给模型的Embedding层传入我们的词嵌入矩阵
optimizer = optim.Adam(net.parameters(),lr=1e-3)          #定义优化器,lr是学习率可以自己调
criterion = nn.CrossEntropyLoss().to(device)              #定义损失函数
train_x_len = len(train_x)                                #这一步是我为了计算后面的Acc而获取的数据数量,也就是9989
#定义训练函数
def train(net,iterator,optimizer,criterion,train_x_len):
    epoch_loss = 0                           #初始化loss值
    epoch_acc = 0                            #初始化acc值
    for batch in iterator:
        optimizer.zero_grad()                #梯度清零
        preds = net(batch.utterance)         #前向传播,求出预测值
        loss = criterion(preds,batch.label)  #计算loss
        epoch_loss +=loss.item()             #累加loss,作为下面求平均loss的分子
        loss.backward()                      #反向传播
        optimizer.step()                     #更新网络中的权重参数
        epoch_acc+=((preds.argmax(axis=1))==batch.label).sum().item()   #累加acc,作为下面求平均acc的分子
    return epoch_loss/(len(iterator)),epoch_acc/train_x_len             #返回的是loss值和acc值
2、进行训练
n_epoch = 100
acc_plot=[]     #用于后面画图
loss_plot=[]    #用于后面画图
for epoch in range(n_epoch):
    train_loss,train_acc = train(net,train_iter,optimizer,criterion,train_x_len)
    acc_plot.append(train_acc)
    loss_plot.append(train_loss)
    if (epoch+1)%10==0:
        print('epoch: %d \t loss: %.4f \t train_acc: %.4f'%(epoch+1,train_loss,train_acc))
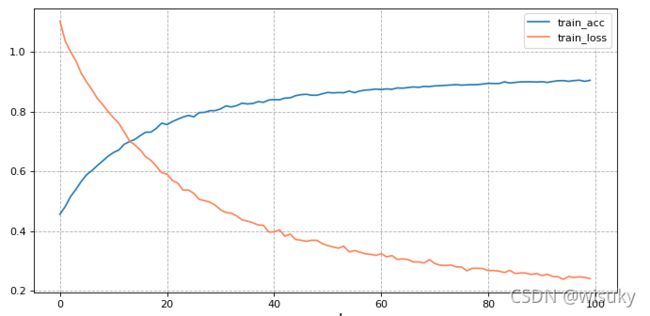
3、可视化结果
#使用画图函数matplotlib
plt.figure(figsize =(10,5),dpi=80)
plt.plot(acc_plot,label='train_acc')
plt.plot(loss_plot,color='coral',label='train_loss')
plt.legend(loc = 0)
plt.grid(True,linestyle = '--',alpha=1)
plt.xlabel('epoch',fontsize = 15)
plt.show()
五、总结
本文主要是利用一个三分类的数据集做分类任务,模型是LSTM后面拼接了Self-Attention机制,本文没有使用验证集对模型进行评估,大家可以尝试从训练集中分出来一部分数据做验证集,并对模型进行评估。
