【目标检测】锚框
提示:文章写完后,目录可以自动生成,如何生成可参考右边的帮助文档
文章目录
- 前言
- 一、锚框
- 二、代码
- 总结
前言
【个人学习笔记记录,如有错误,请指正!】
一、锚框
理解锚框之前,我们需要理解当前主流的目标检测算法,目前主流的目标检测算法都是基于【锚框】的。
那么为什么目标检测算法需要基于【锚框】?
个人理解:在一个图像中,被检测的目标的位置和大小是【不确定的】,所以在图像中找到目标就类似大海捞针,而只能通过对整个图像进行地毯式的搜索。就在特征图上基于每个像素分配不同尺度的【锚框】,以便于匹配不同尺度和位置的目标。
那么什么是【锚框】?
其实【锚框】就是【框】而已,就是不同大小尺度的框。
【anchors (锚框)生成】
锚框的生成一般步骤都是:
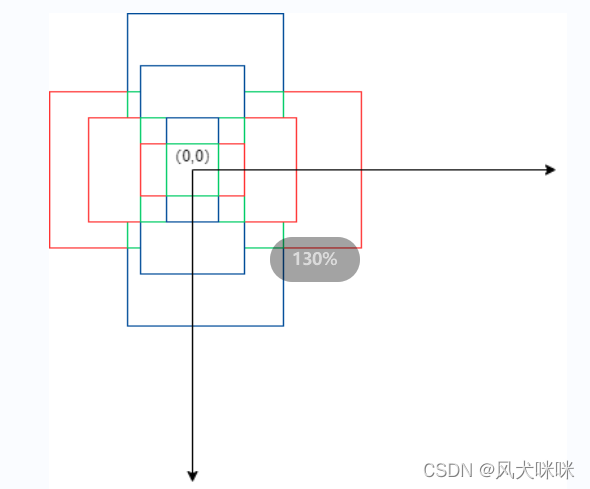
第一步:求得需要生成的 anchors 的高宽,然后基于原点生成出锚框(这里基于原点生成三种尺度和三种比例的anchors,(1:1)(1:2), (2:1))。

第二步:将生成的 anchors 移到每个特征图中每一个像素的中心点上。
这里假设特征图的大小为 3x3 ,且没有考虑原图和特征图的步距。

二、代码
这里给出的代码是,李沐大神给出的锚框代码,大神在 某站 有学习视频。
这里的代码和上面的锚框示意图是不一样的!

def multibox_prior(data, sizes, ratios):
	"""
	data : 特征图
	size : anchors 的大小
	ratios : 高宽比
	"""
    # 获取数据的高宽
    in_height, in_width = data.shape[-2:]
    print('in_height: ', in_height)
    print('in_width: ', in_width)
    device, num_sizes, num_ratios = data.device, len(sizes), len(ratios)
    # 每个像素生成 anchors 的个数
    boxes_per_pixel = (num_sizes + num_ratios - 1)
    # 将 size 和 比例转化为 tensor
    size_tensor = torch.tensor(sizes, device=device)
    ratio_tensor = torch.tensor(ratios, device=device)

    # 高宽的偏移基准(因为像素是(1,1),中心点就应该是(0.5, 0.5))
    offset_h, offset_w = 0.5, 0.5
    # 将图像的高宽缩放到 1,然后求得每个像素的高宽
    steps_h = 1.0 / in_height
    steps_w = 1.0 / in_width
    print('steps_h: ', steps_h)
    print('steps_w: ', steps_w)
    # 基于缩放后的高宽,生成中心点的横纵坐标,这里生成的是 一行和一列
    center_h = (torch.arange(in_height, device=device) + offset_h) * steps_h
    center_w = (torch.arange(in_width, device=device) + offset_w) * steps_w
    print('center_h shape: ', center_h.shape)
    print('center_w shape: ', center_w.shape)
    # 将一行和一列生成一个图像大小的矩阵
    shift_y, shift_x = torch.meshgrid(center_h, center_w)
    shift_y, shift_x = shift_y.reshape(-1), shift_x.reshape(-1)
    # 生成锚框的 宽度和高度
    w = torch.cat((size_tensor * torch.sqrt(ratio_tensor[0]),
                   sizes[0] * torch.sqrt(ratio_tensor[1:])))\
                   * in_height / in_width
    h = torch.cat((size_tensor * torch.sqrt(ratio_tensor[0]),
                   sizes[0] / torch.sqrt(ratio_tensor[1:])))
    # 基于每个像素 生成五个 anchors 的高宽
    anchor_manipulations = torch.stack(
        (-w, -h, w, h)).T.repeat(in_height * in_width, 1) / 2
    print('anchor_manipulations: ', anchor_manipulations[:10, :])
    print('anchor_manipulations shape: ', anchor_manipulations.shape)
    # 基于每一个像素,求得每个 anchors 的偏移
    out_grid = torch.stack([shift_x, shift_y, shift_x, shift_y],
                           dim=1).repeat_interleave(boxes_per_pixel, dim=0)
    print('out_grid: ', out_grid[:10, :])
    print('out_grid shape: ', out_grid.shape)
    # 将每个像素的 anchors 的高宽 和 偏移 相加,构成每个像素的 anchors
    output = out_grid + anchor_manipulations
    return output.unsqueeze(0)
总结
这里对锚框的介绍只是介绍了最常见的生成方法。基本上所有的基于锚框的目标检测方法都是这样的流程。不同的是特征图的尺寸,锚框的高宽比和锚框的高宽。