openpose-GPU版本从安装到实战全攻略!(win10)
前言
必须按照版本执行的:
GPU: 3060
CUDA:10.2
cuDNN:7.6.53
win10
openpose 1.7 V
cmake: 3.15.5
VS2019
python 3.7
如果你使用的cuda版本为11,请务必降级为10.2
10.0也不行,已经试过了,必须10.2
cuDNN也必须是对应版本。
太痛了!!!!!!!!
上述原因主要是openpose不支持cuDNN 8版本,并且每个cuDNN对应的cuda也是固定的,因此我选择降版本来解决这个问题。
一、基本配置
1、github上下载openpose后,解压到自己的目录下,建议不要解压到含有中文路径的地方
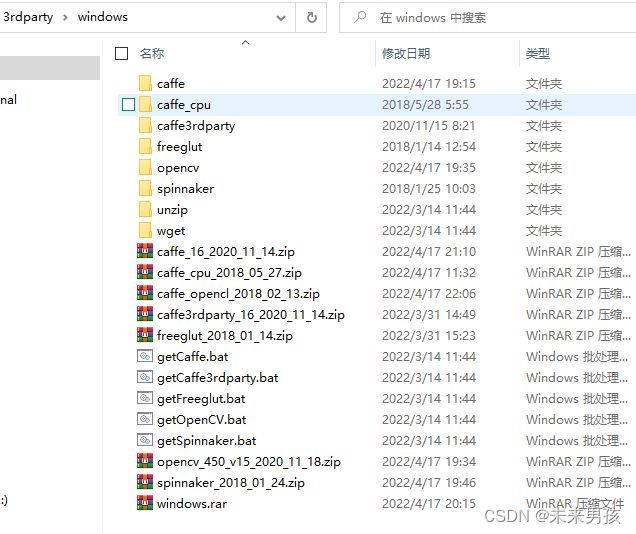
2、首先下载所需文件,打开到openpose-master\3rdparty\windows 下,可以看到五个bat文件

双击后自动下载,或网盘:
caffe等依赖包解压到以下目录\openpose-master\3rdparty\windows
链接:https://pan.baidu.com/s/1sikP3ppFVp14qQzMZn-IQA
提取码:y1i1
pybind11解压到以下目录\openpose-master\3rdparty
链接:https://pan.baidu.com/s/1682rKdIyl22J02HuH-0I6Q
提取码:fb6t
model解压到以下目录\openpose-master\models
链接:https://pan.baidu.com/s/1rXiYqXc7oAUhQwpjX9oXwg
提取码:jgb5
将所有下载的压缩包解压到此目录下
此时所需文件下载完成。
二、CMAKE安装
CMake 官方下载网址: https://cmake.org/download/
或网盘链接:https://pan.baidu.com/s/1G9ShmPPMSKgM10ONDmDXnA
提取码:z1up
解压到自定义文件即可
二、CMAKE配置
1、打开CMAKE-gui


选择自己的路径,如上图所示
2、如果后续想要使用python运行并修改程序,请务必进行以下操作
点击 Add Entry

选择到对应环境的pythonw.exe下就ok了。

3、然后进行configure一次
会出现一片红
选择BUILD_PYTHON (非必须,如果你要用python就选)

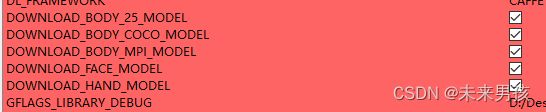
选择以下五个模型(必选)
继续选择
![]()
![]()
注意以下这里,虽然默认打勾,也要记得千万别取消这个钩,不然我们的cuDNN就白下了。(否则会暂用显存)
4、然后再次点击configure
debug直到configure done
然后点击generate,出现generate done即可
三、python运行
然后我们进行python调试
1、打开\openpose-master\build\examples\tutorial_api_python
可以选择pycharm or cmd运行,本文选择pycharm。
2、安装好虚拟环境,直接运行任意01-09的一个py文件。
3、大概率会出现以下报错
```Error: OpenPose library could not be found. Did you enable BUILD_PYTHON in CMake and have this Python script in the right folder?
解决方法
把build/bin里面的全部dll,复制到/build/python/openpose/Release
基本就不会出现这个错了。(还有的话就自行百度吧,只有这个bug我不确定咋解决)
运行基本可以直接成功了。
四、修改python代码读取自己的视频
读取自己的视频呢,参考我修改的以下代码。直接覆盖他自带的其中一个py文件就行

```python
# From Python
# It requires OpenCV installed for Python
import sys
import cv2
import os
from sys import platform
import argparse

try:
    # Import Openpose (Windows/Ubuntu/OSX)
    dir_path = os.path.dirname(os.path.realpath(__file__))
    try:
        # Windows Import
        if platform == "win32":
            # Change these variables to point to the correct folder (Release/x64 etc.)
            sys.path.append(dir_path + '/../../python/openpose/Release');
            os.environ['PATH'] = os.environ['PATH'] + ';' + dir_path + '/../../x64/Release;' + dir_path + '/../../bin;'
            import pyopenpose as op
        else:
            # Change these variables to point to the correct folder (Release/x64 etc.)
            sys.path.append('../../python');
            # If you run `make install` (default path is `/usr/local/python` for Ubuntu), you can also access the OpenPose/python module from there. This will install OpenPose and the python library at your desired installation path. Ensure that this is in your python path in order to use it.
            # sys.path.append('/usr/local/python')
            from openpose import pyopenpose as op
    except ImportError as e:
        print(
            'Error: OpenPose library could not be found. Did you enable `BUILD_PYTHON` in CMake and have this Python script in the right folder?')
        raise e

    # # Flags
    # parser = argparse.ArgumentParser()
    # parser.add_argument("--image_path", default="../../../examples/media/COCO_val2014_000000000192.jpg", help="Process an image. Read all standard formats (jpg, png, bmp, etc.).")
    # args = parser.parse_known_args()

    # Custom Params (refer to include/openpose/flags.hpp for more parameters)
    params = dict()
    params["model_folder"] = "../../../models/"
    params["hand"] = False
    params["number_people_max"] = 1
    params["disable_blending"] = True  # for black background
    # params["display"] = 0

    # # Add others in path?
    # for i in range(0, len(args[1])):
    #     curr_item = args[1][i]
    #     if i != len(args[1]) - 1:
    #         next_item = args[1][i + 1]
    #     else:
    #         next_item = "1"
    #     if "--" in curr_item and "--" in next_item:
    #         key = curr_item.replace('-', '')
    #         if key not in params:  params[key] = "1"
    #     elif "--" in curr_item and "--" not in next_item:
    #         key = curr_item.replace('-', '')
    #         if key not in params: params[key] = next_item

    # Construct it from system arguments
    # op.init_argv(args[1])
    # oppython = op.OpenposePython()

    # Starting OpenPose
    opWrapper = op.WrapperPython()
    opWrapper.configure(params)
    opWrapper.start()

    # Process Image
    datum = op.Datum()
    cap = cv2.VideoCapture("D:\Desktop\Videos/4.mp4") #输入视频
    output_dir = 'D:/Desktop/output/' + '4' + '/' #将处理结果以图片形式保存到指定文件夹

    fps = cap.get(cv2.CAP_PROP_FPS)
    size = (int(cap.get(cv2.CAP_PROP_FRAME_WIDTH)), int(cap.get(cv2.CAP_PROP_FRAME_HEIGHT)))
    framecount = cap.get(cv2.CAP_PROP_FRAME_COUNT)
    print('Total frames in this video: ' + str(framecount))
    #videoWriter = cv2.VideoWriter("op720_2.avi", cv2.VideoWriter_fourcc('D', 'I', 'V', 'X'), fps, size)

    c = 0
    while cap.isOpened():
        hasFrame, frame = cap.read()
        if hasFrame:
            #img_resize = cv2.resize(frame, (640, 360))

            datum.cvInputData = img_resize
            opWrapper.emplaceAndPop(op.VectorDatum([datum]))
            opframe = datum.cvOutputData
            cv2.imshow("main", opframe)
            img = cv2.imwrite(output_dir + str(c) + '.jpg', opframe)

            c = c+1
            #videoWriter.write(opframe)
            if cv2.waitKey(1) & 0xFF == ord('q'):
                break
        else:
            break
    cap.release()
    cv2.destroyAllWindows()

except Exception as e:
    print(e)
    sys.exit(-1)

引用:https://zhuanlan.zhihu.com/p/500875723
五、遇到的报错
CMake Error at CMakeLists.txt:1012 (add_subdirectory):
The source directory

E:/job/2.0/openpose-1.7.0/3rdparty/pybind11

does not contain a CMakeLists.txt file.


CMake Error at python/openpose/CMakeLists.txt:6 (pybind11_add_module):
Unknown CMake command "pybind11_add_module".


CMake Error: The following variables are used in this project, but they are set to NOTFOUND.
Please set them or make sure they are set and tested correctly in the CMake files:
Caffe_LIB_DEBUG
linked by target "openpose" in directory E:/job/2.0/openpose-1.7.0/src/openpose
Caffe_LIB_RELEASE
linked by target "openpose" in directory E:/job/2.0/openpose-1.7.0/src/openpose
Caffe_Proto_LIB_DEBUG
linked by target "openpose" in directory E:/job/2.0/openpose-1.7.0/src/openpose
Caffe_Proto_LIB_RELEASE
linked by target "openpose" in directory E:/job/2.0/openpose-1.7.0/src/openpose
主要是因为克隆openpose-master时丢失文件导致,重新克隆或下载补充文件。
六、报错no module named ‘pyopenpose’
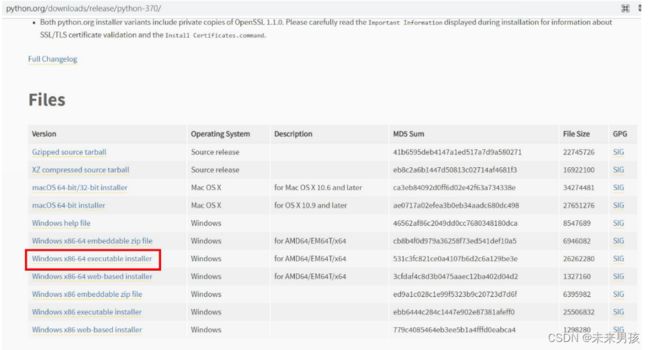
6.1、降级python到 python 3.7.0 。必须是3.7.0版本
官网下载python3.7.0安装或conda虚拟环境中pip install python==3.7.0
6.2、CMAKE重新配置,可以删除之前build也可新建build2


必须选择pythonw.exe,然后进行configure

选择BUILD_PYTHON (必须)

选择以下五个模型(必选)
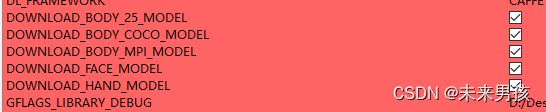
检查是否勾选,没勾选的进行勾选
![]()
![]()
然后进行configure,直到configure done
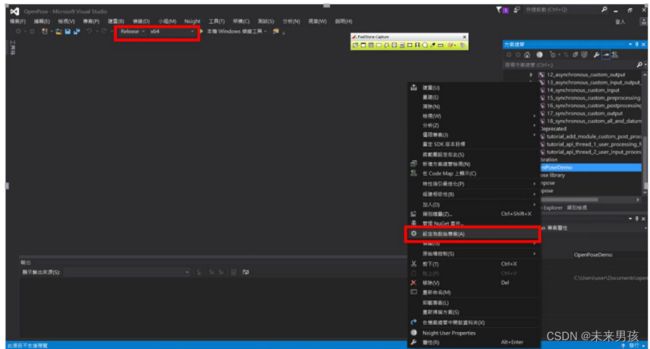
七、vs——方案重建
configure done完成后,点击Generare,configure done完成后,再点击open project

进入vs,将Debug改为release,将openposeDemo设为启动项目
建设方案
完成后在.\openpose-master\build\python\openpose\Release 中生成pyd文件

把build/bin里面的全部dll,复制到/build/python/openpose/Release
之后在pycharm或cmd中选择环境,运行\build\examples\tutorial_api_python中py文件
还会报错如下图:

增加37行代码

再run,成功