OpenCV中边缘检测:Canny算子,Sobel算子,Laplace算子,Scharr滤波
1、基于OpenCV的边缘检测步骤
- 滤波:边缘检测算法主要是基于图像强度的一阶和二阶导数,但是导数对于噪声很敏感,因此需要采用滤波器来改善与噪声有关的边缘检测器的性能。简言之,消除噪声。
- 增强:增强边缘的基础是确定图像各点邻域强度的变化值。增强算法可以将灰度点邻域强度值有显著变化的点凸显出来。简言之,使边界轮廓更加明显。
- 检测:邻域中有很多的点的梯度值较大,但是在特定的应用中,这些点并不是要找的边缘点,需要取舍。简言之,选出边缘点。
2、Canny算子
Canny算子是John F.Canny于1986年开发出来的一个多级边缘检测算法。
void Canny(InputArray image,OutputArray edges,
         double threshold1, double threshold2, int apertureSize=3,bool L2gradient=false )

参数解释:
第一个参数,InputArray类型的image,输入图像,即源图像,填Mat类的对象即可,且需为单通道8位图像。
第二个参数,OutputArray类型的edges,输出的边缘图,需要和源图片有一样的尺寸和类型。
第三个参数,double类型的threshold1,第一个滞后性阈值。
第四个参数,double类型的threshold2,第二个滞后性阈值。
第五个参数,int类型的apertureSize,表示应用Sobel算子的孔径大小,其有默认值3。
第六个参数,bool类型的L2gradient,一个计算图像梯度幅值的标识,有默认值false。
需要注意的是,这个函数阈值1和阈值2两者的小者用于边缘连接,而大者用来控制强边缘的初始段,推荐的高低阈值比在2:1到3:1之间。
#include
#include
#include
using namespace cv;
using namespace std;
int main()
{
Mat img = imread("C:\\Users\\cf\\Desktop\\测试数据\\test00.jpg");
cout << img.size() << endl;
imshow("原图",img);
Mat dst,edge,gray;
//创建与img同类型和大小的矩阵
dst.create(img.size(), img.type());
//转灰度图像
cvtColor(img, gray, COLOR_BGR2GRAY);
//3*3 内核降噪(均值滤波)
blur(gray, edge, Size(3, 3));
//使用canny算子
Canny(edge, edge, 3, 9, 3);
imshow("Canny边缘检测", edge);
//将dst内所有元素清0
dst = Scalar::all(0);
img.copyTo(dst, edge);
imshow("Canny边缘检测效果", dst);
waitKey();
return 0;
} 3、Sobel算子
Sobel算子是一个主要用于边缘检测的离散微分算子(discrete differentiation operator),它结合高斯平滑和微分求导。用来计算图像灰度函数的近似函数。
void Sobel (
 InputArray src,//输入图  OutputArray dst,//输出图
 int ddepth,//输出图像的深度  int dx,  int dy,  int ksize=3,
 double scale=1,  double delta=0,  int borderType=BORDER_DEFAULT );

参数解释:
第一个参数,InputArray 类型的src,为输入图像,填Mat类型即可。
第二个参数,OutputArray类型的dst,即目标图像,函数的输出参数,需要和源图片有一样的尺寸和类型。
第三个参数,int类型的ddepth,输出图像的深度,支持如下src.depth()和ddepth的组合:
若src.depth() = CV_8U, 取ddepth =-1/CV_16S/CV_32F/CV_64F
若src.depth() = CV_16U/CV_16S, 取ddepth =-1/CV_32F/CV_64F
若src.depth() = CV_32F, 取ddepth =-1/CV_32F/CV_64F
若src.depth() = CV_64F, 取ddepth = -1/CV_64F
第四个参数,int类型dx,x 方向上的差分阶数。
第五个参数,int类型dy,y方向上的差分阶数。
第六个参数,int类型ksize,有默认值3,表示Sobel核的大小;必须取1,3,5或7。
第七个参数,double类型的scale,计算导数值时可选的缩放因子,默认值是1,表示默认情况下是没有应用缩放的。我们可以在文档中查阅getDerivKernels的相关介绍,来得到这个参数的更多信息。
第八个参数,double类型的delta,表示在结果存入目标图(第二个参数dst)之前可选的delta值,有默认值0。
第九个参数, int类型的borderType,我们的老朋友了(万年是最后一个参数),边界模式,默认值为BORDER_DEFAULT。这个参数可以在官方文档中borderInterpolate处得到更详细的信息。
#include
#include
#include
using namespace cv;
using namespace std;

int main()
{
	Mat img = imread("C:\\Users\\cf\\Desktop\\测试数据\\test00.jpg");
	cout << img.size() << endl;
	imshow("原图",img);

	Mat grad_x, grad_y;
	Mat abs_grad_x, abs_grad_y, dst;
	//求x方向的梯度
	Sobel(img, grad_x, CV_16S, 1, 0, 3, 1, 1, BORDER_DEFAULT);
	convertScaleAbs(grad_x, abs_grad_x);
	imshow("x方向Sobel", abs_grad_x);

	//求y方向的梯度
	Sobel(img, grad_y, CV_16S, 0, 1, 3, 1, 1, BORDER_DEFAULT);
	convertScaleAbs(grad_y, abs_grad_y);
	imshow("y方向Sobel", abs_grad_y);

	//合并梯度(近似)
	addWeighted(abs_grad_x, 0.5, abs_grad_y, 0.5, 0, dst);
	imshow("整体效果图", dst);
	waitKey();
	return 0;
}
4、Laplacian算子
Laplacian算子是n维欧几里得空间中的一个二阶微分算子。
void Laplacian(InputArray src,OutputArray dst,
                int ddepth, int ksize=1, double scale=1,
                double delta=0, intborderType=BORDER_DEFAULT );
参数解释:
第一个参数,InputArray类型的image,输入图像,即源图像,填Mat类的对象即可,且需为单通道8位图像。
第二个参数,OutputArray类型的edges,输出的边缘图,需要和源图片有一样的尺寸和通道数。
第三个参数,int类型的ddept,目标图像的深度。
第四个参数,int类型的ksize,用于计算二阶导数的滤波器的孔径尺寸,大小必须为正奇数,且有默认值1。
第五个参数,double类型的scale,计算拉普拉斯值的时候可选的比例因子,有默认值1。
第六个参数,double类型的delta,表示在结果存入目标图(第二个参数dst)之前可选的delta值,有默认值0。
第七个参数, int类型的borderType,边界模式,默认值为BORDER_DEFAULT。这个参数可以在官方文档中borderInterpolate()处得到更详细的信息。
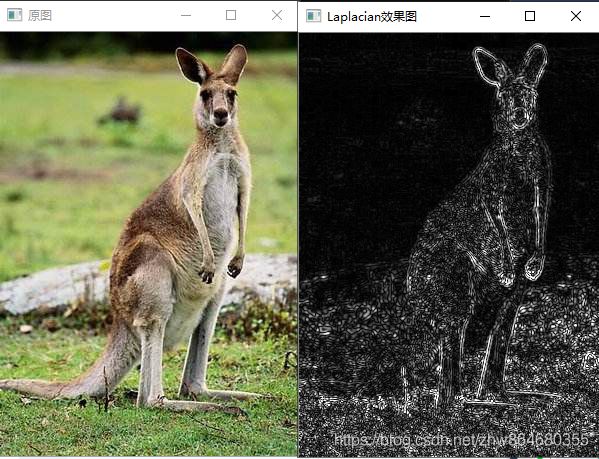
Laplacian( )函数其实主要是利用sobel算子的运算。它通过加上sobel算子运算出的图像x方向和y方向上的导数,来得到我们载入图像的拉普拉斯变换结果。
#include
#include
#include
using namespace cv;
using namespace std;

int main()
{
	Mat img = imread("C:\\Users\\cf\\Desktop\\测试数据\\test00.jpg");
	cout << img.size() << endl;
	imshow("原图",img);

	Mat gray, dst, abs_dst;
	//使用高斯滤波消除噪声
	GaussianBlur(img, img, Size(3, 3), 0, 0, BORDER_DEFAULT);
	//转为灰度图
	cvtColor(img, gray, COLOR_BGR2GRAY);
	//使用Laplace函数
	Laplacian(gray, dst, CV_16S, 3, 1, 0, BORDER_DEFAULT);
	convertScaleAbs(dst, abs_dst);
	imshow("Laplacian效果图", abs_dst);
	waitKey();
	return 0;
}
5、scharr滤波器
scharr一般我就直接称它为滤波器,而不是算子。
void Scharr( InputArray src, OutputArray dst, int ddepth, int dx, int dy,
 double scale=1, double delta=0, intborderType=BORDER_DEFAULT )
参数详解:
第一个参数,InputArray 类型的src,为输入图像,填Mat类型即可。
第二个参数,OutputArray类型的dst,即目标图像,函数的输出参数,需要和源图片有一样的尺寸和类型。
第三个参数,int类型的ddepth,输出图像的深度,支持如下src.depth()和ddepth的组合:
若src.depth() = CV_8U, 取ddepth =-1/CV_16S/CV_32F/CV_64F
若src.depth() = CV_16U/CV_16S, 取ddepth =-1/CV_32F/CV_64F
若src.depth() = CV_32F, 取ddepth =-1/CV_32F/CV_64F
若src.depth() = CV_64F, 取ddepth = -1/CV_64F
第四个参数,int类型dx,x方向上的差分阶数。
第五个参数,int类型dy,y方向上的差分阶数。
第六个参数,double类型的scale,计算导数值时可选的缩放因子,默认值是1,表示默认情况下是没有应用缩放的。我们可以在文档中查阅getDerivKernels的相关介绍,来得到这个参数的更多信息。
第七个参数,double类型的delta,表示在结果存入目标图(第二个参数dst)之前可选的delta值,有默认值0。
第八个参数, int类型的borderType,我们的老朋友了(万年是最后一个参数),边界模式,默认值为BORDER_DEFAULT。这个参数可以在官方文档中borderInterpolate处得到更详细的信息。
#include
#include
#include
using namespace cv;
using namespace std;
int main()
{
Mat img = imread("C:\\Users\\cf\\Desktop\\测试数据\\test00.jpg");
cout << img.size() << endl;
imshow("原图",img);
Mat grad_x, grad_y;
Mat abs_grad_x, abs_grad_y, dst;
//求x方向的梯度
Scharr(img, grad_x, CV_16S, 1, 0, 1, 0, BORDER_DEFAULT);
convertScaleAbs(grad_x, abs_grad_x);
imshow("X方向Scharr", abs_grad_x);
//求y方向的梯度
Scharr(img, grad_y, CV_16S, 0, 1, 1, 0, BORDER_DEFAULT);
convertScaleAbs(grad_y, abs_grad_y);
imshow("Y方向Scharr", abs_grad_y);
//合并梯度
addWeighted(abs_grad_x, 0.5, abs_grad_y, 0.5, 0, dst);
imshow("Scharr效果图", dst);
waitKey();
return 0;
} 6、参考
https://blog.csdn.net/weixin_40647819/article/details/80029858
https://www.cnblogs.com/skyfsm/p/6879265.html
https://blog.csdn.net/huayunhualuo/article/details/81478037

