Pytorch实现表情识别卷积神经网络网络:mini_Xception
论文阅读总结:Real-time Convolutional Neural Networks for Emotion and Gender Classification–O Arriaga
复现代码地址:thgpddl/mini_Xception
首先,论文中没有给出网路结构等细节,使用官方代码中得到了,但是基本上都是常规的卷积、BN、ReLU等层。
1、网络结构
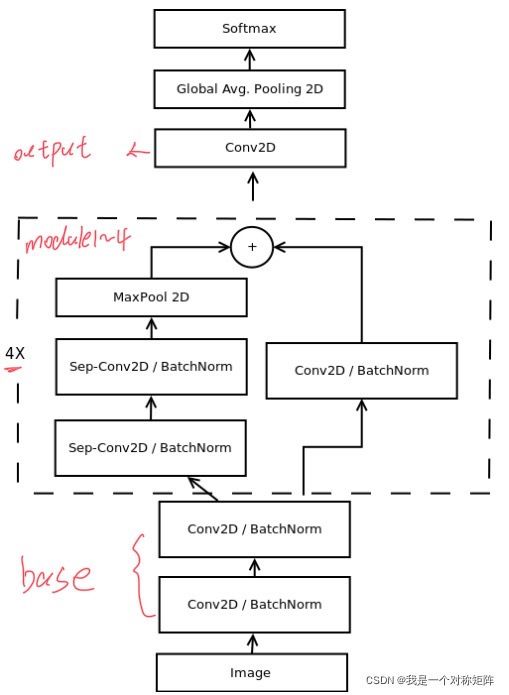
从结构上,主要分成base块,module1~4块、output块(即最后单独的conv操作)、GAP块和softmax块。:
下方展示了base块,module1~4块、output块的结构细节
mini_XCEPTION(
  (base): Sequential(
    (0): Conv2d(1, 8, kernel_size=(3, 3), stride=(1, 1))
    (1): BatchNorm2d(8, eps=1e-05, momentum=0.1, affine=True, track_running_stats=True)
    (2): ReLU()
    (3): Conv2d(8, 8, kernel_size=(3, 3), stride=(1, 1))
    (4): BatchNorm2d(8, eps=1e-05, momentum=0.1, affine=True, track_running_stats=True)
    (5): ReLU()
  )
  (module1): RDWSC(
    (left): Sequential(
      (0): SeparableConv2d(
        (depth_conv): Conv2d(8, 8, kernel_size=(3, 3), stride=(1, 1), padding=(1, 1), groups=8)
        (point_conv): Conv2d(8, 16, kernel_size=(1, 1), stride=(1, 1))
      )
      (1): BatchNorm2d(16, eps=1e-05, momentum=0.1, affine=True, track_running_stats=True)
      (2): ReLU()
      (3): SeparableConv2d(
        (depth_conv): Conv2d(16, 16, kernel_size=(3, 3), stride=(1, 1), padding=(1, 1), groups=16)
        (point_conv): Conv2d(16, 16, kernel_size=(1, 1), stride=(1, 1))
      )
      (4): BatchNorm2d(16, eps=1e-05, momentum=0.1, affine=True, track_running_stats=True)
      (5): MaxPool2d(kernel_size=(3, 3), stride=(2, 2), padding=1, dilation=1, ceil_mode=False)
    )
    (right): Sequential(
      (0): Conv2d(8, 16, kernel_size=(1, 1), stride=(2, 2))
      (1): BatchNorm2d(16, eps=1e-05, momentum=0.1, affine=True, track_running_stats=True)
    )
  )
  (module2): RDWSC(
    (left): Sequential(
      (0): SeparableConv2d(
        (depth_conv): Conv2d(16, 16, kernel_size=(3, 3), stride=(1, 1), padding=(1, 1), groups=16)
        (point_conv): Conv2d(16, 32, kernel_size=(1, 1), stride=(1, 1))
      )
      (1): BatchNorm2d(32, eps=1e-05, momentum=0.1, affine=True, track_running_stats=True)
      (2): ReLU()
      (3): SeparableConv2d(
        (depth_conv): Conv2d(32, 32, kernel_size=(3, 3), stride=(1, 1), padding=(1, 1), groups=32)
        (point_conv): Conv2d(32, 32, kernel_size=(1, 1), stride=(1, 1))
      )
      (4): BatchNorm2d(32, eps=1e-05, momentum=0.1, affine=True, track_running_stats=True)
      (5): MaxPool2d(kernel_size=(3, 3), stride=(2, 2), padding=1, dilation=1, ceil_mode=False)
    )
    (right): Sequential(
      (0): Conv2d(16, 32, kernel_size=(1, 1), stride=(2, 2))
      (1): BatchNorm2d(32, eps=1e-05, momentum=0.1, affine=True, track_running_stats=True)
    )
  )
  (module3): RDWSC(
    (left): Sequential(
      (0): SeparableConv2d(
        (depth_conv): Conv2d(32, 32, kernel_size=(3, 3), stride=(1, 1), padding=(1, 1), groups=32)
        (point_conv): Conv2d(32, 64, kernel_size=(1, 1), stride=(1, 1))
      )
      (1): BatchNorm2d(64, eps=1e-05, momentum=0.1, affine=True, track_running_stats=True)
      (2): ReLU()
      (3): SeparableConv2d(
        (depth_conv): Conv2d(64, 64, kernel_size=(3, 3), stride=(1, 1), padding=(1, 1), groups=64)
        (point_conv): Conv2d(64, 64, kernel_size=(1, 1), stride=(1, 1))
      )
      (4): BatchNorm2d(64, eps=1e-05, momentum=0.1, affine=True, track_running_stats=True)
      (5): MaxPool2d(kernel_size=(3, 3), stride=(2, 2), padding=1, dilation=1, ceil_mode=False)
    )
    (right): Sequential(
      (0): Conv2d(32, 64, kernel_size=(1, 1), stride=(2, 2))
      (1): BatchNorm2d(64, eps=1e-05, momentum=0.1, affine=True, track_running_stats=True)
    )
  )
  (module4): RDWSC(
    (left): Sequential(
      (0): SeparableConv2d(
        (depth_conv): Conv2d(64, 64, kernel_size=(3, 3), stride=(1, 1), padding=(1, 1), groups=64)
        (point_conv): Conv2d(64, 128, kernel_size=(1, 1), stride=(1, 1))
      )
      (1): BatchNorm2d(128, eps=1e-05, momentum=0.1, affine=True, track_running_stats=True)
      (2): ReLU()
      (3): SeparableConv2d(
        (depth_conv): Conv2d(128, 128, kernel_size=(3, 3), stride=(1, 1), padding=(1, 1), groups=128)
        (point_conv): Conv2d(128, 128, kernel_size=(1, 1), stride=(1, 1))
      )
      (4): BatchNorm2d(128, eps=1e-05, momentum=0.1, affine=True, track_running_stats=True)
      (5): MaxPool2d(kernel_size=(3, 3), stride=(2, 2), padding=1, dilation=1, ceil_mode=False)
    )
    (right): Sequential(
      (0): Conv2d(64, 128, kernel_size=(1, 1), stride=(2, 2))
      (1): BatchNorm2d(128, eps=1e-05, momentum=0.1, affine=True, track_running_stats=True)
    )
  )
  (conv): Conv2d(128, 7, kernel_size=(3, 3), stride=(1, 1), padding=(1, 1))
)
GAP块:原理是用一个通道的均值代替整个通道,所以GAP只需要计算每个通道的均值即可,可以用以下操作实现:
# 此时x是output块的输出,shape=[None,7,3,3]
x=x.mean(axis=[-1,-2])
# 此时x是经过GAP后的输出,shape=[None,7],即变成了7维向量
softmax块:softmax是网络最后的操作,但是在代码编写时没有加入该操作,因为本文的Loss使用的是交叉熵损失,他内置了softmax操作,可以移步:paddle:使用CrossEntropyLoss作为loss,训练时loss不下降?,虽然链接中使用的是飞浆框架,但是原理上都一样。
总之,整个结构的构架在这里:mini_Xception/utils/Model.py
2、优化器
优化器使用了Adam,损失使用了交叉熵CrossEntropyLoss
3、数据增强
影响最终精度最显著的就是数据增强了。
先看看官方的数据增强:
data_generator = ImageDataGenerator(
                        featurewise_center=False,
                        featurewise_std_normalization=False,
                        rotation_range=10,	# 随即旋转
                        width_shift_range=0.1,	# 左右平移
                        height_shift_range=0.1,	# 上下平移
                        zoom_range=.1,	# 缩放
                        horizontal_flip=True)	# 水平翻转
3.1、第一次的数据增强
官方代码使用的keras中数据增强的方法在pytorch不全部都有,所以第一次只是用了pytorch中有的数据增强,也即是
self.transform=transforms.Compose([ToTensor(),
                                   ColorJitter(brightness=0.2),	# 亮度增强
                                   RandomRotation(10),	# 随即旋转
                                   RandomHorizontalFlip(0.5)])	# 水平翻转
在该数据增强下,最终测试精度只有62%
3.2、第二次数据增强
第二次自己写了三种数据增强,然后和self.transform串联起来。
self.aug = Augment([Salt_Pepper_Noise(0.05),	# 椒盐噪声
                    Width_Shift_Range(0.1),	 # 左右平移
                    Height_Shift_Range(0.1)])	# 上下平移

self.transform=transforms.Compose([ToTensor(),
                                   ColorJitter(brightness=0.2),
                                   RandomRotation(10),
                                   RandomHorizontalFlip(0.5)])
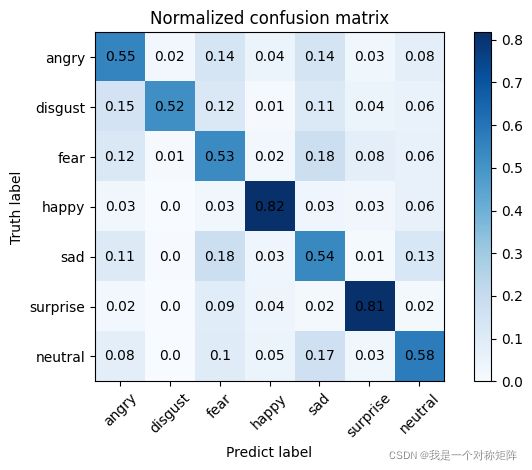
在该数据增强下,在epoch=200时,测试精度达到了0.6481;在epoch=370时,测试精度达到了0.6504

混淆矩阵的画法可以看:动手画混淆矩阵(Confusion Matrix)(含代码)
4、总结
- 在数据增强较少时,训练集精度较高,测试集精度在62%左右,判断是过拟合;增加了数据增强,训练集精度有下降,测试集精度达到了65%左右。
- 在对图像矩阵经行resize时,需要避免的坑是:
- numpy.resize()是直接在边缘填充“0”,
- cv2.resize()则是我们理解的插值进行的resize
所以当我使用numpy.resize()将48*48变形到64*64后作为输入,测试精度只有50%,下滑极大。
使用cv2.resize将48*48变形到64*64后作为输入,与用48*48作为输入最终的测试精度差别不大也在64%~65%之间。
