ONNX笔记
前言
使用pytorch转onnx模型后经常需要做下simplify, 经过simplify后的模型更加简洁,其底层实现原理就是通过读取onnx模型,再将一些需要动态计算的值转换为静态值,从而对模型进行简化。这里顺便就记下onnx的一下操作。
测试代码
import onnx
import io
import torchvision as tv
import torch.nn as nn
import torch

def test():
    with io.BytesIO() as fid:
        m = tv.models.shufflenet_v2_x1_0()
        x = torch.rand((1, 3, 224, 224))
        torch.onnx.export(m, x, fid)
        torch.onnx.export(m, x, 'test.onnx')
        onnx_model = onnx.load_model_from_string(fid.getvalue()) # onnx_model type: 'onnx.onnx_ml_pb2.GraphProto'
        # import ipdb;ipdb.set_trace()
Graph
onnx_model[onnx.onnx_ml_pb2.ModelProto]
     	opset_import
    	ir_version
     	graph[onnx.onnx_ml_pb2.GraphProto]
     			initializer
     			name
     			input[ValueInfo[]]
     			output[ValueInfo[]]
     			node[Node[]]
     			value_info[空]
- graph.input/output
graph.input是一个valueinfo类型的数据, 顾名思义,这是个包含了输入相关的数值信息,如下所示,可以看出m.graph.input保存了输入的图片尺寸[1, 3, 224, 224]
ipdb> m.graph.input
[name: "input.1"
type {
  tensor_type {
    elem_type: 1
    shape {
      dim {
        dim_value: 1
      }
      dim {
        dim_value: 3
      }
      dim {
        dim_value: 224
      }
      dim {
        dim_value: 224
      }
    }
  }
}
]

ipdb> m.graph.output
[name: "1044"
type {
  tensor_type {
    elem_type: 1
    shape {
      dim {
        dim_value: 1
      }
      dim {
        dim_value: 1000
      }
    }
  }
}
]
Node
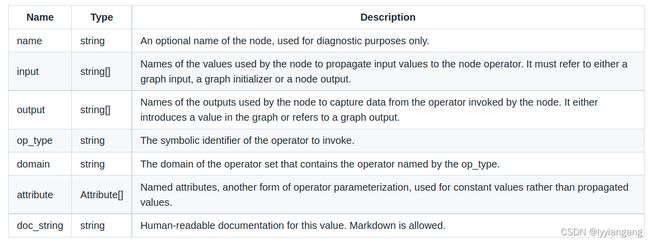
node包含以下属性:
Node
	 attribute[Attribute[]]
	 doc_string
	 domain[string]
	 name[string]
	 op_type[string]
	 input[string[]]
	 output[string[]]
node的input必须是上一个节点的output,或者是graph.input或initializer,
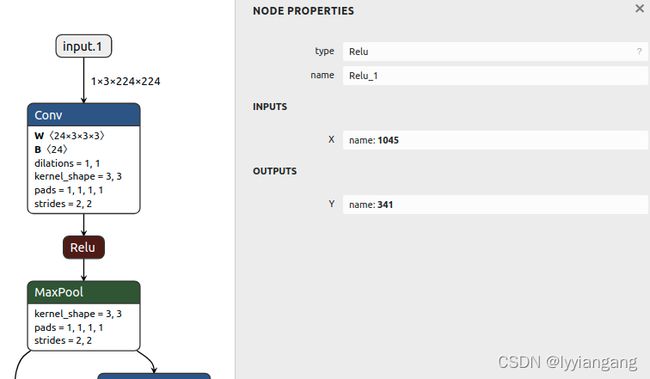
下面打印的第一个节点的input就是graph的input(“input.1”), 第二个节点是第一个节点的output(1045)
ipdb> nn = m.graph.node[0]
ipdb> nn
input: "input.1"
input: "1046"
input: "1047"
output: "1045"
name: "Conv_0"
op_type: "Conv"
attribute {
  name: "dilations"
  ints: 1
  ints: 1
  type: INTS
}
attribute {
  name: "group"
  i: 1
  type: INT
}
attribute {
  name: "kernel_shape"
  ints: 3
  ints: 3
  type: INTS
}
attribute {
  name: "pads"
  ints: 1
  ints: 1
  ints: 1
  ints: 1
  type: INTS
}
attribute {
  name: "strides"
  ints: 2
  ints: 2
  type: INTS
}
## 第二个节点输入是1045,也就是前一个节点的output
ipdb> node[1]
input: "1045"
output: "341"
name: "Relu_1"
op_type: "Relu"

注意input和output是value_info,不会包含在graph.node中。
每个node输出会成为下一个node的输入, node与node之间使用input/output链接。
分割onnx模型
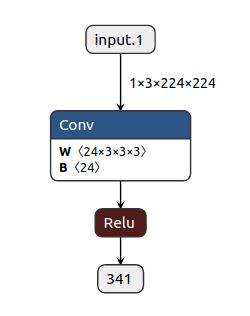
有了上面的基础知识,我们就可以进行onnx模型的分割了。以shufflenet为例,如果我们想在下图中Relu位置将模型截取两段,可以参考下面的代码

def split():
	import onnx
	import io
	import torchvision as tv
    with io.BytesIO() as fid:
        m = tv.models.shufflenet_v2_x1_0()
        x = torch.rand((1, 3, 224, 224))
        torch.onnx.export(m, x, fid)
        onnx_model = onnx.load_model_from_string(fid.getvalue()) # onnx_model type: 'onnx.onnx_ml_pb2.GraphProto'
        del onnx_model.graph.node[2:]
        del onnx_model.graph.output[:]
        onnx_model.graph.output.extend([onnx.ValueInfoProto(name=onnx_model.graph.node[1].output[0])])
        onnx.save(onnx_model, 'split.onnx')
参考链接:
https://github.com/onnx/onnx/blob/main/docs/IR.md

