立体匹配 -- GC-Net网络结构分析
- 参考 GC-Net pytorch版本
一.Unary Features 特征提取
1.使用2-D卷积提取深度特征。首先使用fiter size:5*5,stride:2的conv2d 将输入降维(1/2H,1/2W).
 imgl0=F.relu(self.bn0(self.conv0(imgLeft)))
 imgr0=F.relu(self.bn0(self.conv0(imgRight)))
self.conv0=nn.Conv2d(3,32,5,2,2)
self.bn0=nn.BatchNorm2d(32)
- 注意到这里 num_block[0] ,这里的取值是8 代表八层残差,变量定义在下面
self.res_block=self._make_layer(block,self.in_planes,32,num_block[0],stride=1)
 def _make_layer(self,block,in_planes,planes,num_block,stride):
        strides=[stride]+[1]*(num_block-1)
        layers=[]
        for step in strides:
            layers.append(block(in_planes,planes,step))
        return nn.Sequential(*layers)
- 注意到这个’num_block’参数,是一个数组 [8,1],
- 这个for循环需要注意一下,因为残差结构穿进去的num_block=8,所以这里strides=[[1],[1],[1],[1],[1],[1],[1],[1]],step每次取值都是,所以传到block中的步长stride=1
def GcNet(height,width,maxdisp):
    return GC_NET(BasicBlock,ThreeDConv,[8,1],height,width,maxdisp)
- 下面详细剖析8层残差的代码细节
- 残差结构有两层conv(input=32,output=32,kernel_size=3,stride=1,padding=1)组成,一共八层。这个残差层的主要作用就是提取 左右图像的‘unary features’
class BasicBlock(nn.Module):  #basic block for Conv2d
    def __init__(self,in_planes,planes,stride=1):
        super(BasicBlock,self).__init__()
        self.conv1=nn.Conv2d(in_planes,planes,kernel_size=3,stride=stride,padding=1)
        self.bn1=nn.BatchNorm2d(planes)
        self.conv2=nn.Conv2d(planes,planes,kernel_size=3,stride=1,padding=1)
        self.bn2=nn.BatchNorm2d(planes)
        self.shortcut=nn.Sequential()
    def forward(self, x):
        out=F.relu(self.bn1(self.conv1(x)))
        out=self.bn2(self.conv2(out))
        out+=self.shortcut(x)
        out=F.relu(out)
        return out
- 最后通过一层(no RELU,no BN)的卷积。该层的作用我没懂,大概就是扩大感受野?
self.conv1=nn.Conv2d(32,32,3,1,1)
二.形成cost volume
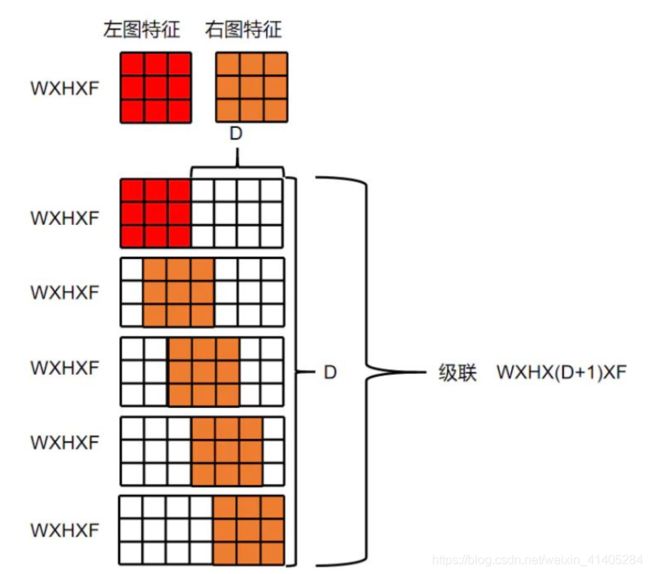
- 通过残差层形成的 ‘unary features’,通过列拼接(w为什么是列拼接,请看我PSMNet的打印结果),形成(1,64,96,1/2H,1/2W)尺寸的 代价体。这个我是参考PSMNet的输出估计的,代码我没跑,要配置环境,主要是理解思想。
 def cost_volume(self,imgl,imgr):
        B, C, H, W = imgl.size()
        cost_vol = torch.zeros(B, C * 2, self.maxdisp , H, W).type_as(imgl)
        for i in range(self.maxdisp):
            if i > 0:
                cost_vol[:, :C, i, :, i:] = imgl[:, :, :, i:]
                cost_vol[:, C:, i, :, i:] = imgr[:, :, :, :-i]
            else:
                cost_vol[:, :C, i, :, :] = imgl
                cost_vol[:, C:, i, :, :] = imgr
        return cost_vol
cost_volum = self.cost_volume(imgl1, imgr1)
- 通过这种拼接的方式,保留了特征维度和 -
unary features,这样网络可以学习到absolute representation,并可以结合 context .用这种拼接的方式优于距离度量函数(L1,L2,cosine) - 下面这个对cost volum形成的解释很形象:
(对于某一个特征,匹配代价卷就是一个三维的方块,第一层是视差为0时的特征图,第二层是视差为1时的特征图,以此类推共有最大视差+1层,长和宽分别是特征图的尺寸,假设一共提取了10个特征,则有10个这样的三维方块)

三. 3D卷积下采样(encoder)
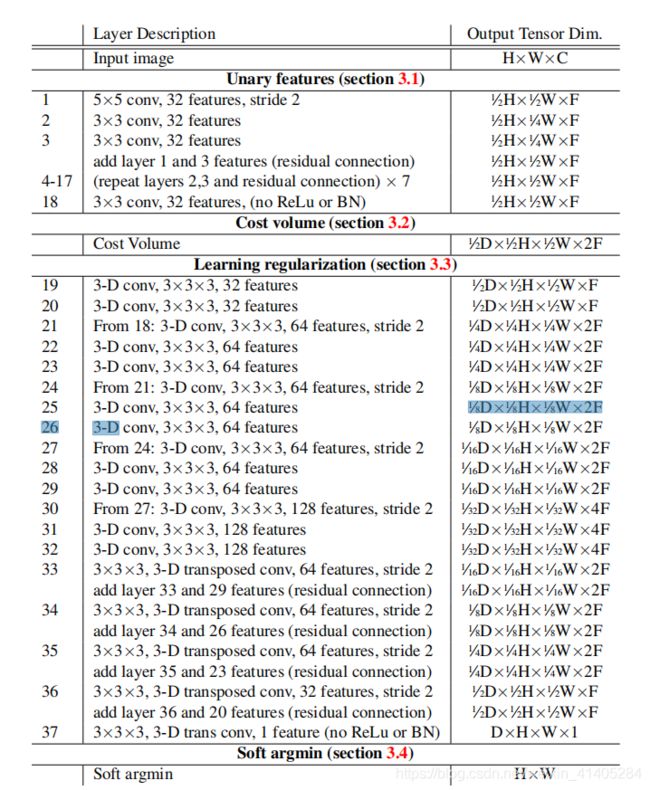
1.合并的’cost volume’ feature size=64,通过两层conv3d把feature size降到32.
        self.conv3d_1 = nn.Conv3d(64, 32, 3, 1, 1)
        self.bn3d_1 = nn.BatchNorm3d(32)
        self.conv3d_2 = nn.Conv3d(32, 32, 3, 1, 1)
        self.bn3d_2 = nn.BatchNorm3d(32)
2.第一个 sub-sampled layer,使1/2变成1/4.
self.block_3d_1 = self._make_layer(block_3d, 64, 64, num_block[1], stride=2)
- 这时num_block[1]=1。运行 3D卷积模块,其中stride=2用于下采样。
class ThreeDConv(nn.Module):
    def __init__(self,in_planes,planes,stride=1):
        super(ThreeDConv, self).__init__()
        self.conv1 = nn.Conv3d(in_planes, planes, kernel_size=3, stride=stride, padding=1)
        self.bn1 = nn.BatchNorm3d(planes)
        self.conv2 = nn.Conv3d(planes, planes, kernel_size=3, stride=1, padding=1)
        self.bn2 = nn.BatchNorm3d(planes)
        self.conv3=nn.Conv3d(planes,planes,kernel_size=3,stride=1,padding=1)
        self.bn3=nn.BatchNorm3d(planes)

    def forward(self, x):
        out=F.relu(self.bn1(self.conv1(x)))
        out=F.relu(self.bn2(self.conv2(out)))
        out=F.relu(self.bn3(self.conv3(out)))
        return out
![]()
- 原文中的描述是,下采样层后面跟两层stirde=2的conv3d()。与代码作者沟通,第二层的kernel_size=1,只起到了改变通道的作用。
 self.conv3d_3 = nn.Conv3d(64, 64, 3, 2, 1)
        self.bn3d_3 = nn.BatchNorm3d(64)
3.第二、第三个下采样层类似,直接说第四个下采样层。
- 注意到这个 该层的输出通道变为128.
self.block_3d_4 = self._make_layer(block_3d, 64, 128, num_block[1], stride=2)
四.上采样(decoder)
1.原文的描述是,下采样提高速度和增大感受野的同时,也使细节丢失。作者使用残差层,将高分辨率的特征图与下采样层级联。高分辨率的图像使用转置卷积nn.ConvTranspose3d()得到,下面看一下残差结构如何形成。
- 转置卷积:注意到将feature size变为2F=64
      # deconv3d
        self.deconv1 = nn.ConvTranspose3d(128, 64, 3, 2, 1, 1)
        self.debn1 = nn.BatchNorm3d(64)
- 直接对下采样的结果进行up-sample 会丢失很多特征,与高分辨率的下采样层输出级联,弥补丢失的细节。有四层上采样和四个残差结构不一一描述。
deconv3d = F.relu(self.debn1(self.deconv1(conv3d_block_4)) + conv3d_block_3)
- 最后一层上采样输出

2.最后在加一层 输出通道为’1’的转置卷积,将‘cost volum’压缩到一层初始视差图,还原尺寸(1DHW),注意到第一层55的conv2d的输出是(1/2H,1/2W),这里恢复原图的size
original_size = [1, self.maxdisp*2, imgLeft.size(2), imgLeft.size(3)]
- 这里补一下view()的语法
  self.deconv5 = nn.ConvTranspose3d(32, 1, 3, 2, 1, 1)
  out = deconv3d.view( original_size)
五.视差回归
- 对于这种匹配代价卷,我们可以通过在视差维度上采用sof t argmin操作来估算视差值,函数有两个特点:
- 可微分,可以使用optimizer进行梯度计算
- 可回归,loss作用可以传递
prob = F.softmax(-out, 1)
- 视差回归
disp1 = self.regression(prob)
六.优化器和loss
    criterion = SmoothL1Loss().to(device)
    optimizer = optim.Adam(model.parameters(), lr=0.001)


