aws sdk 学习和使用aws-sdk-go
- https://www.go-on-aws.com/infrastructure-as-go/cdk-go/
- sdk example,https://github.com/awsdocs/aws-doc-sdk-examples
golang的安装,使用1.15之后默认开启GO15VENDOREXPERIMENT的版本
yum install golang -y
go env -w GOPROXY=https://goproxy.cn,direct
参考在vscode中安装 go tools
go get github.com/cweill/gotests/[email protected]
go get github.com/fatih/[email protected]
go get github.com/josharian/[email protected]
go get github.com/haya14busa/goplay/cmd/[email protected]
go get github.com/go-delve/delve/cmd/dlv@latest
go get honnef.co/go/tools/cmd/staticcheck@latest
go get golang.org/x/tools/gopls@latest
go get github.com/ramya-rao-a/[email protected]
go get golang.org/x/tools/cmd/goimports@latest
aws go sdk分为v1和v2版本(go > 1.5),v2中将不同服务打包成不同的模块减少不必要的依赖,配置上提供单一的config入口。但感觉还是v1的api reference 示例较多
aws-sdk-go
-
doc,https://docs.aws.amazon.com/zh_cn/sdk-for-go/v1/developer-guide/welcome.html
-
sdk,https://docs.aws.amazon.com/zh_cn/sdk-for-go/api/index.html
-
github,https://github.com/aws/aws-sdk-go
-
example,https://github.com/aws/aws-sdk-go
aws-sdk-go-v2
-
迁移指南,https://aws.github.io/aws-sdk-go-v2/docs/migrating/
-
doc,https://aws.github.io/aws-sdk-go-v2/docs/
-
sdk,https://pkg.go.dev/github.com/aws/aws-sdk-go-v2
新建路径并初始化
mkdir gosdk && cd gosdk
go mod init gosdk
安装和更新sdk
go get github.com/aws/aws-sdk-go
go get -u github.com/aws/aws-sdk-go
创建main文件测试helloworld,安装上面的插件之后会自动补全,调格式和导包
$ cat main.go
package main

import (
	"fmt"
)

func main() {
	fmt.Println("hello world")
}
$ go run main.go
hello world
配置sdk
aws-go-sdk使用指定的area和profile凭证,创建会话向aws发送请求
// sess := session.Must(session.NewSessionWithOptions(session.Options{
	// 	SharedConfigState: session.SharedConfigEnable,
	// }))
//sess, err := session.NewSessionWithOptions(session.Options{
	//Config: aws.Config{Region: aws.String("cn-north-1")},
	//Profile: "cdk",
	//})
sess := session.Must(session.NewSession(&aws.Config{
	Region:      aws.String("cn-north-1"),
	Credentials: credentials.NewSharedCredentials("", "cdk"),
}))
get-caller-identity,获取当前凭证
svc := sts.New(sess)
// 开启http请求的log日志
svc := sts.New(sess, aws.NewConfig().WithLogLevel(aws.LogDebugWithHTTPBody))
input := &sts.GetCallerIdentityInput{}
result, err := svc.GetCallerIdentity(input)
fmt.Println(result)
使用aws service的基本逻辑,即通过会话构造器创建client实例,通过该client对每个服务级别api进行调用即可,包括上面的sts
sess, err := session.NewSession()
if err != nil {
    fmt.Println("Error creating session ", err)
    return
}
svc := s3.New(sess, aws.NewConfig().WithLogLevel(aws.LogDebugWithHTTPBody))
output, err := svc.ListBuckets(&s3.ListBucketsInput{})
if err != nil {
    log.Println(err)
}
for _, bucket := range output.Buckets {
    fmt.Println(*bucket.Name)
}

output:
2022/11/26 06:28:35 DEBUG: Request s3/ListBuckets Details:
---[ REQUEST POST-SIGN ]-----------------------------
GET / HTTP/1.1
Host: s3.cn-north-1.amazonaws.com.cn
User-Agent: aws-sdk-go/1.44.145 (go1.18.6; linux; amd64)
Authorization: AWS4-HMAC-SHA256 Credential=AKIAQRxxxxxxxxxxxxxVIBC5T4/20221126/cn-north-1/s3/aws4_request, SignedHeaders=host;x-amz-content-sha256;x-amz-date, Signature=a3d4xxxxxxxxxxxxxxxxxxxxxxb1bbf9339ceef6acc755
X-Amz-Content-Sha256: e3b0c44298fc1c14xxxxxxxxxxxxxxxxxxxxxxxxxxx934ca495991b7852b855
X-Amz-Date: 20221126T062835Z
Accept-Encoding: gzip

-----------------------------------------------------
2022/11/26 06:28:35 DEBUG: Response s3/ListBuckets Details:
---[ RESPONSE ]--------------------------------------
HTTP/1.1 200 OK
Transfer-Encoding: chunked
Content-Type: application/xml
Date: Sat, 26 Nov 2022 06:28:36 GMT
Server: AmazonS3
X-Amz-Id-2: MjHs9TGj/FyvPdxxxxxxxxxxxxxxL+I3mIMSee5ihkuP/7Y=
X-Amz-Request-Id: JNZQxxxxxxxxxXBH
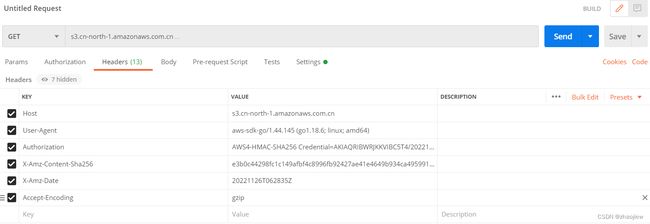
以上实际上就是向aws api发送https请求,将请求头复制到postman中测试一样可以拿到结果
When you call a service operation, the SDK synchronously validates the input, builds the request, signs it with your credentials, sends it to AWS, and then gets a response or an error
所以进一步可以在请i去中加入自定义请求头
svc.Handlers.Send.PushFront(func(r *request.Request) {
    r.HTTPRequest.Header.Set("CustomHeader", fmt.Sprintf("%d", 10))
})
扫了一眼官方example,感觉要和服务结合起来写项目才能更进一步,后续再补充吧
