PyTorch深度学习入门笔记(六)神经网络大学习
神经网络的基本骨架 nn.Module的使用
torch.nn.简介
搭建神经网络常用的工具在 torch.nn 模块。官网:https://pytorch.org/docs/stable/nn.html

Containers中文翻译为容器,但这里可以理解为骨架,往这个骨架中添加一些内容就可以构成一个神经网络
Convolution Layers
Pooling Layers
Paading Layers
都是要添加进网络的各层。
其中,torch,nn.Module 神经网络所有模块的基类

链接: torch,nn.Module.
官方实例代码:
import torch.nn as nn
import torch.nn.functional as F

class Model(nn.Module):
    def __init__(self):
        super(Model, self).__init__()
        self.conv1 = nn.Conv2d(1, 20, 5)
        self.conv2 = nn.Conv2d(20, 20, 5)

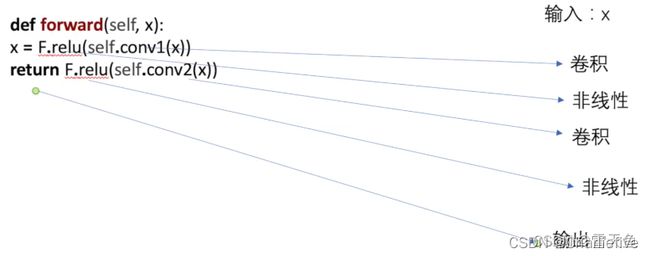
    def forward(self, x):
        x = F.relu(self.conv1(x))
        return F.relu(self.conv2(x))
第三行定义的 Model 就是所要搭建的网络,继承了 nn.Module 类
定义了 forward 函数
神经网络前向传播,就是将数据输入到网络,通过前向传播,输出处理后的数据

在官网示例代码中:
def forward(self, x):
        x = F.relu(self.conv1(x))
        return F.relu(self.conv2(x))
forward 对输入数据 x先进行卷积+非线性处理,再对前一步处理所得到的结果再进行一次卷积+非线性处理。

简单示例
# Kyrie Irving
# !/9462...
from torch import nn
import torch

class Tudui(nn.Module):

    def forward(self, input):
        output = input + 1
        return output

    def __init__(self):
        super().__init__()

tudui = Tudui()
x = torch.tensor(1.0)
out = tudui(x)
print(out)
输出
E:\StudyTools\Anaconda3\envs\pytorch\python.exe E:/CodeCodeCodeCode/AI/Pytorch-study/src/nn_moudle.py
tensor(2.)

Process finished with exit code 0
卷积操作
Pytorch的 nn模块有 Convolution Layers,有3种卷积操作,nn.Conv1d、nn.Conv2d、nn.Conv3d分别对应一维二维以及三维:

注:在Pytorch 官网文档左侧,有 torch.nn和 torch.nn.fuctional,torch.nn 是对 torch.nn.fuctional进行了一个封装,方便用户使用。想细致的了解一些nn模块中的函数可以从 torch.nn.fuctional 入手。
这里主要介绍 nn.Conv2d:
打开 torch.nn.fuctional 对应页面,可以看到对 conv2d 函数的介绍

conv2d 需要的参数有 输入 input、权重 weight(更专业的名称是卷积核)、偏置 bias、步长 stride等。
举例:
左侧是输入图像,中间是卷积核,步长为1时,输出为最右侧的3*3的结果。
# Kyrie Irving
# !/9462...
import torch
import torch.nn.functional as F

input = torch.tensor([[1,2,0,3,1],
                      [0,1,2,3,1],
                      [1,2,1,0,0],
                      [5,2,3,1,1],
                      [2,1,0,1,1]], dtype=torch.float)

kernel = torch.tensor([[1,2,1],
                      [0,1,0],
                      [2,1,0]], dtype=torch.float)
print(input.shape)
print(kernel.shape)

# (1, 1, 5, 5) batch-size=1 1个通道 尺寸5*5
input = torch.reshape(input, (1, 1, 5, 5))
kernel = torch.reshape(kernel, (1, 1, 3, 3))

print(input.shape)
print(kernel.shape)

# 步长 stride = 1
output = F.conv2d(input, kernel, stride=1)
print(output)
输出
E:\StudyTools\Anaconda3\envs\pytorch\python.exe E:/CodeCodeCodeCode/AI/Pytorch-study/src/nn_conv.py
torch.Size([5, 5])#原始尺寸
torch.Size([3, 3])
torch.Size([1, 1, 5, 5])
torch.Size([1, 1, 3, 3])
tensor([[[[10., 12., 12.],
          [18., 16., 16.],
          [13.,  9.,  3.]]]])#计算结果

Process finished with exit code 0
与之前我们计算的结果一致。
这里需要注意是nn.fuctional.conv2d函数的对参数的shape有要求,shape中有四个参数,分别为 Size,Channel,Height,Width。可以用 torch.reshape 函数来进行 shape的设置。
padding是填充的意思,即在输入的四周进行填充,默认是0,不进行填充。
还是用上面的代码,不过将padding设置为1:
# 步长 stride = 1
output2 = F.conv2d(input, kernel, stride=2)
print(output2)
结果
tensor([[[[10., 12.],
          [13.,  3.]]]])
# 四周填充1个单位 默认是0
output2 = F.conv2d(input, kernel, stride=1, padding=1)
print(output2)
结果
tensor([[[[ 1.,  3.,  4., 10.,  8.],
          [ 5., 10., 12., 12.,  6.],
          [ 7., 18., 16., 16.,  8.],
          [11., 13.,  9.,  3.,  4.],
          [14., 13.,  9.,  7.,  4.]]]])
神经网络卷积层
torch.nn.Conv2d简介
打开官网文件中 torch.nn.Conv2d小节

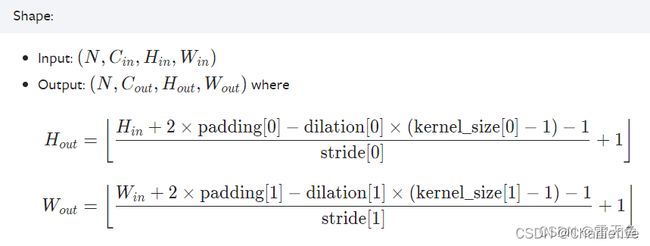
可以看到此函数所需的一些参数,常用的就是前五个参数,具体介绍如下图所示:

彩色图片一般为 RGB格式,一个像素点有RGB三个参数,所以channels为 3。
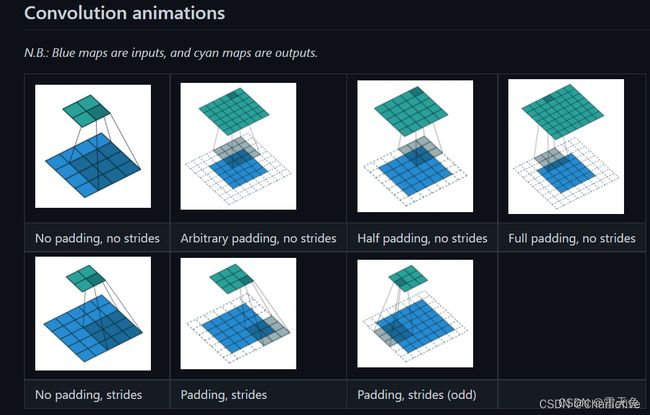
官方提供了一个卷积操作的动态示意图:

有加 padding的,有加strides的
- kernel_size是用来设置卷积核的大小的,可以是 int 或者 tuple 数据类型,例如设置为3时,卷积核的大小为3*3,。在实际训练过程中,网络会对卷积核不断进行调整。
- out-channels 是输出图像的通道数,当输入图片通道数是n时,会使用 n 通道的卷积核来对输入图像进行卷积,若只有一个n 通道卷积核,则会生成通道数为1的输出,若有 m 个 n 通道卷积核,则输出结果的通道数为 m。
代码演示
调用方法参数注解都写在代码里了
# Kyrie Irving
# !/9462...
from torch import nn
from torch.nn import Conv2d
from torch.utils.data import DataLoader
from torch.utils.tensorboard import SummaryWriter

import torch
import torchvision

dataset = torchvision.datasets.CIFAR10("../dataset", train=False, transform=torchvision.transforms.ToTensor(), download=True)

dataLoader = DataLoader(dataset, batch_size=64)

class Net(nn.Module):
    def __init__(self):
        super().__init__()
        self.conv1 = Conv2d(in_channels=3, out_channels=6, kernel_size=3, stride=1, padding=0)

    def forward(self, input):
        x = self.conv1(input)
        return x

net = Net()
print(net)

writer = SummaryWriter("../logs")
step = 0
for data in dataLoader:
    imgs, targets = data
    output = net(imgs)
    # 通道从 3->6 32-3(内核维度)+1=30
    # print(imgs.shape) # torch.Size([64, 3, 32, 32])
    # print(output.shape) # torch.Size([64, 6, 30, 30])

    writer.add_images("input", imgs, step)
    # (-1, 3, 30, 30) batch-size不知道多少时候弄成-1 会根据后边的值进行计算 通道改为3 不然会报错
    output = torch.reshape(output, (-1, 3, 30, 30))
    writer.add_images("output", output, step)
    step = step + 1
输出
E:\StudyTools\Anaconda3\envs\pytorch\python.exe E:/CodeCodeCodeCode/AI/Pytorch-study/src/nn_conv2d.py
Files already downloaded and verified
Net(
  (conv1): Conv2d(3, 6, kernel_size=(3, 3), stride=(1, 1))
)

Process finished with exit code 0

(pytorch) E:\CodeCodeCodeCode\AI\Pytorch-study>tensorboard --logdir="logs/"
TensorFlow installation not found - running with reduced feature set.
Serving TensorBoard on localhost; to expose to the network, use a proxy or pass --bind_all
TensorBoard 2.7.0 at http://localhost:6006/ (Press CTRL+C to quit)
VGG16 CNN Model简介
接下来看下 Vgg16 这个CNN模型

224*224*3的输入图像第一次和第二次操作,都卷积成了224*224*64的结果,输出通道是64,尺寸不变,说明进行的padding,padding大小可以通过公式逆推:
1. 要么内核尺寸是1
2. 要么说明进行的padding,padding大小可以通过公式逆推:


