ubuntu16安装colmap的问题及解决方案
最近想入门一下三维重建,看了一些三维重建的论文,还是想从SFM入手。先了解一下SFM里面经典的colmap(论文:Structure-from-Motion Revisited),看论文难以深入理解,所以打算看看源码,也是为了完成一个小小礼物。
电脑的配置
ubuntu16.04
NVIDIA Driver Version: 440.82
CUDA Version: 10.2
这里CUDA的版本对最终的编译影响应该不大。
安装步骤
官方文档
1、 安装一些依赖项目
sudo apt-get install \
    git \
    cmake \
    build-essential \
    libboost-program-options-dev \
    libboost-filesystem-dev \
    libboost-graph-dev \
    libboost-system-dev \
    libboost-test-dev \
    libeigen3-dev \
    libsuitesparse-dev \
    libfreeimage-dev \
    libmetis-dev \
    libgoogle-glog-dev \
    libgflags-dev \
    libglew-dev \
    qtbase5-dev \
    libqt5opengl5-dev \
    libcgal-dev
安装CGAL Qt5的依赖(这部分后面也没有体现出问题)
sudo apt-get install libcgal-qt5-dev
这一步一般不会出现什么问题,但是博主在安装这一步的时候出现无法安装,出现 libboost-all-dev 报错,未满足依赖关系错误。这一部的解决方法参考:https://blog.csdn.net/otter1010/article/details/105431417
另外检查一下“软件和更新”——》“其他软件”里面,把不需要的取消勾选。
2、安装 Ceres Solver
安装cere不参考官方给出的文档,参考及官方的网站打不开,从github上下载,安装过程参考:https://blog.csdn.net/qq_32320399/article/details/79838609,推荐安装ceres-solver-1.14.0版本
- 安装依赖
$ sudo apt-get install cmake
# google-glog + gflags
$ sudo apt-get install libgoogle-glog-dev
# BLAS & LAPAC
$ sudo apt-get install libatlas-base-dev
# Eigen3
$ sudo apt-get install libeigen3-dev
- 下载cere-solver1.14
  git clone https://github.com/ceres-solver/ceres-solver
  #如果这里下载不下来,可以去找网上的压缩包,解压后也是一样的
- 安装
cd cere-solver-1.14.0 #这里cd到解压后的文件夹下
mkdir ceres-bin && cd ceres-bin
cmake ..
make -j8 # -j4 看自己电脑的CPU性能(无所谓,快慢问题)
make install
安装cere-solver过程中我没有碰到问题,应该问题不大,有问题百度应该都可以解决。
3、安装colmap
这部分是压轴重戏,我这里先给出正常的流畅的安装步骤(大部分人的安装应该都不太正常)。
- 下载colmap
git clone https://github.com/colmap/colmap
这两年上github老是出现网络问题,这里下载不下来就多下几次,实在不行就去网上找一下压缩包。
- 编译colmap
cd colmap
git checkout dev #这个不知道做什么的,不用貌似也没问题
mkdir build
cd build
cmake .. # 直到这一步我都还没有出现什么问题
make -j8 #这一步我出现很多问题,后面会重点列出我遇到的问题和解决方案
sudo make install
如果到这一步都没出现问题,那基本就已经安装成功啦,不知道是否真的有人一番风顺(…)。
- 运行colmap
colmap gui
至此colmap就安装完成啦,可以去学习colmap的源代码啦。走到这一步花了我好几天的心血,下面我分享一下我碰到的问题以及解决方法供大家参考。
4、 遇到的问题以及解决方案
4.1 第一个问题(出现的问题不分先后)
error: #error This file requires compiler and library support for the ISO C++ 2011 standard. This support must be enabled with the -std=c++11 or -std=gnu++11 compiler options
error: #error This file requires compiler and library support for the ISO C++ 2011 standard. This support must be enabled with the -std=c++11 or -std=gnu++11 compiler options.
error: ‘shuffle’ is not a member of ‘std’ std::shuffle(vals_.begin(), vals_.end(), std::default_random_engine())
error: ‘default_random_engine’ is not a member of ‘std’
         std::shuffle(vals_.begin(), vals_.end(), std::default_random_engine());
解决方法:
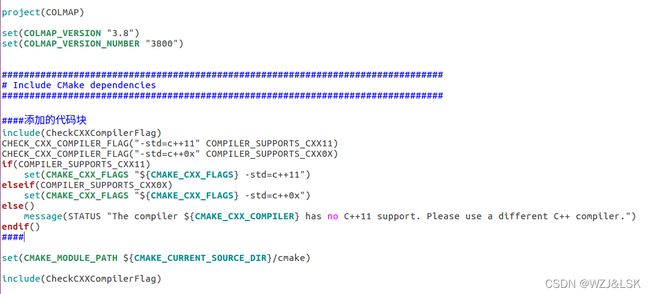
在colmap最外面的CMakeLists.txt文件重添加如下代码(参考:https://blog.csdn.net/lirpa140991/article/details/122798305),具体位置如下:
include(CheckCXXCompilerFlag)
CHECK_CXX_COMPILER_FLAG("-std=c++11" COMPILER_SUPPORTS_CXX11)
CHECK_CXX_COMPILER_FLAG("-std=c++0x" COMPILER_SUPPORTS_CXX0X)
if(COMPILER_SUPPORTS_CXX11)
    set(CMAKE_CXX_FLAGS "${CMAKE_CXX_FLAGS} -std=c++11")
elseif(COMPILER_SUPPORTS_CXX0X)
    set(CMAKE_CXX_FLAGS "${CMAKE_CXX_FLAGS} -std=c++0x")
else()
    message(STATUS "The compiler ${CMAKE_CXX_COMPILER} has no C++11 support. Please use a different C++ compiler.")
endif()
4.2 第二个问题
error: ‘isfinite’ was not declared in this scope
In member function ‘void pba::SparseBundleCU::DebugProjections()’:
colmap/lib/PBA/SparseBundleCU.cpp:933:22: error: ‘isfinite’ was not declared in this scope
    if (!isfinite(dx1) || !isfinite(dy1))
解决方法:
(参考:https://blog.csdn.net/lirpa140991/article/details/122798305)
将/home/xxx/xxx/colmap/lib/PBA/SparseBundleCU.cpp中的isfinite替换成std::isfinite,
代码节选:

4.3 第三个问题
在make过程中出现:error: unable to find numeric literal operator ‘operator""Q’,出现这个问题可能是gcc版本问题。
解决方法:
这个问题在其中一台电脑上没有出现,另外一台出现了,有点玄学,也写下解决方案(参考:https://www.jianshu.com/p/3cad27ca67eb)(仅仅作参考)
查看自己的gcc 和 g++版本:
gcc --version  #我的gcc是5.4.0
g++ --version
将gcc和g++更换到7版本
sudo apt install gcc-6
sudo apt install g++-6
删除之前的gcc和g++的软链接,并建立新的链接到gcc-7
cd /usr/bin
sudo rm gcc #删除gcc链接
sudo ln -s gcc-7 gcc
# 对g++进行同样操作
sudo rm g++
sudo ln -s g++-6 g++
再查看两者版本,有可能出现版本号没变化的情况,但实际上可能已经链接到gcc-7了,这里具体原因我也不太清楚,等待解答。
4.4 第四个问题
undefined reference to `TIFFReadEncodedStrip@LIBTIFF_4.0’
 undefined reference to `TIFFReadEncodedStrip@LIBTIFF_4.0`
 undefined reference to `TIFFReadEXIFDirectory@LIBTIFF_4.0`
 undefined reference to `TIFFFieldReadCount@LIBTIFF_4.0`
 undefined reference to `TIFFSetTagExtender@LIBTIFF_4.0`
 undefined reference to `TIFFCurrentDirectory@LIBTIFF_4.0`
 undefined reference to `TIFFReadTile@LIBTIFF_4.0`
 undefined reference to `TIFFSetDirectory@LIBTIFF_4.0`
 undefined reference to `TIFFClientOpen@LIBTIFF_4.0`
解决方案:
这个问题出现的原因应该是事先安装了anaconda,网上许多人给出了不同的解决方法。我注意到在cmake .. 中Found Qt下面的路径是anaconda的路径,正常应该是cd /usr/lib/x86_64-linux-gnu/ 下的Qt,我给的解决方案是在安装anaconda的路径下,把文件名后面加个1:anaconda3变成anaconda31。编译好之后再改回来,亲测有效。
4.5 最后一个问题
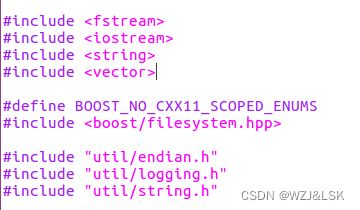
对‘boost::filesystem::detail::copy_file(boost::filesystem::path const&, boost::filesystem::path const&, boost::filesystem::copy_option, boost::system::error_code)’未定义的引用
../libcolmap.a(misc.cc.o):在函数‘colmap::FileCopy(std::__cxx11::basic_string, std::char_traits, std::allocator > const&, std::__cxx11::basic_string, std::char_traits, std::allocator > const&, colmap::CopyType)’中:
misc.cc:(.text+0x57a):对‘boost::filesystem::detail::copy_file(boost::filesystem::path const&, boost::filesystem::path const&, boost::filesystem::copy_option, boost::system::error_code*)’未定义的引用
collect2: error: ld returned 1 exit status
src/exe/CMakeFiles/colmap_exe.dir/build.make:270: recipe for target 'src/exe/colmap' failed
make[2]: *** [src/exe/colmap] Error 1
解决方案:
这个问题困扰了我很长一段时间,其实解决方法很简单(查资料两天,解决问题只要五分钟。)
找到报错的文件misc.cc头文件的位置在:/home/xxx/xxx/colmap/src/util.misc.h
在#include

最后make -j16成功,sudo make install安装,``colmap gui`能打开图形化界面。
完结撒花!如有纰漏,请各位不吝赐教。
