基于Tensorflow2.2 Object detection API使用CenterNet_ResNet50_v2预训练模型训练自己的数据集实现目标检测
基于Tensorflow2.2 Object detection API使用CenterNet_ResNet50_v2预训练模型训练自己的数据集实现目标检测
1 简介
前面一篇博客介绍了Tensorflow2.2 object detection api训练环境的搭建,如果先看到本篇博客且又需要配置训练环境的话,可以参考上一篇博客内容。本篇文章主要是讲在配置好的Tensorflow2.2环境中使用CenterNet_ResNet50_v2训练自己的数据集。
开始前首先要说对于目标检测识别任务CenterNet_Resnet50_v2模型要比SSD系列的模型准确率、召回率要提升很多,损失降低很很多,由于SSD评价损失是主要用定位和分类损失加和得到,而CenterNet评价损失指标使用的是中心点、偏离等损失参数的加和,仅比较总损失,后者要明显优于前者。文章的末尾贴出CenterNet的论文下载地址,供大家参考。
2 准备
2.1 下载预训练模型
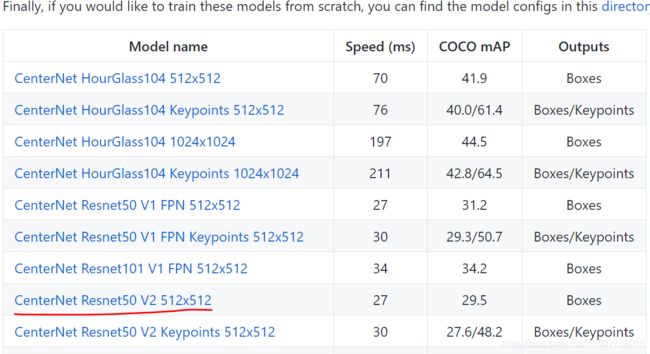
- 到Tensorflow 2 Object Detection Model Zoo 在预训练模型中选择CenterNet Resnet50 V2 512*512,它的检测速度大概40Fms,在coco数据集上的平均精度为31.2,对比SSD_MobileNet V2 的,其速度为31ms/帧,精度27,要有明显的优势,下载完成后放到自己的文件夹。

下载的压缩包,解压如下,里面包含checkpoint,saved_model文件和pipeline.config训练配置文件。

2.2 准备数据集
CenterNet_Resnet的数据和ssd_mobilenet要求的的数据集格式是一致的,因此如果你之前使用过SSD_Mobilenet预训练模型,并且已经按照模型的要求准备了自己的数据集,那么就可以直接使用原来的数据在CenterNet_Resmet50展开训练。如果没有预先准备数据集那么可以按照下面的过程创建自己的数据集。
2.2.1 标注数据
训练数据使用labelImg标注,对图像的检测目标逐个标注,生成对应的xml文件,建议直接使用labelImg.exe可执行程序,不需要麻烦的安装过程,下载后直接使用。另外有时候可能会遇到labelImg.exe无法正常使用的状况,如闪退。出现这种情况请先检查labelImg的使用路径是否有中文及中文字符,任然无法正常使用的话,申请一个账号。还有一种常用的使用labelimg标注工具的方法,需要配置Pyqt,这里不做详述,提供一个github上安装labelImg的安装指导。
2.2.2 xml文件转换为csv文件
这一步需要将标注文件转换为csv文件,训练集和测试需要分别转换,代码如下
# -*- coding: utf-8 -*-
#程序用于将选定文件夹里的xml标注文件转换为csv格式的文件#

import os
import glob
import pandas as pd
import xml.etree.ElementTree as ET

os.chdir('E:/205B/Anti-glare Board/AntiGlare_train_xml')#标注文件
path = 'E:/205B/Anti-glare Board/AntiGlare_train_xml'#标注文件路径
save_path = 'E:/205B/Anti-glare Board/AntiGlare_csv/'#csv文件保存路径


def xml_to_csv(path):
    xml_list = []
    for xml_file in glob.glob(path + '/*.xml'):
        tree = ET.parse(xml_file)
        root = tree.getroot()
        for member in root.findall('object'):
            value = (root.find('filename').text,
                     int(root.find('size')[0].text),
                     int(root.find('size')[1].text),
                     member[0].text,
                     int(member[4][0].text),
                     int(member[4][1].text),
                     int(member[4][2].text),
                     int(member[4][3].text)
                     )
            xml_list.append(value)
    column_name = ['filename', 'width', 'height', 'class', 'xmin', 'ymin', 'xmax', 'ymax']
    xml_df = pd.DataFrame(xml_list, columns=column_name)
    return xml_df


def main():
    image_path = path
    xml_df = xml_to_csv(image_path)
    xml_df.to_csv(save_path + 'Antiglare_train.csv', index=None)
    print('Successfully generate .csv file')

main()
2.2.3 csv文件生成tfrecord文件
tfrecord文件是object detection API网络模型训练数据输入的最终格式,转换代码如下
"""
Usage:
  # From tensorflow/models/
  # Create train data:
  python generate_tfrecord.py --csv_input=data/train_labels.csv  --output_path=train.tfrecord

  # Create test data:
  python generate_tfrecord.py --csv_input=data/test_labels.csv  --output_path=test.tfrecord
"""
from __future__ import division
from __future__ import print_function
from __future__ import absolute_import

import os
import io
import pandas as pd
import tensorflow as tf

from PIL import Image
from object_detection.utils import dataset_util
from collections import namedtuple, OrderedDict

flags = tf.app.flags
flags.DEFINE_string('csv_input', '', 'Path to the CSV input')
flags.DEFINE_string('output_path', '', 'Path to output TFRecord')
FLAGS = flags.FLAGS


# TO-DO replace this with label map,标签数量根据检测目标的数量增减
def class_text_to_int(row_label):
    if row_label == 'AntiGlareBoard':
        return 1
    elif row_label == 'AntiGlareBoardDeficiency':
        return 2
    elif row_label == 'AntiGlareBoardBroken':
        return 3
    elif row_label == 'AntiGlareBoardLean':
        return 4
    else:
        None


def split(df, group):
    data = namedtuple('data', ['filename', 'object'])
    gb = df.groupby(group)
    return [data(filename, gb.get_group(x)) for filename, x in zip(gb.groups.keys(), gb.groups)]


def create_tf_example(group, path):
    with tf.gfile.GFile(os.path.join(path, '{}'.format(group.filename)), 'rb') as fid:
        encoded_jpg = fid.read()
    encoded_jpg_io = io.BytesIO(encoded_jpg)
    image = Image.open(encoded_jpg_io)
    width, height = image.size

    filename = group.filename.encode('utf8')
    image_format = b'jpg'
    xmins = []
    xmaxs = []
    ymins = []
    ymaxs = []
    classes_text = []
    classes = []

    for index, row in group.object.iterrows():
        xmins.append(row['xmin'] / width)
        xmaxs.append(row['xmax'] / width)
        ymins.append(row['ymin'] / height)
        ymaxs.append(row['ymax'] / height)
        classes_text.append(row['class'].encode('utf8'))
        classes.append(class_text_to_int(row['class']))

    tf_example = tf.train.Example(features=tf.train.Features(feature={
        'image/height': dataset_util.int64_feature(height),
        'image/width': dataset_util.int64_feature(width),
        'image/filename': dataset_util.bytes_feature(filename),
        'image/source_id': dataset_util.bytes_feature(filename),
        'image/encoded': dataset_util.bytes_feature(encoded_jpg),
        'image/format': dataset_util.bytes_feature(image_format),
        'image/object/bbox/xmin': dataset_util.float_list_feature(xmins),
        'image/object/bbox/xmax': dataset_util.float_list_feature(xmaxs),
        'image/object/bbox/ymin': dataset_util.float_list_feature(ymins),
        'image/object/bbox/ymax': dataset_util.float_list_feature(ymaxs),
        'image/object/class/text': dataset_util.bytes_list_feature(classes_text),
        'image/object/class/label': dataset_util.int64_list_feature(classes),
    }))
    return tf_example


def main(csv_input, output_path, image_path):
    writer = tf.python_io.TFRecordWriter(output_path)
    path = image_path
    examples = pd.read_csv(csv_input)
    grouped = split(examples, 'filename')
    for group in grouped:
        tf_example = create_tf_example(group, path)
        writer.write(tf_example.SerializeToString())

    writer.close()
    print('Successfully created the TFRecords: {}'.format(output_path))

if __name__ == '__main__':
    csv_input = 'E:/205B/Anti-glare Board/AntiGlare_csv/Antiglare_train.csv'
    output_path = 'E:/205B/Anti-glare Board/AntiGlare_tfrecordl/Antiglare_train.tfrecord'
    image_path = 'E:/205B/Anti-glare Board/AntiGlare_train_pic'
    main(csv_input, output_path, image_path)
2.2.4 创建标签映射文件
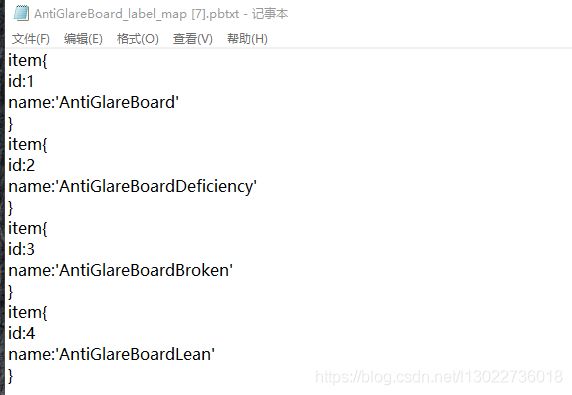
标签映射文件里应该包含所检测目标的所有类别,在csv_generate_tfrecord文件中,设定了四类检测目标标签,因此创建标签映射文件如下
 编辑完成标签映射文件,保存为 .pbtxt格式,可根据自己的情况增删标签项目。
2.2.5 编辑配置文件
训练文件之前需要对配置文件pipeline.config文件进行改动以适配自己的训练数据,pipeline.config文件在上面解压文件夹中。
# CenterNet meta-architecture from the "Objects as Points" [1] paper
# with the ResNet-v2-101 backbone. The ResNet backbone has a few differences
# as compared to the one mentioned in the paper, hence the performance is
# slightly worse. This config is TPU comptatible.
# [1]: https://arxiv.org/abs/1904.07850

model {
center_net {
num_classes: 3#更改类别
feature_extractor {
type: "resnet_v2_50"
}
image_resizer {
keep_aspect_ratio_resizer {
min_dimension: 512
max_dimension: 512
pad_to_max_dimension: true
}
}
object_detection_task {
task_loss_weight: 1.0
offset_loss_weight: 1.0
scale_loss_weight: 0.1
localization_loss {
l1_localization_loss {
}
}
}
object_center_params {
object_center_loss_weight: 1.0
min_box_overlap_iou: 0.5
max_box_predictions: 100
classification_loss {
penalty_reduced_logistic_focal_loss {
alpha: 2.0
beta: 4.0
}
}
}
}
}

train_config: {

batch_size: 24#设置batch_size
num_steps: 200000#更改训练步数

data_augmentation_options {
random_horizontal_flip {
}
}

data_augmentation_options {
random_crop_image {
min_aspect_ratio: 0.5
max_aspect_ratio: 1.7
random_coef: 0.25
}
}


data_augmentation_options {
random_adjust_hue {
}
}

data_augmentation_options {
random_adjust_contrast {
}
}

data_augmentation_options {
random_adjust_saturation {
}
}

data_augmentation_options {
random_adjust_brightness {
}
}

data_augmentation_options {
random_absolute_pad_image {
max_height_padding: 200
max_width_padding: 200
pad_color: [0, 0, 0]
}
}

optimizer {
adam_optimizer: {
epsilon: 1e-7  # Match tf.keras.optimizers.Adam's default.
learning_rate: {
cosine_decay_learning_rate {
learning_rate_base: 1e-3
total_steps: 200000
warmup_learning_rate: 2.5e-4
warmup_steps: 20000
}
}
}
use_moving_average: false
}
max_number_of_boxes: 100
unpad_groundtruth_tensors: false

fine_tune_checkpoint_version: V2
fine_tune_checkpoint: "/home/***/models-master/research/object_detection/save_result_dirlasercenternet/ckpt-0"#更改
fine_tune_checkpoint_type: "fine_tune"
}

train_input_reader: {
label_map_path: "training_laser_Hengfeng/laser_label_map.pbtxt"#更改
tf_record_input_reader {
input_path: "data_laser512+512/tfrecord/train.tfrecord"
}
}

eval_config: {
metrics_set: "coco_detection_metrics"
use_moving_averages: false
batch_size: 1;
}

eval_input_reader: {
label_map_path: "training_laser_Hengfeng/laser_label_map.pbtxt"#更改
shuffle: false
num_epochs: 1
tf_record_input_reader {
input_path: "data_laser512+512/tfrecord/eval.tfrecord"#更改
}
}
2.3 模型训练与评估
2.3.1 模型训练
在做好了相关的准备工作后,下面将开始正式的训练工作。
- 执行开始训练命令,设置训练保存路径,tensorflow2.2环境下的训练执行文件和tensorflow1.x的不同,其执行文件为model_main_tf2.py。
python model_main_tf.py --pipelin_config_path={pipeline_fname} --model_dir={model_name} --alsologtostderr
2.3.2 模型评估
在tensorflow2.2环境中,这一步作为可选的步骤。tensorflow1.x环境中,模型的训练与评估是同是进行的,即在执行训练开始命令后,模型在训练的同时也会对训练的结果进行同步的评估。但是在tensorflow2.2环境中这两步是分开操作的
- 执行命令如下,重点在于设置checkpoint_dir参数,就会执行模型评估,设置eval_timeout参数时长,在无输入的时等待设定的时常,评估过程自动停止。
python model_main_tf2.py --pipeline_config_path={pipeline_fname} --model_dir={model_dir} --checkpoint_dir={model_dir} --eval_timeout=120
2.3.3 可视化训练与评估过程
- 使用tensorboard可视化训练过程,可详细看到训练过程中各参数的变化趋势
tensorboard --logdir={model_dir} #logdir指向训练文件保存文件夹
2.3.4 导出训练结果
导出训练结果并下载,这个导出文件可在后期对目标物进行实际的检测。执行的export_main_v2.py文件。
python export_mian_v2.py input_type image_tensor --pipeline_config_path {pipeline_fanme} --trained_checkpoint_dir {model_dir} --output_directory {putput_dir}
3 总结
在对自己的数据集上对模型训练的过程会遇到很多意想不到的问题,需要不断的查找相关资料和思考才能一步一步完成训练过程,前路漫漫,需行而至!
这篇博客讲到这里,下面准备再写一篇用训练好的模型做实际目标检测的文章,也在不断地摸索过程中,希望和大家一起进步。
CenterNet论文下载地址