TensorFlow Lite 是什么?用 TensorFlow Lite 来转换模型(附代码)
文章目录
- TensorFlow Lite 做了什么?
- 将一个模型用 TensorFlow Lite 转换
-
- 训练一个简易模型
- 保存模型
- 转换模型
- 加载 TFLite 模型并分配张量
- 进行预测
- 将在猫狗大战数据集上进行迁移学习的 MobileNetV2 转换到 TensorFlow Lite
-
- 将模型转换到 TensorFlow Lite
- 优化模型
- References
TensorFlow Lite 是一种用于设备端推断的开源深度学习框架。可帮助开发者在移动设备、嵌入式设备和 IoT 设备上运行 TensorFlow 模型。它可看作是一套 TensorFlow 的补充工具,它可以使我们的模型更加 mobile-friendly,这通常涉及到减少它们的规模和复杂性,并尽可能少地影响它们的准确性,使它们在像移动设备这样的有限电源环境中更好地工作。我们并不能使用 TensorFlow Lite 训练一个模型。我们用 TensorFlow 训练一个模型后,将它转换为 TensorFlow Lite 格式。
TensorFlow Lite 做了什么?
当在计算机或云服务上构建和运行模型时,类似电池消耗、屏幕尺寸和其他移动应用开发方面的问题都不是需要考虑的方面,因此当我们想在移动设备上部署模型时,需要解决一系列新的限制因素。
第一个限制因素是,移动应用框架必须是轻量级的。移动设备跟常规的用来训练模型的机器比起来资源非常有限,开发者必须对资源的消耗非常重视。对于我们使用者来说,打我们打开应用商店,在关注某个应用时肯定会关注它们的大小,如果应用太大,我们的手机带不动,那就肯定不会下载了。
应用框架还必须是低时延的。数据显示,下载的 APP 中有 25% 的都只会被使用一次,时延大,不停转圈圈,肯定是用户放弃这款 APP 的原因之一。
还需要关注的则是高效地模型格式。在计算机上训练模型时我们更关注的是这个模型精度咋样,是不是过拟合了呀等等。但在移动设备上运行模型时,为了达到轻量级以及低时延的要求,我们可能需要考虑模型的格式问题。
直接在终端设备上进行模型推断(on-device)是很有好处的,我们不需要再将数据上传到云端,这意味着用户隐私可以被进一步保护,且能耗更少。
TensorFlow Lite 就是我们上面提到的这些问题的一个解决方案。它是为了满足移动设备以及嵌入式系统的需求而设计的。TensorFlow Lite 可以主要被看作两个部分组成:
- 一个 converter,将模型进行压缩和优化,转化为
.tflite格式; - 一套用于各种 runtimes 的解释器
将一个模型用 TensorFlow Lite 转换
训练一个简易模型
import tensorflow as tf
from keras.models import Sequential
from keras.layers import Dense
import numpy as np

model = Sequential(Dense(1, input_shape=[1]))
model.compile(optimizer='sgd', loss='mean_squared_error')

xs = np.array([-1.0, 0.0, 1.0, 2.0, 3.0, 4.0], dtype=float)
ys = np.array([-3.0, -1.0, 1.0, 3.0, 5.0, 7.0], dtype=float)

model.fit(xs, ys, epochs=500)
保存模型
save_dir = 'saved_model/1'
tf.saved_model.save(model, save_dir)
转换模型
我们可以直接借助 from_saved_model 方法将保存的模型进行转换,而不需要再次加载:
converter = tf.lite.TFLiteConverter.from_saved_model(save_dir)
tflite_model = converter.convert()
然后保存 .tflite 格式的模型:
import pathlib
tflite_model_file = pathlib.Path('model.tflite')
tflite_model_file.write_bytes(tflite_model)
到目前为止,我们已经有了一个 .tflite 格式的模型文件,我们可以将它用在任何解释器环境中。
加载 TFLite 模型并分配张量
下一步是将模型加载到解释器中,分配将用于向模型输入数据进行预测的张量,然后读取模型输出的预测结果。
interpreter = tf.lite.Interpreter(model_content=tflite_model)
interpreter.allocate_tensors()
我们可以从模型中得到输入输出的参数细节,来帮助我们确认应该提供什么样的输入数据,以及它会返回什么样的输出数据:
input_details = interpreter.get_input_details()
output_details = interpreter.get_output_details()
print(input_details)
print(output_details)
其中,输入参数的细节为:
[{'name': 'serving_default_dense_input:0', 'index': 0, 'shape': array([1, 1], dtype=int32),
'shape_signature': array([-1,  1], dtype=int32), 'dtype': <class 'numpy.float32'>, 'quantization': (0.0, 0), 'quantization_parameters': {'scales': array([], dtype=float32),
'zero_points': array([], dtype=int32), 'quantized_dimension': 0}, 'sparsity_parameters': {}}]
我们注意到输入 array 形状为 [1, 1],且输入数据应为 numpy.float32 (dtype 参数为定义 array shape 的数据类型,所以我们应该注意 class 参数表示的类型),所以我们的输入数据应该这样定义:
to_predict = np.array([[10.0]], dtype=np.float32)
print(to_predict)
"""
[[10.]]
"""
进行预测
我们通过 array 的 index 来对输入张量进行设定,因为我们只使用一个输入,我们会用 input_details[0]['index']:
interpreter.set_tensor(input_details[0]['index'], to_predict)
interpreter.invoke() # invoke interpreter
然后我们就可以调用 get_tensor 方法来读出预测结果:
tflite_results = interpreter.get_tensor(output_details[0]['index'])
print(tflite_results)
"""
[[18.975904]]
"""
下面我们来看一个稍微复杂点的例子。
将在猫狗大战数据集上进行迁移学习的 MobileNetV2 转换到 TensorFlow Lite
在 《卷积神经网络的可视化(一)(可视化中间激活)(猫狗分类问题,keras)》里我们在 cats_vs_dogs 数据集上训练了一个简单 CNN 模型,这里我们直接使用预训练好的 MobileNetV2 模型来进行迁移学习,数据预处理以及数据集的加载、数据增强等可以看之前这篇文章,这里我们直接从 MobileNetV2 的部分开始。
from keras.applications.mobilenet_v2 import MobileNetV2

base_model = MobileNetV2(input_shape=(150, 150, 3),
                        include_top=False)

base_model.trainable = False
from keras.layers import GlobalAveragePooling2D, Dense
from keras.models import Model

x = base_model.output
x = GlobalAveragePooling2D()(x)
output = Dense(1, activation='sigmoid')(x)

model = Model(base_model.input, output)
from tensorflow.keras import optimizers

model.compile(loss='binary_crossentropy',
              optimizer=optimizers.Adam(),
              metrics=['accuracy'])

history = model.fit(
    train_generator,
    steps_per_epoch=63,
    epochs=5,
    validation_data=validation_generator,
    validation_steps=32
)
仅仅训练 5 个 epoch 之后,我们的模型训练精度就可以达到 96%,验证精度也可以达到 95%。
接下来,我们将模型保存:
import tensorflow as tf

save_path = 'cats_dogs_saved_model'
tf.saved_model.save(model, save_path)
将模型转换到 TensorFlow Lite
converter = tf.lite.TFLiteConverter.from_saved_model(save_path)
tflite_model = converter.convert()
tflite_model_file = 'converted_model.tflite'

with open(tflite_model_file, 'wb') as f:
    f.write(tflite_model)
interpreter = tf.lite.Interpreter(model_path=tflite_model_file)
interpreter.allocate_tensors()

input_index = interpreter.get_input_details()[0]["index"]
output_index = interpreter.get_output_details()[0]["index"]

predictions = []
下面我们从测试集中采样图片来进行预测:
import numpy as np

test_labels, test_imgs = [], []
i = 0
for img, label in test_generator:
    for i in range(32):
        interpreter.set_tensor(input_index, np.expand_dims(img[i], axis=0))
        interpreter.invoke()
        predictions.append(interpreter.get_tensor(output_index))
        test_labels.append(label[i])
        test_imgs.append(img[i])
    break
如果我们查看 interpreter.get_input_details(),会发现输入 shape 应该为 (1, 150, 150, 3),因此我们需要进行上述代码中的维度扩展。
我们看看一个 batch 32 个样本预测正确的有多少个:
score = 0
for i in range(32):
    if round(predictions[i][0][0]) == test_labels[i]:
        score += 1

print(score)
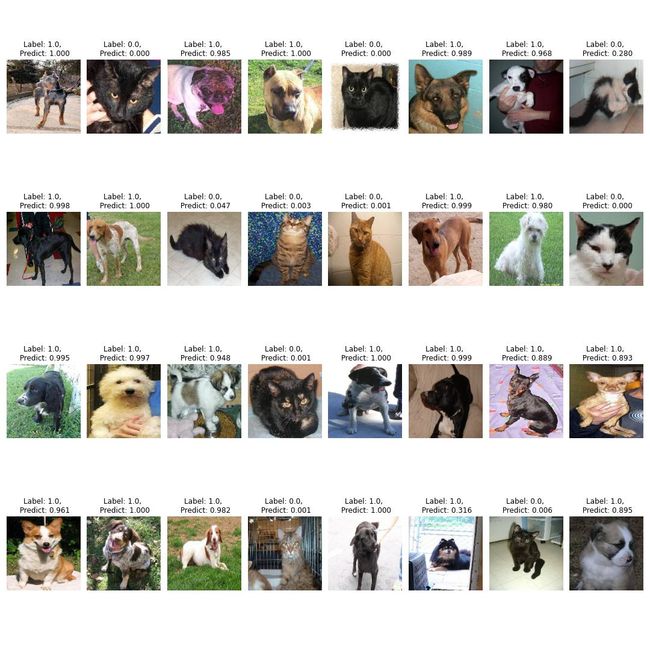
结果为 31,符合我们的预期。
我们也可以对模型的输出做一些可视化:
plt.figure(figsize=(15, 15))
for i in range(32):
    plt.subplot(4, 8, i + 1)
    plt.imshow(test_imgs[i])
    plt.title(f"Label: {test_labels[i]}, \n Predict: {predictions[i][0][0]:.3f}")
    plt.axis("off")

plt.tight_layout()
plt.savefig("prediction.jpg")
plt.show()
优化模型
目前为止,我们没有对转换的模型进行任何优化,如果我们想将它进一步应用于移动设备,还需要对它进行一些优化。
在进行转换模型前,我们需要额外进行模型量化。一种模型量化方法为动态范围量化(dynamic range quantization),实现方法如下:
converter = tf.lite.TFLiteConverter.from_saved_model(save_path)
converter.optimizations = [tf.lite.Optimize.DEFAULT]

tflite_model = converter.convert()
tflite_model_file = 'converted_model.tflite'

with open(tflite_model_file, 'wb') as f:
    f.write(tflite_model)
动态范围量化(也就是这里的 DEFAULT)会平衡模型规模以及时延的因素,还有其它几种量化方式,例如:
OPTIMIZE_FOR_SIZE:使模型规模尽可能小OPTIMIZE_FOR_LATENCY:使模型的推断时间尽可能减少
在使用动态范围量化后,我们这个模型的规模从 8.86 MB下降到了 2.64 MB。大量实验证明,这种方法可以使模型规模下降 4 倍左右,且有 2-3 倍的加速。但是,这种模型量化会使得模型精确度下降,如果我们使用量化后的模型再重复对测试集的一个 batch 进行预测,那么预测正确的数量会有所下降。
如果想要尽可能保持模型的精度,那么我们可以使用全整型量化(full integer quantization)或者半浮点数量化(float16 quantization)。全整型量化可将模型的权重从 32 位的浮点值变为 8 位的整型值。相比动态范围量化,模型规模可能会有所增加,但却保持了模型的精度。
要实现全整型量化,我们需要在动态范围量化的基础之上给转换器指定一个有代表性的输入数据集来告诉它大致要处理什么样的数据。有了这种代表性的数据,转换器就可以在数据流经模型时对其进行检查,并找到最适合进行转换的地方。然后,我们将 supported_ops 设为 INT8:
converter = tf.lite.TFLiteConverter.from_saved_model(save_path)
converter.optimizations = [tf.lite.Optimize.DEFAULT]

def representative_data_gen():
	for img, _ in test_generator:
		for i in range(32):
			yield [np.expand_dims(img[i], axis=0)]
		break

converter.representative_dataset = representative_data_gen
converter.target_spec.supported_ops = [tf.lite.OpsSet.TFLITE_BUILTINS_INT8]

tflite_model = converter.convert()
tflite_model_file = 'converted_model.tflite'

with open(tflite_model_file, 'wb') as f:
    f.write(tflite_model)
References
AI and Machine Learning for Coders by Laurence Moroney.

