语义分割重要方法和机制1(上采样)
目录
一、上采样方式
1.1 反卷积(转置卷积)
1.1.1反卷积介绍
1.1.2反卷积图例
1.1.3代码
1.2 双线性插值上采样
1.2.1方法介绍
1.2.2双线性插值法
1.2.3代码
1.3反池化上采样
1.3.1反池化介绍
1.3.2优点
1.3.3代码
二.参考资料
一、上采样方式
1.1 反卷积(转置卷积)
1.1.1反卷积介绍
转置卷积是用来增大输入的大小,以增加分辨率而细化特征图。其类似卷积的逆向过程。其公式为: out = (Input - 1) * stride + kernel - 2*padding (其中out对应输出,input对应输入,stride对应步长,kernel对应反卷积核,padding是在空白位置补0)
1.1.2反卷积图例
下图对应了滑动步长(Stride)1和2的情况。
1.1.3代码
代码1:(步长为1)转置卷积过程
import torch
def trans_conv(X, K):                #定义转置卷积函数 参数为(X,K)
    h, w = K.shape                             #变量为h,w  K.shape值赋
    Y = torch.zeros((X.shape[0] + h - 1, X.shape[1] + w - 1)) #zeros是返回形状为size,类型为torch.dtype,里面的每一个值都是0的tensor shape[0.1]是行和列
    for i in range(X.shape[0]):            #对行进行遍历
        for j in range(X.shape[1]):              #对列进行遍历
            Y[i:i+h, j:j+w] += X[i, j] * K
    return Y
X = torch.tensor([[0.0, 1.0], [2.0, 3.0]])       #X为输入
K = torch.tensor([[0.0, 1.0], [2.0, 3.0]])       #K为核张量
print(trans_conv(X,K))
代码2:(步长为2)的转置卷积过程
import torch
def trans_conv(X, K, stride=2):
    h, w = K.shape
    Y = torch.zeros(((X.shape[0] - 1) * stride + h, (X.shape[1] - 1) * stride + w))
    for i in range(X.shape[0]):
        for j in range(X.shape[1]):
            Y[i * stride:i * stride +h, j * stride:j * stride +w] += X[i, j] * K
    return Y
X = torch.tensor([[0.0, 1.0], [2.0, 3.0]])
K = torch.tensor([[0.0, 1.0], [2.0, 3.0]])
print(trans_conv(X,K))
1.2 双线性插值上采样
转置卷积能够扩大尺寸细化特征图,但会导致棋盘效应——转置卷积不均匀重叠,中间部分的像素重叠过多,形成类似棋盘格的像素块。 使用双线性插值先将图片扩大,在用卷积即解决转置卷积问题,优化图像。
1.2.1方法介绍
采用拉格朗日插值法中的线性插值中的两点对称式直线方程。
由已知(x0,y0),(x1,y1)两点列出等式,代入x0,x1之间任意点x至等式,可以得到对应y值。
1.2.2双线性插值法
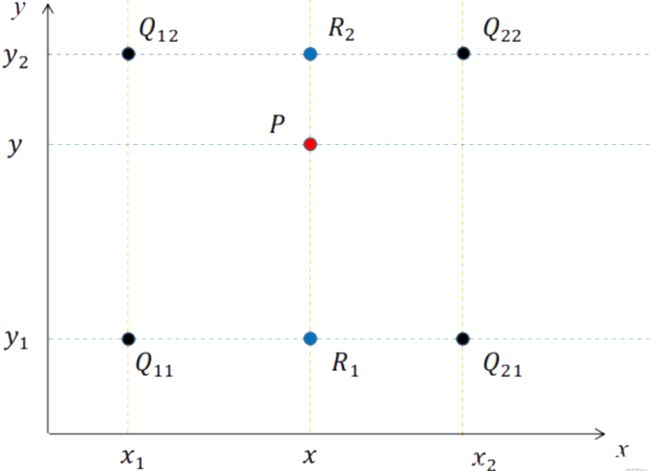
通过进行两个方向的插值。首先对x方向进行两次插值得到R1和R2的坐标,再由两点进行y方向的插值。得到新的等式,将点的x坐标代入可得到y值。
1.2.3代码
代码3 :双线性插值法
import cv2
import numpy as np
def bilinear_interpolation(img, out_dim):
    src_h, src_w, channel = img.shape  # 原图片的高、宽、通道数
    dst_h, dst_w = out_dim[1], out_dim[0]  # 输出图片的高、宽
    print('src_h,src_w=', src_h, src_w)
    print('dst_h,dst_w=', dst_h, dst_w)
    if src_h == dst_h and src_w == dst_w:
        return img.copy()
    dst_img = np.zeros((dst_h, dst_w, 3), dtype=np.uint8)
    scale_x, scale_y = float(src_w) / dst_w, float(src_h) / dst_h
    for i in range(3):  # 指定 通道数,对channel循环
        for dst_y in range(dst_h):  # 指定 高,对height循环
            for dst_x in range(dst_w):  # 指定 宽,对width循环
                # 源图像和目标图像几何中心的对齐
                # src_x = (dst_x + 0.5) * srcWidth/dstWidth - 0.5
                # src_y = (dst_y + 0.5) * srcHeight/dstHeight - 0.5
                src_x = (dst_x + 0.5) * scale_x - 0.5
                src_y = (dst_y + 0.5) * scale_y - 0.5
                # 计算在源图上四个近邻点的位置
                src_x0 = int(np.floor(src_x))
                src_y0 = int(np.floor(src_y))
                src_x1 = min(src_x0 + 1, src_w - 1)
                src_y1 = min(src_y0 + 1, src_h - 1)
                # 双线性插值
                temp0 = (src_x1 - src_x) * img[src_y0, src_x0, i] + (src_x - src_x0) * img[src_y0, src_x1, i]
                temp1 = (src_x1 - src_x) * img[src_y1, src_x0, i] + (src_x - src_x0) * img[src_y1, src_x1, i]
                dst_img[dst_y, dst_x, i] = int((src_y1 - src_y) * temp0 + (src_y - src_y0) * temp1)
    return dst_img
img = cv2.imread(r'C:\Users\1\Desktop\1\1.jpg')      # 修改图像所在的位置
dst = bilinear_interpolation(img, (1500, 1500))      # 图像的输出大小
cv2.imshow("blinear", dst)
cv2.waitKey()
cv2.imwrite("13.jpg",img)    #将图片保存为jpg
1.3反池化上采样
1.3.1反池化介绍
经过下采样时,最大池化会记录池化的索引,索引代表取得值所在的位置。在反池化时,将输入值根据索引放回原来的位置,得到一个元素多为0的稀疏矩阵。
1.3.2优点
反池化的操作,索引记录了更多的边缘信息,可以加强刻画物体的能力,通过重用这些边缘信息,加强精确的边界位置信息。在分割的时候有助于产生更平滑的分割。
1.3.3代码
代码4 :反池化
import torch
import torch.nn as nn
test = torch.rand((2, 3, 128, 128))
print("Original Size -> ", test.size())
# maxPool池化
maxpool = nn.MaxPool2d(2, 2)
# 设定要返回索引
maxpool.return_indices = True
# 记录池化结果,索引结果
mp, indices = maxpool(test)
print("MaxPool -> ", mp.size())
# 设置MaxUnpool反池化
unpooling = nn.MaxUnpool2d((2, 2), stride=2)
# 传入参数和索引
upsamle = unpooling(mp, indices)
print("MaxUnpool -> ", upsamle.size())
二.参考资料
感谢
博客——博主:哈土奇
数值分析——辽宁工程技术大学胡行华等

