谷歌浏览器扩展v3版本总结
前言
前几年使用过谷歌浏览器扩展v2,然后今天想编写一个扩展发现了很多问题,然后想编写一篇文章进行总结一下,v3跟比v2有挺多差距的,具体的大家可以去看看官网文档
开始
开始之前先介绍几个网站,谷歌扩展官网(-英文),谷歌扩展中文网
项目结构
注意事项一(service-worker使用)
service-worker.js 就是 background.js 它必须在根目录
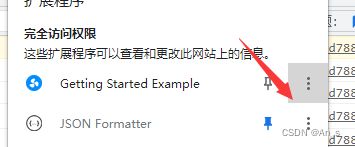
ps:如果你想看它的运行情况,需要单独为扩展插件打开控制台(扩展 - 三个点 - 审查弹出内容)
注意事项二(manifest.json配置)
{
    "name": "Getting Started Example",
    "version": "1.0",
    "description": "Build an Extension!",
    "manifest_version": 3,
    "permissions": [
      "declarativeContent",
      "storage",
      "activeTab"
    ],
    "externally_connectable": {
      "matches": ["*://*.xxxxxx.com/*"]
    },
    "background": {
      "service_worker": "service-worker.js"
    },
    "content_scripts": [
      {
        "matches": [""],
        "js": ["js/jquery-1.8.3.js", "js/content.js"]
      }
    ],
    "web_accessible_resources": [
        {
            "matches": [""],
            "resources": [ "js/inject.js", "js/jquery-1.8.3.js"]
        }
    ],
    "action":{
        "default_popup": "popup.html",
        "default_icon": "img/1.png",
        "default_title": "Latest Covid Report"
    },
    "icons": {
      "16": "img/1.png",
      "32": "img/1.png",
      "48": "img/1.png",
      "128": "img/1.png"
    }
  }
注意事项三(如何发送请求)
content.js
chrome.runtime.sendMessage(
        {
         type: 'post',
         url: "https://xxxx.com/api/users/login",
         data: {
             url: 'test'
         }
        },
        function response(res) {
            console.log("回调...")
            console.log(res)
        }
    )
service-worker.js
chrome.runtime.onMessage.addListener(function(request, sender, sendResponse) {
    console.log("addListener...")
    console.log(request)
        switch(request.type) {
            case 'get':
                fetch(request.url)
                    .then(function(response) { sendResponse(response.json()) })
                .then(function(json) { sendResponse(json) })
                .catch(function(error) { sendResponse(null) });
            break;
            case 'post':
                fetch(request.url, {
                    method: 'POST',
                    mode: 'cors',
                    credentials: 'include',
                    headers: {
                        'Content-Type': 'application/x-www-form-urlencoded'
                    },
                    body: JSON.stringify(request.data)
                })
                    .then(function(response) {
                        console.log(response)
                        sendResponse(response.json())
                    })
                    .then(function(json) {
                        console.log(json)
                        sendResponse(json)
                    })
                    .catch(function(error) {
                        console.log(error)
                        sendResponse(null)
                    });
            break;
            // 你可以定义任意内容,使用sendResponse()来返回它
            case 'test':
                sendResponse({'msg': 'test'});
            break;
    }
});
注意事项四(如何注入js)
content.js
// 可以操作当前页面中的DOM
$(document).ready(function() {

    console.log("---加载content.js---");

    // 注入inject.js
    injectCustomJs();

});

function injectCustomJs() {
    let jsPath = 'js/inject.js';

    var temp = document.createElement('script');
    temp.setAttribute('type', 'text/javascript');
    // 获得的地址类似:chrome-extension://ihcokhadfjfchaeagdoclpnjdiokfakg/js/inject.js
    temp.src = chrome.runtime.getURL(jsPath);
    temp.onload = function() {
        // 执行完后移除掉
        this.parentNode.removeChild(this);
    };
    // 挂载
    document.head.appendChild(temp);
}
inject.js
// 可以访问当前页面中的js
$(document).ready(function() {
    console.log("---inject.js---");
    console.log(window);
});
总结
其实我使用得很浅,所以也没啥好总结的,多看文档多百度!

