pytorch学习笔记二:动态图、自动求导及逻辑回归
一、计算图
计算图是描述运算的有向无环图,有两个主要的元素:节点(Node)和边(Edge),节点表示数据,如向量,矩阵,张量。边表示运算,如加减乘除等。
用计算图表示: y = ( x + w ) ∗ ( w + 1 ) y = \left ( x+w \right ) \ast \left ( w+1 \right ) y=(x+w)∗(w+1) ,如下所示:
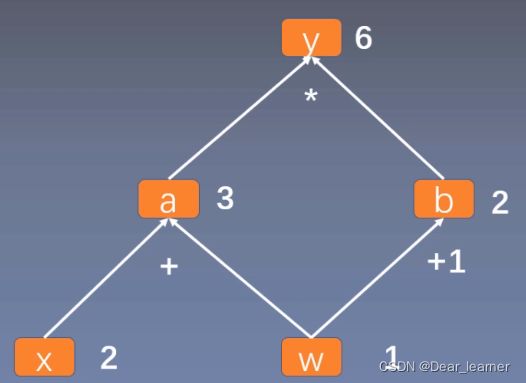
从上面可以看出y = a × b,而a = w + x, b = w + 1,只要给出x和w的值,即可根据计算图得出y的值。
计算图与梯度求导
求y对w的导数,根据求导规则,如下:

体现到计算图中,就是根节点 y 到叶子节点 w 有两条路径 y -> a -> w和y ->b -> w。根节点依次对每条路径的叶子节点求导,一直到叶子节点w,最后把每条路径的导数相加即可。

x = torch.tensor([2.], requires_grad=True)
w = torch.tensor([1.], requires_grad=True)

# y = (x + w) * (w + 1)
a = torch.add(w, x)
b = torch.add(w, 1)
y = torch.mul(a, b)

#y求导
y.backward()
#w的梯度就是y对w的求导
print(w.grad)

###result
tensor([5.])
在tensor中包含一个is_leaf(叶子节点)属性,叶子节点就是用户创建的节点,在上面的例子中,x 和 w 是叶子节点,其他所有节点都依赖于叶子节点。叶子节点的概念主要是为了节省内存,在计算图中的一轮反向传播结束之后,非叶子节点的梯度是会被释放的。
#查看是否是叶子节点
print(w.is_leaf, x.is_leaf, a.is_leaf, b.is_leaf)

###result
True True False False
#查看梯度
print(w.grad, x.grad, a.grad, b.grad, y.grad)
输出结果:

只有叶子节点的梯度保留了下来,而非叶子的梯度为空,如果在反向传播之后仍需要保留非叶子节点的梯度,可以对节点使用retain_grad()方法。
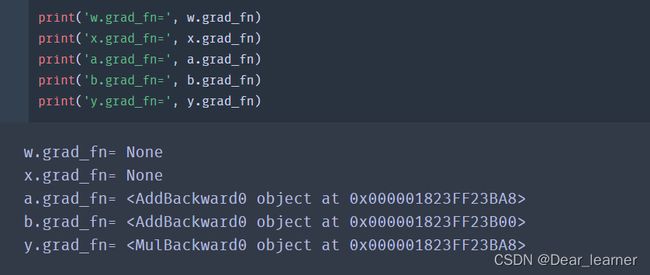
grad_fn:记录创建该张量时所用的方法(函数),记录这个方法主要是用于【梯度的求导】
二、动态图机制
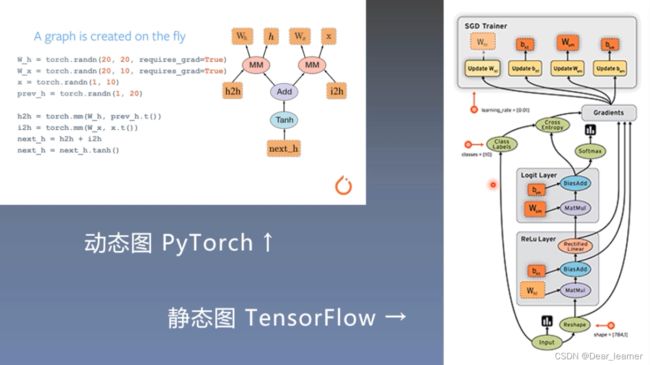
pytroch采用的是动态图机制,而tensorflow采用的是静态图机制
静态图是先搭建,后运算
动态图是运算和搭建同时进行,也就是可以先计算前面节点的值,再根据这些值搭建后面的计算图。优点是灵活,易调节,易调试。
三、自动求导机制
pytorch的自动求导机制是torch.autograd.backward()方法,功能是自动求取梯度
torch.autograd.backward(
    tensors: Union[torch.Tensor, Sequence[torch.Tensor]],
    grad_tensors: Union[torch.Tensor, Sequence[torch.Tensor], NoneType] = None,
    retain_graph: Union[bool, NoneType] = None,
    create_graph: bool = False,
    grad_variables: Union[torch.Tensor, Sequence[torch.Tensor], NoneType] = None,
    inputs: Union[torch.Tensor, Sequence[torch.Tensor], NoneType] = None,
) -> None
● tensor:表示用于求导的张量,如loss,
● grad_tensor: 设置梯度权重,在计算矩阵的梯度时会用到,也是一个tensor,shape和前面的tensor保持一致
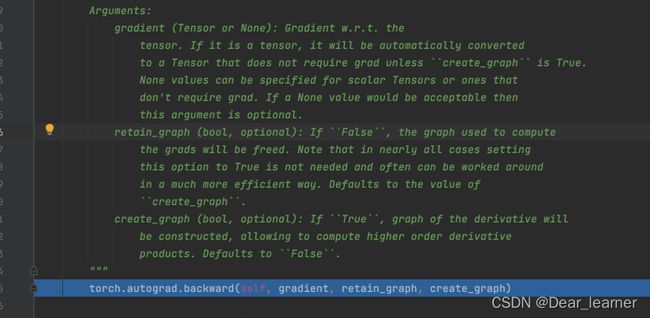
● retain_graph:表示保存计算图,由于pytorch采用了动态图机制,在每一次反向传播之后,计算图都会被释放掉。如果不想释放,就设置这个参数为True
● create_graph:创建导数计算图,用于高阶求导
在上面对y求导 y.backward() 处设置断点,进行debug,可以看出调用的是 torch.autograd.backward() 方法,所以 torch.autograd.backward(y)==y.backward()
在每一次反向传播之后,计算图会释放掉,如果想要使用计算图,可以设置参数retain_graph=True
x = torch.tensor([2.], requires_grad=True)
w = torch.tensor([1.], requires_grad=True)

# y = (x + w) * (w + 1)
a = torch.add(w, x)
b = torch.add(w, 1)
y = torch.mul(a, b)

#y求导
y.backward()
#w的梯度就是y对w的求导
# print(w.grad)

y.backward()
x = torch.tensor([2.], requires_grad=True)
w = torch.tensor([1.], requires_grad=True)

# y = (x + w) * (w + 1)
a = torch.add(w, x)
b = torch.add(w, 1)

y0 = torch.mul(a, b)
y1 = torch.add(a, b)

loss = torch.cat([y0, y1], dim=0)
grad_tensor = torch.tensor([1., 1.])

loss.backward(gradient=grad_tensor)
print(w.grad)

# result
tensor([7.])
torch.autograd.grad()这个方法的功能也是求梯度,可以实现高阶的求导。
torch.autograd.grad(
    outputs: Union[torch.Tensor, Sequence[torch.Tensor]],
    inputs: Union[torch.Tensor, Sequence[torch.Tensor]],
    grad_outputs: Union[torch.Tensor, Sequence[torch.Tensor], NoneType] = None,
    retain_graph: Union[bool, NoneType] = None,
    create_graph: bool = False,
    only_inputs: bool = True,
    allow_unused: bool = False,
) -> Tuple[torch.Tensor, ...]
- outputs:用于求导的张量;
- inputs: 需要梯度的张量;
- create_graph:创建导数计算图,用于高阶求导
- retain_graph:保存计算图
- grad_outputs:多梯度权重
使用autograd需要注意:
● 梯度不自动清零;
● 依赖于叶子结点的结点,默认requires_grad=True;
● 叶子结点不可执行in-place;
示例如下:
x = torch.tensor([2.], requires_grad=True)
w = torch.tensor([1.], requires_grad=True)

for i in range(4):
    a = torch.add(w, x)
    b = torch.add(w, 1)
    y = torch.mul(a, b)

    y.backward()
    print(w.grad)

    # w.grad.zero_()
# 梯度不清零,运算结果
tensor([5.])
tensor([10.])
tensor([15.])
tensor([20.])

#梯度清零的运算结果
tensor([5.])
tensor([5.])
tensor([5.])
tensor([5.])

print(a.requires_grad, b.requires_grad, y.requires_grad)
#result
True True True
x = torch.tensor([2.], requires_grad=True)
w = torch.tensor([1.], requires_grad=True)

# y = (x + w) * (w + 1)
a = torch.add(w, x)
b = torch.add(w, 1)
y = torch.mul(a, b)

w.add_(1)
y.backward()
print(w.grad)
#运行结果会报错
#这是因为在前向传播时已经记录了w的地址,在反向传播时需要利用这个地址来进行求导,若对w进行in-place操作
#会改变w的地址,这就会导致反向传播过程出错。
运行结果:

下面从具体的实例来理解上面两个求导的方法
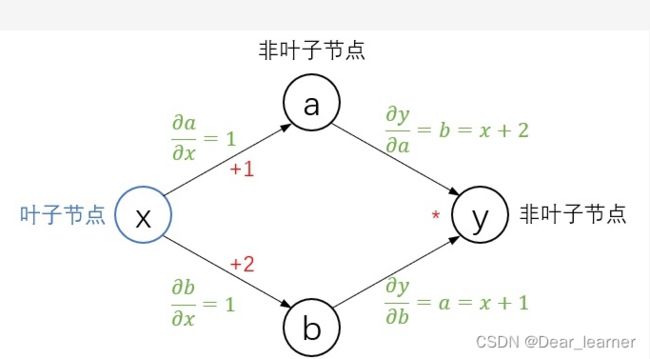
一个简单的求导例子是: y = ( x + 1 ) ∗ ( x + 2 ) y = \left ( x+1 \right ) \ast \left ( x+2 \right ) y=(x+1)∗(x+2) ,计算 ∂ y ∂ x \frac{\partial y}{\partial x} ∂x∂y,假设给定 x=2
先画出计算图

使用backward()
x = torch.tensor(2., requires_grad=True)

a = torch.add(x, 1)
b = torch.add(x, 2)
y = torch.mul(a, b)

y.backward()
print(x.grad)

###result
tensor(7.)
#查看一下这几个tensor的属性
print('requires_grad:', x.requires_grad, a.requires_grad, b.requires_grad, y.requires_grad)
print('is_leaf:', x.is_leaf, a.is_leaf, b.is_leaf, y.is_leaf)
print('grad:', x.grad, a.grad, b.grad, y.grad)

###result
requires_grad: True True True True
is_leaf: True False False False
grad: tensor(7.) None None None
使用backward()计算tensor的梯度时,并不是所有的tensor都能计算其梯度,只能满足这几个条件的tensor:
1、类型为叶子节点;
2、requires_grad=True;
3、依赖该tensor的requires_grad=True的tensor。
所有满足条件的变量梯度会自动保存到grad属性中。
使用autograd.grad()
x = torch.tensor(2., requires_grad=True)

a = torch.add(x, 1)
b = torch.add(x, 2)
y = torch.mul(a, b)

grad = torch.autograd.grad(outputs=y, inputs=x)
print(grad[0])
print(grad)
####result
tensor(7.)
(tensor(7.),)
因为指定了输出y,输入x,所以返回值就是 ∂ y ∂ x \frac{\partial y}{\partial x} ∂x∂y 这一梯度,完整的返回值其实是一个元组,保留第一个元素。
高阶求导的例子: z = x 2 ∗ y z = x^{2}\ast y z=x2∗y,计算 ∂ z ∂ x \frac{\partial z}{\partial x} ∂x∂z, ∂ z ∂ y \frac{\partial z}{\partial y} ∂y∂z, ∂ z 2 ∂ x 2 \frac{\partial z^{2}}{\partial x^{2}} ∂x2∂z2,假设给定 x = 2,y = 3

x = torch.tensor(2., requires_grad=True)
y = torch.tensor(3., requires_grad=True)

z = x * x * y
z.backward()
print('x_grad:', x.grad)
print('y_grad:', y.grad)
###result
x_grad: tensor(12.)
y_grad: tensor(4.)
x = torch.tensor(2.).requires_grad_()
y = torch.tensor(3.).requires_grad_()

z = x * x * y

grad_x = torch.autograd.grad(outputs=z, inputs=x)
grad_y = torch.autograd.grad(outputs=z, inputs=y)
print(grad_x[0])
print(grad_y[0])
输出结果:

在对y求导时报错,是因为在backward()和autograd.grad在计算一次梯度之后就被释放了,如果想要保留,就要用retain_graph=True,在计算完x的梯度后保留计算图,
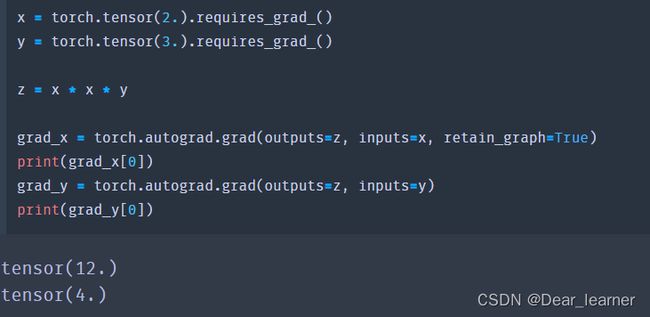
如何进行高阶求导,理论上是由上面的grad_x再对x求导
x = torch.tensor(2.).requires_grad_()
y = torch.tensor(3.).requires_grad_()

z = x * x * y

grad_x = torch.autograd.grad(outputs=z, inputs=x, retain_graph=True)
grad_xx = torch.autograd.grad(outputs=grad_x, inputs=x)
print(grad_xx[0])
输出结果:

虽然retain_graph=True保留了计算图和中间变量梯度, 但没有保存grad_x的运算方式,需要使用creat_graph=True在保留原图的基础上再建立额外的求导计算图,也就是会把 ∂ z ∂ x = 2 x y \frac{\partial z}{\partial x} =2xy ∂x∂z=2xy 这样的运算存下来

grad_xx这里也可以直接用backward(),相当于直接从 ∂ z ∂ x = 2 x y \frac{\partial z}{\partial x} =2xy ∂x∂z=2xy 开始回传
x = torch.tensor(2.).requires_grad_()
y = torch.tensor(3.).requires_grad_()

z = x * x * y

grad_x = torch.autograd.grad(outputs=z, inputs=x, create_graph=True)
grad_x[0].backward()
print(x.grad)
#result
tensor(6.)
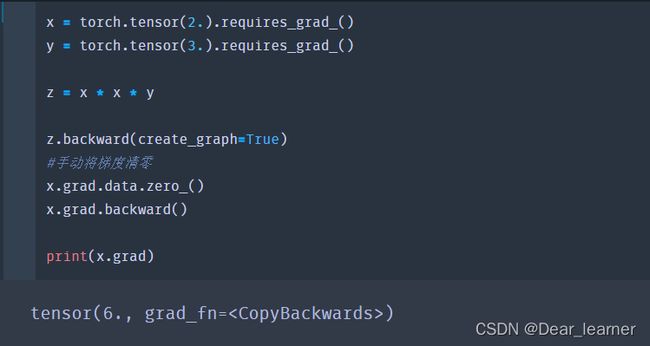
从上面的求导看出,是从x.grad开始回传,下面是从z开始回传,得到的结果是18,这是为什么呢?
因为第一次回传时,x的梯度时12,第二次梯度回传时,x的梯度时6,两次的梯度进行了累加。这是因为pytorch使用backward()时默认会累加梯度,这时需要手动的把梯度清零

将梯度清零
在上面的示例中都是对标量进行求导,如果不是标量呢
x = torch.tensor([1., 2.]).requires_grad_()
y = x + 1

y.backward()
print(x.grad)

报错了,因为只能标量对标量,标量对向量求梯度, x 可以是标量或者向量,但 y 只能是标量;所以只需要先将 y 转变为标量,对分别求导没影响的就是求和。
此时:
![]()
![]()
![]()


x = torch.tensor([1., 2.]).requires_grad_()
y = x * x

y.sum().backward()
print(x.grad)
###result
tensor([2., 4.])
求导计算雅克比矩阵: y = [ y 1 , y 2 ] y = \left [y _{1} ,y _{2}\right ] y=[y1,y2] 是一个向量
J = [ ∂ y ∂ x 1 , ∂ y ∂ x 2 ] = [ ∂ y 1 ∂ x 1 ∂ y 1 ∂ x 2 ∂ y 2 ∂ x 1 ∂ y 2 ∂ x 2 ] J = \left [ \frac{\partial y}{\partial x1},\frac{\partial y}{\partial x2} \right ] = \begin{bmatrix} \frac{\partial y1}{\partial x1}& \frac{\partial y1}{\partial x2} \\ \frac{\partial y2}{\partial x1}& \frac{\partial y2}{\partial x2} \\ \end{bmatrix} J=[∂x1∂y,∂x2∂y]=[∂x1∂y1∂x1∂y2∂x2∂y1∂x2∂y2],希望最终的结果是 [ ∂ y 1 ∂ x 1 , ∂ y 2 ∂ x 2 ] \left [ \frac{\partial y1}{\partial x1},\frac{\partial y2}{\partial x2} \right ] [∂x1∂y1,∂x2∂y2]
注意到 ∂ y 1 ∂ x 2 \frac{\partial y1}{\partial x2} ∂x2∂y1 , ∂ y 2 ∂ x 1 \frac{\partial y2}{\partial x1} ∂x1∂y2 是0,所以

x = torch.tensor([1., 2.]).requires_grad_()
y = x * x

y.backward(torch.ones_like(x))
print(x.grad)
###result
tensor([2., 4.])
也可以使用autograd。上面和这里的torch.ones_like(x) 位置指的就是雅可比矩阵右乘的那个向量
x = torch.tensor([1., 2.]).requires_grad_()
y = x * x

grad_x = torch.autograd.grad(outputs=y, inputs=x, grad_outputs=torch.ones_like(x))
print(grad_x[0])

##或者
x = torch.tensor([1., 2.]).requires_grad_()
y = x * x

grad_x = torch.autograd.grad(outputs=y.sum(), inputs=x)
梯度清零
Pytorch的自动求导机制的梯度时累加的,所以每一次反向传播之后梯度要清零
x.grad.zero_()

###在神经网络中,需要执行
optimizer.zero_grad()
detach() 切断
假设有模型A和模型B,我们需要将A的输出作为B的输入,但训练时只训练模型B,这时可以用detach()来切断
input_B = output_A.detach()
示例:
x = torch.tensor([2.], requires_grad=True)

a = torch.add(x, 1).detach()
b = torch.add(x, 2)
y = torch.mul(a, b)

y.backward()

print("requires_grad: ", x.requires_grad, a.requires_grad, b.requires_grad, y.requires_grad)
print("is_leaf: ", x.is_leaf, a.is_leaf, b.is_leaf, y.is_leaf)
print("grad: ", x.grad, a.grad, b.grad, y.grad)

###result
requires_grad:  True False True True
is_leaf:  True True False False
grad:  tensor([3.]) None None None
四、逻辑回归
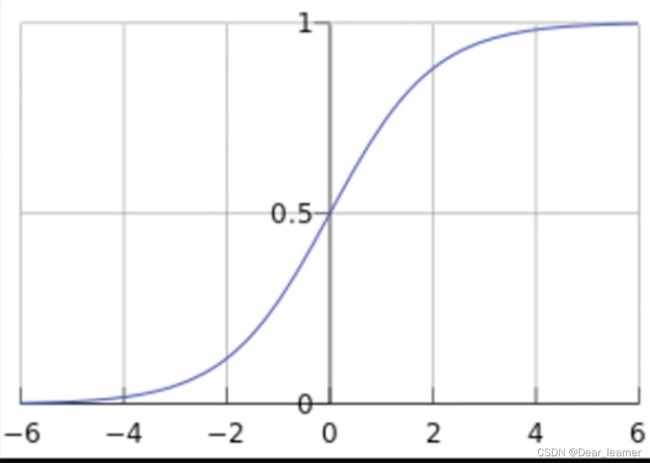
逻辑回归模型是线性的二分类模型,模型表达式为:
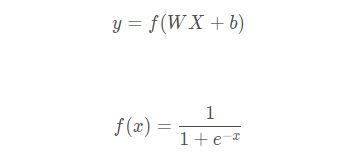
f(x)称为sigmoid函数,也称为Logistic函数

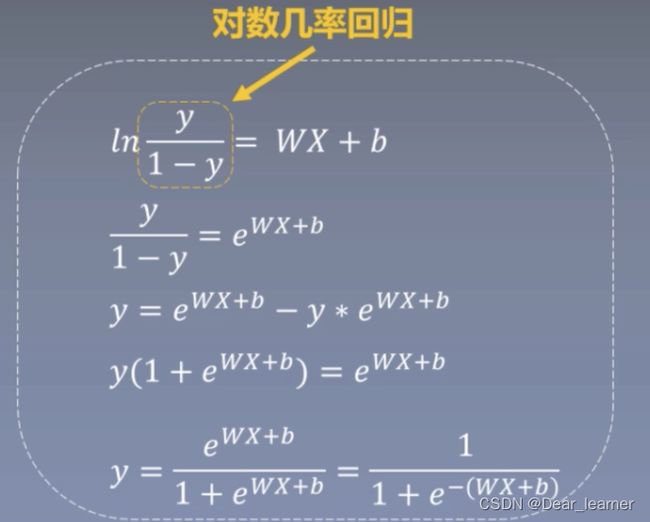
逻辑回归又称为对数几率回归
#数据生成
torch.manual_seed(1)

sample_nums = 100
mean_value = 1.7
bias = 1

n_data = torch.ones(sample_nums, 2)
x0 = torch.normal(mean_value*n_data, 1) + bias  # 类别0  数据shape=(100,2)
y0 = torch.zeros(sample_nums)   # 类别0, 数据shape=(100, 1)
x1 = torch.normal(-mean_value*n_data, 1) + bias   # 类别1, 数据shape=(100,2)
y1 = torch.ones(sample_nums)    # 类别1  shape=(100, 1)

train_x = torch.cat([x0, x1], 0)
train_y = torch.cat([y0, y1], 0)
#构建模型
class LR(torch.nn.Module):
    def __init__(self):
        super(LR, self).__init__()
        self.features = torch.nn.Linear(2, 1)  # Linear 是module的子类,是参数化module的一种,与其名称一样,表示着一种线性变换。输入2个节点,输出1个节点
        self.sigmoid = torch.nn.Sigmoid()

    def forward(self, x):
        x = self.features(x)
        x = self.sigmoid(x)

        return x

lr_net = LR()     # 实例化逻辑回归模型
#选择损失函数
loss_fn = torch.nn.BCELoss()

#选择优化器
lr = 0.01
optimizer = torch.optim.SGD(lr_net.parameters(), lr=lr, momentum=0.9)

#模型训练
for iteration in range(1000):

    # 前向传播
    y_pred = lr_net(train_x)

    # 计算loss
    loss = loss_fn(y_pred.squeeze(), train_y)

    # 反向传播
    loss.backward()

    # 更新参数
    optimizer.step()

    # 清空梯度
    optimizer.zero_grad()

    # 绘图
    if iteration % 20 == 0:

        mask = y_pred.ge(0.5).float().squeeze()  # 以0.5为阈值进行分类
        correct = (mask == train_y).sum()  # 计算正确预测的样本个数
        acc = correct.item() / train_y.size(0)  # 计算分类准确率

        plt.scatter(x0.data.numpy()[:, 0], x0.data.numpy()[:, 1], c='r', label='class 0')
        plt.scatter(x1.data.numpy()[:, 0], x1.data.numpy()[:, 1], c='b', label='class 1')

        w0, w1 = lr_net.features.weight[0]
        w0, w1 = float(w0.item()), float(w1.item())
        plot_b = float(lr_net.features.bias[0].item())
        plot_x = np.arange(-6, 6, 0.1)
        plot_y = (-w0 * plot_x - plot_b) / w1

        plt.xlim(-5, 7)
        plt.ylim(-7, 7)
        plt.plot(plot_x, plot_y)

        plt.text(-5, 5, 'Loss=%.4f' % loss.data.numpy(), fontdict={'size': 20, 'color': 'red'})
        plt.title("Iteration: {}\nw0:{:.2f} w1:{:.2f} b: {:.2f} accuracy:{:.2%}".format(iteration, w0, w1, plot_b, acc))
        plt.legend()

        plt.show()
        plt.pause(0.5)

        if acc > 0.99:
            break


