目标检测之YOLO v3-You Only Look Once(三)
这几天写YOLO v3文章的时候发现网上相关讲解的文章因为下面这三个问题讲的并不够透彻:1.讲解网络结构时纯文字叙述,没有流程图。(本文引用木盏的流程图)2.由于论文中没有损失函数的公式,所以很多文章对此也是略带一句,本文会详细展开阐述。3.很多文章理论部分确实讲解得不错,但是光有理论看过之后还是摸不着头脑(YOLO的论文中细节太少,光看论文细节会忽略很多),本文将会结合YunYang用tensorflow复现的YOLO v3代码,对每一个理论部分的代码也进行对应的剖析,力争让每一位读者看完后不仅对理论清晰也可以直接上手代码,也因为想更详细地讲解YOLO v3的细节,本文字数差不多有1W字,但保证字字都是干货
目录
- 前言
- 网络结构
- 解码与筛选框
- 损失函数
- 参考
前言
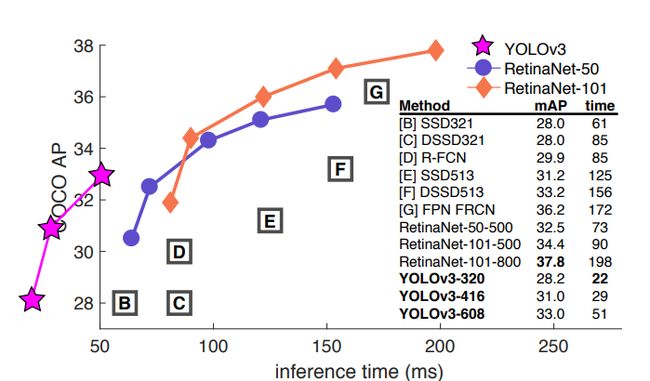
- YOLO v3的论文的风格感觉是作者的日记,作者开篇就说到这一年都在玩推特,也玩了一点GAN,顺便对YOLO做了一个升级,然后还上了一张这样的对比图:

- 这张图来自
focal loss的论文,但是focal loss的作者在画这张图的时候,给出了YOLO v2的坐标但是没有给出成绩,作者觉得不爽,于是直接把自己放在了第二象限,以示**“无敌”**。 - 总的来说,YOLO v3借鉴了视觉这一块最新的一些思想融合在了一起,改动并不多,因此本文也将注重理论与实现细节的融合。
网络结构
1.backbone:Darknet-53
- 作者对YOLO v2时期的
Darknet-19进行了升级,借鉴了ResNet的残差单元,在加深网络层数提高精度的同时大大降低计算量,接下来我们来具体剖析,先上backbone的结构图:

- 我们可以看到,在整个
YOLO v3结构里面,是没有池化层和全连接层的。张量的尺寸的变换是通过改变卷积核的步长来实现的(也就是通过卷积实现下采样),比如stride=(2, 2),这就等于将图像边长缩小了一半,整个特征图缩小 2 2 2^2 22倍。在YOLO v3中,最终要经历5次缩小,会将特征图缩小到原输入尺寸的 1 2 5 \frac{1}{2^5} 251 ,即1/32。输入为416x416,则输出为13x13(416/32=13)。需要注意的是,最后三层Avgpool、Connected和softmax layer是用于在Imagenet数据集上作分类训练用的。当我们用Darknet-53层对图片提取特征时,是不会用到这三层的。 - 这个backbone的效果也非常好,比起同精度的ResNet-152速度也是它的两倍,具体见下图:

- 接下来我们对backbone里的
Convolutional和Residual模块进行讲解:
Convolutional模块
- 这里的
Convolutional模块不是单单的一个卷积层,是YOLO v3的一个基本组件:卷积层+BN层+leaky relu激活层(Conv+BN+leaky_relu),BN层和leaky_relu到了v3已经基本和卷积层绑定了,除了整个网络的最后一层卷积层(讲到整个网络结构的时候会提到),具体代码如下:
def convolutional(input_data, filters_shape, trainable, name, downsample=False, activate=True, bn=True):
    """yolo_v3的基本组件:Conv+BN+leaky_relu"""
    with tf.variable_scope(name):
        if downsample:
            """利用tf.pad()函数手动给feature map往外做填充"""
            pad_h, pad_w = (filters_shape[0] - 2) // 2 + 1, (filters_shape[1] - 2) // 2 + 1
            paddings = tf.constant([[0, 0], [pad_h, pad_h], [pad_w, pad_w], [0, 0]])
            input_data = tf.pad(input_data, paddings, 'CONSTANT')
            strides = (1, 2, 2, 1)
            padding = 'VALID'
        else:
            strides = (1, 1, 1, 1)
            padding = "SAME"
        weight = tf.get_variable(name='weight', dtype=tf.float32, trainable=True,
                                 shape=filters_shape, initializer=tf.random_normal_initializer(stddev=0.01))
        conv = tf.nn.conv2d(input=input_data, filter=weight, strides=strides, padding=padding)
        if bn:
            conv = tf.layers.batch_normalization(conv, beta_initializer=tf.zeros_initializer(),gamma_initializer=tf.ones_initializer(),                                           moving_mean_initializer=tf.zeros_initializer(),                                           moving_variance_initializer=tf.ones_initializer(), training=trainable)
        else:
            bias = tf.get_variable(name='bias', shape=filters_shape[-1], trainable=True,
                                   dtype=tf.float32, initializer=tf.constant_initializer(0.0))
            conv = tf.nn.bias_add(conv, bias)
        if activate == True: conv = tf.nn.leaky_relu(conv, alpha=0.1)
    return conv
- 这里稍微说一下两个变量维度方便大家理解:shape(input_data) = (Batch, Height, Width, Channel) ,filters_shape=(Height,Width,input,output)
- 前面提到,作者舍弃池化层使用卷积层来做下采样,而至于为什么作者采用tf.pad()扩充后再以valid padding的方式来做下采样而不是直接用same padding的方式来做下采样可以看我这篇文章:https://zhuanlan.zhihu.com/p/105470105
Residual 残差模块
- 残差模块是
backbone升级的关键,残差模块最显著的特点是使用了 short cut 机制(有点类似于电路中的短路机制)来缓解在神经网络中增加深度带来的梯度消失问题,从而使得神经网络变得更容易优化。它通过恒等映射(identity mapping)的方法使得输入和输出之间建立了一条直接的关联通道,从而使得网络集中学习输入和输出之间的残差,这里读者先理解这个模块的结构是怎么样的即可,后面会写篇文章介绍ResNet,具体结构和对应的代码如下:

def residual_block(input_data, input_channel, filter_num1, filter_num2, trainable, name):
    """借鉴ResNet的res_unit"""
    short_cut = input_data
    with tf.variable_scope(name):
        input_data = convolutional(input_data, filters_shape=(1, 1, input_channel, filter_num1),
                                   trainable=trainable, name='conv1')
        input_data = convolutional(input_data, filters_shape=(3, 3, filter_num1,   filter_num2),
                                   trainable=trainable, name='conv2')
        residual_output = input_data + short_cut
    return residual_output
2.整个网络结构
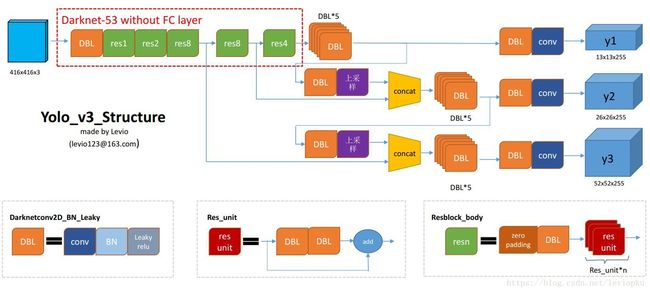
- 这张流程图非常清晰地刻画了整个YOLO v3的结构:利用
backbone Darknet-53进行特征提取,再用三个预测分支进行预测,接下来先介绍下图中的几个组件,再对图中各个部分进行拆解剖析:
组件介绍
- DBL:图中的DBL其实就是我们上面介绍的一个YOLO v3基本组件:Conv+BN+leaky_relu,我们可以看到这个组件在整个YOLO v3使用得可以说是相当多了。
- resn:前面提到
YOLO v3借鉴的ResNet的残差结构既是这个模块。n代表数字,有res1,res2, … ,res8等等,表示这个res_block里含有多少个res_unit。Res_unit的结构就是残差结构,在backbone部分也已介绍。 - concat:我们可以看到图中做了两次
concat,concat即是张量拼接。将darknet中间层和后面的某一层的上采样进行拼接,个人觉得这个操作可能是做一个特征融合,类似v2中的passthrough层。要注意拼接的操作和残差层add的操作是不一样的,拼接会扩充张量的维度,而add只是直接相加不会导致张量维度的改变。比如第一个concat中,将原本13×13×256的输出通过上采样变成26×26×256,与其中一个分支的输出(也是26×26×512)进行concat,变成26×26×768。我们结合代码看一下(具体的整个流程待讲完特征金字塔再给出,先给出上采样和concat的代码):
上采样部分
- 上采样这里有两个选项,一个是用简单的线性插值,一个则是用反卷积来进行上采样,作者这里默认使用线性插值,毕竟线性插值很简单,不需要学习参数。
def upsample(input_data, name, method="deconv"):
    """上采样操作
    method:resize——使用最近邻插值方法进行上采样(不需要学习参数)
           deconv——使用反卷积的方法进行上采样

    """
    assert method in ["resize", "deconv"]
    if method == "resize":
        with tf.variable_scope(name):
            input_shape = tf.shape(input_data)
            output = tf.image.resize_nearest_neighbor(input_data, (input_shape[1] * 2, input_shape[2] * 2))
    if method == "deconv":
        # replace resize_nearest_neighbor with conv2d_transpose To support TensorRT optimization
        numm_filter = input_data.shape.as_list()[-1]
        output = tf.layers.conv2d_transpose(input_data, numm_filter, kernel_size=2, padding='same',
                                            strides=(2,2), kernel_initializer=tf.random_normal_initializer())
    return output
拼接
- 这部分只是简单的concat,就一笔带过了。
def route(name, previous_output, current_output):
    """尺度拼接"""
    with tf.variable_scope(name):
        output = tf.concat([current_output, previous_output], axis=-1)
    return output
特征金字塔
- 作者借鉴了特征金字塔FPN(feature pyramid networks)的思想,采用多尺度来对不同size的目标进行检测,这也对应了网络结构图的三个预测分支(输出)y1,y2,y3(每一个特征图会分配3个先验框,一共9个先验框)。y1,y2和y3的深度都是255,边长的规律是13:26:52,越小的特征图代表下采样的倍数高,而感受野也大,所以13×13的y1特征图对应检测大物体,26×26的y2特征图对应检测中物体,52×52的y3特征图对应检测小物体,所以这才就是y1,y2,y3的前两个维度的含义,那第三个维度是什么含义?请往下看。
网络输出
- 我们可以看到无论是y1,y2,y3的输出,最后一个维度总是255,这个255跟YOLO v1的网络输出类似。YOLO v3设定的是每个网格单元预测3个box,所以每个box需要有(x, y, w, h, confidence)五个基本参数,然后还要有80个类别的概率,所以3×(5 + 80) = 255。
代码
- 至此,整个YOLO v3除了损失函数之外的东西我们都已经搞清楚了,我们结合代码来看一下(读者结合上面的流程图就可以和代码块一一对应):
    def __build_nework(self, input_data):
        """经过Darknet-53后,分出三个分支y1,y2,y3"""
        route_1, route_2, input_data = backbone.darknet53(input_data, self.trainable)
        #(Conv + BN + leaky_relu)×5
        input_data = common.convolutional(input_data, (1, 1, 1024,  512), self.trainable, 'conv52')
        input_data = common.convolutional(input_data, (3, 3,  512, 1024), self.trainable, 'conv53')
        input_data = common.convolutional(input_data, (1, 1, 1024,  512), self.trainable, 'conv54')
        input_data = common.convolutional(input_data, (3, 3,  512, 1024), self.trainable, 'conv55')
        input_data = common.convolutional(input_data, (1, 1, 1024,  512), self.trainable, 'conv56')
        conv_lobj_branch = common.convolutional(input_data, (3, 3, 512, 1024), self.trainable, name='conv_lobj_branch')
        #y1的输出[None,13,13,3*(80+5)=255],用于检测大物体
        conv_lbbox = common.convolutional(conv_lobj_branch, (1, 1, 1024, 3*(self.num_class + 5)),
                                          trainable=self.trainable, name='conv_lbbox', activate=False, bn=False)
        input_data = common.convolutional(input_data, (1, 1,  512,  256), self.trainable, 'conv57')
        input_data = common.upsample(input_data, name='upsample0', method=self.upsample_method)
        #第一个concat操作
        with tf.variable_scope('route_1'):
            input_data = tf.concat([input_data, route_2], axis=-1)
        input_data = common.convolutional(input_data, (1, 1, 768, 256), self.trainable, 'conv58')
        input_data = common.convolutional(input_data, (3, 3, 256, 512), self.trainable, 'conv59')
        input_data = common.convolutional(input_data, (1, 1, 512, 256), self.trainable, 'conv60')
        input_data = common.convolutional(input_data, (3, 3, 256, 512), self.trainable, 'conv61')
        input_data = common.convolutional(input_data, (1, 1, 512, 256), self.trainable, 'conv62')
        conv_mobj_branch = common.convolutional(input_data, (3, 3, 256, 512),  self.trainable, name='conv_mobj_branch' )
        #y2的输出[None,26,26,3*(80+5)=255],用于检测中等物体
        conv_mbbox = common.convolutional(conv_mobj_branch, (1, 1, 512, 3*(self.num_class + 5)),
                                          trainable=self.trainable, name='conv_mbbox', activate=False, bn=False)

        input_data = common.convolutional(input_data, (1, 1, 256, 128), self.trainable, 'conv63')
        input_data = common.upsample(input_data, name='upsample1', method=self.upsample_method)
        #第二个concat操作
        with tf.variable_scope('route_2'):
            input_data = tf.concat([input_data, route_1], axis=-1)
        input_data = common.convolutional(input_data, (1, 1, 384, 128), self.trainable, 'conv64')
        input_data = common.convolutional(input_data, (3, 3, 128, 256), self.trainable, 'conv65')
        input_data = common.convolutional(input_data, (1, 1, 256, 128), self.trainable, 'conv66')
        input_data = common.convolutional(input_data, (3, 3, 128, 256), self.trainable, 'conv67')
        input_data = common.convolutional(input_data, (1, 1, 256, 128), self.trainable, 'conv68')
        conv_sobj_branch = common.convolutional(input_data, (3, 3, 128, 256), self.trainable, name='conv_sobj_branch')
        #y3的输出[None,52,52,3*(80+5)=255],用于检测小物体
        conv_sbbox = common.convolutional(conv_sobj_branch, (1, 1, 256, 3*(self.num_class + 5)),
                                          trainable=self.trainable, name='conv_sbbox', activate=False, bn=False)
        return conv_lbbox, conv_mbbox, conv_sbbox
解码与筛选框
解码
- 通过上面对网络结构的掌握,读到这里笔者已经可以大概掌握
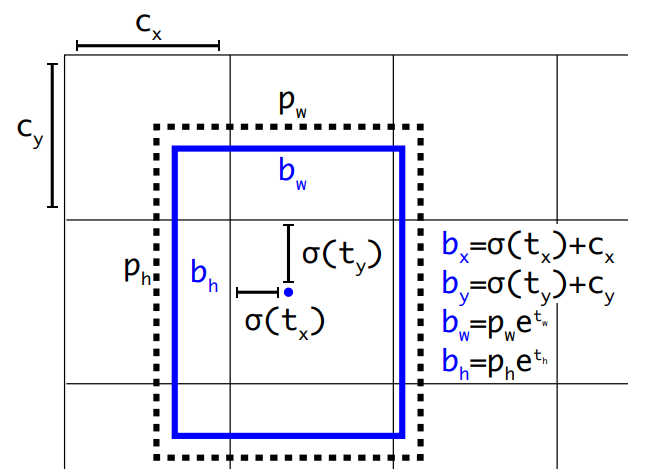
YOLO v3的思想,可这里有个问题,上面的网络输出的最后一个维度255是怎么用来训练呢?那就是要经过一个解码的步骤,将255按照实际意义**(output_size, output_size, anchor_per_scale, 5 + num_classes)**拆解出来,才能还原出我们预测的坐标。

- 有了解过
YOLO v2的读者应该对这些公式并不陌生,这里做一个简单的回顾: b h b^h bh和 b w b^w bw分别表示预测框的长宽, P h P^h Ph和 P w P^w Pw分别表示先验框的长和宽。 t x t^x tx和 t y t^y ty表示的是物体中心距离网格左上角位置的偏移量, c x c^x cx和 c y c^y cy则代表网格左上角的坐标。想了解详情的读者可以看我解读YOLO v2的那篇文章。我们结合代码来看一下(先按照255由来的方式拆解出各个坐标以及位移,再按照公式还原出预测框坐标):
   def decode(self, conv_output, anchors, stride):
        """
        return tensor of shape [batch_size, output_size, output_size, anchor_per_scale, 5 + num_classes]
               contains (x, y, w, h, score, probability)
        stride对应三种feature map的尺寸13,26,52
        anchor_per_scale即为每个cell预测3个bounding box
        """
        conv_shape       = tf.shape(conv_output)
        batch_size       = conv_shape[0]
        output_size      = conv_shape[1]
        anchor_per_scale = len(anchors)
        conv_output = tf.reshape(conv_output, (batch_size, output_size, output_size, anchor_per_scale, 5 + self.num_class))
        conv_raw_dxdy = conv_output[:, :, :, :, 0:2]
        conv_raw_dwdh = conv_output[:, :, :, :, 2:4]
        conv_raw_conf = conv_output[:, :, :, :, 4:5]
        conv_raw_prob = conv_output[:, :, :, :, 5: ]
        #画出(output_size,output_size)的网格
        y = tf.tile(tf.range(output_size, dtype=tf.int32)[:, tf.newaxis], [1, output_size])
        x = tf.tile(tf.range(output_size, dtype=tf.int32)[tf.newaxis, :], [output_size, 1])
        xy_grid = tf.concat([x[:, :, tf.newaxis], y[:, :, tf.newaxis]], axis=-1)
        xy_grid = tf.tile(xy_grid[tf.newaxis, :, :, tf.newaxis, :], [batch_size, 1, 1, anchor_per_scale, 1])
        #要计算位移先把int32转换为float32
        xy_grid = tf.cast(xy_grid, tf.float32)
        #根据公式计算预测框的中心x,y位置
        pred_xy = (tf.sigmoid(conv_raw_dxdy) + xy_grid) * stride
        #根据公式计算预测框的宽高w,h
        pred_wh = (tf.exp(conv_raw_dwdh) * anchors) * stride
        pred_xywh = tf.concat([pred_xy, pred_wh], axis=-1)
        # 根据公式计算含有object的置信度
        pred_conf = tf.sigmoid(conv_raw_conf)
        # 根据公式计算含有类别概率
        pred_prob = tf.sigmoid(conv_raw_prob)
        return tf.concat([pred_xywh, pred_conf, pred_prob], axis=-1)
筛选框
- 筛选框部分包含利用NMS筛选低分框以及筛选掉无物体的框。
NMS
- NMS也就是非极大值抑制,其实就是去除掉那些重叠率较高并且评分较低的边界框,这里的步骤分为三步:
- 判断边界框的数目是否大于0(是否检测出边界框)。
- 按照 socre 排序选出评分最大的边界框;
- 计算这个边界框与剩下所有边界框的IoU并剔除那些 IoU值高于阈值的边界框(IoU的计算代码在损失函数部分给出);
- 这里NMS也给出了两种方法,分别是普通NMS和soft-NMS,soft-NMS的思路就是不要直接删除所有IoU大于阈值的框,因为在密集物体的检测中会出现误删的情况,而是降低其置信度。soft-NMS可以选择通过线性加权和高斯加权的方式进行降低置信度,这里选择高斯加权的方式,这里读者后面会补充一篇文章介绍原理。结合代码看一下:
def nms(bboxes, iou_threshold, sigma=0.3, method='nms'):
    """
    :param bboxes: (xmin, ymin, xmax, ymax, score, class)

    Note: soft-nms, https://arxiv.org/pdf/1704.04503.pdf
          https://github.com/bharatsingh430/soft-nms
    NMS非极大值抑制处理
    """
    classes_in_img = list(set(bboxes[:, 5]))
    best_bboxes = []
    for cls in classes_in_img:
        cls_mask = (bboxes[:, 5] == cls)
        cls_bboxes = bboxes[cls_mask]
        #先判断该类别是否检测出边界框
        while len(cls_bboxes) > 0:
            #然后取出该类别下得分最高的边界框id
            max_ind = np.argmax(cls_bboxes[:, 4])
            #取出得分最高的边界框并在cls_bboxes中删除
            best_bbox = cls_bboxes[max_ind]
            best_bboxes.append(best_bbox)
            cls_bboxes = np.concatenate([cls_bboxes[: max_ind], cls_bboxes[max_ind + 1:]])
            iou = bboxes_iou(best_bbox[np.newaxis, :4], cls_bboxes[:, :4])
            weight = np.ones((len(iou),), dtype=np.float32)
            assert method in ['nms', 'soft-nms']
            """可选nms和soft-nms两种方法,soft-nms对得分小的框不直接删除而是减少其置信度"""
            if method == 'nms':
                iou_mask = iou > iou_threshold
                weight[iou_mask] = 0.0
            if method == 'soft-nms':
                #高斯加权的soft-nms方式
                weight = np.exp(-(1.0 * iou ** 2 / sigma))
            cls_bboxes[:, 4] = cls_bboxes[:, 4] * weight
            score_mask = cls_bboxes[:, 4] > 0.
            cls_bboxes = cls_bboxes[score_mask]
    return best_bboxes
筛选掉无物体的检测框
- 这部分比较简单,就是一些评分太低(无物体)和不正常的检测框我们当做这是多余的框,将之去掉,我们结合代码看一下:
def postprocess_boxes(pred_bbox, org_img_shape, input_size, score_threshold):
    valid_scale=[0, np.inf]
    pred_bbox = np.array(pred_bbox)
    pred_xywh = pred_bbox[:, 0:4]
    pred_conf = pred_bbox[:, 4]
    pred_prob = pred_bbox[:, 5:]
    # # (1)通过(x, y, w, h)计算 --> (xmin, ymin, xmax, ymax)
    pred_coor = np.concatenate([pred_xywh[:, :2] - pred_xywh[:, 2:] * 0.5,
                                pred_xywh[:, :2] + pred_xywh[:, 2:] * 0.5], axis=-1)
    # # (2) 通过特征图中心坐标计算原图坐标(xmin, ymin, xmax, ymax) -> (xmin_org, ymin_org, xmax_org, ymax_org)
    org_h, org_w = org_img_shape
    resize_ratio = min(input_size / org_w, input_size / org_h)
    dw = (input_size - resize_ratio * org_w) / 2
    dh = (input_size - resize_ratio * org_h) / 2
    pred_coor[:, 0::2] = 1.0 * (pred_coor[:, 0::2] - dw) / resize_ratio
    pred_coor[:, 1::2] = 1.0 * (pred_coor[:, 1::2] - dh) / resize_ratio
    # # (3) 去除掉一些不在正常范围的检测框clip some boxes those are out of range
    pred_coor = np.concatenate([np.maximum(pred_coor[:, :2], [0, 0]),
                                np.minimum(pred_coor[:, 2:], [org_w - 1, org_h - 1])], axis=-1)
    invalid_mask = np.logical_or((pred_coor[:, 0] > pred_coor[:, 2]), (pred_coor[:, 1] > pred_coor[:, 3]))
    pred_coor[invalid_mask] = 0
    # # (4) 筛选出在一开始定义的合法范围框内的检测狂discard some invalid boxes
    bboxes_scale = np.sqrt(np.multiply.reduce(pred_coor[:, 2:4] - pred_coor[:, 0:2], axis=-1))
    scale_mask = np.logical_and((valid_scale[0] < bboxes_scale), (bboxes_scale < valid_scale[1]))
    # # (5) 将低分的框也去除discard some boxes with low scores
    classes = np.argmax(pred_prob, axis=-1)
    scores = pred_conf * pred_prob[np.arange(len(pred_coor)), classes]
    score_mask = scores > score_threshold
    mask = np.logical_and(scale_mask, score_mask)
    coors, scores, classes = pred_coor[mask], scores[mask], classes[mask]
    return np.concatenate([coors, scores[:, np.newaxis], classes[:, np.newaxis]], axis=-1)
损失函数
- YOLO系列除了v1外在论文中都没有出现损失函数,这导致很多文章在讲解的时候都比较模糊。先上图:

- 和YOLO v1一样,我们将他进行拆解,把整个损失函数分为边界框损失+置信度损失+分类损失,我们分开来讲(大部分与YOLO v1的损失函数重合,不了解的读者可以先去看看我YOLO v1中讲解损失函数的部分,这里只会讲和v1不同的地方)
边界框损失
- 这里和YOLO v1一个不同的地方则是当时YOLO v1计算长宽损失的时候多了一个根号。当时说这是因为对于相等的误差值,大物体误差对检测的影响应小于小物体误差对检测的影响。例如,5个像素点的偏差,对于400×500的预测框几乎没有影响,此时的IOU数值还是很大,但是对于10×10的预测框影响就很大,加了根号就是为了减少这种影响,但是后面发现加了根号后对小框的损失来说更大: ( 20 − 10 ) 2 = 3.43 (\sqrt{20}-\sqrt{10})^2=3.43 (20−10)2=3.43, ( 110 − 100 ) 2 = 0.48 (\sqrt{110}-\sqrt{100})^2=0.48 (110−100)2=0.48,所以作者对损失函数进行了改进,不再简单地加根号了,而是用 s c a l e = 2 − W × H scale = 2 -W×H scale=2−W×H进一步加大对小框的损失,值的范围是 ( 1 , 2 ) (1,2) (1,2),边界框的尺寸越小,bbox_loss_scale 的值就越大。box_loss_scale可以弱化边界框尺寸对损失值的影响;
- 另一个不同的地方则使用GIoU代替了原来的IoU,解决了IoU在预测的检测框如果和真实物体的检测框没有重叠(没有交集)的话,始终为0且无法优化和对于两个IoU相同的物体,他们的对齐方式IoU并不敏感的缺点,具体原理的话可以看笔者讲解GIoU的文章。这里先给出GIoU的计算代码(完整损失函数计算放在最后):
    def bbox_giou(self, boxes1, boxes2):
        # 通过中心坐标分别加减宽高的一半计算bboxex的左上角坐标右下角坐标并拼接在一起
        boxes1 = tf.concat([boxes1[..., :2] - boxes1[..., 2:] * 0.5,
                            boxes1[..., :2] + boxes1[..., 2:] * 0.5], axis=-1)
        boxes2 = tf.concat([boxes2[..., :2] - boxes2[..., 2:] * 0.5,
                            boxes2[..., :2] + boxes2[..., 2:] * 0.5], axis=-1)
        boxes1 = tf.concat([tf.minimum(boxes1[..., :2], boxes1[..., 2:]),
                            tf.maximum(boxes1[..., :2], boxes1[..., 2:])], axis=-1)
        boxes2 = tf.concat([tf.minimum(boxes2[..., :2], boxes2[..., 2:]),
                            tf.maximum(boxes2[..., :2], boxes2[..., 2:])], axis=-1)
        # 分别计算两个boxes的面积
        boxes1_area = (boxes1[..., 2] - boxes1[..., 0]) * (boxes1[..., 3] - boxes1[..., 1])
        boxes2_area = (boxes2[..., 2] - boxes2[..., 0]) * (boxes2[..., 3] - boxes2[..., 1])
        # 计算交集的左上角以及右下角的坐标
        left_up = tf.maximum(boxes1[..., :2], boxes2[..., :2])
        right_down = tf.minimum(boxes1[..., 2:], boxes2[..., 2:])
        # 计算交集的宽高,如果right_down - left_up < 0,则没有交集,宽高设置为0
        inter_section = tf.maximum(right_down - left_up, 0.0)
        # 计算交集面积
        inter_area = inter_section[..., 0] * inter_section[..., 1]
        # 计算并集面积
        union_area = boxes1_area + boxes2_area - inter_area
        # 计算IoU
        iou = inter_area / union_area
        # 计算最小并集的坐标
        enclose_left_up = tf.minimum(boxes1[..., :2], boxes2[..., :2])
        enclose_right_down = tf.maximum(boxes1[..., 2:], boxes2[..., 2:])
        # 计算最小并集的宽高,如果enclose_right_down - enclose_left_up < 0,则宽高设置为0
        enclose = tf.maximum(enclose_right_down - enclose_left_up, 0.0)
        # 计算最小并集的面积
        enclose_area = enclose[..., 0] * enclose[..., 1]
        # 计算GIoU
        giou = iou - 1.0 * (enclose_area - union_area) / enclose_area
        return giou
置信度损失
- 这部分和分类损失作者都用交叉熵取代了原本的均方误差,即把所有类别的分类问题归结为是否属于这个类别,这样就把多分类看做是二分类问题。这样做的好处在于排除了类别的互斥性,特别是解决了因多个类别物体的重叠而出现漏检的问题。
- 引入Focal loss ,Focal Loss, 通过修改标准的交叉熵损失函数,降低对能够很好分类样本的权重(down-weights the loss assigned to well-classified examples),解决正负样本不均衡和难易样本不均衡的问题,这个后面也会写篇文章介绍原理,形式如下,这里的 α γ 都 是 超 参 数 \alpha\gamma都是超参数 αγ都是超参数:

    def focal(self, target, actual, alpha=1, gamma=2):
        focal_loss = alpha * tf.pow(tf.abs(target - actual), gamma)
        return focal_loss
分类损失
- 这里没什么改动,也只是用交叉熵取代了原本的均方误差。
损失计算代码
- 我们再用代码巩固一下刚才讲的计算公式:
    def loss_layer(self, conv, pred, label, bboxes, anchors, stride):
        conv_shape  = tf.shape(conv)
        batch_size  = conv_shape[0]
        output_size = conv_shape[1]
        input_size  = stride * output_size
        conv = tf.reshape(conv, (batch_size, output_size, output_size,
                                 self.anchor_per_scale, 5 + self.num_class))
        conv_raw_conf = conv[:, :, :, :, 4:5]
        conv_raw_prob = conv[:, :, :, :, 5:]
        pred_xywh     = pred[:, :, :, :, 0:4]
        pred_conf     = pred[:, :, :, :, 4:5]
        label_xywh    = label[:, :, :, :, 0:4]
        #respond_bbox:如果网格单元中包含物体,那么就会计算边界框损失;
        respond_bbox  = label[:, :, :, :, 4:5]
        label_prob    = label[:, :, :, :, 5:]
        #计算GIoU
        giou = tf.expand_dims(self.bbox_giou(pred_xywh, label_xywh), axis=-1)
        input_size = tf.cast(input_size, tf.float32)
        #计算bbox_loss_scale
        bbox_loss_scale = 2.0 - 1.0 * label_xywh[:, :, :, :, 2:3] * label_xywh[:, :, :, :, 3:4] / (input_size ** 2)
        giou_loss = respond_bbox * bbox_loss_scale * (1- giou)
        #找出与真实框 iou 值最大的预测框
        iou = self.bbox_iou(pred_xywh[:, :, :, :, np.newaxis, :], bboxes[:, np.newaxis, np.newaxis, np.newaxis, :, :])
        max_iou = tf.expand_dims(tf.reduce_max(iou, axis=-1), axis=-1)
        #如果最大的 iou 小于阈值,那么认为该预测框不包含物体,则为背景框
        respond_bgd = (1.0 - respond_bbox) * tf.cast( max_iou < self.iou_loss_thresh, tf.float32 )
        conf_focal = self.focal(respond_bbox, pred_conf)
        #置信度损失
        conf_loss = conf_focal * (
                respond_bbox * tf.nn.sigmoid_cross_entropy_with_logits(labels=respond_bbox, logits=conv_raw_conf)
                +
                respond_bgd * tf.nn.sigmoid_cross_entropy_with_logits(labels=respond_bbox, logits=conv_raw_conf)
        )
        prob_loss = respond_bbox * tf.nn.sigmoid_cross_entropy_with_logits(labels=label_prob, logits=conv_raw_prob)
        giou_loss = tf.reduce_mean(tf.reduce_sum(giou_loss, axis=[1,2,3,4]))
        conf_loss = tf.reduce_mean(tf.reduce_sum(conf_loss, axis=[1,2,3,4]))
        prob_loss = tf.reduce_mean(tf.reduce_sum(prob_loss, axis=[1,2,3,4]))
        return giou_loss, conf_loss, prob_loss
参考
- 论文:YOLOv3: An Incremental Improvement
- 源代码:https://github.com/YunYang1994/tensorflow-yolov3
- 网络流程图:https://blog.csdn.net/leviopku/article/details/82660381
- 损失函数图:https://blog.csdn.net/qq_34795071/article/details/92803741
