openvino系列 13. 使用 OpenVINO 多模型级联使用:车辆检测与识别示例
openvino系列 13. 使用 OpenVINO 多模型级联使用:车辆检测与识别示例
此案例演示如何使用 Open Model Zoo 中的两个预训练模型:vehicle-detection-0202 用于对象检测,和 vehicle-attributes-recognition-barrier-0039 用于图像分类。 使用这些模型,我们将从原始图像中检测车辆并识别检测到的车辆的属性(颜色与种类)。
环境描述:
- 本案例运行环境:Win10,10代i5笔记本
- IDE:VSCode
- openvino版本:2022.1
- 代码链接,
9-vehicle-detection-and-recognition
文章目录
- openvino系列 13. 使用 OpenVINO 多模型级联使用:车辆检测与识别示例
-
- 1 关于预训练模型
-
- 1.1 vehicle-detection-020X 物体识别预训练模型
- 1.2 vehicle-attributes-recognition-barrier-00XX 分类模型
- 2 模块介绍
- 3 代码
-
- 3.1 下载模型
- 3.2 读取图片
- 3.3 使用检测模型检测车辆
- 3.4 使用识别模型检测车辆识别车辆属性
- 3.5 将检测识别模型串起来
1 关于预训练模型
英特尔的OpenVINO有一个Open Model Zoo,里面包含了非常多的预训练模型。关于我们这个案例,相关的预训练模型包括:
- [Object detection] vehicle-detection-0200
- [Object detection] vehicle-detection-0201
- [Object detection] vehicle-detection-0202
- [Classification] vehicle-attributes-recognition-barrier-0039
- [Classification] vehicle-attributes-recognition-barrier-0042
不同的车辆识别模型的区别在于模型复杂度(GFLOPs)不同,当然,越复杂的模型,对应的精度(AP)也就越高。
1.1 vehicle-detection-020X 物体识别预训练模型
| vehicle-detection-0200 | vehicle-detection-0201 | vehicle-detection-0202 | |
|---|---|---|---|
| High-Level Description | This is a vehicle detector that is based on MobileNetV2 backbone with two SSD heads from 1/16 and 1/8 scale feature maps and clustered prior boxes for 256x256 resolution. | This is a vehicle detector that is based on MobileNetV2 backbone with two SSD heads from 1/16 and 1/8 scale feature maps and clustered prior boxes for 384x384 resolution. | This is a vehicle detector that is based on MobileNetV2 backbone with two SSD heads from 1/16 and 1/8 scale feature maps and clustered prior boxes for 512x512 resolution. |
| AP @ [ IoU=0.50:0.95 ] | 0.254 (internal test set) | 0.322 (internal test set) | 0.363 (internal test set) |
| GFlops | 0.786 | 1.768 | 3.143 |
| MParams | 1.817 | 1.817 | 1.817 |
| Source framework | PyTorch* | PyTorch* | PyTorch* |
三个模型的输入图像尺寸有多不同,输出尺寸一致。
- 输入:[1,3,256,256]/[1,3,384,384]/[1,3,512,512],对应0200,0201,0202(所以这个就是为什么计算量0202最大的原因)。输入格式:[B,C,H,W],即:[batch size,number of channels,image height,image width]。输入期望BGR格式图片。
- 输出:[1,1,200,7],即[1,1,N,7],N指的是bounding box的数量。每一个检测框包括七个维度:[image_id, label, conf, x_min, y_min, x_max, y_max]。
对比上面三个模型,我们最终选择vehicle-detection-0202,因为相较于前两个模型,0202的精度更高,而计算量也可以接受。
1.2 vehicle-attributes-recognition-barrier-00XX 分类模型
这里介绍和比较OpenVINO提供的两个分类模型,见下表:
| vehicle-attributes-recognition-barrier-0039 | vehicle-attributes-recognition-barrier-0042 | |
|---|---|---|
| Car pose | Front facing cars | Front facing cars |
| High-level Description | This model presents a vehicle attributes classification algorithm r a traffic analysis scenario. | This model presents a vehicle attributes classification algorithm for a traffic analysis scenario. |
| Occlusion coverage | <50% | <50% |
| Supported colors | White, gray, yellow, red, green, blue, black | White, gray, yellow, red, green, blue, black |
| Supported types | Car, van, truck, bus | Car, van, truck, bus |
| GFlops | 0.126 | 0.462 |
| MParams | 0.626 | 11.177 |
| Source framework | Caffe* | PyTorch* |
| White Color Accuracy | 84.83% | 84.20% |
| gray Color Accuracy | 78.01% | 77.47% |
| yellow Color Accuracy | 54.01% | 61.50% |
| red Color Accuracy | 92.27% | 94.65% |
| green Color Accuracy | 83.33% | 81.82% |
| Color average accuracy | 81.15 % | 82.71% |
| car | 98.26% | 97.44% |
| van | 89.16% | 86.41% |
| track | 94.27% | 96.95% |
| bus | 68.57% | 68.57% |
| Type average accuracy | 87.56 % | 87.34% |
两个模型的输入输出格式尺寸是一样的:
- 输入:尺寸[1,3,72,72],即[1,C,H,W],代表[number of channels, image height, image width];
- 输出1:color,车的颜色分类,尺寸[1,7],即车辆七种颜色的概率:[white, gray, yellow, red, green, blue, black];
- 输出2:type,车的种类分类,尺寸[1,4],即车辆4种种类的概率:[car, van, truck, bus]。
对比上面的两个模型,最终我们选择了vehicle-attributes-recognition-barrier-0039,因为相较于0042,0039的精度没有低多少,但计算量和参数量却0042小很多。
2 模块介绍
下图对数据流做了大致的解释:

此案例整体的逻辑还会非常直白,容易理解的。我们首先需要导入模型,导入图片,然后对于图片进行一些预处理,使其大小符合第一个车辆检测模型的输入要求。通过车辆检测模型的推断,我们获得检测到车辆的位置信息。接着,我们对输入的图片进行裁剪,使得每张裁剪完的图片只包含检测到的车辆。最后,我们对裁剪完的照片进行预处理,使其大小符合第二个车辆分类模型的输入要求。通过车辆分类模型,我们可以得到这辆车的颜色和种类信息。
当我们运行完所有代码,这里先附上Terminal中打印的信息,从中我们可以直白地看到每个步骤以及其输入输出:
1 - Download detection and recognition models from Open Model Zoo.
2 - Load detection and recognition models from Open Model Zoo.
Get input size - Detection: [512,512]
Get input size - Recognition: [72,72]
3 - Read image, and resize it in order to align with detection model inputs.
- original image shape: (563, 1000, 3)
- original image is reshaped into (1, 3, 512, 512)
4 - Object detection Model Inference. Got bounding box of vehicle detected.
- Box detected: [[0. 0. 0.999808 0.23658293 0.18023151 0.7706103 0.9189388 ]]
5 - Now we crop the image and only left vehicle.
- size of original image: [563,1000]
- size of reshape image and sent into detection model: [512,512]
- Now we refit the scale of bounding box in order to fit the size of original image.
- car position in original image: [[236, 101, 770, 517]]
6 - Classification Model. We got the cropped vehicle image, and resize it in order to align with classification model input.
- Image scale of classification model input: [72,72]
- Model inference. The result contains vehicle colors (white, gray, yellow, red, green, blue, black) and vehicle types (car, bus, truck, van).
- Recognition result: ('Gray', 'Car')
7 - Finally let's combine 2 models and show results.
运行代码后,最终的结果如下:


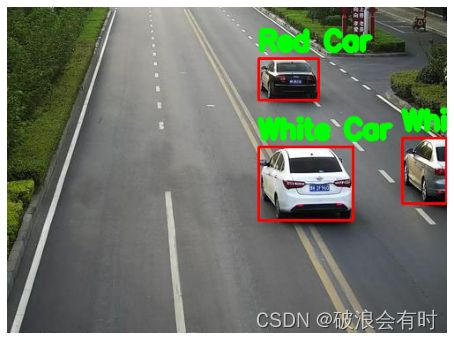
我们看到,最后那张图识别出来的效果不是很好。但这个案例中,我们不考虑如何改进识别率,而是如何使用预训练模型得到上图效果。
3 代码
3.1 下载模型
我们使用 omz_downloader,它是 openvino-dev 包中的一个命令行工具。 omz_downloader 自动创建目录结构并下载所选模型。 如果模型已下载,则跳过此步骤。 所选模型来自公共目录,这意味着它必须转换为中间表示(IR)。
注意:如果要更改模型,我们可以直接修改模型名称,如"vehicle-detection-0201"、"vehicle-detection-0202"(关于模型之间的区别,参见Open Model Zoo以及我们上面章节的介绍)。此外,如果要改变精度,需要修改"FP32"、"FP16"、"FP16-INT8"中的精度值,不同的型号有不同的模型尺寸和精度值。
相关代码:
import os
import sys
from pathlib import Path
from typing import Tuple

import cv2
import numpy as np
import matplotlib.pyplot as plt
from openvino.runtime import Core

print("1 - Download detection and recognition models from Open Model Zoo.")
# Directory where model will be downloaded
base_model_dir = "model"
# Model name as named in Open Model Zoo
detection_model_name = "vehicle-detection-0202"
recognition_model_name = "vehicle-attributes-recognition-barrier-0039"
# Selected precision (FP32, FP16, FP16-INT8)
precision = "FP32"

# Check if the model exists
detection_model_path = (
    f"model/intel/{detection_model_name}/{precision}/{detection_model_name}.xml"
)
recognition_model_path = (
    f"model/intel/{recognition_model_name}/{precision}/{recognition_model_name}.xml"
)

# Download the detection model
if not os.path.exists(detection_model_path):
    download_command = f"omz_downloader " \
                       f"--name {detection_model_name} " \
                       f"--precision {precision} " \
                       f"--output_dir {base_model_dir}"
    ! $download_command
# Download the recognition model
if not os.path.exists(recognition_model_path):
    download_command = f"omz_downloader " \
                       f"--name {recognition_model_name} " \
                       f"--precision {precision} " \
                       f"--output_dir {base_model_dir}"
    ! $download_command

print("2 - Load detection and recognition models from Open Model Zoo.")
'''
和常规的OpenVINO流程一样,我们首先初始化推理引擎runtime(Core()),然后读取网络架构和权重
(ie_core.read_model),最后对模型进行编译(ie_core.compile_model)
这里,由于我们检测和识别模型都需要用到这几个步骤,所以定义了一个类:model_init,两个模型的初始化都可以用到。
'''

# Initialize inference engine runtime
ie_core = Core()

def model_init(model_path: str) -> Tuple:
    """
    Read the network and weights from file, load the
    model on the CPU and get input and output names of nodes

    :param: model: model architecture path *.xml
    :retuns:
            input_key: Input node network
            output_key: Output node network
            exec_net: Encoder model network
            net: Model network
    """

    # Read the network and corresponding weights from file
    model = ie_core.read_model(model=model_path)
    # compile the model for the CPU (you can use GPU or MYRIAD as well)
    compiled_model = ie_core.compile_model(model=model, device_name="CPU")
    # Get input and output names of nodes
    input_keys = compiled_model.input(0)
    output_keys = compiled_model.output(0)
    return input_keys, output_keys, compiled_model

# de -> detection
# re -> recognition
# Detection model initialization
input_key_de, output_keys_de, compiled_model_de = model_init(detection_model_path)
# Recognition model initialization
input_key_re, output_keys_re, compiled_model_re = model_init(recognition_model_path)

# Get input size - Detection
height_de, width_de = list(input_key_de.shape)[2:]
# Get input size - Recognition
height_re, width_re = list(input_key_re.shape)[2:]

print("Get input size - Detection: [{0},{1}]".format(height_de, width_de))
print("Get input size - Recognition: [{0},{1}]".format(height_re, width_re))
Terminal的记录:
1 - Download detection and recognition models from Open Model Zoo.
2 - Load detection and recognition models from Open Model Zoo.
Get input size - Detection: [512,512]
Get input size - Recognition: [72,72]
3.2 读取图片
导入图片,然后对于图片进行一些预处理,使其大小符合第一个车辆检测模型的输入要求。
def plt_show(raw_image):
    """
    Use matplot to show image inline
    raw_image: input image

    :param: raw_image:image array
    """
    plt.figure(figsize=(10, 6))
    plt.axis("off")
    plt.imshow(raw_image)

print('3 - Read image, and resize it in order to align with detection model inputs.')
# Read an image
image_de = cv2.imread("data/car1.jpg")
print("- original image shape: {}".format(image_de.shape))
# Resize to [3, 512, 512]
resized_image_de = cv2.resize(image_de, (width_de, height_de))
# Expand to [1, 3, 512, 512]
input_image_de = np.expand_dims(resized_image_de.transpose(2, 0, 1), 0)
print("- original image is reshaped into {}".format(input_image_de.shape))
# Show image
# plt_show(cv2.cvtColor(image_de, cv2.COLOR_BGR2RGB))
Terminal的记录:
3 - Read image, and resize it in order to align with detection model inputs.
- original image shape: (370, 499, 3)
- original image is reshaped into (1, 3, 512, 512)
3.3 使用检测模型检测车辆
回顾我们使用的识别模型,它的输出:[1,1,200,7],即[1,1,N,7],N指的是bounding box的数量。每一个检测框包括七个维度:[image_id, label, conf, x_min, y_min, x_max, y_max]。其中:
- image_id - 批次中图像的 ID
- 标签 - 预测的类别 ID(0 - 车辆)
- conf - 预测类的置信度
- (x_min, y_min) - 边界框左上角的坐标
- (x_max, y_max) - 右下边界框角的坐标
我们通过模型推理得到boxes,即识别的车辆位置以及执行度。然后,我们对其稍作处理,比如删除前两个维度(因为它们只是代表图像ID和预测类别,我们这里只有一个类别),然后,我们删除置信度与检测框为0的box。最后,我们将过滤下来的boxes通过crop_images函数,获得对应原输入照片的车辆位置(需要注意,我们一开始获得的车辆位置坐标是基于缩放过的图片基础上的)。
相关代码:
def crop_images(bgr_image, resized_image, boxes, threshold=0.6) -> np.ndarray:
    """
    Use bounding boxes from detection model to find the absolute car position

    :param: bgr_image: raw image
    :param: resized_image: resized image
    :param: boxes: detection model returns rectangle position
    :param: threshold: confidence threshold
    :returns: car_position: car's absolute position
    """
    # Fetch image shapes to calculate ratio
    (real_y, real_x), (resized_y, resized_x) = bgr_image.shape[:2], resized_image.shape[:2]
    ratio_x, ratio_y = real_x / resized_x, real_y / resized_y

    print("- size of original image: [{},{}]".format(real_y, real_x))
    print("- size of reshape image and sent into detection model: [{},{}]".format(resized_y, resized_x))
    print("- Now we refit the scale of bounding box in order to fit the size of original image.")

    # Find the boxes ratio
    boxes = boxes[:, 2:]
    # Store the vehicle's position
    car_position = []
    # Iterate through non-zero boxes
    for box in boxes:
        # Pick confidence factor from last place in array
        conf = box[0]
        if conf > threshold:
            # Convert float to int and multiply corner position of each box by x and y ratio
            # In case that bounding box is found at the top of the image,
            # we position upper box bar little bit lower to make it visible on image
            (x_min, y_min, x_max, y_max) = [
                int(max(corner_position * ratio_y * resized_y, 10)) if idx % 2
                else int(corner_position * ratio_x * resized_x)
                for idx, corner_position in enumerate(box[1:])
            ]

            car_position.append([x_min, y_min, x_max, y_max])

    return car_position

print("4 - Object detection Model Inference. Got bounding box of vehicle detected.")
# Run Inference
boxes = compiled_model_de([input_image_de])[output_keys_de]
# 删除输出的第0,第1维度。
boxes = np.squeeze(boxes, (0, 1))
# 删除那些置信度以及bounding box坐标只有0的bounding box
boxesFilter = []
for idx,box in enumerate(boxes):
    if np.all(box[2:]==0):
        pass
    else:
        boxesFilter.append(box)
boxesFilter = np.array(boxesFilter)
print("- Box detected: {}".format(boxesFilter))
print("5 - Now we crop the image and only left vehicle.")
# Find car position
car_position = crop_images(image_de, resized_image_de, boxes)
print("- car position in original image: {}".format(car_position))
Terminal中的打印:
4 - Object detection Model Inference. Got bounding box of vehicle detected.
- Box detected: [[0. 0. 0.99987304 0.57274306 0.4301208  0.7870749 0.6561528 ]
 [0. 0. 0.99982446 0.5723677 0.15962084 0.70758444 0.28779876]
 [0. 0. 0.8183867  0.8989585  0.40307313 0.9999551 0.6037573 ]
 [0. 0. 0.04074085 0.91444695 0.01791241 0.95828915 0.08315378]]
5 - Now we crop the image and only left vehicle.
- size of original image: [370,499]
- size of reshape image and sent into detection model: [512,512]
- Now we refit the scale of bounding box in order to fit the size of original image.
- car position in original image: [[285, 159, 392, 242], [285, 59, 353, 106], [448, 149, 498, 223]]
3.4 使用识别模型检测车辆识别车辆属性
选择一个检测到的框,然后裁剪到包含车辆的区域以使用识别模型进行测试。同样,我们需要调整输入图像的大小并运行推理。
识别结果包含车辆颜色(白色、灰色、黄色、红色、绿色、蓝色、黑色)和车辆类型(汽车、公共汽车、卡车、货车)。 接下来,我们需要计算每个属性的概率。 最后,我们确定最大概率作为结果。
相关代码:
print("6 - Classification Model. We got the cropped vehicle image, and resize it in order to align with classification model input.")
# Select a vehicle to recognize
pos = car_position[0]
# Crop the image with [y_min:y_max, x_min:x_max]
test_car = image_de[pos[1]:pos[3], pos[0]:pos[2]]
# resize image to input_size
resized_image_re = cv2.resize(test_car, (width_re, height_re))
print("- Image scale of classification model input: [{},{}]".format(width_re,height_re))
input_image_re = np.expand_dims(resized_image_re.transpose(2, 0, 1), 0)
#plt_show(cv2.cvtColor(test_car, cv2.COLOR_BGR2RGB))

def vehicle_recognition(compiled_model_re, input_size, raw_image):
    """
    Vehicle attributes recognition, input a single vehicle, return attributes
    :param: compiled_model_re: recognition net
    :param: input_size: recognition input size
    :param: raw_image: single vehicle image
    :returns: attr_color: predicted color
                       attr_type: predicted type
    """
    # vehicle's attribute
    colors = ['White', 'Gray', 'Yellow', 'Red', 'Green', 'Blue', 'Black']
    types = ['Car', 'Bus', 'Truck', 'Van']

    # resize image to input size
    resized_image_re = cv2.resize(raw_image, input_size)
    input_image_re = np.expand_dims(resized_image_re.transpose(2, 0, 1), 0)

    # Run Inference
    # Predict Result
    predict_colors = compiled_model_re([input_image_re])[compiled_model_re.output(1)]
    # delete the dim of 2, 3
    predict_colors = np.squeeze(predict_colors, (2, 3))
    predict_types = compiled_model_re([input_image_re])[compiled_model_re.output(0)]
    predict_types = np.squeeze(predict_types, (2, 3))

    attr_color, attr_type = (colors[np.argmax(predict_colors)],
                             types[np.argmax(predict_types)])
    return attr_color, attr_type

print("- Model inference. The result contains vehicle colors (white, gray, yellow, red, green, blue, black) and vehicle types (car, bus, truck, van).")
print(f"- Recognition result: {vehicle_recognition(compiled_model_re, (72, 72), test_car)}")
Terminal中打印:
6 - Classification Model. We got the cropped vehicle image, and resize it in order to align with classification model input.
- Image scale of classification model input: [72,72]
- Model inference. The result contains vehicle colors (white, gray, yellow, red, green, blue, black) and vehicle types (car, bus, truck, van).
- Recognition result: ('White', 'Car')
注意,上面的代码,我们只是选中了检测框中的一个,进行图像识别。
3.5 将检测识别模型串起来
最后,我们将两个模型串起来,最后返回类似结果章节的图。代码如下:
print("7 - Finally let's combine 2 models and show results.")

def convert_result_to_image(compiled_model_re, bgr_image, resized_image, boxes, threshold=0.6):
    """
    Use Detection model boxes to draw rectangles and plot the result

    :param: compiled_model_re: recognition net
    :param: input_key_re: recognition input key
    :param: bgr_image: raw image
    :param: resized_image: resized image
    :param: boxes: detection model returns rectangle position
    :param: threshold: confidence threshold
    :returns: rgb_image: processed image
    """
    # Define colors for boxes and descriptions
    colors = {"red": (255, 0, 0), "green": (0, 255, 0)}

    # Convert base image from bgr to rgb format
    rgb_image = cv2.cvtColor(bgr_image, cv2.COLOR_BGR2RGB)

    # Find cars' positions
    car_position = crop_images(image_de, resized_image, boxes)

    idx = 0
    for x_min, y_min, x_max, y_max in car_position:
        print("- Final car position {}: [{}]".format(idx, car_position[idx]))
        # Run vehicle recognition inference
        attr_color, attr_type = vehicle_recognition(compiled_model_re, (72, 72),
                                                    image_de[y_min:y_max, x_min:x_max])
        print("- Final car recognition result: {}, {}".format(attr_color, attr_type))
        # close the vehicle window
        plt.close()

        # Draw bounding box based on position
        # Parameters in rectangle function are: image, start_point, end_point, color, thickness
        rgb_image = cv2.rectangle(rgb_image, (x_min, y_min), (x_max, y_max), colors["red"], 2)

        # Print vehicle attributes
        # parameters in putText function are: img, text, org, fontFace, fontScale, color, thickness, lineType
        rgb_image = cv2.putText(
            rgb_image,
            f"{attr_color} {attr_type}",
            (x_min, y_min - 10),
            cv2.FONT_HERSHEY_SIMPLEX,
            1,
            colors["green"],
            5,
            cv2.LINE_AA
        )
        idx += 1

    return rgb_image

plt_show(convert_result_to_image(compiled_model_re, image_de, resized_image_de, boxes))
Terminal打印:
- size of original image: [370,499]
- size of reshape image and sent into detection model: [512,512]
- Now we refit the scale of bounding box in order to fit the size of original image.
- Final car position 0: [[285, 159, 392, 242]]
- Final car recognition result: White, Car
- Final car position 1: [[285, 59, 353, 106]]
- Final car recognition result: Red, Car
- Final car position 2: [[448, 149, 498, 223]]
- Final car recognition result: White, Truck