搭建LNMP实现分离
目录
nginx理论
nginx日志格式:log_format
nginx日志格式的变量
nginx的location
安装LNMP
1. 安装nginx
2. 安装mysql(mariadb)
3. 安装PHP
应用安装
搭建wordpress
搭建知乎WeCenter
LNMP实现动静分离
LNMP数据库的迁移
LNMP的PHP迁移
:大虾好吃吗的博客_大虾好吃吗
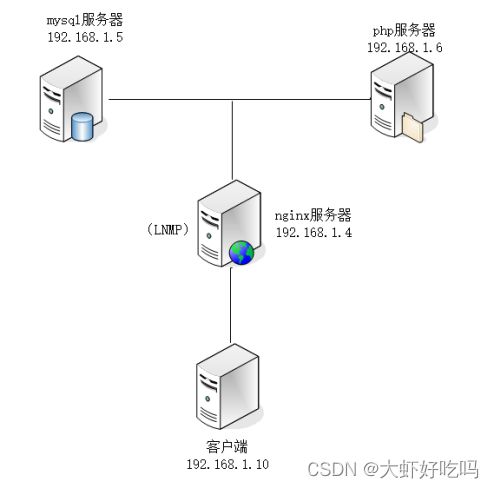
实验目标:使用一台linux服务器先搭建LNMP平台,安装两个论坛后实现LNMP分离。
实验拓扑图如下:
nginx理论
nginx日志格式:log_format
示例:
vim /etc/nginx/nginx.conf
http {
log_format main '$remote_addr - $remote_user [$time_iso8601] "$request" ' #定义日志输出格式main
'$status $body_bytes_sent "$http_referer" '
'"$http_user_agent" "$http_x_forwarded_for"';
access_log /var/log/nginx/access.log main; #调用日志格式main
}
nginx日志格式的变量
$remote_addr #记录客户端的ip地址
$remote_user #记录客户端的用户名
$time_local #通用的时间格式
$time_iso8601 #iso8601时间格式
$request #请求的方法和请求的HTTP协议
$status #请求状态码
$body_bytes_sent #服务器回应的字节数,不包含头部大小
$bytes_sent #服务器回应的总字节数
$msec #日志写入时间,单位为秒,精度为毫秒
$http_referer #记录链接访问源地址
$http_user_agent #记录客户端浏览器信息
$http_x_forwarded_for #代理服务器ip
$request_length #请求包的长度(请求头+请求正文)
$request_time #请求花费的时间,单位为秒,精度为毫秒
(经验: 1秒=1000毫秒(ms), 1毫秒=1/1000秒(s);1秒=1000000 微秒)
nginx的location
语法规则: location [=|~|~*|^~] /uri/ { … }
下列以优先级从高到低排序
= 开头表示精确匹配
^~ 开头表示uri以某个常规字符串开头,理解为匹配 url路径即可。
~ 开头表示区分大小写的正则匹配
~* 开头表示不区分大小写的正则匹配
!~和!~*分别为区分大小写不匹配及不区分大小写不匹配的正则
/ 通用匹配,任何请求都会匹配到。
示例:测试匹配符的优先级
cd /etc/nginx/conf.d/
vim test.conf
添加:
server {
listen 80;
server_name test.benet.com;
location / {
default_type text/html;
return 200 "location /";
}
location =/ {
default_type text/html;
return 200 "location =/";
}
location ~ / {
default_type text/html;
return 200 "location ~ /";
}
location ~* / {
default_type text/html;
return 200 "location ~* /";
}
}
保存退出
客户端修改hosts文件,测试访问
真实企业场景配置:*
#通用匹配,任何请求都会匹配到。
location / {
}
#严格区分大小写,匹配.php结尾
location ~ \.php$ {
fastcgi_pass http://127.0.0.1:9000;
}
#严格区分大小写,匹配.jsp结尾
location ~ \.jsp$ {
proxy_pass http://127.0.0.1:8080;
}
#不区分大小写匹配
location ~* "\.(sql|bak|tgz|tar.gz|.git)$ {
default_type text/html;
return 403 "启用访问控制";
}
(注意:以上主要用于网页的动、静分离)
安装LNMP
1. 安装nginx
所需安装包如下:
安装并启动:
[root@nginx ~]# rpm -ivh /media/nginx-rpm/*.rpm --nodeps --force

[root@nginx ~]# systemctl start nginx

[root@nginx ~]# systemctl enable nginx

Created symlink from /etc/systemd/system/multi-user.target.wants/nginx.service to /usr/lib/systemd/system/nginx.service.
2. 安装mysql(mariadb)
所需安装包如下:
安装mysql并启动
[root@nginx ~]# rpm -ivh /media/mysql5.6-rpm/*.rpm --nodeps --force

[root@nginx ~]# systemctl start mysqld

[root@nginx ~]# systemctl enable mysqld

创建mysql密码

[root@nginx ~]# mysqladmin -uroot password

New password: //输入新密码

Confirm new password: //再次输入新密码
3. 安装PHP
所需安装包如下:
安装php并启动
[root@nginx ~]# rpm -ivh /media/php-rpm/*.rpm --nodeps --force

[root@nginx ~]# systemctl start php-fpm

[root@nginx ~]# systemctl enable php-fpm
应用安装
本次php可以搭建两个应用wordpress和wecenter,两个app搭建一个论坛即可。如搭建两个app需要测试机本地解析域名,通过域名访问虚拟主机。
搭建wordpress
注意:下面操作需要在同一台服务器操作,注意看服务器名称。
1. 下载并解压wordpree包到/下并解压授权。
[root@nginx ~]# cp -rp /media/wordpress-4.9.4-zh_CN.zip /

[root@nginx ~]# cd /

[root@nginx /]# unzip wordpress-4.9.4-zh_CN.zip

[root@nginx /]# chmod -R 777 /wordpress
2. 创建虚拟主机配置文件
[root@nginx /]# vim /etc/nginx/conf.d/blog.conf

server {

        listen 80;

        server_name www.blog.com;

        root /wordpress;

        index index.php index.html;


        location ~ \.php$ {

                        root /wordpress;

                        fastcgi_pass 127.0.0.1:9000; //php服务器地址,如分离需要指定PHP服务器。

                        fastcgi_index index.php;

                        fastcgi_param SCRIPT_FILENAME $document_root$fastcgi_script_name;  //与上一行是同一行,注意有空格

                include fastcgi_params;

                }

        }

[root@nginx /]# nginx -t

nginx: the configuration file /etc/nginx/nginx.conf syntax is ok

nginx: configuration file /etc/nginx/nginx.conf test is successful

[root@nginx /]# systemctl restart nginx //修改配置文件后需要重启或重载服务。
3. 创建blog数据库和管理用户
[root@nginx ~]# mysql -uroot -p123

//省略部分内容

mysql> create database blog;

Query OK, 1 row affected (0.00 sec)


mysql> grant all on blog.* to lisi@localhost identified by '123456';

Query OK, 0 rows affected (0.00 sec)


mysql> exit

Bye
4. 通过客户端服务器验证
注意下面使用测试机1.10访问。
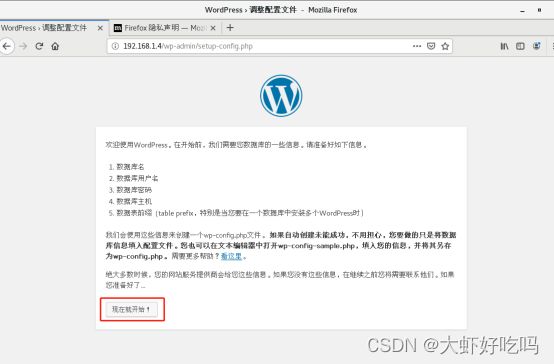
因为只搭建了第一个app,所以直接访问IP即可,http://192.168.1.4,后台网址为http://192.168.1.4/wp-admin。根据下图点击(现在就开始!)。
修改以下三项内容后点击提交。
点击现在安装。
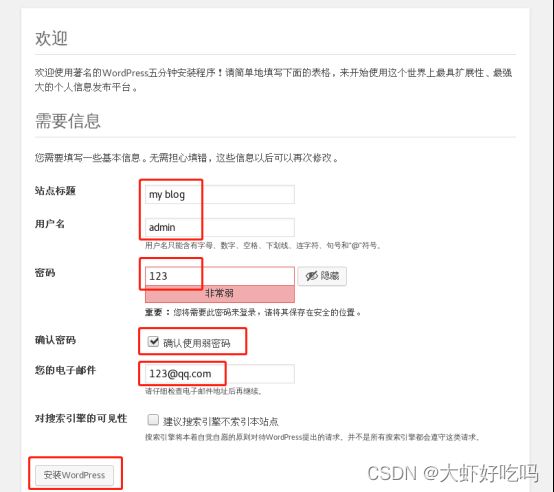
创建站点标题,管理用户名及密码,如密码过于简单需要勾选确认使用弱密码,输入邮箱后点击安装即可。
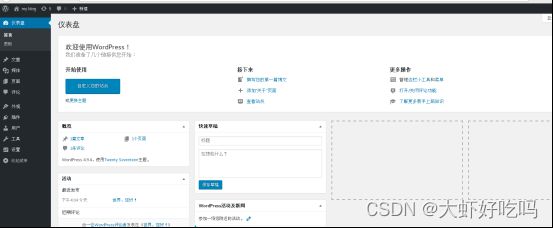
完成后使用用户密码登录即可。
登录后可以看到论坛板块,根据需求修改添加即可。
搭建知乎WeCenter
1. 下载并解压wecenter包到/zh下并解压授权。
[root@nginx ~]# mkdir /zh

[root@nginx ~]# cp -rp /media/WeCenter_3-3-4.zip /zh

[root@nginx ~]# cd /zh

[root@nginx zh]# unzip WeCenter_3-3-4.zip

[root@nginx zh]# chmod -R 777 /zh
2. 创建虚拟主机配置文件
[root@nginx zh]# vim /etc/nginx/conf.d/zh.conf

server {

        listen 80;

        server_name www.zh.com;

        root /zh;

        index index.php index.html;


        location ~ \.php$ {

                root /zh;

                fastcgi_pass 127.0.0.1:9000; //php服务器地址,如分离需要指定PHP服务器。

                fastcgi_index index.php;

                fastcgi_param SCRIPT_FILENAME $document_root$fastcgi_script_name;

                include fastcgi_params;

                }

        }

[root@nginx zh]# systemctl restart nginx
3. 创建blog数据库和管理用户
[root@nginx ~]# mysql -uroot -p123

//省略部分内容

mysql> create database zh;

Query OK, 1 row affected (0.00 sec)


mysql> grant all on zh.* to wangwu@localhost identified by '123456';

Query OK, 0 rows affected (0.00 sec)


mysql> exit

Bye
4. 通过客户端服务器验证
注意:下面使用测试机1.10访问。
前面已经安装了wordpress,使用IP访问的话优先访问wordpree论坛,所以需要修改测试机的本地hosts文件或配置DNS域名解析。如两者只安装一个可以忽略域名方式访问,使用IP访问即可。访问http://zh.benet.com登录后台为http://zh.benet.com/?/admin。
[root@client ~]# echo "192.168.1.4 www.blog.com" >> /etc/hosts

[root@client ~]# echo "192.168.1.4 www.zh.com" >> /etc/hosts
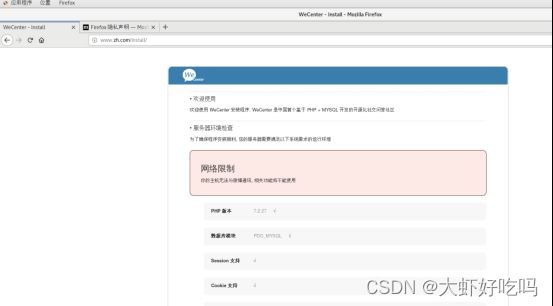
浏览器访问http://www.zh.com,进入安装页面,拉到最下面确认没问题,点击下一步。
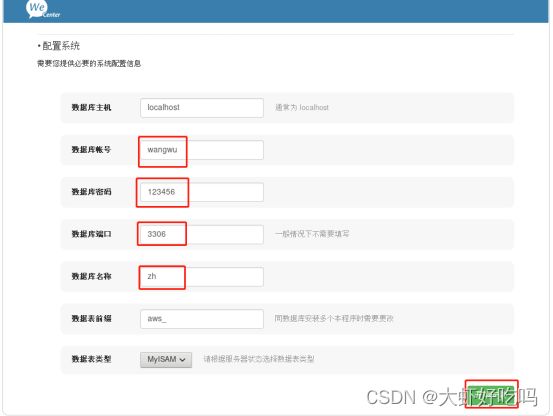
修改下面四项内容,端口默认3306,如使用其他端口需添加上去,完成后点击现在安装。
根据要求创建管理员用户密码,输入邮箱后点击完成。
完成后点击访问网站首页即可。
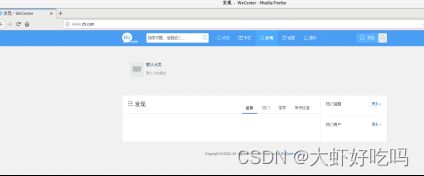
输入用户密码后登录论坛首页即可。
LNMP实现动静分离
根据以上操作,lnmp搭建论坛就完成了,下面将进行拆分lnmp。
LNMP数据库的迁移
1. 为了实现mysql独立运行,现需要把nginx服务器中的mysql数据库迁移到1.5mysql服务器中。打开1.5mysql服务器,安装mysql,配置密码。
[root@mysql ~]# rpm -ivh /media/mysql5.6-rpm/*.rpm --nodeps --force

[root@mysql ~]# systemctl start mysqld

[root@mysql ~]# systemctl enable mysqld

[root@mysql ~]# mysqladmin -uroot password

New password:

Confirm new password:
2. 把nginx服务器(192.168.1.4)中的mysql数据库文件导出,并复制到新的mysql服务器(192.168.1.5)中。
[root@nginx ~]# mysqldump -uroot -p123 --all-databases > my.sql

Warning: Using a password on the command line interface can be insecure.

[root@nginx ~]# scp my.sql [email protected]:/root

The authenticity of host '192.168.1.5 (192.168.1.5)' can't be established.

ECDSA key fingerprint is SHA256:i7pBmvf3GlxXGmjiEWzSfTD1J8gwQ32anS7qK/jbMbM.

ECDSA key fingerprint is MD5:80:da:11:52:72:6d:4e:08:3f:b7:64:25:8c:8f:49:14.

Are you sure you want to continue connecting (yes/no)? yes

Warning: Permanently added '192.168.1.5' (ECDSA) to the list of known hosts.

[email protected]'s password: //输入mysql服务器的root密码

my.sql                                                         100% 1757KB  38.3MB/s   00:00
3. 在新的mysql服务器上导入数据库文件。
[root@mysql ~]# mysql -uroot -p123 < /root/my.sql

Warning: Using a password on the command line interface can be insecure.

[root@mysql ~]# systemctl restart mysqld
4. 在新的mysql服务器上创建相同的管理用户和密码。
[root@mysql ~]# mysql -uroot -p123 //登录mysql

//省略部分内容

mysql> grant all on blog.* to lisi@'%' identified by '123456'; //创建用户lisi密码123456

Query OK, 0 rows affected (0.00 sec)


mysql> grant all on zh.* to wangwu@'%' identified by '123456'; //创建用户wangwu密码123456

Query OK, 0 rows affected (0.00 sec)

mysql> exit

Bye
5. 在原服务器(nginx服务器1.4)中修改blog和zh的配置文件,重新指定数据库服务器ip。
(1)修改blog配置文件
[root@nginx ~]# grep -R 123456 /wordpress //查找blog的配置文件,查看后发现wp-config.php文件

[root@nginx ~]# vim /wordpress/wp-config.php //下面只需要修改服务器IP地址

/** WordPress数据库的名称 */

define('DB_NAME', 'blog');


/** MySQL数据库用户名 */

define('DB_USER', 'lisi');


/** MySQL数据库密码 */

define('DB_PASSWORD', '123456');


/** MySQL主机 */

define('DB_HOST', '192.168.1.5'); //新的mysql服务器的主机地址。
(2)修改zh文件
[root@nginx ~]# grep -R 123456 /zh //查找zh的配置文件,查看后发现/zh/system/config/database.php的配置文件

[root@nginx ~]# vim /zh/system/config/database.php

  'host' => '192.168.1.5',         //该配置文件中依旧只需要修改为新的mysql主机地址。
以上步骤就完成了mysql的拆分,下面将进行php的拆分。
LNMP的PHP迁移
1. 打开新的linux服务器,安装PHP。
[root@php ~]# rpm -ivh /media/php-rpm/*.rpm --nodeps --force2. 修改nginx服务器(192.168.1.4)中的配置文件,重新指向新的php服务器,blog和zh配置文件都需要修改。
[root@nginx ~]# vim /etc/nginx/conf.d/blog.conf

 fastcgi_pass 192.168.1.6:9000; //修改该行配置中的IP为PHP服务器的地址。

[root@nginx ~]# vim /etc/nginx/conf.d/zh.conf

fastcgi_pass 192.168.1.6:9000; //同上

[root@nginx ~]# systemctl restart nginx
3. 修改PHP服务器(192.168.1.6)的配置文件。
[root@php ~]# vim /etc/php-fpm.d/www.conf

listen = 192.168.1.6:9000 //PHP服务器IP

listen.allowed_clients = 192.168.1.4 //web服务器IP,表示允许web主机访问php服务器

[root@php ~]# systemctl restart php-fpm
4. 复制wordpress和zh安装目录到php根下。
[root@php ~]# scp -rp [email protected]:/wordpress /

[email protected]'s password: //1.4root密码

[root@php ~]# scp -rp [email protected]:/zh /

[email protected]'s password: //1.4root密码
5. 客户端(192.168.1.10)验证
访问http://www.blog.com登录用户验证成功。
访问http://www.zh.com登录用户验证成功。
