ccc-sklearn-10-SVM(4)
1.SVC的其他考虑
SVC处理多分类问题:参数decision_function_shape
支持向量机是天在生二分类的模型,所以支持向量机在处理多分类问题的时候,是把多分类问题转换成了二分类问题来解决。这种转换有两种模式,一种叫做“一对一”模式(one vs one),一种叫做“一对多”模式(one vs rest)。
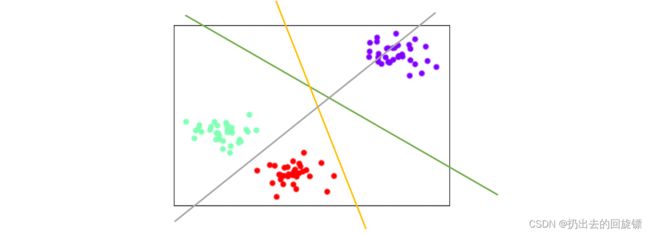
ovo模式下,标签中的所有类别会被两两组合,每两个类别之间建一个SVC模型,每个模型生成一个决策边界,分别进行二分类,所以对于含有n个标签类别的数据,会产生 C n 2 C_{n}^{2} Cn2个模型。效果如上图

ovr模式下,标签中所有的类别会分别与其他类别进行组合,建立n_class个模型,每个模型生成一个决策边界,分别进行二分类。效果如上图
说明:
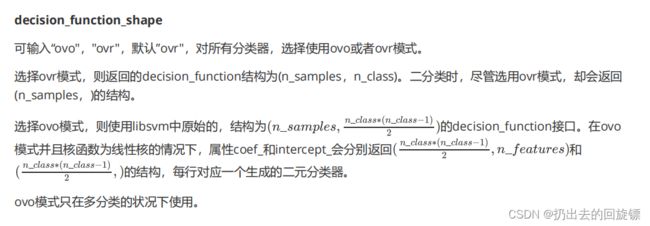
- 通常情况下ovo模式比ovr模式更精确
- 在二分类中,所有的支持向量都服务于唯一的超平面,在多分类问题中,每个支持向量都会被用来服务于多个超平面
- 两个不同超平面的支持向量被用来决定一个拉格朗日乘数的取值,并且规定一个支持向量至少要被两个超平面使用
- 在简单二分类中,decision_function只返回每个样本点到唯一的超平面的距离,而在多分类问题中这个接口将根据选择的多分类模式不同而返回不同的结构
SVC重要属性:
#属性n_support_:调用每个类别下的支持向量的数目
clf_proba.n_support_
#属性coef_:每个特征的重要性,这个系数仅仅适合于线性核
clf_proba.coef_
#属性intercept_:查看生成的决策边界的截距
clf_proba.intercept_
#属性dual_coef_:查看生成的拉格朗日乘数
clf_proba.dual_coef_
clf_proba.dual_coef_.shape
#支持向量的属性
clf_proba.support_vectors_
clf_proba.support_vectors_.shape
#注意到dual_coef_中生成的拉格朗日乘数的数目和的支持向量的数目一致
#注意到KKT条件的条件中的第五条,所有非支持向量会让拉格朗日乘数为0
#所以拉格朗日乘数的数目和支持向量的数目是一致的
#注意,此情况仅仅在二分类中适用!
2.SVC真实案例:预测明天是否降雨
数据集介绍:
| 特征/标签 | 含义 |
|---|---|
| Date | 观察日期 |
| Location | 获取该信息的气象站的名称 |
| MinTemp | 以摄氏度为单位的最低温度 |
| MaxTemp | 以摄氏度为单位的最高温度 |
| Rainfall | 当天记录的降雨量,单位为mm |
| Evaporation | 到早上9点之前的24小时的A级蒸发量(mm) |
| Sunshine | 白日受到日照的完整小时 |
| WindGustDir | 在到午夜12点前的24小时中的最强风的风向 |
| WindGustSpeed | 在到午夜12点前的24小时中的最强风速(km / h) |
| WindDir9am | 上午9点时的风向 |
| WindDir3pm | 下午3点时的风向 |
| WindSpeed9am | 上午9点之前每个十分钟的风速的平均值(km / h) |
| WindSpeed3pm | 下午3点之前每个十分钟的风速的平均值(km / h) |
| Humidity9am | 上午9点的湿度(百分比) |
| Humidity3am | 下午3点的湿度(百分比) |
| Pressure9am | 上午9点平均海平面上的大气压(hpa) |
| Pressure3pm | 上午9点的天空被云层遮蔽的程度,这是以“oktas”来衡量的,这个单位记录了云层遮挡天空的程度。0表示完全晴朗的天空,而8表示它完全是阴天 |
| Cloud9am | 下午3点的天空被云层遮蔽的程度 |
| Temp9am | 上午9点的摄氏度温度 |
| Temp3pm | 下午3点的摄氏度温度 |
| RainTomorrow | 目标变量:明天下雨了吗? |
步骤一:导入库和数据
import pandas as pd
import numpy as np
from sklearn.model_selection import train_test_split

weather = pd.read_csv("data/weatherAUS5000.csv")
weather.head()
#分类特征和标签
X = weather.iloc[:,:-1]
Y = weather.iloc[:,:-1]
X.shape
#数据类型
X.info()
#缺失值
X.isnull().mean()
#标签分类
np.unique(Y)

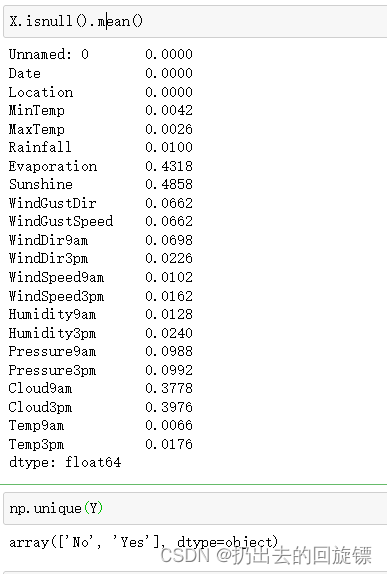
特征矩阵由一部分分类变量和一部分连续变量组成,其中云层遮蔽程度虽然是以数字表示,但是本质却是分类变量。大多数特征都是采集的自然数据,比如蒸发量,日照时间,湿度等等,而少部分特征是人为构成的。还有一些是单纯表示样本信息的变量,比如采集信息的地点,以及采集的时间
步骤三:分训练集和描述性统计
Xtrain, Xtest, Ytrain, Ytest = train_test_split(X,Y,test_size=0.3,random_state=420)
for i in [Xtrain, Xtest, Ytrain, Ytest]:
    i.index = range(i.shape[0])
注意恢复索引。由于现实中测试集一般不可获得,所以一般实验应该先分训练集和测试集在一步步进行预处理。否则会导致建模过程会受到测试集的影响。
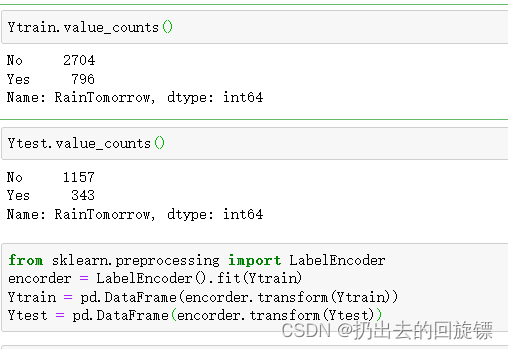
#查看样本不平衡问题
Ytrain.value_counts()
Ytest.value_counts()
#标签编码
from sklearn.preprocessing import LabelEncoder
encorder = LabelEncoder().fit(Ytrain)
Ytrain = pd.DataFrame(encorder.transform(Ytrain))
Ytest = pd.DataFrame(encorder.transform(Ytest))
有一点点不平衡,暂时不做处理
步骤四:特征处理
4.1查看描述性统计
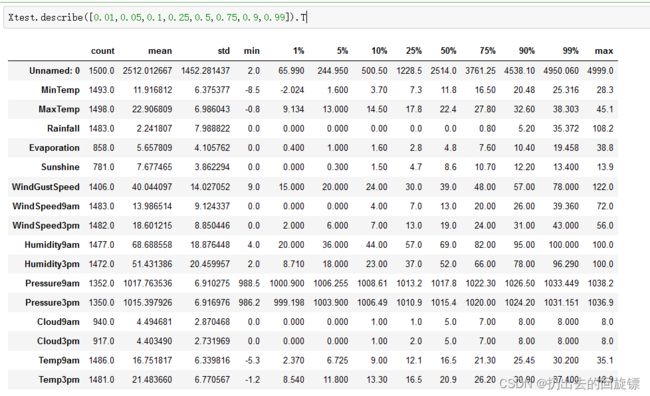
Xtrain.describe([0.01,0.05,0.1,0.25,0.5,0.75,0.9,0.99]).T
Xtest.describe([0.01,0.05,0.1,0.25,0.5,0.75,0.9,0.99]).T
Xtrainc = Xtrain.copy()
Xtrainc.sort_values(by="Location")
Xtrainc.iloc[:,0].value_counts()

可以看到,日期并不是独一无二的,是有重复的。一般情况下,降雨和某日的日期关系确实不大。但是如果将时间范围扩大到月份,在雨季的降雨概率肯定是大于旱季的。所以可以取出日期中的月份创建新的特征Month
Xtrain["Date"] = Xtrain["Date"].apply(lambda x:int(x.split("-")[1]))
Xtrain = Xtrain.rename(columns={"Date":"Month"})
Xtrain.head()

Xtest["Date"] = Xtest["Date"].apply(lambda x:int(x.split("-")[1]))
Xtest = Xtest.rename(columns={"Date":"Month"})
Xtest.head()
Xtrain.loc[Xtrain["Rainfall"]>=1,"RainToday"]="Yes"
Xtrain.loc[Xtrain["Rainfall"] < 1,"RainToday"] = "No"
Xtrain.loc[Xtrain["Rainfall"]==np.nan,"RainToday"] = np.nan

Xtest.loc[Xtest["Rainfall"]>=1,"RainToday"]="Yes"
Xtest.loc[Xtest["Rainfall"] < 1,"RainToday"] = "No"
Xtest.loc[Xtest["Rainfall"]==np.nan,"RainToday"] = np.nan
对于降雨量大于1,认为会下雨。缺失值继续填补缺失nan

4.4地点的处理
我们需要让算法意识到,不同的地点因为气候不同,所以对“明天是否会下雨”有这不同的影响。所以可以考虑将地点转换为当地的气候。
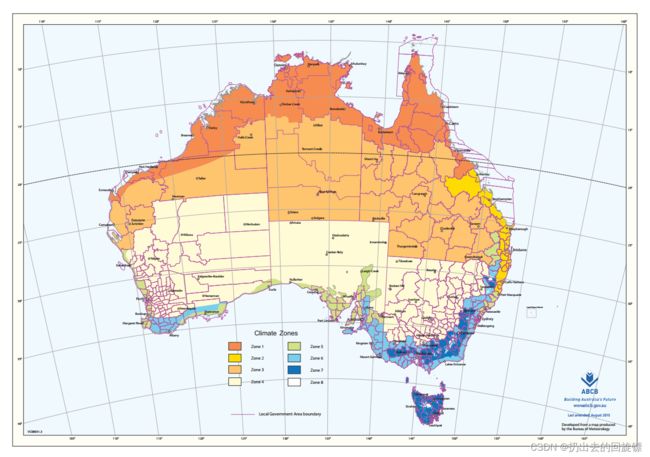
上面这张地图将澳大利亚不同城市所在的气候区域划分为了八个。如果能够将49个城市转换成8种不同的气候。可以通过爬虫将各个城市对应的经纬度保存。
import time
from selenium import webdriver #导入需要的模块,其中爬虫使用的是selenium
import pandas as pd
import numpy as np
df = pd.DataFrame(index=range(len(cityname))) #创建新dataframe用于存储爬取的数据
driver = webdriver.Chrome() #调用谷歌浏览器
time0 = time.time() #计时开始
#循环开始
for num, city in enumerate(cityname): #在城市名称中进行遍历
	driver.get('https://www.google.co.uk/webhp?hl=en&sa=X&ved=0ahUKEwimtcX24cTfAhUJE7wKHVkWB5AQPAgH')
	 time.sleep(0.3)
	 search_box = driver.find_element_by_name('q') #锁定谷歌的搜索输入框
	 search_box.send_keys('%s Australia Latitude and longitude' % (city))
	 search_box.submit() #enter,确认开始搜索
	 result = driver.find_element_by_xpath('//div[@class="Z0LcW"]').text #?爬取需要的经纬度,就是这里,怎么获取的呢?
	 resultsplit = result.split(" ") #将爬取的结果用split进行分割
	 df.loc[num,"City"] = city #向提前创建好的df中输入爬取的数据,第一列是城市名
	 df.loc[num,"Latitude"] = resultsplit[0] #第二列是纬度
	 df.loc[num,"Longitude"] = resultsplit[2] #第三列是经度
	 df.loc[num,"Latitudedir"] = resultsplit[1] #第四列是纬度的方向
	 df.loc[num,"Longitudedir"] = resultsplit[3] #第五列是经度的方向
	 print("%i webcrawler successful for city %s" % (num,city)) #每次爬虫成功之后,就打印“城市”成功了

time.sleep(1) #全部爬取完毕后,停留1秒钟
driver.quit() #关闭浏览器
print(time.time() - time0) #打印所需的时间
为什么需要城市的经纬度?
由于样本中的地点名称是气候站的名称,它们不一定代表所在城市的真实气候。可以利用经纬度算出不同气象站和城市之间的距离,选出一个离气象站最近的城市代表。
cityll和cityclimate文件结构如下

处理两张表
澳大利亚整体在南半球,东半球
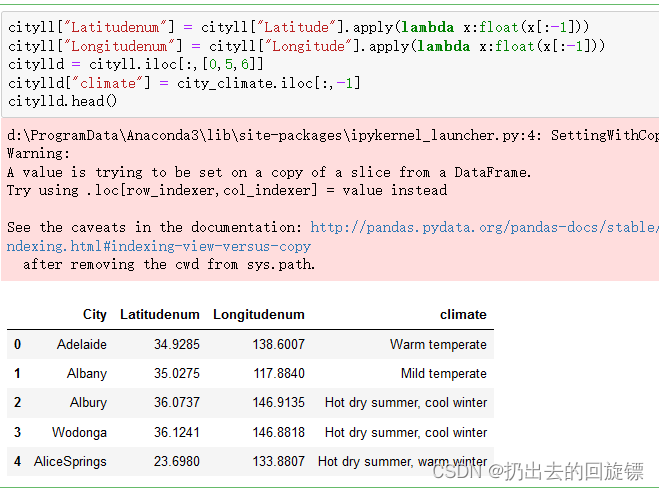
#去掉度数符号
cityll["Latitudenum"] = cityll["Latitude"].apply(lambda x:float(x[:-1]))
cityll["Longitudenum"] = cityll["Longitude"].apply(lambda x:float(x[:-1]))
#只取名字和去掉度数后的经纬度
citylld = cityll.iloc[:,[0,5,6]]
citylld["climate"] = city_climate.iloc[:,-1]
citylld.head()
#训练集中所有的地点
cityname = Xtrain.iloc[:,1].value_counts().index.tolist()
cityname
import time
from selenium import webdriver #导入需要的模块,其中爬虫使用的是selenium
import pandas as pd
import numpy as np
df = pd.DataFrame(index=range(len(cityname))) #创建新dataframe用于存储爬取的数据
driver = webdriver.Chrome() #调用谷歌浏览器
time0 = time.time() #计时开始
#循环开始
for num, city in enumerate(cityname): #在城市名称中进行遍历
    driver.get('https://www.google.co.uk/webhp?hl=en&sa=X&ved=0ahUKEwimtcX24cTfAhUJE7wKHVkWB5AQPAgH')
    time.sleep(0.3)
    search_box = driver.find_element_by_name('q') #锁定谷歌的搜索输入框
    search_box.send_keys('%s Australia Latitude and longitude' % (city)) #在输入框中输入“城市” 澳大利亚 经纬度
    search_box.submit() #enter,确认开始搜索
    result = driver.find_element_by_xpath('//div[@class="Z0LcW"]').text #?爬取需要的经纬度,就是这里,怎么获取的呢?
    resultsplit = result.split(" ") #将爬取的结果用split进行分割
    df.loc[num,"City"] = city #向提前创建好的df中输入爬取的数据,第一列是城市名
    df.loc[num,"Latitude"] = resultsplit[0] #第二列是经度
    df.loc[num,"Longitude"] = resultsplit[2] #第三列是纬度
    df.loc[num,"Latitudedir"] = resultsplit[1] #第四列是经度的方向
    df.loc[num,"Longitudedir"] = resultsplit[3] #第五列是纬度的方向
 	print("%i webcrawler successful for city %s" % (num,city)) #每次爬虫成功之后,就打印“城市”成功了

time.sleep(1) #全部爬取完毕后,停留1秒钟
driver.quit() #关闭浏览器
print(time.time() - time0) #打印所需的时间
df.to_csv(r"C:\work\learnbetter\micro-class\week 8 SVM (2)\samplecity.csv")
同样处理经纬度的度数
samplecity["Latitudenum"] = samplecity["Latitude"].apply(lambda x:float(x[:-1]))
samplecity["Longitudenum"] = samplecity["Longitude"].apply(lambda x:float(x[:-1]))
samplecity = samplecity.iloc[:,[0,5,6]]
samplecity.head()
地理中两点距离公式如下:
d i s t = R ∗ a c r c o s ( s i n ( s l a t ) ∗ s i n ( e l a t ) + c o s ( s l a t ) ∗ c o s ( e l a t ) ∗ c o s ( s l o n − e l o n ) ) dist = R*acrcos(sin(slat)*sin(elat)+cos(slat)*cos(elat)*cos(slon-elon)) dist=R∗acrcos(sin(slat)∗sin(elat)+cos(slat)∗cos(elat)∗cos(slon−elon))
其中R是地球半径,slat是起始地点维度,slon是起始地点经度;elat是结束地点维度,elon是结束地点的经度。公式由来不做解释。。
首先使用radians将角度转换为弧度
from math import radians ,sin,cos,acos
citylld.loc[:,"slat"] = citylld.iloc[:,1].apply(lambda x : radians(x))
citylld.loc[:,"slon"] = citylld.iloc[:,2].apply(lambda x : radians(x))
samplecity.loc[:,"elat"] = samplecity.iloc[:,1].apply(lambda x : radians(x))
samplecity.loc[:,"elon"] = samplecity.iloc[:,2].apply(lambda x : radians(x))
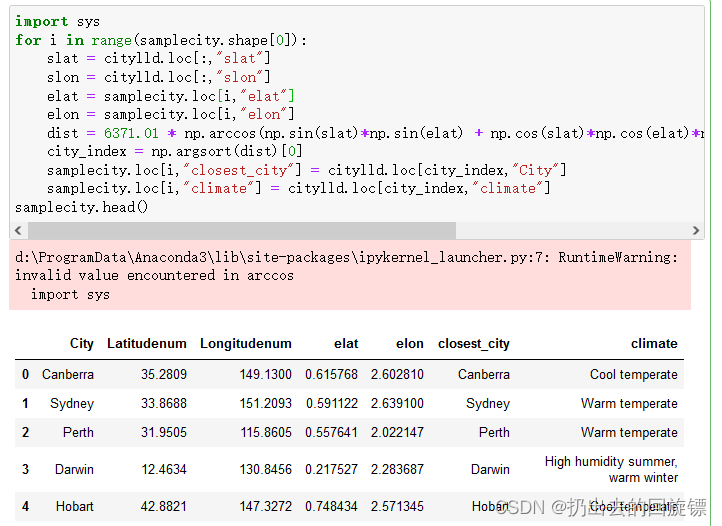
import sys
for i in range(samplecity.shape[0]):
    slat = citylld.loc[:,"slat"]
    slon = citylld.loc[:,"slon"]
    elat = samplecity.loc[i,"elat"]
    elon = samplecity.loc[i,"elon"]
    dist = 6371.01 * np.arccos(np.sin(slat)*np.sin(elat) + np.cos(slat)*np.cos(elat)*np.cos(slon.values - elon))
    city_index = np.argsort(dist)[0]
    samplecity.loc[i,"closest_city"] = citylld.loc[city_index,"City"]
    samplecity.loc[i,"climate"] = citylld.loc[city_index,"climate"]
samplecity.head()
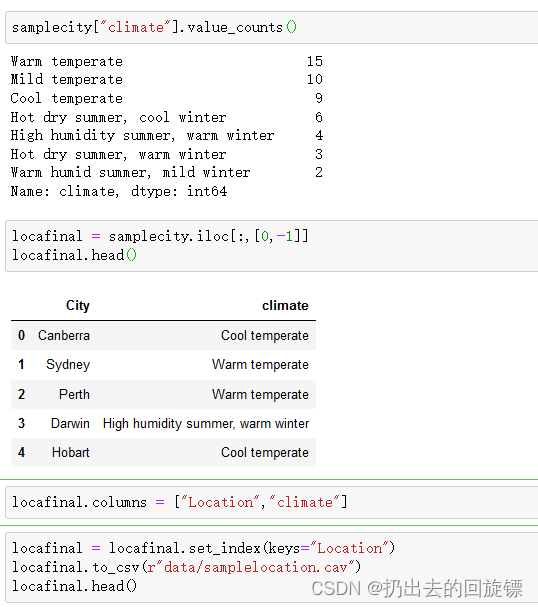
samplecity["climate"].value_counts()
locafinal = samplecity.iloc[:,[0,-1]]
locafinal.head()
locafinal.columns = ["Location","climate"]
#设定locafinal索引为地点,为了之后的map匹配
locafinal = locafinal.set_index(keys="Location")
locafinal.to_csv(r"data/samplelocation.cav")
locafinal.head()
import re
#sub消除逗号,strip去掉空格
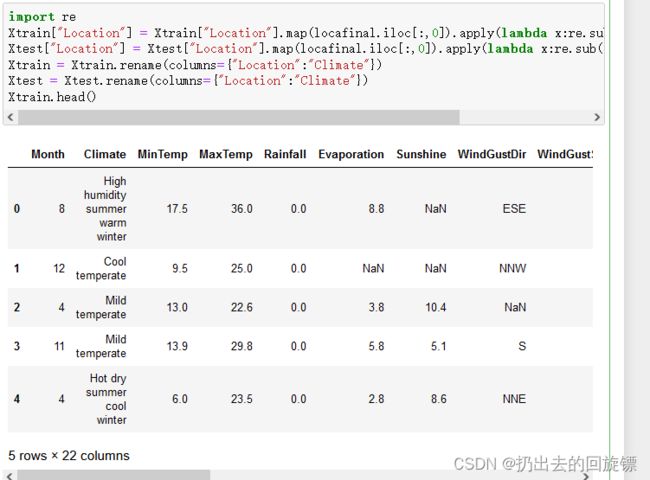
Xtrain["Location"] = Xtrain["Location"].map(locafinal.iloc[:,0]).apply(lambda x:re.sub(",","",x.strip()))
Xtest["Location"] = Xtest["Location"].map(locafinal.iloc[:,0]).apply(lambda x:re.sub(",","",x.strip()))
#重命名
Xtrain = Xtrain.rename(columns={"Location":"Climate"})
Xtest = Xtest.rename(columns={"Location":"Climate"})
Xtrain.head()
Xtest.head()
步骤五:处理分类型变量
一般来说,如果是分类型数据使用众数进行填补;如果是连续性数据使用均值填补。这里假设测试集合训练集的数据分布和性质都是相似的,因此统一使用训练集的众数和均值来进行填补。
找出所有分类型特征并使用众数来进行填补
cate = Xtrain.columns[Xtrain.dtypes == "object"].tolist()
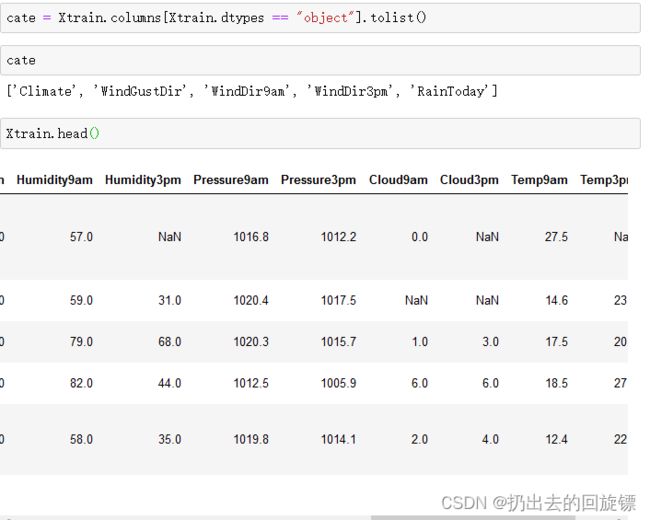
除了特征类型为“object”的特征,还有用数字表示但本质为分类型特征的云层遮蔽程度
cloud = ["Cloud9am","Cloud3pm"]
cate = cate + cloud
cate
from sklearn.impute import  SimpleImputer
si = SimpleImputer(missing_values=np.nan,strategy="most_frequent")
si.fit(Xtrain.loc[:,cate])
Xtrain.loc[:,cate] = si.transform(Xtrain.loc[:,cate])
Xtest.loc[:,cate] = si.transform(Xtest.loc[:,cate])
Xtrain.head()
#查看分类型特征是否依然有缺失值
Xtrain.loc[:,cate].isnull().mean()

将分类型变量编码
本质是将训练集中已经存在的类别转换成数字,然后再使用接口transform分别在测试集合训练集上进行编码。如果测试集汇总出现了训练集汇总从未出现过的类别就会报错,需要调整模型。
#将所有分离型变量编码为数字,一个类别为一个数字
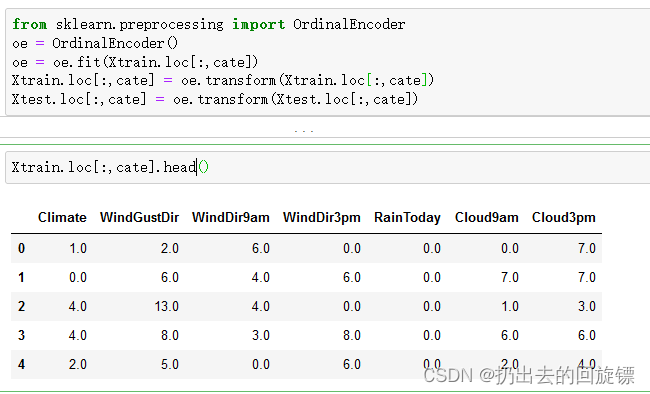
from sklearn.preprocessing import OrdinalEncoder
oe = OrdinalEncoder()
oe = oe.fit(Xtrain.loc[:,cate])
Xtrain.loc[:,cate] = oe.transform(Xtrain.loc[:,cate])
Xtest.loc[:,cate] = oe.transform(Xtest.loc[:,cate])
Xtrain.loc[:,cate].head()
步骤六:处理连续型变量
可以采用算法进行填补。但考虑到数据的解释性以及时间的消耗,这里采用更加方便的均值和中位数进行填补。
去除所有的非连续型变量并进行填充
col = Xtrain.columns.tolist()
for i in cate:
    col.remove(i)
col
impmean = SimpleImputer(missing_values=np.nan,strategy="mean")
impmean = impmean.fit(Xtrain.loc[:,col])
Xtrain.loc[:,col] = impmean.transform(Xtrain.loc[:,col])
Xtest.loc[:,col] = impmean.transform(Xtest.loc[:,col])
Xtrain.head()

对连续型变量进行无量纲化
数据的无量纲化是SVM执行前的重要步骤。转换成均值为0,方差为一的分布。但不是正态分布!
#由于month有分类特征,所以剔除
col.remove("Month")
from sklearn.preprocessing import StandardScaler
ss = StandardScaler()
ss = ss.fit(Xtrain.loc[:,col])
Xtrain.loc[:,col] = ss.transform(Xtrain.loc[:,col])
Xtest.loc[:,col] = ss.transform(Xtest.loc[:,col])
from time import time
import datetime
from sklearn.svm import SVC
from sklearn.model_selection import cross_val_score
from sklearn.metrics import roc_auc_score, recall_score
import pytz
导入模型并计算运行时间
Ytrain = Ytrain.iloc[:,0].ravel()
Ytest = Ytest.iloc[:,0].ravel()

times = time()
for kernel in ["linear","poly","rbf","sigmoid"]:
    clf = SVC(kernel = kernel
             ,gamma="auto"
             ,degree=1
             ,cache_size = 5000
             ).fit(Xtrain,Ytrain)
    result = clf.predict(Xtest)
    score = clf.score(Xtest,Ytest)
    recall = recall_score(Ytest,result)
    auc = roc_auc_score(Ytest,clf.decision_function(Xtest))
    print("%s 's testing accuracy %f,recall is %f',auc is %f" %(kernel,score,recall,auc))
    print(datetime.datetime.fromtimestamp(time()-times,pytz.timezone('UTC')).strftime("%M:%S:%f"))
- 得到最高的recall,不惜一切代价判断少数类
- 追求最高的预测准确率,让accuracy更高
- 希望recall,ROC和accuracy的平衡
步骤八:模型调参
8.1追求最高的recall
balance模式下模型
times = time()
for kernel in ["linear","poly","rbf","sigmoid"]:
    clf = SVC(kernel = kernel
             ,gamma="auto"
             ,degree=1
             ,cache_size = 5000
              ,class_weight="balanced"
             ).fit(Xtrain,Ytrain)
    result = clf.predict(Xtest)
    score = clf.score(Xtest,Ytest)
    recall = recall_score(Ytest,result)
    auc = roc_auc_score(Ytest,clf.decision_function(Xtest))
    print("%s 's testing accuracy %f,recall is %f',auc is %f" %(kernel,score,recall,auc))
    print(datetime.datetime.fromtimestamp(time()-times,pytz.timezone('UTC')).strftime("%M:%S:%f"))

此时综合效果好的还是linear,所以可以在linear核函数下手动调节少数类占比
times = time()
clf = SVC(kernel = "linear"
         ,gamma="auto"
         ,degree=1
         ,cache_size = 5000
          ,class_weight={1:10}
         ).fit(Xtrain,Ytrain)
result = clf.predict(Xtest)
score = clf.score(Xtest,Ytest)
recall = recall_score(Ytest,result)
auc = roc_auc_score(Ytest,clf.decision_function(Xtest))
print("%s 's testing accuracy %f,recall is %f',auc is %f" %(kernel,score,recall,auc))
print(datetime.datetime.fromtimestamp(time()-times,pytz.timezone('UTC')).strftime("%M:%S:%f"))
times = time()
clf = SVC(kernel = "linear"
         ,gamma="auto"
         ,degree=1
         ,cache_size = 5000
          ,class_weight={1:15}
         ).fit(Xtrain,Ytrain)
result = clf.predict(Xtest)
score = clf.score(Xtest,Ytest)
recall = recall_score(Ytest,result)
auc = roc_auc_score(Ytest,clf.decision_function(Xtest))
print("%s 's testing accuracy %f,recall is %f',auc is %f" %(kernel,score,recall,auc))
print(datetime.datetime.fromtimestamp(time()-times,pytz.timezone('UTC')).strftime("%M:%S:%f"))

可以看到少数类占比越大,最后recall结果越好,精准捕捉了每一个雨天
8.2追求最高准确率
首先查看样本均衡度
valuec = pd.Series(Ytest).value_counts()
valuec
valuec[0]/valuec.sum()
from sklearn.metrics import confusion_matrix as CM
clf = SVC(kernel = "linear"
         ,gamma="auto"
         ,cache_size = 5000
         ).fit(Xtrain,Ytrain)
result = clf.predict(Xtest)
cm = CM(Ytest,result,labels=(1,0))
cm
 可以看到特异度很高,可以尝试稍微调整class_weight将模型想少数类的方向调整
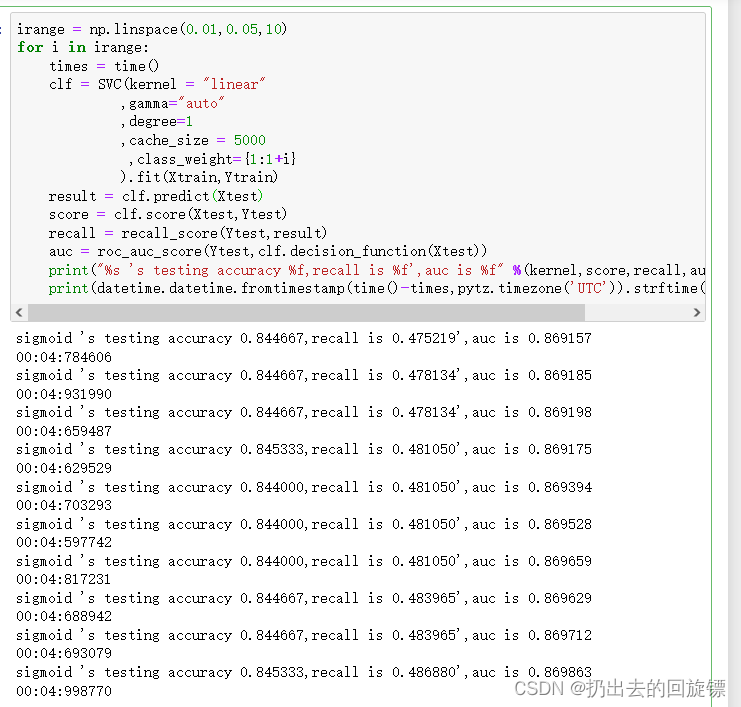
irange = np.linspace(0.01,0.05,10)
for i in irange:
    times = time()
    clf = SVC(kernel = "linear"
             ,gamma="auto"
             ,degree=1
             ,cache_size = 5000
              ,class_weight={1:1+i}
             ).fit(Xtrain,Ytrain)
    result = clf.predict(Xtest)
    score = clf.score(Xtest,Ytest)
    recall = recall_score(Ytest,result)
    auc = roc_auc_score(Ytest,clf.decision_function(Xtest))
    print("%s 's testing accuracy %f,recall is %f',auc is %f" %(kernel,score,recall,auc))
    print(datetime.datetime.fromtimestamp(time()-times,pytz.timezone('UTC')).strftime("%M:%S:%f"))
irange = np.linspace(0.018889,0.027778,10)
for i in irange:
    times = time()
    clf = SVC(kernel = "linear"
             ,gamma="auto"
             ,degree=1
             ,cache_size = 5000
              ,class_weight={1:1+i}
             ).fit(Xtrain,Ytrain)
    result = clf.predict(Xtest)
    score = clf.score(Xtest,Ytest)
    recall = recall_score(Ytest,result)
    auc = roc_auc_score(Ytest,clf.decision_function(Xtest))
    print("%s 's testing accuracy %f,recall is %f',auc is %f" %(kernel,score,recall,auc))
    print(datetime.datetime.fromtimestamp(time()-times,pytz.timezone('UTC')).strftime("%M:%S:%f"))

此时已经没有更好的结果了。说明以及到了极限。尝试下线性模型表现效果好的逻辑回归
from sklearn.linear_model  import LogisticRegression as LR
logclf = LR(solver="liblinear").fit(Xtrain,Ytrain)
logclf.score(Xtest,Ytest)
C_range= np.linspace(3,5,10)
for C in C_range:
    logclf = LR(solver="liblinear",C=C).fit(Xtrain,Ytrain)
    print(C,logclf.score(Xtest,Ytest))

一动不动。。。。也许要继续提高模型准确度需要使用更加强劲的算法如梯度提升树叭
8.3追求召回率和准确率的平衡
在选定线性核的情况下,调节class_weight并不能使我们的模型有较大的改善。现在调节线性核函数的C值查看效果
###======【TIME WARNING:10mins】======###
import matplotlib.pyplot as plt
C_range = np.linspace(0.01,20,20)
recallall = []
aucall = []
scoreall = []
for C in C_range:
    times = time()
    clf = SVC(kernel = "linear",C=C,cache_size = 5000
             ,class_weight = "balanced"
             ).fit(Xtrain, Ytrain)
    result = clf.predict(Xtest)
    score = clf.score(Xtest,Ytest)
    recall = recall_score(Ytest, result)
    auc = roc_auc_score(Ytest,clf.decision_function(Xtest))
    recallall.append(recall)
    aucall.append(auc)
    scoreall.append(score)
    print("under C %f, testing accuracy is %f,recall is %f', auc is %f" %
(C,score,recall,auc))
    print(datetime.datetime.fromtimestamp(time()-times).strftime("%M:%S:%f"))

print(max(aucall),C_range[aucall.index(max(aucall))])
plt.figure()
plt.plot(C_range,recallall,c="red",label="recall")
plt.plot(C_range,aucall,c="black",label="auc")
plt.plot(C_range,scoreall,c="orange",label="accuracy")
plt.legend()
plt.show()

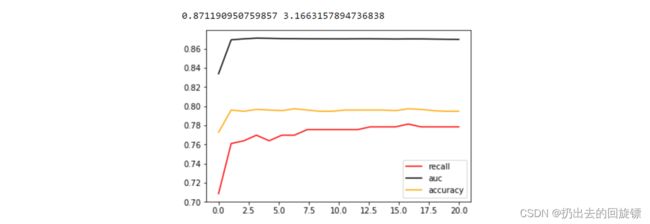
可以看到,随着C值变大,模型运行速度越来越慢。因为C值 的改变消耗比较大。其次C值很小的时候,模型的各项指标都很低,但C到1以上后,模型的表现开始稳定,之后再提高C值模型的效果也没有显著提高。代入最佳C值,查看准确率和Recall具体值
times = time()
clf = SVC(kernel = "linear",C=3.1663157894736838,cache_size = 5000
          ,class_weight = "balanced"
         ).fit(Xtrain, Ytrain)
result = clf.predict(Xtest)
score = clf.score(Xtest,Ytest)
recall = recall_score(Ytest, result)
auc = roc_auc_score(Ytest,clf.decision_function(Xtest))
print("testing accuracy %f,recall is %f', auc is %f" % (score,recall,auc))
print(datetime.datetime.fromtimestamp(time()-times,pytz.timezone('UTC')).strftime("%M:%S:%f"))
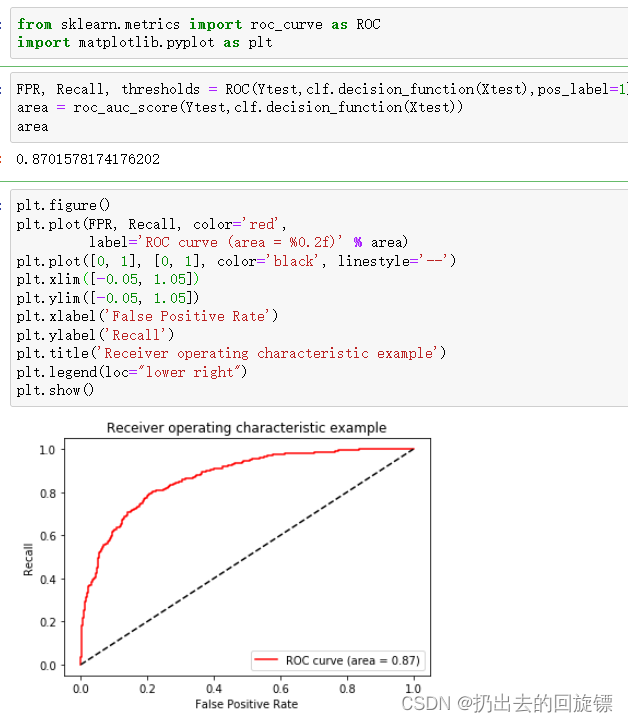
from sklearn.metrics import roc_curve as ROC
import matplotlib.pyplot as plt
FPR, Recall, thresholds = ROC(Ytest,clf.decision_function(Xtest),pos_label=1)
area = roc_auc_score(Ytest,clf.decision_function(Xtest))
area

plt.figure()
plt.plot(FPR, Recall, color='red',
         label='ROC curve (area = %0.2f)' % area)
plt.plot([0, 1], [0, 1], color='black', linestyle='--')
plt.xlim([-0.05, 1.05])
plt.ylim([-0.05, 1.05])
plt.xlabel('False Positive Rate')
plt.ylabel('Recall')
plt.title('Receiver operating characteristic example')
plt.legend(loc="lower right")
plt.show()
maxindex = (Recall - FPR).tolist().index(max(Recall - FPR))
thresholds[maxindex]

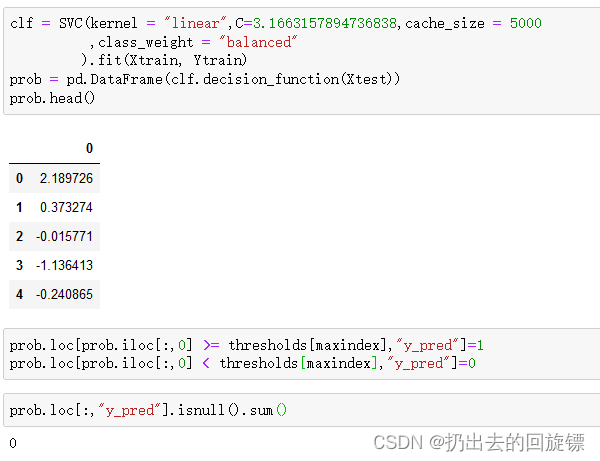
通过选出来的最佳阈值,确定y_predict,并确定此时的recall和准确率
from sklearn.metrics import accuracy_score as AC

clf = SVC(kernel = "linear",C=3.1663157894736838,cache_size = 5000
          ,class_weight = "balanced"
         ).fit(Xtrain, Ytrain)
prob = pd.DataFrame(clf.decision_function(Xtest))
prob.head()
prob.loc[prob.iloc[:,0] >= thresholds[maxindex],"y_pred"]=1
prob.loc[prob.iloc[:,0] < thresholds[maxindex],"y_pred"]=0
times = time()
score = AC(Ytest,prob.loc[:,"y_pred"].values)
recall = recall_score(Ytest, prob.loc[:,"y_pred"])
print("testing accuracy %f,recall is %f" % (score,recall))
print(datetime.datetime.fromtimestamp(time()-times,pytz.timezone('UTC')).strftime("%M:%S:%f"))

效果甚至不如手动调参。可见,最求平衡的话,SVC本身的结果就十分优秀率,调节阈值和C值的效果都很有限。
3.SVM总结
SVM原理,包括决策边界,损失函数,拉格朗日函数,拉格朗日对偶函数,软间隔硬间隔,核函数以及核函数的各种应用。我们了解了SVC类的各种重要参数,属性和接口,其中参数包括软间隔的惩罚系数C,核函数kernel,核函数的相关参数gamma,coef0和degree,解决样本不均衡的参数class_weight,解决多分类问题的参数decision_function_shape,控制概率的参数probability,控制计算内存的参数cache_size,属性主要包括调用支持向量的属性support_vectors_和查看特征重要性的属性coef_。接口中,学习了最核心的decision_function。除此之外,还有分类模型的模型评估指标:混淆矩阵和ROC曲线,还介绍了部分特征工程和数据预处理的思路。

