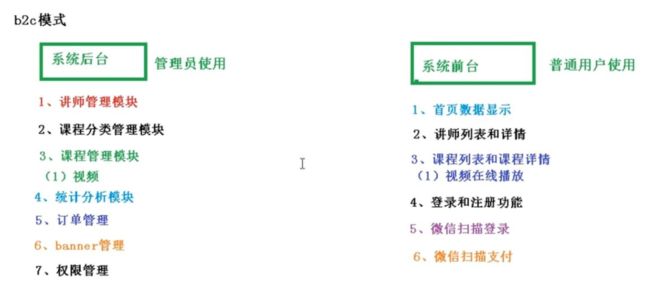
谷粒学苑-项目搭建、讲师前后端、课程分类前后端、OSS、EasyExcel
谷粒学苑
url: jdbc:mysql://localhost:3306/guli?useUnicode=true&useSSL=false&characterEncoding=UTF-8&serverTimezone=UTC
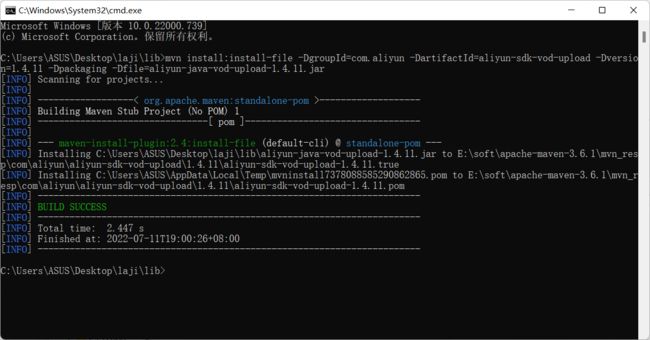
vod依赖解决 详细可看这https://blog.csdn.net/Airuiliya520/article/details/109017091
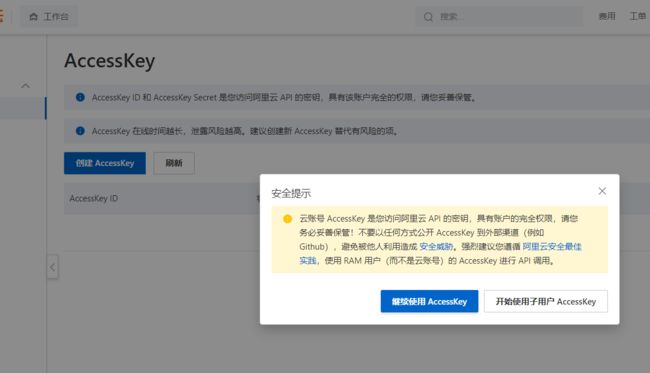
阿里云jar包下载
网址
mvn install:install-file -DgroupId=com.aliyun -DartifactId=aliyun-sdk-vod-upload -Dversion=1.4.11 -Dpackaging=jar -Dfile=aliyun-java-vod-upload-1.4.11.jar
cmd运行这个命令,然后重启idea。
忽略
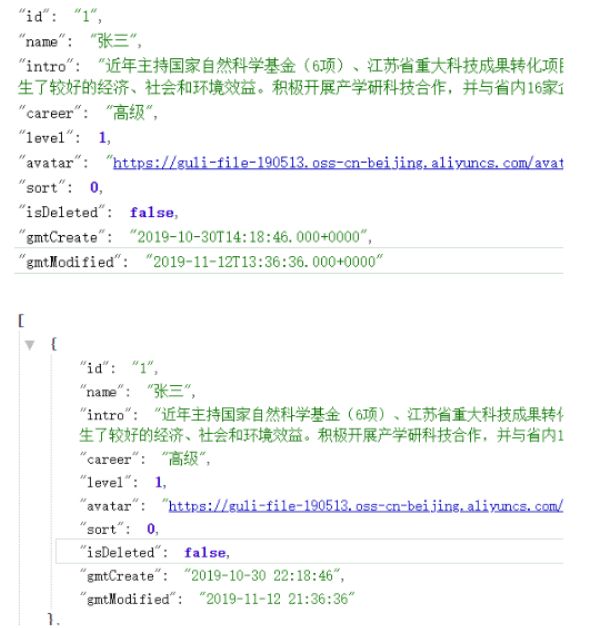
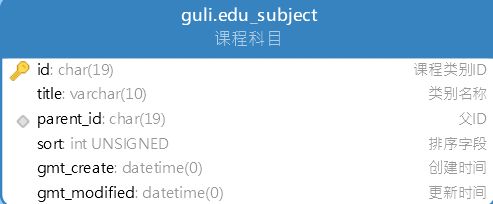
aaaaaaaachenggong!数据库表新加了几个字段,时间的关于
[外链图片转存失败,源站可能有防盗链机制,建议将图片保存下来直接上传(img-8gimFQCX-1661002567764)(谷粒学苑.assets/image-20220712110231248.png)]
[外链图片转存失败,源站可能有防盗链机制,建议将图片保存下来直接上传(img-HJt7mEdo-1661002567765)(谷粒学苑.assets/image-20220712110246601.png)]
后端项目搭建
注:为知笔记,.ziw笔记修改后缀为.zip,解压打开,为html格式,方便观看;但是粘贴不便
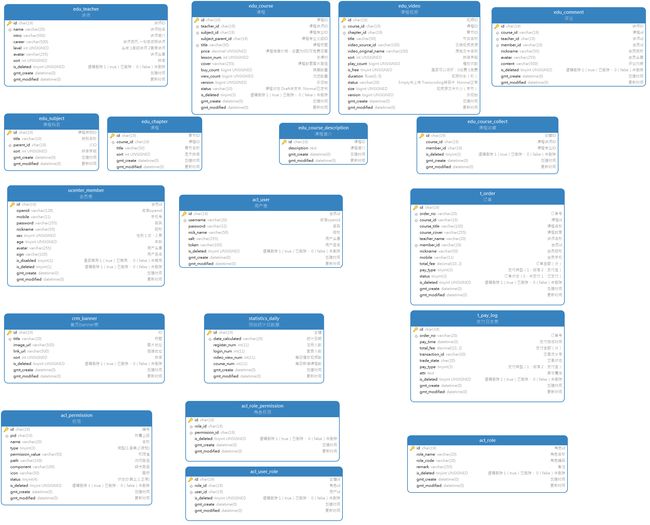
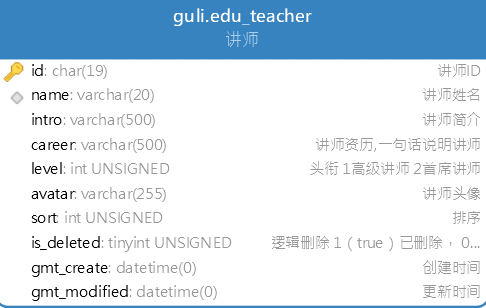
一.数据库设计
表模型
1、库名与应用名称尽量一致

2、表名、字段名必须使用小写字母或数字,禁止出现数字开头,

3、表名不使用复数名词

4、表的命名最好是加上“业务名称_表的作用”。如,edu_teacher

5、表必备三字段:id, gmt_create, gmt_modified

说明:

其中 id 必为主键,类型为 bigint unsigned、单表时自增、步长为 1。

(如果使用分库分表集群部署,则id类型为verchar,非自增,业务中使用分布式id生成器)

gmt_create, gmt_modified 的类型均为 datetime 类型,前者现在时表示主动创建,后者过去分词表示被 动更新。

6、单表行数超过 500 万行或者单表容量超过 2GB,才推荐进行分库分表。 说明:如果预计三年后的数据量根本达不到这个级别,请不要在创建表时就分库分表。

7、表达是与否概念的字段,必须使用 is_xxx 的方式命名,数据类型是 unsigned tinyint (1 表示是,0 表示否)。

说明:任何字段如果为非负数,必须是 unsigned。

注意:POJO 类中的任何布尔类型的变量,都不要加 is 前缀。数据库表示是与否的值,使用 tinyint 类型,坚持 is_xxx 的 命名方式是为了明确其取值含义与取值范围。

正例:表达逻辑删除的字段名 is_deleted,1 表示删除,0 表示未删除。

8、小数类型为 decimal,禁止使用 float 和 double。 说明:float 和 double 在存储的时候,存在精度损失的问题,很可能在值的比较时,得到不 正确的结果。如果存储的数据范围超过 decimal 的范围,建议将数据拆成整数和小数分开存储。

9、如果存储的字符串长度几乎相等,使用 char 定长字符串类型。

10、varchar 是可变长字符串,不预先分配存储空间,长度不要超过 5000,如果存储长度大于此值,定义字段类型为 text,独立出来一张表,用主键来对应,避免影响其它字段索 引效率。

11、唯一索引名为 uk_字段名;普通索引名则为 idx_字段名。
说明:uk_ 即 unique key;idx_ 即 index 的简称

12、不得使用外键与级联,一切外键概念必须在应用层解决。外键与级联更新适用于单机低并发,不适合分布式、高并发集群;级联更新是强阻塞,存在数据库更新风暴的风险;外键影响数据库的插入速度
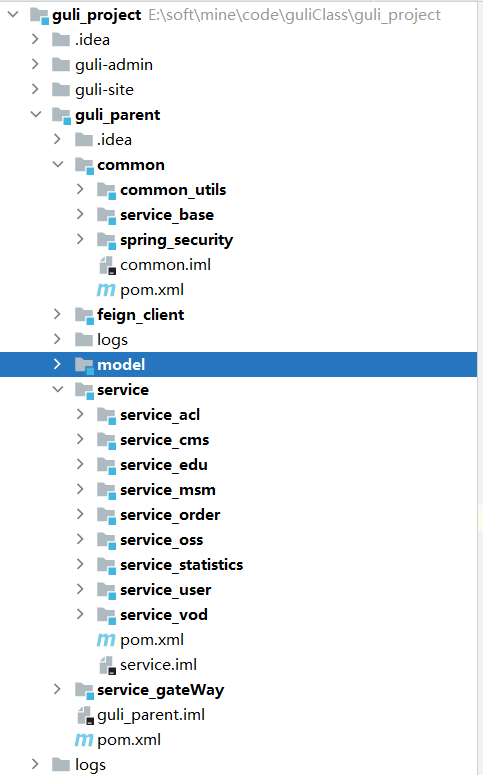
二.项目结构
父工程模块
版本使用:2.2.1.RELEASE
版本统一管理
common模块
common-util:工具类模块,所有模块都可以依赖于它

service-base:service服务的base包,包含service服务的公共配置类,所有service模块依赖于它

spring-security:认证与授权模块,需要认证授权的service服务依赖于它
service模块
service-acl:用户权限管理api接口服务(用户管理、角色管理和权限管理等)

service-cms:cms api接口服务

service-edu:教学相关api接口服务

service-msm:短信api接口服务

service-order:订单相关api接口服务

service-oss:阿里云oss api接口服务

service-statistics:统计报表api接口服务

service-ucenter:会员api接口服务

service-vod:视频点播api接口服务
service_gateWay模块
feign_client 调用模块
model模块
所有实体类,返回前端的vo类,参数类(也在vo里)都在此
三.前置配置
1.配置文件
可能有没对齐
# 服务端口
server:
  port: 8001
# 服务名
spring:
  application:
    name: service-edu
   # mysql数据库连接
  datasource:
    type: com.zaxxer.hikari.HikariDataSource
    driver-class-name: com.mysql.cj.jdbc.Driver
    url: jdbc:mysql://localhost:3306/guli?serverTimezone=GMT%2B8&useSSL=false
    username: root
    password: 1234
    hikari:
      connection-test-query: SELECT 1
      connection-timeout: 60000
      idle-timeout: 500000
      max-lifetime: 540000
      maximum-pool-size: 12
      minimum-idle: 10
      pool-name: GuliHikariPool
  #时间格式解析
  jackson:
    date-format: yyyy-MM-dd HH:mm:ss
    time-zone: GMT+8
2.代码生成器
public class CodeGenerator {

    @Test
    public void run() {

        // 1、创建代码生成器
        AutoGenerator mpg = new AutoGenerator();

        // 2、全局配置
        GlobalConfig gc = new GlobalConfig();
        String projectPath = System.getProperty("user.dir");
//        gc.setOutputDir(projectPath + "/src/main/java");    //尽量写绝对路径
        gc.setOutputDir("E:soft\\mine\\code\\guliClass\\guli_parent\\service\\service_edu" + "/src/main/java");

        gc.setAuthor("xiaoxin");   //作者
        gc.setOpen(false); //生成后是否打开资源管理器
        gc.setFileOverride(false); //重新生成时文件是否覆盖
        gc.setServiceName("%sService");	//去掉Service接口的首字母I
        gc.setIdType(IdType.ID_WORKER); //主键策略
        gc.setDateType(DateType.ONLY_DATE);//定义生成的实体类中日期类型
        gc.setSwagger2(true);//开启Swagger2模式

        mpg.setGlobalConfig(gc);

        // 3、数据源配置
        DataSourceConfig dsc = new DataSourceConfig();
        dsc.setUrl("jdbc:mysql://localhost:3308/guli?serverTimezone=GMT%2B8");
        dsc.setDriverName("com.mysql.cj.jdbc.Driver");
        dsc.setUsername("root");
        dsc.setPassword("root");
        dsc.setDbType(DbType.MYSQL);
        mpg.setDataSource(dsc);

        // 4、包配置
        PackageConfig pc = new PackageConfig();
        pc.setModuleName("eduservice"); //模块名
        pc.setParent("com.xiaoxin");
        pc.setController("controller");
        pc.setEntity("entity");
        pc.setService("service");
        pc.setMapper("mapper");
        mpg.setPackageInfo(pc);

        // 5、策略配置
        StrategyConfig strategy = new StrategyConfig();
        strategy.setInclude("edu_teacher");
        strategy.setNaming(NamingStrategy.underline_to_camel);//数据库表映射到实体的命名策略
        strategy.setTablePrefix(pc.getModuleName() + "_"); //生成实体时去掉表前缀

        strategy.setColumnNaming(NamingStrategy.underline_to_camel);//数据库表字段映射到实体的命名策略
        strategy.setEntityLombokModel(true); // lombok 模型 @Accessors(chain = true) setter链式操作

        strategy.setRestControllerStyle(true); //restful api风格控制器
        strategy.setControllerMappingHyphenStyle(true); //url中驼峰转连字符

        mpg.setStrategy(strategy);


        // 6、执行
        mpg.execute();
    }
}
3.Swagger集成
guli_project\guli_parent\common\service_base\config
-
通用模板
-
设置包扫描规则,为了扫描到swagger的配置类
//记得在启动类扫描
@ComponentScan(basePackages ={"com.xiaoxin"})
@Configuration
@EnableSwagger2//记得加这个
public class SwaggerConfig {

    @Bean
    public Docket webApiConfig(){

        return new Docket(DocumentationType.SWAGGER_2)
                .groupName("webApi")
                .apiInfo(webApiInfo())
                .select()
                .paths(Predicates.not(PathSelectors.regex("/admin/.*")))
                .paths(Predicates.not(PathSelectors.regex("/error.*")))
                .build();

    }

    private ApiInfo webApiInfo(){

        return new ApiInfoBuilder()
                .title("网站-课程中心API文档")
                .description("本文档描述了课程中心微服务接口定义")
                .version("1.0")
                .contact(new Contact("Helen", "http://atguigu.com", "[email protected]"))
                .build();
    }
}
4.统一结果返回对象
-
Result 其中的return this为了支持链式调用(一种设计模式)
result中一般(模板)包含 状态码 是否成功 返回消息 数据(一般是map)
@Data
public class Result {
    @ApiModelProperty(value = "是否成功")
    private Boolean success;

    @ApiModelProperty(value = "返回码")
    private Integer code;

    @ApiModelProperty(value = "返回消息")
    private String message;

    @ApiModelProperty(value = "返回数据")
    private Map<String, Object> data = new HashMap<String, Object>();

    private Result(){}

    public static Result ok(){
        Result r = new Result();
        r.setSuccess(true);
        r.setCode(ResultCode.SUCCESS);
        r.setMessage("成功");
        return r;
    }

    public static Result error(){
        Result r = new Result();
        r.setSuccess(false);
        r.setCode(ResultCode.ERROR);
        r.setMessage("失败");
        return r;
    }

    public Result success(Boolean success){
        this.setSuccess(success);
        return this;
    }

    public Result message(String message){
        this.setMessage(message);
        return this;
    }

    public Result code(Integer code){
        this.setCode(code);
        return this;
    }

    public Result data(String key, Object value){
        this.data.put(key, value);
        return this;
    }

    public Result data(Map<String, Object> map){
        this.setData(map);
        return this;
    }
}
- ResultCodeEnum (配合GuliException)使用
package com.xxx.result;

import lombok.Getter;
import lombok.experimental.Accessors;

/**
 * 统一返回结果状态信息类
 */
@Getter
@Accessors(chain = true)
public enum ResultCodeEnum {

    SUCCESS(200,"成功"),
    FAIL(201, "失败"),
    PARAM_ERROR( 202, "参数不正确"),
    SERVICE_ERROR(203, "服务异常"),
    DATA_ERROR(204, "数据异常"),
    DATA_UPDATE_ERROR(205, "数据版本异常"),

    LOGIN_AUTH(206, "未登陆"),
    PERMISSION(207, "没有权限"),

    CODE_ERROR(208, "验证码错误"),
    SEND_CODE_ERROR(209, "验证码发送失败"),
    LOGIN_INFO_ERROR(210, "账号或密码为空"),
    LOGIN_MOBLE_ERROR(211, "账号不正确"),
    LOGIN_PASSWORD_ERROR(212, "密码不正确"),
    LOGIN_DISABLED_ERROR(213, "该用户已被禁用"),
    REGISTER_MOBLE_ERROR(214, "手机号已被使用"),
    LOGIN_AURH(215, "需要登录"),
    LOGIN_ACL(216, "没有权限"),
    TOKEN_OVERDUE( 224,"登录时间过期"),

    URL_ENCODE_ERROR( 217, "URL编码失败"),
    ILLEGAL_CALLBACK_REQUEST_ERROR( 218, "非法回调请求"),
    FETCH_ACCESSTOKEN_FAILD( 219, "获取accessToken失败"),
    FETCH_USERINFO_ERROR( 220, "获取用户信息失败"),
    LOGIN_ERROR( 221, "登录失败"),

    PAY_RUN(222, "支付中"),
    PAY_ERROR(225, "支付失败"),
    CANCEL_ORDER_FAIL(223, "取消订单失败");

    private final Integer code;
    private final String message;

    ResultCodeEnum(Integer code, String message) {
        this.code = code;
        this.message = message;
    }
}
- ResultCode接口 (用于结果类的静态方法成功、失败)
package com.xxx.result;

public interface ResultCode {

    public static Integer SUCCESS = 200;

    public static Integer ERROR = 201;
}
5.MybatisPlus配置类
MybatisPlusConfig
@Configuration
@EnableTransactionManagement
@MapperScan("com.xxx.edu.mapper")
public class MyBatisPlusConfig {
    /**
     * SQL 执行性能分析插件
     * 开发环境使用,线上不推荐。 maxTime 指的是 sql 最大执行时长
     */
    /*@Bean
    @Profile({"dev","test"})// 设置 dev test 环境开启
    public PerformanceInterceptor performanceInterceptor() {
        PerformanceInterceptor performanceInterceptor = new PerformanceInterceptor();
        performanceInterceptor.setMaxTime(1000);//ms,超过此处设置的ms则sql不执行
        performanceInterceptor.setFormat(true);
        return performanceInterceptor;
    }*/

    @Bean
    public ISqlInjector sqlInjector() {
        return new LogicSqlInjector();
    }

    /**
     * 分页插件
     */
    @Bean
    public PaginationInterceptor paginationInterceptor() {
        return new PaginationInterceptor();
    }
}
自动填充
在实体类属性上添加
@TableField(fill = FieldFill.INSERT)@TableField(fill = FieldFill.INSERT_UPDATE)
@Component
public class MyMetaObjectHandler implements MetaObjectHandler {


    @Override
    public void insertFill(MetaObject metaObject) {
        this.setFieldValByName("gmtCreate", new Date(), metaObject);
        this.setFieldValByName("gmtModified", new Date(), metaObject);
        this.setFieldValByName("loginTime", new Date(), metaObject);
        this.setFieldValByName("viewTime", new Date(), metaObject);
        this.setFieldValByName("buyTime", new Date(), metaObject);
    }

    @Override
    public void updateFill(MetaObject metaObject) {
        this.setFieldValByName("gmtModified", new Date(), metaObject);

    }
}
逻辑删除插件在3.1之后不用配置
1.插件:配置类
2.添加@Tablelogic
6.统一异常处理
全局异常
/**
 * @program: guli_parent
 * @description: 自定义异常类
 * @author:xiaoxin
 * @create: 2022-05-08 11:42
 **/

@EqualsAndHashCode(callSuper = true)
@Data
@AllArgsConstructor
@NoArgsConstructor
public class GuliException extends RuntimeException {

    @ApiModelProperty(value = "异常状态码")
    private Integer code;

    /**
     * 通过状态码和错误消息创建异常对象
     * @param message
     * @param code
     */
    public GuliException(String message, Integer code) {
        super(message);
        this.code = code;
    }

    /**
     * 接收枚举类型对象
     * @param resultCodeEnum
     */
    public GuliException(ResultCodeEnum resultCodeEnum) {
        super(resultCodeEnum.getMessage());
        this.code = resultCodeEnum.getCode();
    }

    @Override
    public String toString() {
        return "GuliException{" +
                "code=" + code +
                ", message=" + this.getMessage() +
                '}';
    }
}
7.统一日志处理
配置日志级别
日志记录器(Logger)的行为是分等级的。如下表所示:
分为:OFF、FATAL、ERROR、WARN、INFO、DEBUG、ALL
默认情况下,spring boot从控制台打印出来的日志级别只有INFO及以上级别,可以配置日志级别
# 设置日志级别
logging.level.root=WARN
这种方式只能将日志打印在控制台上
Logback
spring boot内部使用Logback作为日志实现的框架。
logback相对于log4j的一些优点:https://blog.csdn.net/caisini_vc/article/details/48551287
1、配置logback日志
删除application.properties中的日志配置

安装idea彩色日志插件:grep-console

resources 中创建 logback-spring.xml
<configuration  scan="true" scanPeriod="10 seconds">


    <contextName>logbackcontextName>

    <property name="log.path" value="logs/guli_log/edu" />


    <property name="CONSOLE_LOG_PATTERN"
              value="%yellow(%date{yyyy-MM-dd HH:mm:ss}) |%highlight(%-5level) |%blue(%thread) |%blue(%file:%line) |%green(%logger) |%cyan(%msg%n)"/>


    <appender name="CONSOLE" class="ch.qos.logback.core.ConsoleAppender">


        <filter class="ch.qos.logback.classic.filter.ThresholdFilter">
            <level>DEBUGlevel>
        filter>
        <encoder>
            <Pattern>${CONSOLE_LOG_PATTERN}Pattern>

            <charset>UTF-8charset>
        encoder>
    appender>


    <appender name="INFO_FILE" class="ch.qos.logback.core.rolling.RollingFileAppender">

        <file>${log.path}/log_info.logfile>

        <encoder>
            <pattern>%d{yyyy-MM-dd HH:mm:ss.SSS} [%thread] %-5level %logger{50} - %msg%npattern>
            <charset>UTF-8charset>
        encoder>

        <rollingPolicy class="ch.qos.logback.core.rolling.TimeBasedRollingPolicy">

            <fileNamePattern>${log.path}/info/log-info-%d{yyyy-MM-dd}.%i.logfileNamePattern>
            <timeBasedFileNamingAndTriggeringPolicy class="ch.qos.logback.core.rolling.SizeAndTimeBasedFNATP">
                <maxFileSize>100MBmaxFileSize>
            timeBasedFileNamingAndTriggeringPolicy>

            <maxHistory>15maxHistory>
        rollingPolicy>

        <filter class="ch.qos.logback.classic.filter.LevelFilter">
            <level>INFOlevel>
            <onMatch>ACCEPTonMatch>
            <onMismatch>DENYonMismatch>
        filter>
    appender>


    <appender name="WARN_FILE" class="ch.qos.logback.core.rolling.RollingFileAppender">

        <file>${log.path}/log_warn.logfile>

        <encoder>
            <pattern>%d{yyyy-MM-dd HH:mm:ss.SSS} [%thread] %-5level %logger{50} - %msg%npattern>
            <charset>UTF-8charset>
        encoder>

        <rollingPolicy class="ch.qos.logback.core.rolling.TimeBasedRollingPolicy">
            <fileNamePattern>${log.path}/warn/log-warn-%d{yyyy-MM-dd}.%i.logfileNamePattern>
            <timeBasedFileNamingAndTriggeringPolicy class="ch.qos.logback.core.rolling.SizeAndTimeBasedFNATP">
                <maxFileSize>100MBmaxFileSize>
            timeBasedFileNamingAndTriggeringPolicy>

            <maxHistory>15maxHistory>
        rollingPolicy>

        <filter class="ch.qos.logback.classic.filter.LevelFilter">
            <level>warnlevel>
            <onMatch>ACCEPTonMatch>
            <onMismatch>DENYonMismatch>
        filter>
    appender>


    <appender name="ERROR_FILE" class="ch.qos.logback.core.rolling.RollingFileAppender">

        <file>${log.path}/log_error.logfile>

        <encoder>
            <pattern>%d{yyyy-MM-dd HH:mm:ss.SSS} [%thread] %-5level %logger{50} - %msg%npattern>
            <charset>UTF-8charset>
        encoder>

        <rollingPolicy class="ch.qos.logback.core.rolling.TimeBasedRollingPolicy">
            <fileNamePattern>${log.path}/error/log-error-%d{yyyy-MM-dd}.%i.logfileNamePattern>
            <timeBasedFileNamingAndTriggeringPolicy class="ch.qos.logback.core.rolling.SizeAndTimeBasedFNATP">
                <maxFileSize>100MBmaxFileSize>
            timeBasedFileNamingAndTriggeringPolicy>

            <maxHistory>15maxHistory>
        rollingPolicy>

        <filter class="ch.qos.logback.classic.filter.LevelFilter">
            <level>ERRORlevel>
            <onMatch>ACCEPTonMatch>
            <onMismatch>DENYonMismatch>
        filter>
    appender>


    <springProfile name="dev">

        <logger name="com.xxx" level="DEBUG" />


        <root level="INFO">
            <appender-ref ref="CONSOLE" />
            <appender-ref ref="INFO_FILE" />
            <appender-ref ref="WARN_FILE" />
            <appender-ref ref="ERROR_FILE" />
        root>
    springProfile>


    <springProfile name="pro">

        <root level="INFO">
            <appender-ref ref="CONSOLE" />
            <appender-ref ref="DEBUG_FILE" />
            <appender-ref ref="INFO_FILE" />
            <appender-ref ref="ERROR_FILE" />
            <appender-ref ref="WARN_FILE" />
        root>
    springProfile>

configuration>
2、将错误日志输出到文件
GlobalExceptionHandler.java 中
类上添加注解 @Slf4j
异常输出语句
log.error(e.getMessage());
3、将日志堆栈信息输出到文件
定义工具类common_untils下创建util包,创建ExceptionUtil.java工具类
public class ExceptionUtil {

	public static String getMessage(Exception e) {
		StringWriter sw = null;
		PrintWriter pw = null;
		try {
			sw = new StringWriter();
			pw = new PrintWriter(sw);
			// 将出错的栈信息输出到printWriter中
			e.printStackTrace(pw);
			pw.flush();
			sw.flush();
		} finally {
			if (sw != null) {
				try {
					sw.close();
				} catch (IOException e1) {
					e1.printStackTrace();
				}
			}
			if (pw != null) {
				pw.close();
			}
		}
		return sw.toString();
	}
}
调用
log.error(ExceptionUtil.getMessage(e));
GuliException中创建toString方法(前面已经写了)
8.MybatisPlus学习
建议官方文档学习或者尚硅谷视频/我的博客
讲师管理模块
一.后端
1.根据ID查询
    @GetMapping("/findByIdTeacher/{id}")
    @ApiOperation("根据Id查询讲师")
    public Result findByIdTeacher(
            @ApiParam(name = "id",value = "讲师Id",required = true) @PathVariable("id") String id
    ){
        Teacher teacher = teacherService.getById(id);
        log.info("获取讲师信息,teacher =》{}",teacher);
        return Result.ok().data("teacher",teacher);
    }
2.查询所有
    @GetMapping("/getTeacherList")
    @ApiOperation(value = "所有讲师列表")
    public Result getTeacherList(){
        List<Teacher> list = teacherService.list(null);
        return Result.ok().data("items",list);
    }

    @DeleteMapping("{id}")
    @ApiOperation(value = "逻辑删除讲师")
    //public Result removeById(@ApiParam(name = "id",value = "讲师Id",readOnly = true) @PathVariable("id")String id){
    //    boolean b = teacherService.removeById(id);
    //    if (b){
    //        return Result.ok();
    //    }else {
    //        return Result.error();
    //    }
    //}
//三元表达式优化
return teacherService.removeById(id)? Result.ok():Result.error();
3.逻辑删除
    @DeleteMapping("{id}")
    @ApiOperation(value = "逻辑删除讲师")
    public Result removeById(@ApiParam(name = "id",value = "讲师Id",readOnly = true) @PathVariable("id")String id){
        boolean b = teacherService.removeById(id);
        if (b){
            return Result.ok();
        }else {
            return Result.error();
        }
    }
4.分页条件查询
Teachercontroller
@PostMapping("/pageTeacherQuery/{page}/{limit}")
    @ApiOperation(value = "分页条件查询讲师")
    public Result pageTeacherQuery(
            @ApiParam(name = "page",value = "当前页码",required = true) @PathVariable("page")Long page,
            @ApiParam(name = "limit",value = "每页记录数",required = true) @PathVariable("limit")Long limit,
            @ApiParam(name = "teacherVo",value = "条件查询实体类",required = false) @RequestBody(required = false) TeacherVo teacherVo
    ){

        Page<Teacher> pageParam = new Page<>(page, limit);

        teacherService.pageQuery(pageParam, teacherVo);

        List<Teacher> records = pageParam.getRecords();
        long total = pageParam.getTotal();

        return  Result.ok().data("total", total).data("rows", records);
    }

//使用@Requestbody注解修饰参数(把json数据封装到对应的对象),需要请求方式为post,get得不到(不用注解使用get方式也可以)还要加required=false,默认为true;不加上的话不行(因为是条件查询,可以没条件)
//这里swagger的界面也变了,从一个框一个框变成一个大框,写json数据
TeacherServiceImpl
也可使用LambdaQueryWrapper,此方法可优化
@Override
    public void pageQuery(Page<Teacher> pageParam, TeacherVo teacherQuery) {

        QueryWrapper<Teacher> queryWrapper = new QueryWrapper<>();
        queryWrapper.orderByDesc("gmt_create","sort");

        if (teacherQuery == null){
            baseMapper.selectPage(pageParam, queryWrapper);
            return;
        }

        String name = teacherQuery.getName();
        Integer level = teacherQuery.getLevel();
        String begin = teacherQuery.getBegin();
        String end = teacherQuery.getEnd();

        if (!StringUtils.isEmpty(name)) {
            queryWrapper.like("name", name);
        }

        if (!StringUtils.isEmpty(level) ) {
            queryWrapper.eq("level", level);
        }

        if (!StringUtils.isEmpty(begin)) {
            queryWrapper.ge("gmt_create", begin);
        }

        if (!StringUtils.isEmpty(end)) {
            queryWrapper.le("gmt_create", end);
        }

        baseMapper.selectPage(pageParam, queryWrapper);
    }
注
@RequestParam和@Pathvariable区别
常见判空方法
1.Stringutils.isnotblank
2.!Stringutils.isempty
3.Objectt.nonnull
4.collertorutils.isempty(判断集合的)
LambdaQueryWrapper忘记加泛型,会导致Teacher::getName不能用
LambdaQueryWrapperqueryWrapper = new LambdaQueryWrapper<>(); //判空,拼接条件 queryWrapper.like(!StringUtils.isEmpty(teacherQuery.getName()),Teacher::getName,teacherQuery.getName()); Teacher::getName 映射到数据库中的字段属性,防止你写错
5.新增讲师接口
    @PostMapping("/addTeacher")
    @ApiOperation(value = "添加讲师")
    public Result addTeacher(
            @ApiParam(name = "teacher",value = "讲师实体类") @RequestBody Teacher teacher
    ){
        boolean save = teacherService.save(teacher);
        if (save) {
            log.info("添加讲师信息,teacher =》{}",teacher);
            return Result.ok();
        }else {
            return Result.error();
        }
    }
6.修改讲师接口
    @PutMapping("/updateTeacher")
    @ApiOperation(value = "修改讲师")
    public Result updateTeacher(
            @ApiParam(name = "teacher",value = "讲师实体类") @RequestBody Teacher teacher
    ){
        boolean b = teacherService.updateById(teacher);

        if (b) {
            log.info("修改讲师信息,teacher =》{}",teacher);
            return Result.ok();
        }else {
            return Result.error();
        }
    }
}
批量删除
待开发,尚医通有
二.前端
1.后台项目模板
vue-element-admin GitHub地址
vue-admin-template GitHub地址
项目在线预览:地址
elementui(基于vue2x) 地址
建议:你可以在 vue-admin-template 的基础上进行二次开发,把 vue-element-admin当做工具箱,想要什么功能或者组件就去 vue-element-admin 那里复制过来
//克隆工程  有关git可以看[这篇文章](http://t.csdn.cn/9qbIk)
git clone https://github.com/PanJiaChen/vue-admin-template.git
//下载相关依赖
npm install
//运行
 npm run dev
如果下载以依赖出现node-sass类错,尝试先执行下面的代码
npm i -g node-sass --sass_binary_site=https://npm.taobao.org/mirrors/node-sass/
结构
vue-damin-temeplate
	bulid:构建相关
	config:全局配置
	src:源代码
		api:所有请求
		assets:主题 字体等静态资源
		components:全局公共组件
		icons:项目所有svg icons
		router:路由
		store:全局store管理
		styles:全局样式
		utils:全局公用方法
		views:视图
		App.vue:入口页面
		main.js:入口 加载组件 初始化等
		permission.js:权限管理
	static:静态资源
	.babelrc:babel-loader配置
	.eslintrc.js:eslint配置项
	.gitignore:git忽略项
	package.json:依赖管理
最终界面侧边栏展示
2.开发流程
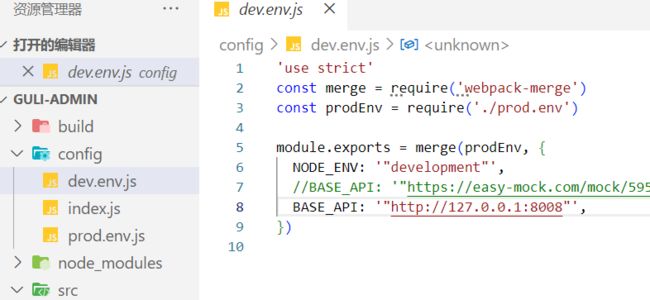
修改请求地址
3.登录改造
login返回token值
info返回信息roles name avatar
前端
user.js中
注意login.js中的url路径和后端要匹配
actions: {
    // 登录
    Login({ commit }, userInfo) {
      const username = userInfo.username.trim()
      return new Promise((resolve, reject) => {
        login(username, userInfo.password).then(response => {
          const data = response.data
          setToken(data.token)
          commit('SET_TOKEN', data.token)
          resolve()
        }).catch(error => {
          reject(error)
        })
      })
    },

    // 获取用户信息
    GetInfo({ commit, state }) {
      return new Promise((resolve, reject) => {
        getInfo(state.token).then(response => {
          const data = response.data
          if (data.roles && data.roles.length > 0) { // 验证返回的roles是否是一个非空数组
            commit('SET_ROLES', data.roles)
          } else {
            reject('getInfo: roles must be a non-null array !')
          }
          commit('SET_NAME', data.name)
          commit('SET_AVATAR', data.avatar)
          resolve(response)
        }).catch(error => {
          reject(error)
        })
      })
    },
后端模拟
后面会用Spring security
@RestController("adminLogin")
@RequestMapping("/user")
public class LoginController {

    @PostMapping("/login")
    @ApiOperation("用户登录接口")
    public Result login(
            @ApiParam(name = "username",value = "用户名",required = true) String username,
            @ApiParam(name = "password",value = "密码",required = true) String password
    ){
        log.info("用户登录");
        return Result.ok().data("token","admin");
    }

    @GetMapping("/info")
    @ApiOperation("获取用户信息接口")
    public Result info(@ApiParam(name = "token",value = "token",required = true) String token){
        log.info("获取用户信息");
        return Result.ok().data("roles","[admin]").data("name","admin").data("avatar","https://wpimg.wallstcn.com/f778738c-e4f8-4870-b634-56703b4acafe.gif");
    }
}
跨域解决
1.@CrossOrigin(先用这个)在controller上
2.网关配置
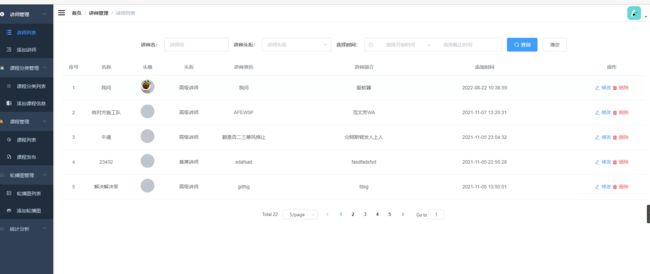
4.讲师列表
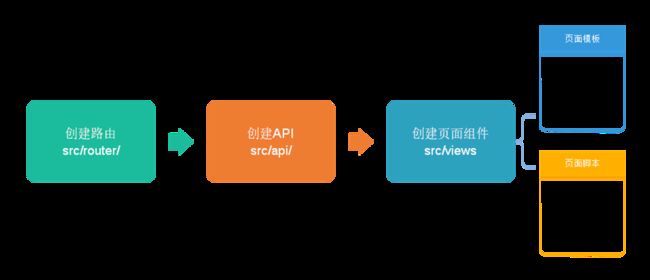
创建路由
 {
    path: '/teacher',
    component: Layout,
    redirect: '/teacher/list',
    name: '讲师管理',
    meta: { title: '讲师管理', icon: 'teacher' },
    children: [
      {
        path: 'list',
        name: '讲师列表',
        component: () => import('@/views/edu/teacher/list'),
        meta: { title: '讲师列表', icon: 'list' }
      },
      {
        path: 'save',
        name: '添加讲师',
        component: () => import('@/views/edu/teacher/save'),
        meta: { title: '添加讲师', icon: 'teacher_edit' }//icon为对性的图标,在icons文件里
      },
      {
        path: 'edit/:id',
        name: '修改讲师',
        component: () => import('@/views/edu/teacher/save'),
        meta: { title: '修改讲师', icon: 'teacher_edit' },
        hidden:true
      }
    ]
  },
创建api
后端用Requestbody获取数据,前端请求(data:teacherVo)要这样写,加个data,表示使用json方式传递数据;如果写param,则前面不用加data
import request from '@/utils/request'

const frontUrl = '/edu/teacher'

export default {

  // 1、讲师列表,条件查询带分页
  pageTeacherQuery(page, limit, teacherVo) {
    return request({
      url: `${frontUrl}/pageTeacherQuery/${page}/${limit}`,
      method: 'post',
      data: teacherVo
    })
  },
}
页面、js
**table表格 **
    <!--表格-->
    <el-table
      v-loading="listLoading"
      :data="list"
      element-loading-text="数据加载中"
      fit
      highlight-current-row
      style="width: 100%;">
      <el-table-column label="序号" width="70" align="center">
        <template slot-scope="scope">
          {{ (page - 1) * limit + scope.$index + 1 }}
        </template>
      </el-table-column>

      <el-table-column prop="name" label="名称" width="120" align="center"/>

      <el-table-column prop="avatar" label="头像" width="120" align="center">
        <template slot-scope="scope">
          <el-avatar :src="scope.row.avatar" size="large"/>
        </template>

      </el-table-column>

      <el-table-column label="头衔" width="120" align="center">
        <template slot-scope="scope">
          {{ scope.row.level===1?'高级讲师':'首席讲师' }}
        </template>
      </el-table-column>

      <el-table-column prop="career" label="讲师资历" width="200" align="center"/>

      <el-table-column prop="intro" label="讲师简介" width="500" align="center" show-overflow-tooltip/>

      <el-table-column prop="gmtCreate" label="添加时间" width="200" align="center"/>
    </el-table>
data 封装好了,帮你遍历 (:data=list)
prop 即properties(属性)data了的key,会显示对应value
整个表格是scope,scope.row 每行中的内容
<template slot-scope="scope">//整个表格域
  {{ scope.row.level===1?'高级讲师':'首席讲师' }}
</template>
分页组件
    <el-pagination
       :current-page="page"
       :page-size="limit"
       :total="total"
       :hide-on-single-page="false"
       style="padding: 30px 0;text-align: center;"
       :page-sizes="[5, 10, 50, 100]"
       layout="total, sizes, prev, pager, next, jumper"  //显示内容,前页后叶等等
       @size-change="handleSizeChange"   //会传递参数给这个函数(封装了单击事件,点2传2)
       @current-change="fetchData"  //分页切换 我还没搞懂fetchData函数是干嘛的(懂了,配合下面的条件查询)
    />
分页查询条件
找个一行显示的 inline=true
el-form el-form-item 类比 el-table el-table-column
    <div style="margin: 3vh auto 0;text-align:center;width: 100%">
      <!--查询表单-->
      <el-form :inline="true" class="demo-form-inline">
        <el-form-item label="讲师名:">
          <el-input v-model="teacherVo.name" placeholder="讲师名"/>
        </el-form-item>

        <el-form-item label="讲师头衔:">
          <el-select v-model="teacherVo.level" clearable placeholder="讲师头衔">
            <el-option :value="1" label="高级讲师"/>
            <el-option :value="2" label="首席讲师"/>
          </el-select>
        </el-form-item>

        <el-form-item label="选择时间:" >
          <!--          <el-date-picker v-model="teacherVo.begin" type="datetime" placeholder="选择开始时间" value-format="yyyy-MM-dd HH:mm:ss" default-time="00:00:00"/>
          <el-date-picker v-model="teacherVo.end" type="datetime" placeholder="选择截止时间" value-format="yyyy-MM-dd HH:mm:ss" default-time="00:00:00"/>-->
          <el-date-picker v-model="value1" :default-time="['00:00:00']" align="right" type="datetimerange" start-placeholder="选择开始时间" end-placeholder="选择截止时间" value-format="yyyy-MM-dd HH:mm:ss"/>
        </el-form-item>

        <el-button type="primary" icon="el-icon-search" @click="fetchData()">查询</el-button>
        <el-button type="default" @click="resetData()">清空</el-button>
      </el-form>
    </div>
页面逻辑js
import teacher from '@/api/edu/teacher'
export default {
  name: 'List',
  data() {
    return {
      value1: '',
      listLoading: true, // 是否显示loading信息
      page: 1, // 当前页
      limit: 5, // 每页显示记录数
      total: 0, // 总记录数
      teacherVo: {}, // 条件查询参数
      list: [] // 查询出结果
    }
  },

  created() { // 页面渲染之前执行,一般执行methods中的方法
    this.getList()
  },
  methods: {
  	//
    fetchData(page) {
      this.teacherVo.begin = this.value1[0]
      this.teacherVo.end = this.value1[1]
      this.getList(page, this.limit)
    },

    handleSizeChange(limit) {
      this.getList(this.page, limit)
    },
    resetData() {
      this.value1 = ''
      this.teacherVo = {}
      this.fetchData()
    },
    getList(page = 1, limit = 5) { // 为了使能查不同页的数据
      this.page = page
      this.limit = limit
      this.listLoading = true
      console.log(this)
      teacher.pageTeacherQuery(this.page, this.limit, this.teacherVo)
        .then(res => {
          if (res.success === true) {
            this.list = res.data.rows
            this.total = res.data.total
          }
          this.listLoading = false
        }).catch(error => { this.$message.error('加载失败,请联系管理员') })
    },
  }
}
5.讲师删除
1.每条记录后添加按钮(修改/删除)
2.按钮绑定删除事件(removeDataById(id))
2.1找个删除弹框,提高用户体验MessageBox
3.给事件方法传递讲师id(scope.row.id)区别于序号哦
4.teacher.js中定义删除接口
创建api
  // 根据Id删除讲师
  removeById(id) {
    return request({
      url: `${frontUrl}/${id}`,
      method: 'delete'
    })
  },
页面、js
      <el-table-column fixed="right" label="操作" width="200" align="center">
        <template slot-scope="scope">
          <router-link :to="'/teacher/edit/'+scope.row.id">
            <el-link type="primary" icon="el-icon-edit">修改</el-link>
          </router-link>

          <el-link type="danger" icon="el-icon-delete-solid" @click="removeDataById(scope.row.id)">删除</el-link>
        </template>
      </el-table-column>
views/edu/teacher/list.vue
    removeDataById(id){
        //element-ui粘贴来的
      this.$confirm('此操作将永久删除该讲师信息, 是否继续?', '提示', {
        confirmButtonText: '确定',
        cancelButtonText: '取消',
        type: 'warning'
      }).then(() => {
        teacher.removeById(id)
          .then(res =>{
            if (res.success === true) {
              this.$message({
                type: 'success',
                message: '删除成功!'
              });
              this.fetchData(this.page)
            }
          })
          .catch(error=>{this.$message.error('加载失败,请联系管理员');})
      }).catch(() => {
        this.$message({
          type: 'info',
          message: '已取消删除'
        });
      });
.catch不写也可以,request.js已经封装好了,做了输出
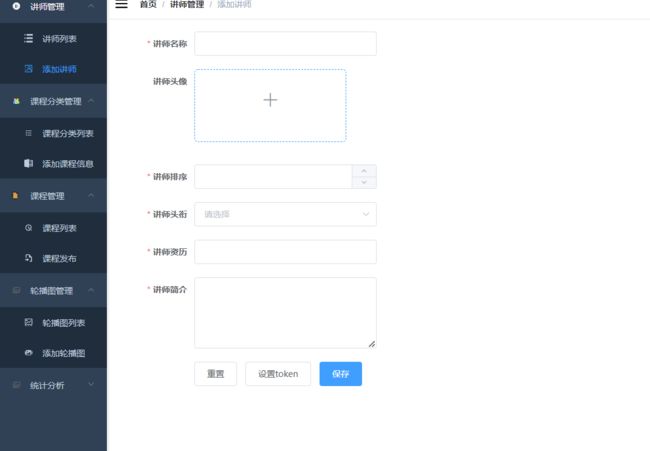
6.讲师添加
views/edu/teacher/save.vue
1.点击添加讲师,进入添加表单页面(添加修改共用一个界面)
2.调用添加成功之后,弹出提示信息
3.路由跳转回到列表页面(this.$roter.push({path:‘/teacher/table’})
创建api
  // 添加讲师
  addTeacher(teacher) {
    return request({
      url: `${frontUrl}/addTeacher`,
      method: 'post',
      data: teacher
    })
  },
  // 根据id查询讲师
  findByIdTeacher(id) {
    return request({
      url: `${frontUrl}/findByIdTeacher/${id}`,
      method: 'get'
    })
  },
页面、js
  <div class="app-container" >
    <el-form ref="teacher" :model="teacher" :rules="rules" label-width="120px" size="" >
      <el-form-item label="讲师名称" prop="name">
        <el-input v-model="teacher.name" style="width: 300px;"/>
      </el-form-item>


      <el-form-item label="讲师排序" prop="sort">
        <el-input-number v-model="teacher.sort" :min="0" controls-position="right" style="width: 300px"/>
      </el-form-item>
      <el-form-item label="讲师头衔" prop="level">
        <el-select v-model="teacher.level" clearable placeholder="请选择" style="width: 300px">
          <!--
            数据类型一定要和取出的json中的一致,否则没法回填
            因此,这里value使用动态绑定的值,保证其数据类型是number
          -->
          <el-option :value="1" label="高级讲师"/>
          <el-option :value="2" label="首席讲师"/>
        </el-select>
      </el-form-item>
      <el-form-item label="讲师资历" prop="career">
        <el-input v-model="teacher.career" style="width: 300px"/>
      </el-form-item>
      <el-form-item label="讲师简介" prop="intro">
        <el-input v-model="teacher.intro" :rows="5" type="textarea" style="width: 300px"/>
      </el-form-item>

      <el-form-item>
        <el-button @click="resetForm('teacher')">重置</el-button>
        <el-button @click="setCokkie">设置token</el-button>
        <el-button :disabled="saveBtnDisabled" type="primary" @click="saveOrUpdate('teacher')">保存</el-button>
      </el-form-item>
    </el-form>
  </div>
页面逻辑js
import teacherApi from '@/api/edu/teacher'
import cookie from 'js-cookie'
export default {
  name: 'Save',
  data() {
    return {
      teacher: {
        name: '',
        sort: 0,
        level: '',
        career: '',
        intro: '',
        avatar: ''
      },
      fileUrl: process.env.BASE_API + '/oss/fileOss/avatarUpload',
      saveBtnDisabled: false, // 保存按钮是否禁用,
      dialogVisible: false,
      rules: {
        name: [
          { required: true, message: '请输入讲师名称', trigger: 'blur' }
        ],
        sort: [
          { required: true, message: '请输入讲师排序', trigger: 'blur' },
          { type: 'number', message: '讲师排序为数字值' }
        ],
        level: [
          { required: true, message: '请选择讲师头衔', trigger: 'change' }
        ],
        career: [
          { required: true, message: '请输入讲师资历', trigger: 'blur' }
        ],
        intro: [
          { required: true, message: '请输入讲师简介', trigger: 'blur' }
        ]
      }
    }
  },
  watch: { // 监听
    $route(to, from) { // 路由变化的方式。。路由发生变化后,就执行
      this.init()
    }
  },
  created() {
    this.init()
  },
  methods: {
    init() {
      if (this.$route.params && this.$route.params.id) {
        this.dialogVisible = true
        this.getInfo(this.$route.params.id)
      } else {
        this.dialogVisible = false
        this.teacher = {}
      }
    },
    resetForm(formName) {
      this.$refs[formName].resetFields()
    },
    saveOrUpdate(formName) {
      this.$refs[formName].validate((valid) => {
        if (valid) {
          this.saveBtnDisabled = true
          if (this.teacher.id) {
            this.updateTeacher()
          } else {
            this.saveData()
          }
        } else {
          this.$message({
            message: '提交失败,请检查填写信息',
            type: 'warning'
          })
          return false
        }
      })
    },
    // 保存
    saveData() {
      teacherApi.addTeacher(this.teacher)
        .then(res => {
          if (res.success === true) {
            this.$message({
              type: 'success',
              message: '添加成功!'
            })
            setTimeout(() => {
              this.$router.push('/teacher/list')
            }, 1000)
          }
        })
        .catch(error => { this.$message.error('添加失败!'); this.saveBtnDisabled = false })
    },
    getInfo(id) {
      teacherApi.findByIdTeacher(id)
        .then(res => {
          if (res.success === true) {
            this.teacher = res.data.teacher
          }
        })
        .catch(error => { this.$message.error('加载失败,请联系管理员') })
    },

    setCokkie() {
      cookie.set('name', JSON.stringify('token'), { domain: 'localhost' })
    }
  }
}
7.讲师修改
views/edu/teacher/save.vue
1.添加修改按钮
2.数据回显(根据id查询数据库显示数据,但是不查好像也可以,页面的list有)
3.通过路由跳转进入数据回显页面
4.(根据有没有id值判断调用)this.$router.params 得到路由的参数值,页面加载完成后钩子函数里执行init函数,完成数据回显
5.修改,传入data(为Requestbody),请求接口修改
创建路由
隐藏路由
//添加路由
      {
        path: 'edit/:id',  //id占位符,讲师id
        name: '修改讲师',
        component: () => import('@/views/edu/teacher/save'),
        meta: { title: '修改讲师', icon: 'teacher_edit' },
        hidden:true  //不显示
      }
//用router-link-to跳转;前面已经写过
          <router-link :to="'/teacher/edit/'+scope.row.id">
            <el-link type="primary" icon="el-icon-edit">修改</el-link>
          </router-link>
创建api
  // 修改讲师信息
  updateTeacher(teacher) {
    return request({
      url: `${frontUrl}/updateTeacher`,
      method: 'put',
      data: teacher
    })
  },
  // 根据id查询讲师
  findByIdTeacher(id) {
    return request({
      url: `${frontUrl}/findByIdTeacher/${id}`,
      method: 'get'
    })
  },
页面、js
    init(){
      if(this.$route.params && this.$route.params.id){
        this.dialogVisible = true
        this.getInfo(this.$route.params.id)
      }else {
        this.dialogVisible = false
        this.teacher = {}
      }
    },

    getInfo(id){
      teacherApi.findByIdTeacher(id)
        .then(res =>{
          if(res.success === true){
            this.teacher = res.data.teacher
          }
        })
        .catch(error=>{this.$message.error('加载失败,请联系管理员');})
    },
//修改
    updateTeacher(){
      teacherApi.updateTeacher(this.teacher)
        .then(res =>{
          if (res.success === true) {
            this.$message({
              type: 'success',
              message: '修改成功!'
            });
            setTimeout(() => {
              this.$router.push("/teacher/list")
            }, 1000)
          }
        })
        .catch(error=>{this.$message.error('修改失败!');this.saveBtnDisabled = false})
    },
路由切换问题
要解决的问题是,点击修改,页面显示回显数据,但是在点击添加,数据没有清楚,还是之前的
解决方案:添加的时候清空表单数据 this.teacher = {}
注意:添加修改在同一页面。函数若在created里,这里面只会执行一次(多次路由跳转到同一页面)
再次解决:使用监听watch
  watch: { //监听
    $route(to, from) { //路由变化的方式。。路由发生变化后,就执行
      this.init()
    }
  },
二.OSS
为了上传头像做准备
OSS官网
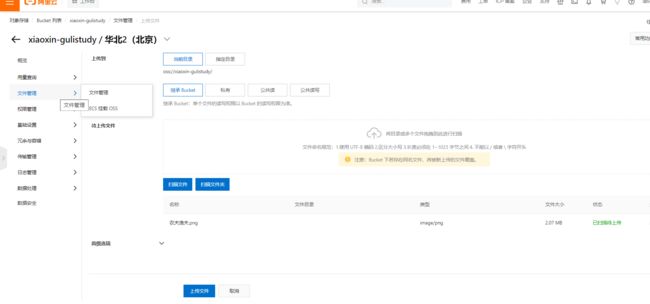
创建
1.bucket创建;类似建个文件夹或者包
2.标准存储(读取多)、低频存储(读取少)、归档存储(只存)
3.读写权限(私有:只有自己能访问到;公共读:别人可以读;公共读写:尽量别用;后面的都不开通
4.创建之后测试
使用流程
1.获取id和密钥
2.学习 路径
3.依赖(7.14 最新)
<dependency>
    <groupId>com.aliyun.ossgroupId>
    <artifactId>aliyun-sdk-ossartifactId>
    <version>3.10.2version>
dependency>
maven示例工程demo
4.使用
快速入门
域节点(新建了访问路径才有的)
    oss-cn-beijing.aliyuncs.com
上传头像后端
依赖可放在service中,但是只有oss模块用到,所以单独放到这里就行(版本还是guli_parent统一控制)
<dependency>
    <groupId>com.aliyun.ossgroupId>
    <artifactId>aliyun-sdk-ossartifactId>
dependency>
配置文件
server:
  port: 8002
spring:
  application:
    name: service-oss
  profiles:
    active: dev
  cloud:
    nacos:
      discovery:
        server-addr: 127.0.0.1:8848

aliyun:
  oss:
    file:
      endpoint: oss-cn-beijing.aliyuncs.com
      keyId:
      keySecret:
      bucketName: xiaoxin-gulistudy
启动类配置注解
@SpringBootApplication(exclude = DataSourceAutoConfiguration.class)
因为启动时会找数据库配置,但是这个模块不需要操作数据库,
解决方式
    1.加上这个exclude(默认不去加载数据库配置)
    2.配置数据库
创建常量类
读取配置的oss id、密钥等
/**
 * @program: guli_parent
 * @description: 读取配置文件的属性工具类
 * @author: xiaoxin
 * @create: 2022-05-12 15:11
 **/
@Data
@Component
public class ConstantPropertiesUtils implements InitializingBean {

    @Value("${aliyun.oss.file.endpoint}")
    private String endpoint;

    @Value("${aliyun.oss.file.keyId}")
    private String keyId;

    @Value("${aliyun.oss.file.keySecret}")
    private String keySecret;

    @Value("${aliyun.oss.file.bucketName}")
    private String bucketName;

    public static String END_POINT;
    public static String KEY_ID;
    public static String KEY_SECRET;
    public static String BUCKET_NAME;

    @Override
    public void afterPropertiesSet() throws Exception {
        END_POINT = endpoint;
        KEY_ID = keyId;
        KEY_SECRET = keySecret;
        BUCKET_NAME = bucketName;
    }
}
头像上传接口(后端)
@RestController
@RequestMapping("/oss/fileOss")
public class OssController {

    @Autowired
    private OssService ossService;

    @PostMapping("/avatarUpload")
    @ApiOperation("/头像上传接口")
    public Result avatarUpload(MultipartFile file){
        //获取文件上传 MultipartFile
        //方法返回url
        String url = ossService.pictureUpload(file,"avatar");
        return Result.ok().data("url",url);
    }
service实现类
用官方的上传文件流方式比较适合
    @Override
    public String pictureUpload(MultipartFile file,String name) {
        //获取配置信息
        String endPoint = ConstantPropertiesUtils.END_POINT;
        String keyId = ConstantPropertiesUtils.KEY_ID;
        String keySecret = ConstantPropertiesUtils.KEY_SECRET;
        String bucketName = ConstantPropertiesUtils.BUCKET_NAME;

        //创建OSS示例
        OSS ossClient = new OSSClientBuilder().build(endPoint,keyId,keySecret);
        try {

            //上传文件流
            InputStream inputStream = file.getInputStream();
            //获取file名称
            String fileName = file.getOriginalFilename();

            //生成随机性唯一值,使用uuid,添加到名称里面
            //erw55-4sfsd-df555如
            //String uuid = UUID.randomUUID().toString().replaceAll("-","");

            //if (fileName != null && fileName.length() < 20) {//不懂这句什么屁用
            //    fileName = uuid + fileName;
            }

            //按照当前日期,创建文件夹,上传到创建的文件夹里
            String timeUrl = new DateTime().toString("yyyy/MM/dd");//joda-tmie工具类,如果没有要用SimpleFormate

            //这样是按时间分类,也可以自定义,如aa/bb/1.jpg
            //二选一即可,可以不拼接,也可用uuid那个filename;时间的这个更好用
            fileName = timeUrl+"/"+fileName;

            /*
                调用oss方法上传文件
                1、第一个参数,bucketName
                2、第二个参数:上传到oss文件的路径和文件的名称
                3.第三个参数:文件上传输入流
             */
            ossClient.putObject(bucketName,fileName,inputStream);
            log.info("fileName => {}",fileName);
            //获取url路径
            String url;
            url = "https://" + bucketName + "." + endPoint + "/" + fileName;
            log.info("url =>{}",url);
            return url;
        } catch (Exception e) {
            e.printStackTrace();
        }finally {
            //关闭oss
            ossClient.shutdown();
        }
        return "";
    }
[外链图片转存失败,源站可能有防盗链机制,建议将图片保存下来直接上传(img-2DFVya8E-1661002567777)(谷粒学苑.assets/EA35C4AA69330F6B391B5DE7E8C702E1.jpg)]
上传头像前端
在edu/teacher/save.vue
页面、js
      <!-- 讲师头像: -->
      <el-form-item label="讲师头像" prop="avatar">
        <el-upload
           //发送请求
          :action="fileUrl"
          :show-file-list="false"
          :on-success="handleAvatarSuccess"
          :before-upload="beforeAvatarUpload"
          class="avatar-uploader">
          <div class="upload-inner-wrapper">
            <img
              v-if="dialogVisible"
              :src="teacher.avatar"
              class="avatar"
              alt="">
            <i v-else class="el-icon-plus avatar-uploader-icon"/>
          </div>
        </el-upload>
      </el-form-item>
    // fileUrl: process.env.BASE_API + '/oss/fileOss/avatarUpload',
    handleAvatarSuccess(response, file) {
      if (response.code !== 200) {
        this.$message.error('上传失败')
        return
      }
      // 填充上传文件列表
      this.teacher.avatar = file.response.data.url
      this.dialogVisible = true
    },
    beforeAvatarUpload(file) {
      const isJPG = file.type === 'image/jpeg'
      const isLt2M = file.size / 1024 / 1024 < 2

      if (!isJPG) {
        this.$message.error('上传头像图片只能是 JPG 格式!')
      }
      if (!isLt2M) {
        this.$message.error('上传头像图片大小不能超过 2MB!')
      }
      return isJPG && isLt2M
    },
三.nigix
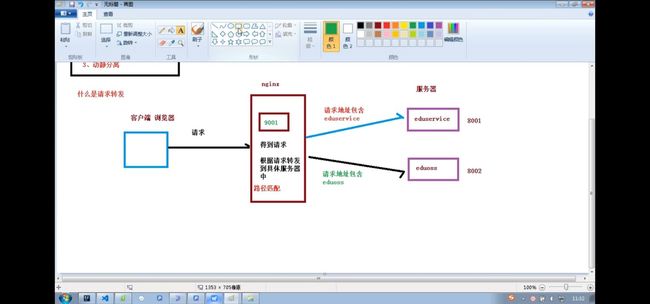
1.请求转发
动静分离
下载配置
1.启动
(启动后有两个进程,关闭窗口不会停止)
直接点击Nginx目录下的nginx.exe 或者 cmd运行start nginx 最好用后者 ;关闭也是
2.关闭
nginx -s stop
nginx -s quit
stop表示立即停止nginx,不保存相关信息
quit表示正常退出nginx,并保存相关信息
3.重启
nginx -s reload
因为改变了配置,需要重启
前端请求转发
BASE_API: '"http://127.0.0.1:8008"',//nigix的,然后统一转发
nginx.conf配置
配置位在http
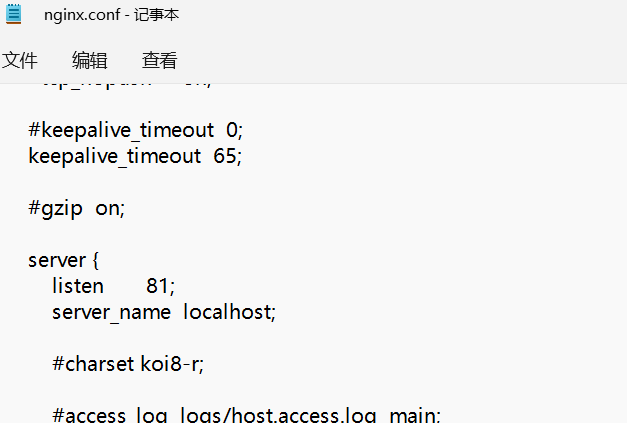
1.修改nginx默认端口;如:81
2.配置写在http{}里面!
#谷粒学苑配置
	server {
			listen 9001;#监听端口
			server_name localhost;#主机
		 #匹配路径
		location ~ /eduservice/ {
			proxy_pass http://localhost:8001;
		}

		location ~ /eduoss/ {
			proxy_pass http://localhost:8002;
		}
	}
课程分类管理
一.EasyExcel
1.概述
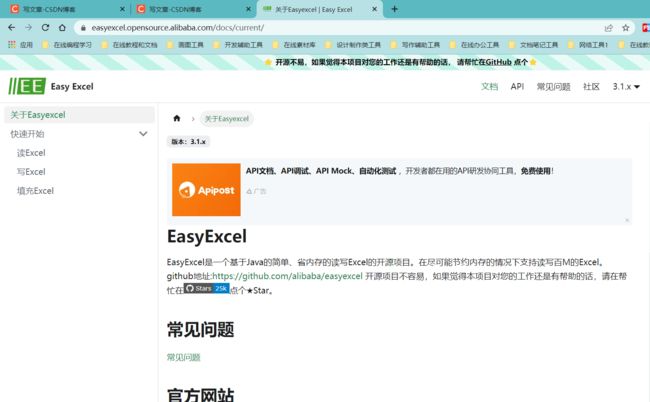
Java领域解析、生成Excel比较有名的框架有Apache poi、jxl等。但他们都存在一个严重的问题就是非常的耗内存。面对高访问高并发,一定会OOM或者JVM频繁的full gc (重jc)。
EasyExcel是阿里巴巴开源的一个excel处理框架,以使用简单、节省内存著称。EasyExcel能大大减少占用内存的主要原因是在解析Excel时没有将文件数据一次性全部加载到内存中,而是从磁盘上一行行读取数据,逐个解析。
github地址
因为easyexcel本质是对poi的封装,所以依赖它 版本对应2.1.1–3.17
2.测试
写操作
导入依赖
<dependencies>

    <dependency>
        <groupId>com.alibabagroupId>
        <artifactId>easyexcelartifactId>
        <version>2.1.1version>
    dependency>
dependencies>
实体对象
@Data
public class Stu {

    //设置表头名称
    @ExcelProperty("学生编号")
    private int sno;

    //设置表头名称
    @ExcelProperty("学生姓名")
    private String sname;

}
测试类
public class WriteTest {

    public static void main(String[] args) {
        String fileName = "E:\\test.xlsx";
        EasyExcel.write(fileName,Stu.class)//文件名/流,class类型
                .sheet("学生信息")//设置sheet名
                .doWrite(data());//传入要写的list集合data
    }

    //循环设置要添加的数据,最终封装到list集合中
    private static List<Stu> data() {
        List<Stu> list = new ArrayList<Stu>();
        for (int i = 0; i < 10; i++) {
            Stu data = new Stu();
            data.setSno(i);
            data.setSname("lucy"+i);
            list.add(data);
        }
        return list;
    }
}
读操作
改造实体类,指定对应关系
@Data
public class Stu {

    //设置表头名称,指定映射关系(第0列);index即为索引
    @ExcelProperty(value = "学生编号",index = 0)
    private int sno;

    //设置表头名称,指定映射关系(第1列)
    @ExcelProperty(value = "学生姓名",index = 1)
    private String sname;

}
创建监听器
public class ExcelListener extends AnalysisEventListener<Stu> {
    //一行一行去读取excle内容,从第二行开始
    @Override
    public void invoke(Stu stu, AnalysisContext analysisContext) {
        System.out.println("stu = " + stu);
    }
    //读取excel表头信息
    @Override
    public void invokeHeadMap(Map<Integer, String> headMap, AnalysisContext context) {
        System.out.println("表头信息:"+headMap);
    }

    //读取完成后执行
    @Override
    public void doAfterAllAnalysed(AnalysisContext analysisContext) {

    }
}
测试
public class ReadTest {
    public static void main(String[] args) {
        String fileName = "E:\\test.xlsx";
        //文件名,class类型,监听器
        EasyExcel.read(fileName,Stu.class,new ExcelListener())
                .sheet()
                .doRead();
    }

}
总结 :读操作需要配置监听器
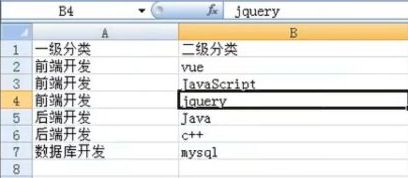
二.课程分类添加
后端
- 获取上传文件,把内容读取出来 //MultipartFile 得到上传文件
- 实现上传方法
- 创建对应(表格)实体类
接口
@Api(tags = "课程管理")
@Slf4j
@RestController
@RequestMapping("/edu/subject")
public class SubjectController {
        @Autowired
        private SubjectService subjectService;
    @PostMapping("/addSubject")
    @ApiOperation("通过上传Excel添加课程分类")
    public Result addSubject(MultipartFile file){

    subjectService.excelUpload(file,subjectService);
    return Result.ok();
    }
}
监听器
@service @componoment 把对象创建交给spring管理,但是这个监听器是我们自己new的,不用,所以也自动注入其他对象,也不能实现数据库操作;
解决方案
1.构造器注入;在添加方法中作为参数传过来subjectService;
自动注入会形成循环依赖,listener调用service,service调用listener,所以不能使用同一个service对象
public class SubjectExcelListener extends AnalysisEventListener<SubjectData> {

    public SubjectService subjectService;

    public SubjectExcelListener() {
    }

    public SubjectExcelListener(SubjectService subjectService) {
        this.subjectService = subjectService;
    }

    //读取excel的内容,一行一行读取
    @Override
    public void invoke(SubjectData subjectData, AnalysisContext analysisContext) {
        if (subjectData == null){//读取内容为空
            throw new GuliException(ResultCodeEnum.DATA_ERROR);
        }
        //还可这样判断
//subjectData = Optional.ofNullable(subjectData).orElseThrow(() -> GuliException.from(EduResultCode.FILE_IS_EMPTY));
        //一行一行读取,每次读取有两个值,第一个值为一级分类,第二个值为二级分类
        Subject existOneSubject = this.existOneSubject(subjectService, subjectData.getOneSubjectName());
        if (existOneSubject == null) { //没有一级分类,进行添加
            existOneSubject = new Subject();
            existOneSubject.setParentId("0")
                    .setTitle(subjectData.getOneSubjectName());
            subjectService.save(existOneSubject);
        }
        //二级分类
        String pid = existOneSubject.getId();//取一级分类值(数据库没有一级的时候,添加了便生成了id;有一级分类的时候,那当然也有id),然后继续添加对应的二级分类
        Subject existTwoSubject = this.existTwoSubject(subjectService, subjectData.getTwoSubjectName(), pid);
        if (existTwoSubject == null) {
            existTwoSubject = new Subject();
            existTwoSubject.setParentId(pid)
                    .setTitle(subjectData.getTwoSubjectName());
            subjectService.save(existTwoSubject);
        }

    }

    //判断一级分类是否有重复的
    private Subject existOneSubject(SubjectService service,String name){
        QueryWrapper<Subject> wrapper = new QueryWrapper<>();
        wrapper.eq("title",name)
                .eq("parent_id",0);
        Subject one = service.getOne(wrapper);
        return one;
    }

    //判断二级分类是否有重复的
    private Subject existTwoSubject(SubjectService service,String name,String pid){
        QueryWrapper<Subject> wrapper = new QueryWrapper<>();
        wrapper.eq("title",name)
                .eq("parent_id",pid);
        Subject one = service.getOne(wrapper);
        return one;
    }

    @Override
    public void doAfterAllAnalysed(AnalysisContext analysisContext) {

    }
}
回顾知识点
subjectService.save()这个方法,添加了部分属性,其他为null的属性不会覆盖数据库里的数据,所以上面可以分两次添加,成功
方法实现
@Override
public void excelUpload(MultipartFile file,SubjectService subjectService) {
    InputStream in = null;
    try {
        //获取文件输入流
        in = file.getInputStream();
        //调用方法进行读取  流 实体类  监听器 这是另一种读取方式
        EasyExcel.read(in, SubjectData.class,new SubjectExcelListener(subjectService)).sheet().doRead();
    }catch (Exception e){
        e.printStackTrace();
    }finally {
        try {
            if (in != null) {
                in.close();
            }
        } catch (IOException e) {
            e.printStackTrace();
        }
    }

}
实体类
src/main/java/com/xxx/model/excel/SubjectData.java
@Data
@EqualsAndHashCode(callSuper = false)
@ApiModel(value="Excel读取对象", description="课程分类的表格读取对象")
public class SubjectData {

    @ApiModelProperty(value = "一级分类")
    @ExcelProperty(index = 0)
    private String oneSubjectName;

    @ApiModelProperty(value = "二级分类")
    @ExcelProperty(index = 1)
    private String twoSubjectName;
}
前端
创建路由
  {
    path: '/subject',
    component: Layout,
    redirect: '/subject/list',
    name: '课程分类管理',
    meta: { title: '课程分类管理', icon: 'subject' },
    children: [
      {
        path: 'list',
        name: '课程分类列表',
        component: () => import('@/views/edu/subject/list'),
        meta: { title: '课程分类列表', icon: 'list2' }
      },
      {
        path: 'save',
        name: '添加课程分类',
        component: () => import('@/views/edu/subject/save'),
        meta: { title: '添加课程信息', icon: 'excel2' }
      }
    ]
  },
页面、js
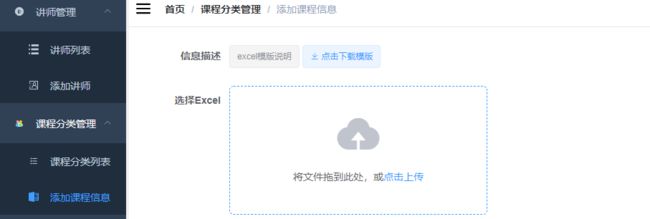
  <div class="app-container">
    <el-form label-width="120px">
      <el-form-item label="信息描述">
        <el-tag type="info">excel模版说明</el-tag>
        <el-tag>
          <i class="el-icon-download"/>
          <a :href="'/static/subject.xls'">点击下载模版</a>
        </el-tag>
      </el-form-item>
      <el-form-item label="选择Excel">
        <el-upload
          ref="upload"
          :auto-upload="true"
          :on-success="fileUploadSuccess"
          :on-error="fileUploadError"
          :action="fileUrl"
          class="upload-demo"
          drag
          accept="application/vnd.ms-excel"
          multiple
          name="file">
          <i class="el-icon-upload"/>
          <div class="el-upload__text">将文件拖到此处,或<em>点击上传</em></div>
          <div slot="tip" class="el-upload__tip">只能上传xls/xlsx文件,且不超过500m</div>
        </el-upload>
      </el-form-item>
    </el-form>
  </div>
页面逻辑js
export default {
  name: 'Save',
  data() {
    return {
      fileUrl: process.env.BASE_API + '/edu/subject/addSubject'
    }
  },
  watch: { // 监听

  },
  created() {

  },
  methods: {
    fileUploadSuccess(response) {
      if (response.success === true) {
        this.$message({
          type: 'success',
          message: '添加课程分类成功!'
        })
        setTimeout(() => {
          this.$router.push('/subject/list')
        }, 1000)
      } else {
        this.$message.error('上传失败,请检查Excel表格是否符合规范,再刷新页面重新上传')
      }
    },
    fileUploadError(response) {
      if (response.success === false) {
        this.$message.error('上传失败,请检查Excel表格是否符合规范,再重新上传')
      }
    }
  }
}
三.课程分类显示
后端接口
用Stream显示更简单
接口
@GetMapping("/getSubjectList")
@ApiOperation("获取课程分类集合")
public Result getSubjectList(){
    List<SubjectNestedVo> list = subjectService.getAllOneTwoSubject();
    return Result.ok().data("list",list);
}
方法实现
    @Override
    public List<SubjectNestedVo> getAllOneTwoSubject() {
        //1、先查询出一级分类的
        QueryWrapper<Subject> oneWrapper = new QueryWrapper<>();
        oneWrapper.eq("parent_id",0);
        List<Subject> oneSubjectList = this.baseMapper.selectList(oneWrapper);

        //2、再查出来二级分类的
        QueryWrapper<Subject> twoWrapper = new QueryWrapper<>();
        twoWrapper.ne("parent_id",0);
        List<Subject> twoSubjectList = this.baseMapper.selectList(twoWrapper);

        //3、封装一级分类
        List<SubjectNestedVo> finalList = new ArrayList<>();
        if (oneSubjectList != null && oneSubjectList.size() > 0) {
            oneSubjectList.forEach(s -> {
                SubjectNestedVo subjectNestedVo = new SubjectNestedVo();
                BeanUtils.copyProperties(s,subjectNestedVo);

                //4、封装二级分类
                List<SubjectVo> subjectVoList = new ArrayList<>();
                if (twoSubjectList != null && twoSubjectList.size() > 0) {
                    twoSubjectList.forEach(t->{
                        if(s.getId().equalsIgnoreCase(t.getParentId())){
                            SubjectVo subjectVo = new SubjectVo();
                            BeanUtils.copyProperties(t,subjectVo);
                            subjectVoList.add(subjectVo);
                        }
                    });
                }
                subjectNestedVo.setChildren(subjectVoList);
                finalList.add(subjectNestedVo);
            });
        }

        return finalList;
    }
谷粒商城的递归+stream实现分级参考
     /**
     * 列表
     */
    @RequestMapping("/list/tree")
    public List<CategoryEntity> list(){
        List<CategoryEntity> categoryEntities = categoryService.listWithTree();
        //找到所有的一级分类
        List<CategoryEntity> level1Menus = categoryEntities.stream()
                .filter(item -> item.getParentCid() == 0)
                .map(menu->{
                    menu.setChildCategoryEntity(getChildrens(menu,categoryEntities));
                    return menu;
                })
                .sorted((menu1, menu2) -> {

                  return (menu1.getSort() ==null ? 0:menu1.getSort())- (menu2.getSort()==null?0:menu2.getSort());

                })
                .collect(Collectors.toList());


        return level1Menus;
    }

    public List<CategoryEntity> getChildrens(CategoryEntity root,List<CategoryEntity> all){

        List<CategoryEntity> childrens = all.stream().filter(item -> {
            return item.getParentCid() == root.getCatId();
        }).map(item -> {
            item.setChildCategoryEntity(getChildrens(item, all));
            return item;
        }).sorted((menu1, menu2) -> {
            return (menu1.getSort() ==null ? 0:menu1.getSort())- (menu2.getSort()==null?0:menu2.getSort());
        }).collect(Collectors.toList());

        return childrens;
    }
前端
添加api
import request from '@/utils/request'

const frontUrl = '/edu/subject'

export default {
  // 1、课程分类列表,条件查询带分页
  getSubjectList() {
    return request({
      async: false,
      url: `${frontUrl}/getSubjectList`,
      method: 'get'
    })
  }
}
页面、js
  <div class="app-container">
    <el-form style="margin: 3vh auto 0" label-width="180px">
      <el-form-item label="输入关键字进行过滤:">
        <el-input v-model="filterText" placeholder="输入关键字进行过滤" style="width: 200px"/>
      </el-form-item>
    </el-form>

    <el-tree
      ref="tree"
      :data="list"
      :props="defaultProps"
      :filter-node-method="filterNode"
      accordion
      class="filter-tree"/>
  </div>
label 指定节点标签为节点对象的某个属性值
children 指定子树为节点对象的某个属性值
让输入的过滤值不区分大小写。
data.label.toLowerCase().indexOf(value.toLowerCase())
没见过的函数都是element自带的/封装好的
页面逻辑js
import subject from '@/api/edu/subject'
export default {
  name: 'List',
  data() {
    return {
      list: [], // 查询出结果
      filterText: '',
      defaultProps: {
        children: 'children',
        label: 'title',
        value: 'id'
      }
    }
  },
  watch: {
    filterText(val) {
      this.$refs.tree.filter(val)
    }
  },
  created() {
    this.getList()
  },
  methods: {
    getList() {
      subject.getSubjectList()
        .then(res => {
          if (res.success === true) {
            this.list = res.data.list
          }
        })
        .catch(error => { this.$message.error('加载失败,请联系管理员') })
    },
    filterNode(value, data) {
      if (!value) return true
      return data.label.toLowerCase().indexOf(value.toLowerCase()) !== -1
    }
  }
}
