Jetson nano一站式配置
Jetson nano在安装完系统之后,往往需要进行配置才可以进行程序开发。主要的配置项目包括拼音输入法、换源、更换python版本、安装SSH、配置CUDA等。
最近遇到一个坑:nano在连接显示器之后总是出现各种闪屏黑屏的问题,最后发现,nano距离自己的笔记本太近了,可能出现了电磁干扰,我猜的,只需要将nano远离自己的笔记本就不再闪屏和黑屏。
遇到的另一个坑:jetson nano安装第三方的python库时,不要用pip,直接用apt-get的方式。
一、拼音输入法
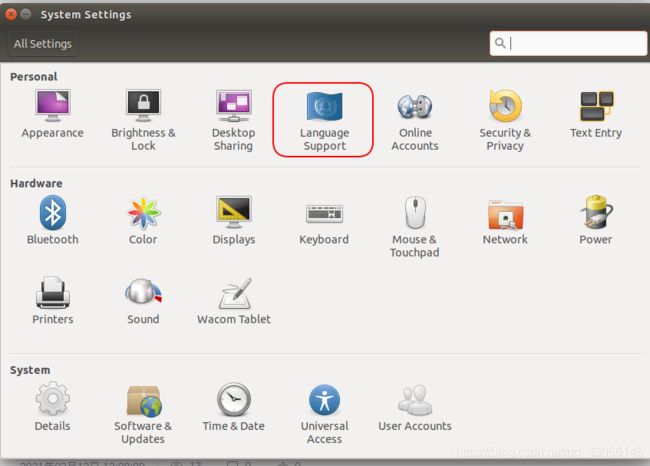
1.安装Chinese语言包支持
点击system settings–>Language Support
点击Install/Remove Languages…
将Chinese语言包安装上:

如果提示更新就更新,等待几分钟就好。
2.bus输入法安装
安装ibus框架
sudo apt-get install ibus ibus-clutter ibus-gtk ibus-gtk3 ibus-qt4
切换到ibus框架
im-config -s ibus
安装拼音引擎
sudo apt-get install ibus-pinyin
再调出ibus Preference来添加该拼音输入法:
sudo ibus-setup
找到Chinese,如果找不到,就重启电脑。
然后就OK了。
二、换源
1.先备份原本的source.list文件
sudo cp /etc/apt/sources.list /etc/apt/sources.list.bak    #为防止误操作后无法恢复,先备份原文件sources.list
sudo gedit /etc/apt/sources.list
2.写入镜像网站
deb http://mirrors.tuna.tsinghua.edu.cn/ubuntu-ports/ bionic main multiverse restricted universe
deb http://mirrors.tuna.tsinghua.edu.cn/ubuntu-ports/ bionic-security main multiverse restricted universe
deb http://mirrors.tuna.tsinghua.edu.cn/ubuntu-ports/ bionic-updates main multiverse restricted universe
deb http://mirrors.tuna.tsinghua.edu.cn/ubuntu-ports/ bionic-backports main multiverse restricted universe
deb-src http://mirrors.tuna.tsinghua.edu.cn/ubuntu-ports/ bionic main multiverse restricted universe
deb-src http://mirrors.tuna.tsinghua.edu.cn/ubuntu-ports/ bionic-security main multiverse restricted universe
deb-src http://mirrors.tuna.tsinghua.edu.cn/ubuntu-ports/ bionic-updates main multiverse restricted universe
deb-src http://mirrors.tuna.tsinghua.edu.cn/ubuntu-ports/ bionic-backports main multiverse restricted universe
3.保存之后打开终端输入
sudo apt-get update
三、更换python版本
1.安装python和pip
sudo apt install python3
sudo apt install python3-pip
2.pip换源
cd ~
mkdir .pip
sudo gedit ~/.pip/pip.conf
输入以下内容:
[global]
index-url = https://pypi.tuna.tsinghua.edu.cn/simple/
[install]
trusted-host = pypi.tuna.tsinghua.edu.cn
3.更换软连接
sudo rm /usr/bin/python
sudo ln -s /usr/bin/python3 /usr/bin/python
sudo ln -s /usr/bin/pip3 /usr/bin/pip
四、安装SSH
1.安装openssh-server
sudo apt install openssh-server
openssh-client一般ubuntu默认安装好了
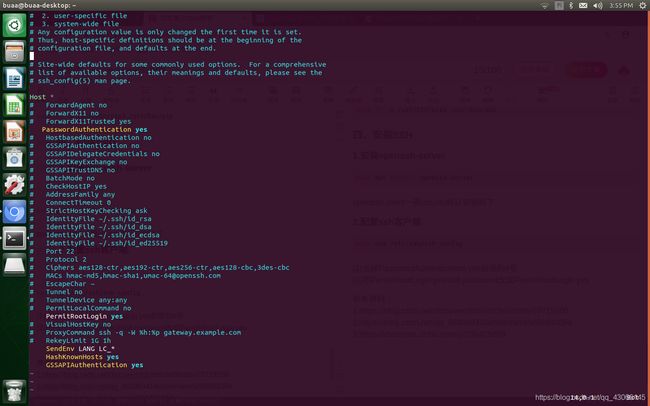
2.配置ssh客户端.
sudo vim /etc/ssh/ssh_config
(1)去掉PasswordAuthentication yes前面的#号
(2)把PermitRootLogin prohibit-password改成PermitRootLogin yes
五、固定IP地址
1.点击右上角的网络连接,打开Edit Connections…
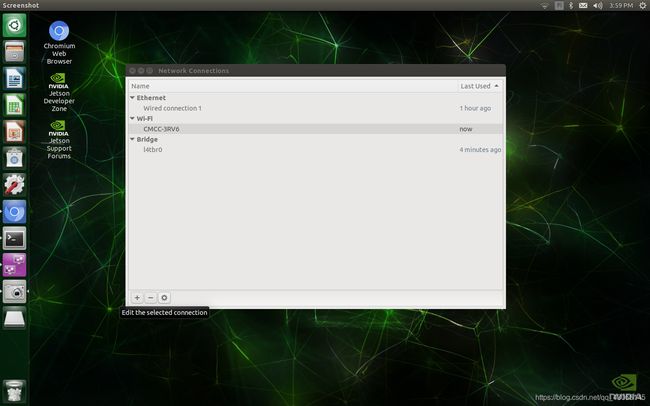
2.点击最下面的齿轮按钮
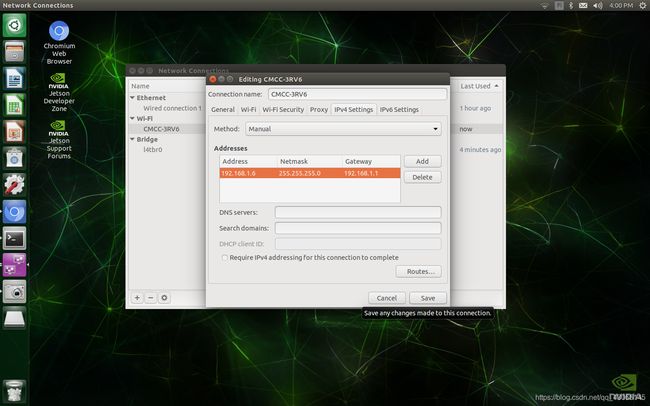
Method设置为手动manual,点击save。
六、启用CUDA
输入nvcc -V
出现bash: nvcc: command not found
是因为nano默认安装了CUDA,但是需要配置一下才能使用。
sudo gedit ~/.bashrc
在文件最后面添加
export CUBA_HOME=/usr/local/cuda-10.0
export LD_LIBRARY_PATH=/usr/local/cuda-10.0/lib64:$LD_LIBRARY_PATH
export PATH=/usr/local/cuda-10.0/bin:$PATH
source ~/.bashrc
重新输入
nvcc -V
出现
nvcc: NVIDIA (R) Cuda compiler driver
Copyright (c) 2005-2018 NVIDIA Corporation
Built on Sun_Sep_30_21:09:22_CDT_2018
Cuda compilation tools, release 10.0, V10.0.166
说明CUDA已经配置好了。
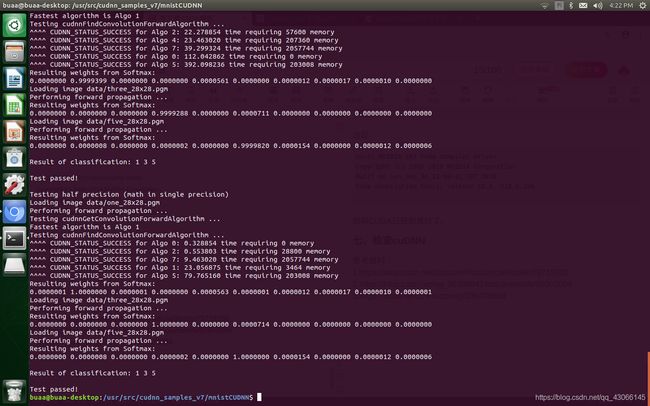
七、检查cuDNN
运行官方例程进行验证:
cd /usr/src/cudnn_samples_v8/mnistCUDNN   #进入例子目录
sudo make     #编译一下例子
sudo chmod a+x mnistCUDNN # 为可执行文件添加执行权限
./mnistCUDNN # 执行
八、虚拟环境配置
安装 virtualenv 和 virtualenvwrapper
sudo pip install virtualenv virtualenvwrapper
安装完之后,需要更新.bashrc :
vim ~/.bashrc
在文件底部输入:
# virtualenv and virtualenvwrapper
export WORKON_HOME=$HOME/.virtualenvs #指定所有的需拟环境的安装位置
export VIRTUALENVWRAPPER_PYTHON=/usr/bin/python3 #指定解释器
source /usr/local/bin/virtualenvwrapper.sh#进行激活生效
保存并退出,使用source 重新载入:
source ~/.bashrc
接着创建python的虚拟环境:
mkvirtualenv tf14_py36 -p python3 #-p 是指定解释器是python3
常用命令:
#创建一个环境
mkvirtualenv name #在~/.virtualenvs下安装name的需拟环境
#激活工作环境
workon name
#workon后不加任何东西可以列出所有虚拟环境
#退出当前虚拟环境
deactivate
#删除虚拟环境,需先退出
rmvirtualenv name
CPU fan
#!/usr/bin/env python
import os
import commands

# from the path of this pattern
path = '/sys//kernel/debug/soctherm/{dev}/temp'
# get the temperature from following sensors
dev = ['cpu', 'gpu', 'mem', 'pll']
# the fan PWM factor is 0 ~ 255, make 10 as the min, 255 as the max
# the fan speed will be sliding from 10% ~ 100% according to the temperature
# the greater, the cooler yet noisier, this script will balance it
MIN=26
MAX=255
RANGE=MAX-MIN
# the target file to write PWM factor to control the fan speed
TARGET_PWM = '/sys/devices/pwm-fan/target_pwm'

# defined the lowest temperature (Celsius), fan speed at MIN if temp lower then this
LOWEST=40.0
# defined the highest temperature (Celsius), fan speed at MAX if temp higher then this
HIGHEST=60.0
# the temp at range between HIGHEST and LOWEST, the fan speed is auto ajusted
# to balance the cool and the quiet
TMP_RANGE=HIGHEST-LOWEST

def getTmpFromFile(p):
    '''get temp value in Celsius from a file'''
    with open(p, 'r') as f:
        x = f.read()
        y = int(x)/1000.0
        return y

def getSpeedByTemp(temp):
    '''calculate a fan speed pwm factor from a temperature in Celsius'''
    if temp<=LOWEST:
        return MIN
    if temp>=HIGHEST:
        return MAX

    rate = (temp-LOWEST)/TMP_RANGE
    return MIN+int(RANGE*rate) if rate<1.0 else MAX

def setSpeed(pwm):
    '''write target PWM factor to the target file to set fan speed'''
    with open(TARGET_PWM, 'w') as f:
        f.write(str(pwm))

# get max temperature from all sensors
max_temp = max(map(getTmpFromFile, map(lambda x: path.format(dev=x), dev)))
print max_temp
# calculate the target fan pwm factor
target_speed = getSpeedByTemp(max_temp)
print target_speed
# set to target file to take effect
setSpeed(target_speed)
参考资料:
1.https://blog.csdn.net/discoverhfub/article/details/79719208
2.https://blog.csdn.net/qq_36396941/article/details/88903094
3.https://zhuanlan.zhihu.com/p/336429888