一文学会快速搭建Janus服务端
1、概述
想要了解Janus,首先需要知道WebRTC以及Janus和WebRTC之间的关系,本文将会对这些内容做简单的介绍,同时也会介绍一下Janus的架构,Janus可以实现的功能,并展示如何快速搭建一套Janus的后台服务器,最后利用官方的前端demo,实现sip通话。
2、JANUS简介
什么是WebRTC,它有哪些功能?WebRTC (Web Real-Time Communications) 是一个开源项目是一项实时通讯的技术,旨在使得浏览器能为实时通信提供简单的JavaScript接口,让浏览器通过JS实现即时通信接口。这个接口是通过一系列的信令,建立一个浏览器与浏览器之间(peer-to-peer)的信道,这个信道可以发送任何数据,而不需要经过服务器。并且WebRTC通过实现MediaStream,通过浏览器调用设备的摄像头、话筒,使得浏览器之间可以传递音频和视频。
那么什么是Janus呢?janus是一个WebRTC网关,由Meeteco设计和开发,是为Linux系统量身定制的,也可以在MacOS编译和安装。Windows不受支持,但如果需要的话,Janus可以在Windows 10中的“Windows Subsystem for Linux”上工作。
3、JANUS的架构及各文件作用
3.1、janus架构图

3.2、janus部分目录及文件的作用
plugins          # 业务插件目录
docs             # Janus相关文档目录
html             # 前端相关Demo目录
rtcp.c           # RTCP协议的具体实现
rtp.c            # RTP协议的实现,它用于传输音视频数据
sctp.c           # SCTP协议的实现
sdp.c            # SDP协议的实现
sdp-utils.c      # 处理SDP的常用工具
test             # 测试文件所在目录
record.c         # 录制功能的实现
ice.c            # 实现对libnice库的封装
janus.c          # Janus的主框架程序
log.c            # 日志
dtls-bio.c       # DTLS中BIO实现
dtls.c           # DTLS协议实现
。。。
4、JANUS服务端的简单搭建
好了说了这么多废话,下面就开始Janus服务端的搭建,搭建环境为centos7。
4.1、安装依赖包
首先需要安装janus的相关依赖包,以保证Janus服务能正常运行。其中有些依赖包是在github上的,下载的时候可能出现速度比较慢,或者出现会卡顿无法下载等情况,wget多试几次,多等待一会即可。
#step1 安装相关依赖包
yum install -y epel-release && \
yum update -y && \
yum install -y deltarpm && \
yum install -y gnutls-devel&& \
yum install -y openssh-server sudo which file curl zip unzip wget && \
yum install -y libmicrohttpd-devel jansson-devel libnice-devel glib22-devel opus-devel libogg-devel pkgconfig  gengetopt libtool autoconf automake make gcc gcc-c++ git cmake libconfig-devel openssl-devel
#step2 安装libsrtp 1.5.4或安装libsrtp 2.0.0,根据你安装的版本使用即可
wget https://github.com/cisco/libsrtp/archive/v1.5.4.tar.gz
tar xfv v1.5.4.tar.gz
cd libsrtp-1.5.4
./configure --prefix=/usr --enable-openssl
make shared_library && sudo make install
wget https://github.com/cisco/libsrtp/archive/v2.0.0.tar.gz
tar xfv v2.0.0.tar.gz
cd libsrtp-2.0.0
./configure --prefix=/usr --enable-openssl
make shared_library && sudo make install
#step3 安装 sofia-sip,用于Janus的sip-gateway插件
wget https://sourceforge.net/projects/sofia-sip/files/sofia-sip/1.12.11/sofia-sip-1.12.11.tar.gz
tar zxf sofia-sip-1.12.11.tar.gz
cd sofia-sip-1.12.11
./configure --prefix=/usr CFLAGS=-fno-aggressive-loop-optimizations
make && make install
#step4 安装usrsctp,data-channel支持
git clone https://github.com/sctplab/usrsctp
cd usrsctp
./bootstrap
./configure --prefix=/usr
make && make install
#step5 安装libwebsocket
git clone https://github.com/warmcat/libwebsockets
mkdir libwebsockets/build
cd libwebsockets/build
cmake -DMAKE_INSTALL_PREFIX:PATH=/usr -DCMAKE_C_FLAGS="-fpic" ..
make && make install
#step6 安装libmicrohttpd
wget https://ftp.gnu.org/gnu/libmicrohttpd/libmicrohttpd-0.9.71.tar.gz
tar zxf libmicrohttpd-0.9.71.tar.gz
cd libmicrohttpd-0.9.71/
./configure --prefix=/usr
make && sudo make install
#step7 安装libnice,不安装该依赖会“nice_address_ip_version”有报错
yum install -y python3 python3-pip python3-setuptools python3-wheel ninja-build
pip3 install meson ninja
git clone https://gitlab.freedesktop.org/libnice/libnicelibnice-dev
tar zxf libnice-master.tar.gz
cd libnice/
meson --prefix=/usr build && ninja -C build && sudo ninja -C build install
4.2、安装Janus
安装完Janus相关的依赖包以后,便要进入到我们主程序的安装,Janus的安装如下。
#安装Janus
#配置环境变量,否则可能会报错
export PKG_CONFIG_PATH=$PKG_CONFIG_PATH:/usr/lib/pkgconfig
git clone https://github.com/meetecho/janus-gateway.git
cd janus-gateway
sh autogen.sh
./configure --prefix=/opt/janus --disable-rabbitmq --disable-docs --disable-libsrtp2  &&\
make && make install && make configs
到此,janus的服务器的安装已经完成了。janus安装完成以后,是安装在/opt/janus目录的, 进入目录后可以看到组成结构,其中,Janus的执行文件在bin文件夹中,配置在etc/janus文件夹中。

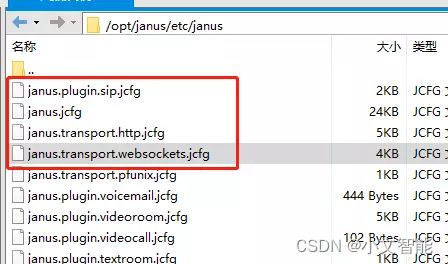
由于本文旨在快速搭建,并实现sip通话,就不对配置做一一介绍,直接使用默认的配置启动,配置文件默认https是关闭,如需开启,需要进入janus.transport.http.jcfg文件中,将https = false改为true,并且需要将cert_pem和cert_key配置为有效的https证书路径再启动。


4.3、启动Janus
# 启动(后台)
cd /opt/janus/bin
nohup ./janus &
tail -f nohup


#启动的部分信息如下,下面是直接控制台启动,看输出
[root@localhost ~]# cd /opt/janus/bin/
[root@localhost bin]# ./janus
Janus version: 1101 (1.1.1)
Janus commit: d659656b49b32046d60b3a9af21b74db790d5880
Compiled on:  Mon Oct 10 17:08:48 CST 2022


Logger plugins folder: /opt/janus/lib/janus/loggers
---------------------------------------------------
  Starting Meetecho Janus (WebRTC Server) v1.1.1
---------------------------------------------------


Checking command line arguments...
Debug/log level is 4
Debug/log timestamps are disabled
Debug/log colors are enabled
Using ***.**.**.*8 as local IP...
Token based authentication disabled
Initializing recorder code
Initializing ICE stuff (Full mode, ICE-TCP candidates disabled, half-trickle, IPv6 support disabled)
Crypto: OpenSSL pre-1.1.0
Fingerprint of our certificate: 13:AF:B3:B0:44:73:58:64:A8:6B:24:C6:D8:1C:30:92:99:52:D4:6D:AD:4A:AA:0E:5A:44:17:E8:32:D6:C7:D6
Event handlers support disabled
Plugins folder: /opt/janus/lib/janus/plugins
Sessions watchdog started
Joining Janus requests handler thread
Loading plugin 'libjanus_audiobridge.so'...
JANUS AudioBridge plugin initialized!
Loading plugin 'libjanus_echotest.so'...
JANUS EchoTest plugin initialized!
Loading plugin 'libjanus_recordplay.so'...
JANUS Record&Play plugin initialized!
Loading plugin 'libjanus_sip.so'...
JANUS SIP plugin initialized!
Loading plugin 'libjanus_nosip.so'...
JANUS NoSIP plugin initialized!
Loading plugin 'libjanus_streaming.so'...
[WARN] libcurl not available, Streaming plugin will not have RTSP support
JANUS Streaming plugin initialized!
Loading plugin 'libjanus_videocall.so'...
JANUS VideoCall plugin initialized!
Loading plugin 'libjanus_videoroom.so'...
JANUS VideoRoom plugin initialized!
Loading plugin 'libjanus_voicemail.so'...
JANUS VoiceMail plugin initialized!
Loading plugin 'libjanus_textroom.so'...
JANUS TextRoom plugin initialized!
Transport plugins folder: /opt/janus/lib/janus/transports
Loading transport plugin 'libjanus_http.so'...
HTTP transport timer started
HTTP webserver started (port 8088, /janus path listener)...
JANUS REST (HTTP/HTTPS) transport plugin initialized!
Loading transport plugin 'libjanus_websockets.so'...
Websockets server started (port 8188)...
JANUS WebSockets transport plugin initialized!
Loading transport plugin 'libjanus_pfunix.so'...
WebSockets thread started
查看进程:ps -ef|grep janus
查看相关端口:netstat -apn|grep janus
停止进程:直接kill即可:kill -9 xxx
到此,可以看到http端口和ws端口已经提示启动成功了,这也表示Janus的后端服务已经启动成功了。个人认为对于Janus的服务端,不一定非要通过janus的配置开启https,可以通过nginx做一层转发即可。
4.4、前端项目
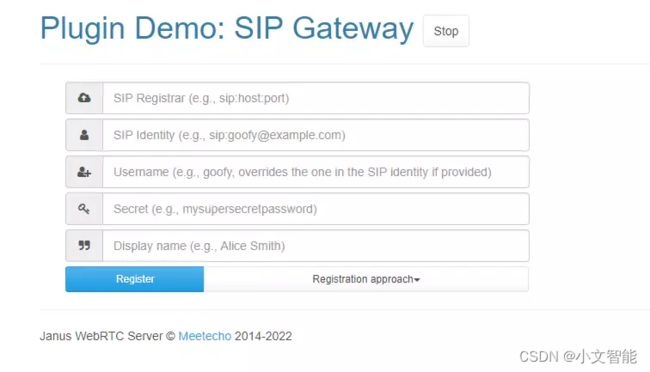
上面图中能看到Janus的目录中有一个share目录,/opt/janus/share/janus/demos这个目录下,即使demo环境了。将demos目录拷贝本地nginx的www目录中,www目录为nginx的安装目录,然后访问即可。由于本文主要是搭建简单的sip,所以只需要关注janus.js, settings.js,siptest.html,siptest.js,在启动窗口可以看到后端为http请求的服务端口为8088,将settings.js中的server改为本机的8088端口即可,如果需要集成到自己的项目中,也只需要对这几个文件进行修改。部署完成以后,浏览器访问http://localhost:8088/demos即可访问。页面如下,点击demos,选择Sip Gateway, 点击start,填入真实的sip话机信息,即可实现从浏览器打电话。

4.5、项目部署遇到的坑
4.5.1、版本问题
前端代码的版本和服务端使用同一版本,在开发过程中,如果使用老版本的前端的js文件修改后调用高版本的服务端,由于一下协议的不同,可能会导致电话打通后秒挂,所以要注意使用同一版本的前后端。
4.5.2、nice_address_ip_version
检查一下依赖环境,参考4.1安装依赖包有关于libnice这段安装。
4.5.3、提示找不到libsrtp
export PKG_CONFIG_PATH=/usr/lib/libsrtp/lib/pkgconfig4.5.4、提示找不到 libnice
export PKG_CONFIG_PATH=/path/to/libnice/lib/pkgconfig`(libnice的安装路径)4.5.5、要使用libsrtp1.5.4
在configure janus 时加上 --disable-libsrtp2。
4.5.6、libwebsockets.so.12报错
错误提示:libwebsockets.so.12: cannot open shared object file: No such file or directory。
# 修改/etc/ld.so.conf文件,加入libwebsockets的so路径
vi /etc/ld.so.conf
#include ld.so.conf.d/*.conf
#/usr/local/src/libwebsockets-2.4.1/build/lib
ldconfig
mosquitto -c /etc/mosquitto/mosquitto.conf -d