opencv+matlab双目标定(python版)
采集的图像用opencv自带程序识别不出棋盘格角点,可能是因为分辨率太低了。好在MATLAB标定工具箱可以正常使用,不过获得的标定参数导入opencv之后需要转置,记录一下官方自带实例的方法免得以后忘了。
1.MATLAB标定
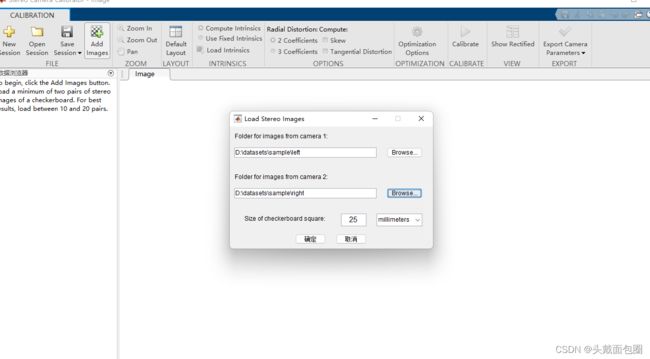
导入左右相机图片:
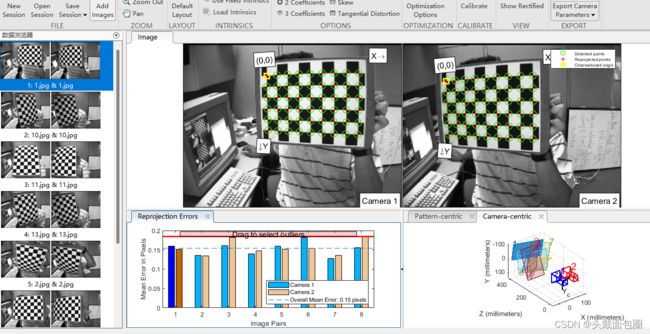
标定:
 获得数据:
获得数据:
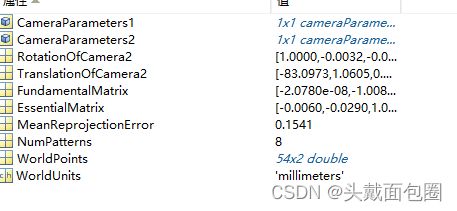
标定一共需要6个矩阵,分别是以下几个:
CameraParameters1:
# 左相机内参
534.314442500514	0	0
0	534.311045251050	0
342.636713711777	234.424520796539	1
# 左相机畸变系数
-0.292177185491001	0.113413077396564 0 0 0

CameraParameters2:
# 右相机内参
537.394004961703	0	0
0	537.010363287503	0
326.619433762878	250.580543822792	1
# 右相机畸变系数
-0.289290173351616	0.103918371734871 0 0 0

# 旋转矩阵 R
0.999978261400964	-0.00323454487115736	-0.00574581978326371
0.00328980725949397	0.999948174770527	0.00963457011427661
0.00571435855548597	-0.00965326331185474	0.999937078327297

# 平移向量 T
-83.0973307644613	1.06051772463688	0.0391816078736937
注意:此处矩阵为MATLAB直接导出的矩阵,未经过转置
2、opencv极线校正
import cv2.cv2 as cv
import numpy as np
import glob


def cat2images(limg, rimg):
    HEIGHT = limg.shape[0]
    WIDTH = limg.shape[1]
    imgcat = np.zeros((HEIGHT, WIDTH * 2 + 20, 3))
    imgcat[:, :WIDTH, :] = limg
    imgcat[:, -WIDTH:, :] = rimg
    for i in range(int(HEIGHT / 32)):
        imgcat[i * 32, :, :] = 255
    return imgcat


left_img = glob.glob(r"D:/datasets/sample/left/*.jpg")
right_img = glob.glob(r'D:/datasets/sample/right/*.jpg')

left_image = cv.imread("D:/datasets/sample/left/1.jpg")
right_image = cv.imread("D:/datasets/sample/right/1.jpg")

HEIGHT = left_image.shape[0]
WIDTH = left_image.shape[1]

# 相机参数
camera_matrix0 = np.array([[534.314442500514, 0.00000000e+00, 342.636713711777],
                           [0.00000000e+00, 534.311045251050, 234.424520796539],
                           [0.00000000e+00, 0.00000000e+00, 1.00000000e+00]]
                          ).reshape((3, 3))  # 标定得到的 cameraMatrix1
distortion0 = np.array(
    [-0.292177185491001, 0.113413077396564, 0, 0, 0])  # 即上文标定得到的 distCoeffs1 3.53580145118377

camera_matrix1 = np.array([[537.394004961703, 0.00000000e+00, 326.619433762878],
                           [0.00000000e+00, 537.010363287503, 250.580543822792],
                           [0.00000000e+00, 0.00000000e+00, 1.00000000e+00]]
                          ).reshape((3, 3))  # 标定得到的 cameraMatrix2
distortion1 = np.array(
    [-0.289290173351616, 0.103918371734871, 0, 0, 0])  # 标定得到的 distCoeffs2 7.68101455548747
R = np.array([[0.999978261400964, 0.00328980725949397, 0.00571435855548597],
              [-0.00323454487115736, 0.999948174770527, -0.00965326331185474],
              [-0.00574581978326371, 0.00963457011427661, 0.999937078327297]]
             )  # 标定得到的 R
T = np.array([-83.0973307644613, 1.06051772463688, 0.0391816078736937])  # 即上文标定得到的T

# 计算左右旋转矩阵和参数
(R_l, R_r, P_l, P_r, Q, validPixROI1, validPixROI2) = \
    cv.stereoRectify(camera_matrix0, distortion0, camera_matrix1, distortion1, np.array([WIDTH, HEIGHT]), R,
                     T)  # 计算旋转矩阵和投影矩阵

# 左图重映射表
(map1_L, map2_L) = \
    cv.initUndistortRectifyMap(camera_matrix0, distortion0, R_l, P_l, np.array([WIDTH, HEIGHT]),
                               cv.CV_32FC1)

# 右图重映射表
(map1_R, map2_R) = \
    cv.initUndistortRectifyMap(camera_matrix1, distortion1, R_r, P_r, np.array([WIDTH, HEIGHT]), cv.CV_32FC1)

for i in range(10):
    img_l = cv.imread(left_img[i])
    img_r = cv.imread(right_img[i])

    # 重映射
    rect_left_image = cv.remap(img_l, map1_L, map2_L, cv.INTER_CUBIC)
    rect_right_image = cv.remap(img_r, map1_R, map2_R, cv.INTER_CUBIC)

    # 输出图像
    imgcat_out = cat2images(rect_left_image, rect_right_image)
    cv.imwrite('D:/project/make_video/cal_pitures/out3-4/imgcat_out' + str(i) + '.jpg', imgcat_out)
注意:相机参数的6个矩阵全部需要转置
校正后图像如下:

批量校正也可以将MATLAB获得的相机参数做成xml文档用python读。
参考了这位博主的校正程序:opencv-python立体匹配(极线校正)_小张zzzz的博客-CSDN博客_opencv 极线校正