关于Keras 的 ImageDataGenerator 和 Data Augmentation
今天的分享是关于如何使用 keras 的 ImageDataGenerator类 来进行数据增强处理(data augmentation)。
通过这篇博客你会了解 :
什么是数据增强?
为什么我们要使用 数据增强 ?
数据增强的几种常用类型。
什么情况下可以使用, 什么情况下不能使用 ?
1 什么是数据增强
如果你使用过 keras , 那么首先请你来看一下面的这个问题:
以下的选项当中, 哪一个是 增强处理(data augmentation)这项操作所做的 ?
- 添加更多的训练数据(training data)
- 替换原始的训练数据
- 二者都有涉及
- I don’t know
你默默地选择了哪一项呢 ? ? ?
这篇博文的原作者 Adrian Rosebrock 曾经在它的 Twitter 中做过相同的调查,调查的结果如下:
只有 5% 的人选择了 “ 正确 ” 的答案 B , (这里的正确仅仅是存在于使用 keras 的 ImageDataGenerator class 来进行
数据增强处理 的范围内, 如果你用的不是keras 的I..D..G..类, 那可能 B 项就算不是正确的了, 但是在今天的这篇博客
当中,我们仅仅针对 keras 的 ImageDataGenerator 类。)其实它的这个问题并没有表达清楚, 如果只是单讲数据增强,
那么前三个选项都是正确的。 好了, 不要纠结于这个小问题了,它的出现只不过是用于引出我们今天的出题。
到底应当如何来定义 data augment , 要根据你的使用环境来综合考虑。
augment 这个词有 make something ' great ' , or ' increase ' something 的意思,
什么是广义上的数据增强呢?
————它是一种 从给定的原始数据当中 通过一些图像处理的方法 来生成“ 新的 ”训练数据的技巧(techniques), 但是要注意的是,生成后的图像要和原图像的 class label 是相同的。
为什么要使用数据增强?
——我们使用数据增强的这个技巧 可以 增强模型的泛化能力(the generalizability of the model.)
并且 Given that our network is constantly seeing new, slightly modified versions of the input data, the network is able to learn more robust features.
注意 : 在测试模型的时候我们不针对 test data 使用数据增强, 在绝大多数的时候,数据增强的使用是可以增加 测试集 在
网络模型上的准确度的; 但是这也许会在你的训练阶段 导致 有轻微的在精度上的下降。
针对数据 :
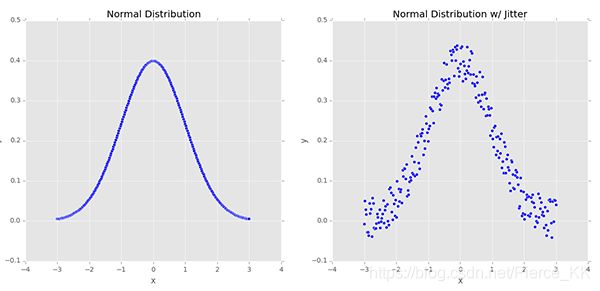
| 下面的两张图是我们随机创建的一些样本点, 左侧的数据服从正态分布, 右侧的数据使我们为这个分布添加了一些微小的扰动(jitter), 这种类型的数据增强的应用 就能够有效的 增加我们网络模型的 泛化能力(the generalizability of our networks) 。 |
基于 类似于左侧图像的 如此标准的数据分布 来训练我们的 machine learning model , 也许能够精确的进行建模,
但是这种模型的泛化能力实在是令人堪忧的。 况且 在真实的世界当中 这种如此标注的 数据分布 是并不多见的,或者说是并不存在的。
为了增强我们分类器的泛化能力, 我们人为的为其增加一些 大小为e的 随机扰动( randomly jitter ),就有了右侧的分布。
它总体上也是个正态分布, 只不过没有左侧的那么标准罢了。
针对图像 :
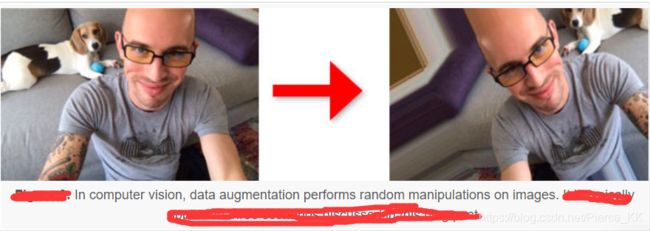
如果换做是将图像作为输入, 那么应用数据增强 就会生成如下的“ 新图像 ” ,
这种变换只不过是增强方法的一种 , we can obtain augmented data from the original images by applying simple geometric transforms, such as random:
- Translations
- Rotations
- Changes in scale
- Shearing
- Horizontal (and in some cases, vertical) flips
三种常见的数据增强 类型
常见的数据增强方式大致可以分为如下的几种:
1. Dataset generation and data expansion via data augmentation (less common)
(通过数据增强来扩展数据集)
2. In-place/on-the-fly data augmentation (most common)
(在训练的时候给模型 输入随机变化后的图像, 以达到数据增强的目的)
3. Combining dataset generation and in-place augmentation
(两者的结合)
Type #1: Dataset generation and expanding an existing dataset (less common)
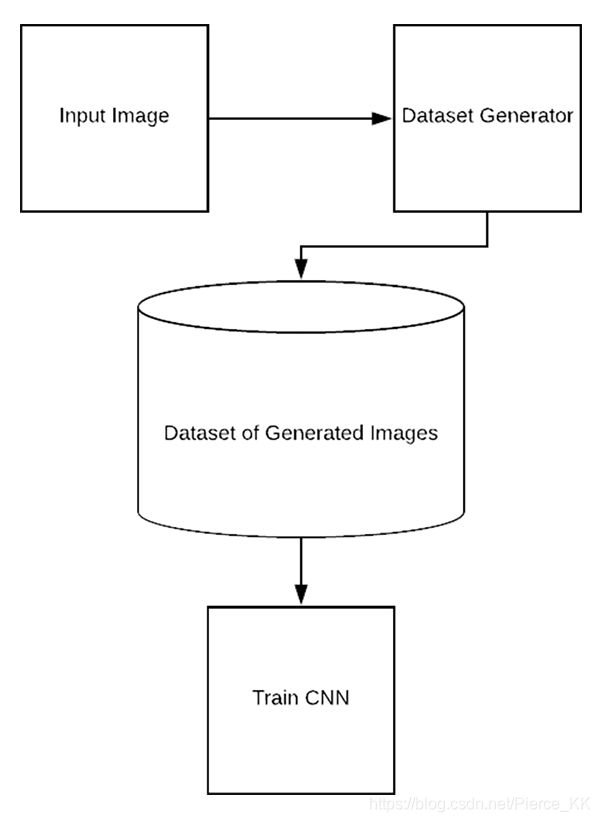
第一种类型是 使用图像增强方式来扩充我们现有的数据集, 但这并不常用, 流程如下 :
这种形式的数据增强 我们一般称其为 dataset generation or dataset expansion.
众所周知, 无论是 machine learning 还是 deep learning 都是需要大量的数据集来训练模型的, 但是很多时候我们的数据集
当中往往没有这么多的图像, 那该怎么办?
我们举一个极端一些的例子, 假设我们只有一张图像, 那么你就要基于这一张图像apply data augmentation to create an entire dataset of images 。
为了完成这个任务, 你需要:
- Load the original input image from disk.
- Randomly transform the original image via a series of random translations, rotations, etc.
- Take the transformed image and write it back out to disk.
- Repeat steps 2 and 3 a total of N times.
这样一来, 你也能拥有一个数量相对可观的数据集了, 这些数据都是基于一张图像,通过各种形式的变换得到的。
当然,你肯定并不是只有一张图 , 你可能有几十张, 上百种, 并且想通过这种形式来拓展你的数据集 到几千张的数量级。
但是, In those situations, dataset expansion and dataset generation may be worth exploring.
因为这样做虽然增加了 训练集的数据量,但是却对模型的泛化能力没有什么帮助,
你的数据虽然很多,但是都是基于少量数据所生成的, 在训练的阶段,你可能会发现精度有所提升,
但是在 test 的时候就会原形毕露了,因为 neural network is only as good as the data it was trained on ,
我们不能指望着只用少量的数据来训练网络, 然后使其能够识别 “ 他从来没有见过的东西 。 ”
如果你现在正在考虑以这种方式来扩充数据集, 那么我觉得你应该再向后退一步,并且
将你的时间投入到如何 收集 数据上, 或者是 考虑一下 behavioral cloning 这种方法
Type #2: In-place/on-the-fly data augmentation (most common)
在训练的时候给模型 输入随机变化后的图像, 以达到数据增强的目的, 这是我们最常用的数据增强方式,
也是 keras 的 ImageDataGenerator 类所使用的方式,使我们这篇博客的终点所在。
它的流程如下:
使用这种类型的 数据增强 方法, 可以确保我们的网络在训练时 接收到新 batch 里的图像都是 之前从未 ‘ 看到过 ’ 的新图像,
( Using this type of data augmentation we want to ensure that our network, when trained, sees new variations of our data at each and every epoch. )
从上图中我们可以看到, 这个过程共分为三步:
- Step #1: An input batch of images is presented to the ImageDataGenerator .
- Step #2: The ImageDataGenerator transforms each image in the batch by a series of random translations, rotations, etc.
- Step #3: The randomly transformed batch is then returned to the calling function.
有两点需要额外的注意:
第一, keras 的 ImageDataGenerator 类并不会 return 原图, 他仅仅是return 经过随机变换过后的图像,
第二, We call this “in-place” and “on-the-fly” data augmentation because this augmentation is done at training time (i.e., we are not generating these examples ahead of time/prior to training).
你可能会觉得这与你头脑中所想像的 数据增强 的方式有些不同,( 你可能认为应当是返回 原始数据 + 一些图像变换
所生成的 ‘ 综合 ’ 数据 , )但这确实是keras 的 ImageDataGenerator 类所做的。
它所执行的是 替换(Replace) 操作, 而不是 添加(additive) 操作。
下面的这个想法是错误的:
Keras 的 ImageDataGenerator class 类 接收一个 batch 的数据来用于网络的训练。 并对接收到的 batch 中的每一张图片都使用一些随机的transformations (including random rotation, resizing, shearing, etc.)。 它仅仅 return 这些新生成的图像,并组成一个全新的batch 代替 原始的batch 来训练网络 。
你可能会觉得这与你头脑中所想像的 数据增强 的方式有些不同,( 你可能认为应当是返回 原始数据 + 一些图像变换
所生成的 ‘ 综合 ’ 数据 , )但这确实是keras 的 ImageDataGenerator 类所做的。
它所执行的是 替换(Replace) 操作, 而不是 添加(additive) 操作。
或许你会有这样的问题, 那原始的训练数据怎么办? 为什么我们不使用原始数据呢?
———— 请你回想一下我们使用 数据增强 的目的, 不就是为了让网络在每个 epoch 都使用 “ 新的” “ 没见过 ” 的图像么,
以此来增加模型的泛化能力。
如果我们没个 epoch 都使用相同的图像来训练, 这就与我们使用 数据增强 方法的初中相违背了, 所以,我们使用
“replace” the training data 的方法。
( 关于 keras 中的 ImageDataGenerator 类的使用方法会在后文当中提到,)
Type #3: Combining dataset generation and in-place augmentation
也就是说你既要填充数据, 以扩充你的 dataset 的数量 ; 还要用 replace 的方法来训练。
you may see this type of data augmentation when performing behavioral cloning 。
behavioral cloning 经常可以在自动驾驶领域中见到, 这个领域当中 数据的采集 是extremely time consuming and expensive。
一个常用的解决方法就是 instead use video games and car driving simulators.
Video game graphics have become so life-like that it’s now possible to use them as training data.

Therefore, instead of driving an actual vehicle, you can instead:

Play a video game
Write a program to play a video game
Use the underlying rendering engine of the video game
…all to generate actual data that can be used for training.

Once you have your training data you can go back and apply Type #2 data augmentation
 (i.e., in-place/on-the-fly data augmentation) to the data you gathered via your simulation.
如何使用通过keras 来实现这几种数据增强
你可以从这里下载到源码,https://download.csdn.net/download/pierce_kk/11473611
我们先来看一下压缩文件中的目录,
$ tree --dirsfirst --filelimit 10
.
├── dogs_vs_cats_small
│   ├── cats [1000 entries]
│   └── dogs [1000 entries]
├── generated_dataset
│   ├── cats [100 entries]
│   └── dogs [100 entries]
├── pyimagesearch
│   ├── __init__.py
│   └── resnet.py
├── cat.jpg
├── dog.jpg
├── plot_dogs_vs_cats_no_aug.png
├── plot_dogs_vs_cats_with_aug.png
├── plot_generated_dataset.png
├── train.py
└── generate_images.py
我们有两个数据集, dogs_vs_cats_small 和 generated_dataset, 都是有两类物体(猫和狗)。
前者是从 kaggle 的猫狗大战中节选出来的部分数据 (原数据每类有 25000 张)。
后者是 采用 第一类数据增强 的方式生成的, 它的原始image 是 parent directory 下的 cat.jpg 和 dog.jpg。
pyimagecearch 文件当中包含了 our implementation of the ResNet CNN classifier.
接下来是几张训练结果的截图,
最后是 train 和 generate 的 script 。
train.py 实现的就是 一个从数据加载到训练, 最后测试并绘制曲线 的过程 使用的是resnet,
generate.py 实现的是我们上面说的第一种 数据增强的方法, 也就是给一张 image ,然后利用各种图像处理的方法
生成一大堆的 基于它变换后的iamge
如果你不了解什么keras 的 imageDataGeneraton 和 fit_generation 我推荐你读一下这篇博客
(https://blog.csdn.net/learning_tortosie/article/details/85243310)
我们先来看train.py
2-18 行 import 我们需要使用的package
# set the matplotlib backend so figures can be saved in the background
import matplotlib
matplotlib.use("Agg")

# import the necessary packages
from pyimagesearch.resnet import ResNet
from sklearn.preprocessing import LabelEncoder
from sklearn.model_selection import train_test_split
from sklearn.metrics import classification_report
from keras.preprocessing.image import ImageDataGenerator
from keras.optimizers import SGD
from keras.utils import np_utils
from imutils import paths
import matplotlib.pyplot as plt
import numpy as np
import argparse
import cv2
import os
20- 28 行我们定义了一些命令行参数 (如果你不太理解命令行参数,可以看一下我的这篇博客 )
# construct the argument parser and parse the arguments
ap = argparse.ArgumentParser()
ap.add_argument("-d", "--dataset", required=True,
	help="path to input dataset")
ap.add_argument("-a", "--augment", type=int, default=-1,
	help="whether or not 'on the fly' data augmentation should be used")
ap.add_argument("-p", "--plot", type=str, default="plot.png",
	help="path to output loss/accuracy plot")
args = vars(ap.parse_args())
接下来的 30 - 53 是 initialize hyperparameters and load our image data
标签的种类从image 的名字当中得到, 并且将 image resize 到 64 x 64
# initialize the initial learning rate, batch size, and number of
# epochs to train for
INIT_LR = 1e-1
BS = 8
EPOCHS = 50

# grab the list of images in our dataset directory, then initialize
# the list of data (i.e., images) and class images
print("[INFO] loading images...")
imagePaths = list(paths.list_images(args["dataset"]))
data = []
labels = []

# loop over the image paths
for imagePath in imagePaths:
	# extract the class label from the filename, load the image, and
	# resize it to be a fixed 64x64 pixels, ignoring aspect ratio
	label = imagePath.split(os.path.sep)[-2]
	image = cv2.imread(imagePath)
	image = cv2.resize(image, (64, 64))

	# update the data and labels lists, respectively
	data.append(image)
	labels.append(label)
对image 做归一化处理, 对 label做 one-hot 处理 (如果不太理解什么事one-hot 可以参考一下我的这篇博客)
并划分 training data 和 test data
# convert the data into a NumPy array, then preprocess it by scaling
# all pixel intensities to the range [0, 1]
data = np.array(data, dtype="float") / 255.0

# encode the labels (which are currently strings) as integers and then
# one-hot encode them
le = LabelEncoder()
labels = le.fit_transform(labels)
labels = np_utils.to_categorical(labels, 2)

# partition the data into training and testing splits using 75% of
# the data for training and the remaining 25% for testing
(trainX, testX, trainY, testY) = train_test_split(data, labels,
	test_size=0.25, random_state=42)
处理过的 one-hot 形式的label 大概是下面的这个样子:
# 这代表 狗 狗 狗 猫 猫 狗 狗,
array([[0., 1.],
       [0., 1.],
       [0., 1.],
       [1., 0.],
       [1., 0.],
       [0., 1.],
       [0., 1.]], dtype=float32)
OK 我们开始数据生成的部分, 首先 实例化一个 ImageDataGenerator类,
(i.e., no augmentation will be performed). This is the default operation of this script.
# initialize an our data augmenter as an "empty" image data generator
aug = ImageDataGenerator()
然后 第73-84 行是检查 通过命令行赋值的参数‘ augment ’ 的具体值 , 参数 ' augment ' 的默认值为 -1,即不进行数据增强操作
如果我们想要增强,那么就需要改变这个参数的值 ---> (if args["augment"] > 0)
然后 , 如果确实要进行增强操作,接下来就是为实现增强的一些参数赋值 (包括 rotation_range, zoom_range等)
# check to see if we are applying "on the fly" data augmentation, and
# if so, re-instantiate the object
if args["augment"] > 0:
	print("[INFO] performing 'on the fly' data augmentation")
	aug = ImageDataGenerator(
		rotation_range=20,
		zoom_range=0.15,
		width_shift_range=0.2,
		height_shift_range=0.2,
		shear_range=0.15,
		horizontal_flip=True,
		fill_mode="nearest")
86 - 100 compile our model and train .
优化方法是 随机梯度下降 SGD ,loss 为binary_crossentropy 评价方式是accuracy ,model 使我们的resnet,
使用 . fit_generator的方法来训练。
# initialize the optimizer and model
print("[INFO] compiling model...")
opt = SGD(lr=INIT_LR, momentum=0.9, decay=INIT_LR / EPOCHS)
model = ResNet.build(64, 64, 3, 2, (2, 3, 4),
	(32, 64, 128, 256), reg=0.0001)
model.compile(loss="binary_crossentropy", optimizer=opt,
	metrics=["accuracy"])

# train the network
print("[INFO] training network for {} epochs...".format(EPOCHS))
H = model.fit_generator(
	aug.flow(trainX, trainY, batch_size=BS),
	validation_data=(testX, testY),
	steps_per_epoch=len(trainX) // BS,
	epochs=EPOCHS)
最后(102 - 120)是用test data 来评估模型, print statistics, and generate a training history plot
# evaluate the network
print("[INFO] evaluating network...")
predictions = model.predict(testX, batch_size=BS)
print(classification_report(testY.argmax(axis=1),
	predictions.argmax(axis=1), target_names=le.classes_))

# plot the training loss and accuracy
N = np.arange(0, EPOCHS)
plt.style.use("ggplot")
plt.figure()
plt.plot(N, H.history["loss"], label="train_loss")
plt.plot(N, H.history["val_loss"], label="val_loss")
plt.plot(N, H.history["acc"], label="train_acc")
plt.plot(N, H.history["val_acc"], label="val_acc")
plt.title("Training Loss and Accuracy on Dataset")
plt.xlabel("Epoch #")
plt.ylabel("Loss/Accuracy")
plt.legend(loc="lower left")
plt.savefig(args["plot"])
我们的 输入图像的路径 是通过以 命令行参数的 形式给定的, 所以我们可以在 程序执行时 来选择具体训练哪些数据。
- - - - - - generate_images.py
Generating a dataset/dataset expansion with data augmentation and Keras
上面的demo 讲述的是如何通过 keras 的 ImageDataGeneration 来在模型训练的时候 实现data augment ,
下面我们来看一下 dataset expansion via data augmentation with Keras 也就是第一种方法, 基于较少的数据
来扩充你的数据集。
在训练CNN之前,我们首先需要 制作我们的 dataset,
下面我们使用 generate_images.py 和 这两张猫狗的图像 来生成我们的 dataset,
首先, 依旧是 import 环节 和 命令行参数的定义环节
命令行的参数共有三个, input/ output path 和你要生成多少张
# import the necessary packages
from keras.preprocessing.image import ImageDataGenerator
from keras.preprocessing.image import img_to_array
from keras.preprocessing.image import load_img
import numpy as np
import argparse

# construct the argument parser and parse the arguments
ap = argparse.ArgumentParser()
ap.add_argument("-i", "--image", required=True,
	help="path to the input image")
ap.add_argument("-o", "--output", required=True,
	help="path to output directory to store augmentation examples")
ap.add_argument("-t", "--total", type=int, default=100,
	help="# of training samples to generate")
args = vars(ap.parse_args())
(line 18 - 35)加载数据, 并且 实例化一个ImageDataGenerator 类,
在加载数据的部分, 我们使用的是 Keras functionality (i.e. we aren’t using OpenCV) ;
This object( aug ) will facilitate performing random rotations, zooms, shifts, shears, and flips on our input image.
# load the input image, convert it to a NumPy array, and then
# reshape it to have an extra dimension
print("[INFO] loading example image...")
image = load_img(args["image"])
image = img_to_array(image)
image = np.expand_dims(image, axis=0)

# construct the image generator for data augmentation then
# initialize the total number of images generated thus far
aug = ImageDataGenerator(
	rotation_range=30,
	zoom_range=0.15,
	width_shift_range=0.2,
	height_shift_range=0.2,
	shear_range=0.15,
	horizontal_flip=True,
	fill_mode="nearest")
total = 0
接下来我们便 construct 我们的 Python generator , 并且run , 直到生成我们预设数量的图像。
# construct the actual Python generator
print("[INFO] generating images...")
imageGen = aug.flow(image, batch_size=1, save_to_dir=args["output"],
	save_prefix="image", save_format="jpg")

# loop over examples from our image data augmentation generator
for image in imageGen:
	# increment our counter
	total += 1

	# if we have reached the specified number of examples, break
	# from the loop
	if total == args["total"]:
		break
具体的操作过程如下, (这里偷个懒,直接放上原作者的截图)
实验部分
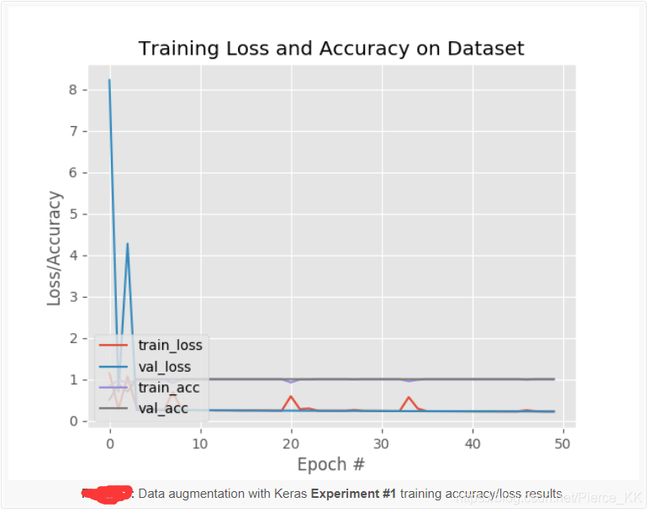
首先是 用网络来训练 generated_data 这个数据集,(就是基于一张图 变换出来的dataset)
过程和结果如下:
从上面的结果中我们可以看出, accuracy 已经接近了 100% ,
我们看到其出现了严重的过拟合现象, 并且可想而知, 模型的泛化能力也会很糟糕。
这并不是一个严肃的实验, 你就把它当做是个热身吧,
下面的这部分才是今天实验内容的重点所在 ----> in-place data augmentation 。
也就是用变换后的图像 替换 原图像 来进行训练的方法。
Obtaining a baseline (no data augmentation)
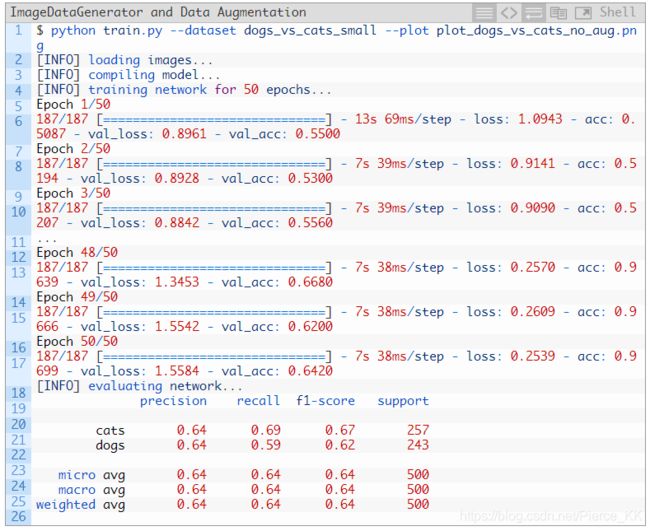
1000张cat和1000张dog 的图像来训练网络, 不使用数据增强的技巧。
实验过程如下:
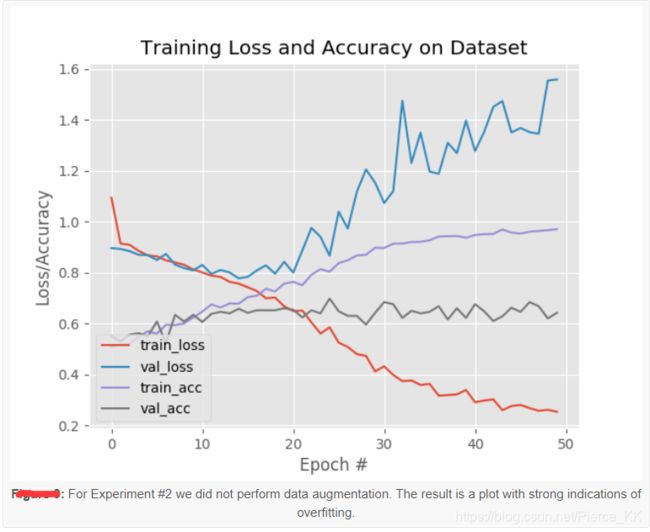
我们得到了 0.64 的准确率, 但是同时也出现了一个问题, 我们看下面的这张图:
网络出现了严重的过拟合 : 大约在 epoch = 15 的时候,training loss 的曲线还是处于下降的趋势,
但是validation loss 的曲线 已经有了上升的趋势; 在 epoch = 20的时候就更加明显了。
这是典型的过拟合现象, The solution is to (1) reduce model capacity, and/or (2) perform regularization.
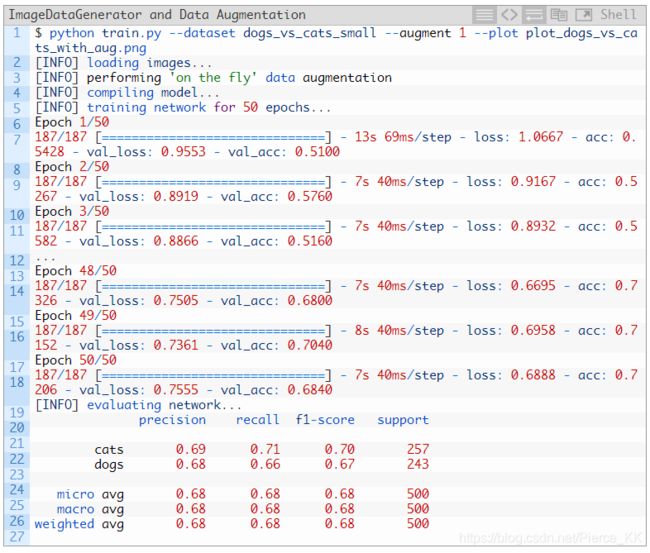
加入数据增强, (使用 keras 的 ImageDataGeneration )
实验的流程如下
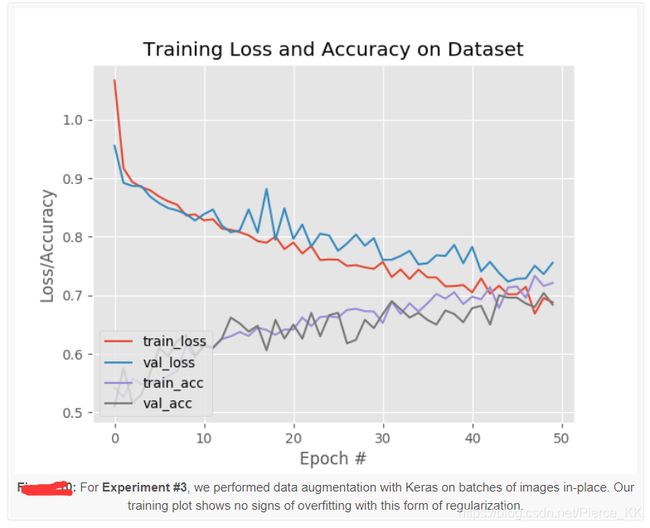
准确率由 64% 提升到了 68% , 更为重要的是,我们解决了过拟合问题
By using data augmentation we were able to combat overfitting!
In nearly all situations, unless you have very good reason not to,
you should be performing data augmentation when training your own neural networks.
总结
今天我们分享了一些关于 数据增强 的知识, 包括什么是数据增强, 为什么要使用数据增强 以及
如何使用数据增强 等等,,
我们现在知道了,一共有三种数据增强的方法,以及哪些是有用的,哪些是没什么太大用的;
掌握了如何通过 keras 的 ImageDataGeneration 类来实现数据增强 ;
并且 你要注意到 : data augmentation is a form of regularization
This claim of data augmentation as regularization was verified in our experiments when we found that:
- Not applying data augmentation at training caused overfitting
- While apply data augmentation allowed for smooth training, no overfitting, and higher accuracy/lower loss
好了, 今天的分享到此为止,
如果你喜欢 计算机视觉 或者 deeplearning 这个领域的一些内容, 你也可以关注 Adrian Rosebrock 的blog。
或者是持续关注我这个专栏的分享(PS 本人能力和水平有限)
如果你觉得我分享的内容帮助到了你, 就请给我点个赞吧, 这是对我一种莫大的鼓励;
当然, 也欢迎你对我提出宝贵的意见 。
我们下次再见 @

