yolov5m.pt triton部署
1.创建triton docker镜像
docker pull nvcr.io/nvidia/tritonserver:21.10-py3
2.将yolov5m转为onnx
A.下载yolov5官方代码
B.在运行export.py文件之前,因为onnx必须转成动态的,需要修改dynamic参数,并且根据自己需求修改精度(一般为FP16)。
python path/to/export.py --weights yolov5m.pt --img 640 --include onnx --dynamic --half
3.配置triton模型仓库,
A.模型仓库的目录如下:
<model-repository-path>/
<model-name>/   # model-name必须与配置文件config.pbtxt中的name一致
config.pbtxt    # 新建一个文件,用vim打开,并按下述步骤配置
1/                # 新建文件夹1,并在里面放入已转成的yolov5.onnx
model.onnx
修改配置文件:
格式如下:
```python
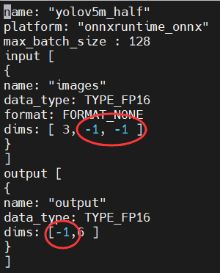
name: "yolov5m_half"       # 命名与一致
platform: "onnxruntime_onnx"
max_batch_size : 16
input [
{
name: "images"
data_type: TYPE_FP32
format: FORMAT_NONE
dims: [ 3, 640, 640 ]
}
]
output [
{
name: "output"
data_type: TYPE_FP32
dims: [8400,7 ]
}
]
关于onnx模型的输入输出维度,可以使用下面几行代码查看
import onnx
model_onnx = onnx.load('model.onnx')
print(model_onnx.graph.input)
print(model_onnx.graph.output)
若显示的维度不是具体的数字或输入输出有多个维度,如:
[name: "images"
type {
  tensor_type {
    elem_type: 10
    shape {
      dim {
        dim_param: "batch"
      }
      dim {
        dim_value: 3
      }
      dim {
        dim_param: "height"
      }
      dim {
        dim_param: "width"
      }
    }
  }
}
]
[name: "output"
type {
  tensor_type {
    elem_type: 10
    shape {
      dim {
        dim_param: "batch"
      }
      dim {
        dim_param: "anchors"
      }
      dim {
        dim_value: 6
      }
    }
  }
}
, name: "524"
type {
  tensor_type {
    elem_type: 10
    shape {
      dim {
        dim_value: 1
      }
      dim {
        dim_value: 3
      }
      dim {
        dim_value: 48
      }
      dim {
        dim_value: 80
      }
      dim {
        dim_value: 6
      }
    }
  }
}
, name: "622"
type {
  tensor_type {
    elem_type: 10
    shape {
      dim {
        dim_value: 1
      }
      dim {
        dim_value: 3
      }
      dim {
        dim_value: 24
      }
      dim {
        dim_value: 40
      }
      dim {
        dim_value: 6
      }
    }
  }
}
, name: "720"
type {
  tensor_type {
    elem_type: 10
    shape {
      dim {
        dim_value: 1
      }
      dim {
        dim_value: 3
      }
      dim {
        dim_value: 12
      }
      dim {
        dim_value: 20
      }
      dim {
        dim_value: 6
      }
    }
  }
}
]
4.启动triton
systemctl start docker
systemctl enable docker
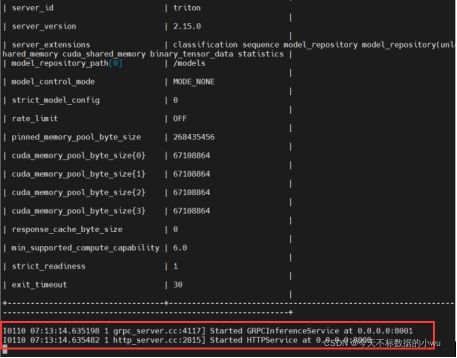
docker run --gpus=1 --rm -p8000:8000 -p8001:8001 --ipc=host -p8002:8002 -v /home/xxy/triton/server-main/docs/examples/model_repository:/models 5c99e9b6586e tritonserver --model-repository=/models --model-control-mode=None --strict-model-config=false --allow-metrics=false
# 这行命令用以查看上述步骤部署的yolov5 triton版本是否无误
5.测试triton调用是否成功
A.在python环境中安装triton库
pip install tritonclient[all]
B.同步调用
import cv2
import numpy as np
import tritonclient.grpc as grpcclient
if __name__ == '__main__':
imgpath = '/home/xxy/Pictures/2_00000.jpg'    # 数据
img0 = cv2.imread(imgpath)   # 预处理
img = cv2.resize(img0,(640,640))
img = img[:, :, ::-1].transpose(2, 0, 1)
img = np.ascontiguousarray(img)
img = img.astype(np.float32)
img /= 255.0
img = np.stack([img],0) #可多张图⽚,这个list⾥弄成多张图就⾏
# 初始化triton客⼾端对象
triton_client = grpcclient.InferenceServerClient(
url='0.0.0.0:8001', verbose=False) #ip地址为启动docker之后输出的:Started GRPCInferenceService的地址,端口直接 8001
outputs = [
grpcclient.InferRequestedOutput('output'),
]
inputs = [grpcclient.InferInput('images', img.shape, 'FP32')]
inputs[0].set_data_from_numpy(img)
result = triton_client.infer(
'yolov5m_half',
inputs,
request_id=str('1'),   # request_id 值随便填
model_version='',
outputs=outputs)
#拿到结果
output_array = result.as_numpy('output')  # 将其转为numpy类型数据输出查看
C.异步调用
import cv2
import numpy as np
import tritonclient.grpc as grpcclient
import queue
from functools import partial
class UserData:
def __init__(self):
self._completed_requests = queue.Queue()

def completion_callback(user_data, result, error):
user_data._completed_requests.put((result, error))

if __name__ == '__main__':
imgpath = '/home/xxy/Pictures/2_00000.jpg'   # 数据
img0 = cv2.imread(imgpath)
img = cv2.resize(img0,(640,640))
img = img[:, :, ::-1].transpose(2, 0, 1) # h*w*c convert to c*h*w
img = np.ascontiguousarray(img)
img = img.astype(np.float32)
img /= 255.0 # 0 - 255 to 0.0 - 1.0
img = img.reshape(1,img.shape[0],img.shape[1],img.shape[2])
user_data = UserData()
triton_client = grpcclient.InferenceServerClient(
url='0.0.0.0:8001', verbose=False)
outputs = [
grpcclient.InferRequestedOutput('output'),
]
inputs = [grpcclient.InferInput('images', img.shape, 'FP32')]
inputs[0].set_data_from_numpy(img)
triton_client.start_stream(partial(completion_callback, user_data))
for i in range(100):
result = triton_client.async_stream_infer(
'yolov5m_half',
inputs,
request_id=str(i),
model_version='',
outputs=outputs)
while True:
(results, error) = user_data._completed_requests.get()
result = results.get_response(True)
print(result['id'])
print(results.as_numpy('output'))


