非关系型数据库技术课程 第十二周作业(Docker中搭建redis分片集群,搭建redis哨兵结构,实现springboot中对redis分片集群、哨兵结构的访问,Redis缓存雪崩、缓存击穿处理)
文章目录
- 一、要求:
- 二、知识总结
-
- 缓存雪崩
-
- 解决方案
- docker中redis分片集群搭建
-
- 配置好配置文件
-
- redis-6380.conf
- redis-6381.conf
- redis-6382.conf
- redis-6383.conf
- redis-6384.conf
- redis-6385.conf
- 将conf_cluster文件夹移动到对应位置
- docker中运行对应的redis容器
- docker中创建分片集群
- springboot项目访问redis分片集群
- 缓存击穿
-
- 什么是缓存击穿
- 解决方案
- 互斥锁机制
-
- 互斥锁原理
-
- (1) 利用互斥锁处理缓存击穿问题的逻辑流程
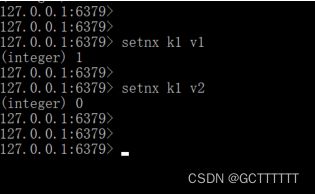
- (2) 使用redis 的setnx 命令来实现
- 互斥锁代码实现
- docker中redis哨兵结构搭建
-
- 关于哨兵结构
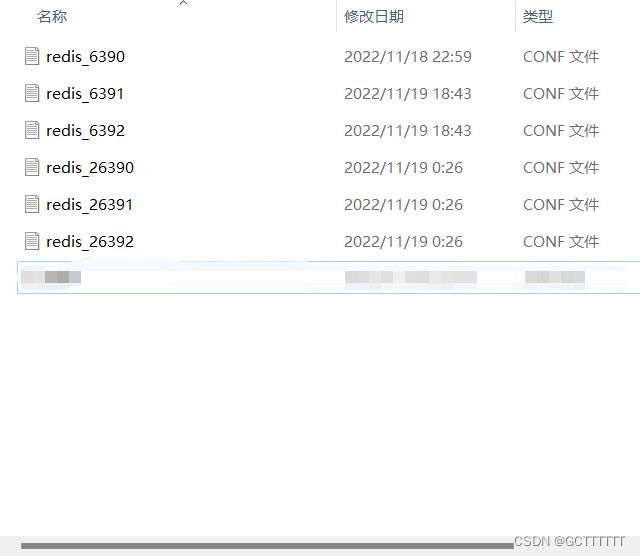
- 配置配置文件
-
- redis_6390.conf
- redis_6391.conf
- redis_6392.conf
- redis_26390.conf
- redis_26391.conf
- redis_26392.conf
- 把配置文件文件夹移动到对应位置
- docker中创建主从结构对应容器
-
- 启动主节点(redis_master_6390)
- 启动从节点1(redis_slave1_6391)
- 启动从节点2(redis_slave2_6392)
- 查询主从结构是否成功
- docker中创建哨兵结构对应容器
-
- 启动哨兵节点1(redis_sentinel1_26390)
- 启动哨兵节点2(redis_sentinel2_26391)
- 启动哨兵节点3(redis_sentinel3_26392)
- 查询哨兵结构是否搭建成功
- springboot项目访问redis哨兵集群
-
- 配置文件配置
- 配置主从读写分离(可选)
- 三、经验总结和报错处理
-
- 关于docker启动容器后秒退问题处理
- 关于云服务器端口开放问题
- 关于哨兵结构与分片集群
- 四、相关代码
-
- application.yml
-
- 访问分片集群版
- 访问哨兵结构版:
- com.example.service.impl.StudentServiceImpl
- 五、运行结果
-
- 1.搭建redis分片集群,并实现springboot对集群的访问
- 2.搭建redis哨兵集群,并实现springboot对哨兵集群的访问
一、要求:
- 搭建redis分片集群,并实现springboot对分片集群的访问;
- 搭建redis哨兵模式,并实现springboot对哨兵集群的访问;
二、知识总结
缓存雪崩
解决方案
常用的缓存雪崩的解决方案包括:
- 给不同的 Key 的 TTL 添加随机值
- 利用 Redis 集群提高服务的可用性
- 给缓存业务添加降级限流策略
- 给业务添加多级缓存
上一讲(非关系型数据库技术课程 第十一周作业(SpringBoot项目中使用Redis作为数据缓存,Redis的缓存机制,数据一致性、缓存穿透和缓存雪崩等问题的处理))中
提供了 给不同的 Key 的 TTL 添加随机值 方案解决缓存雪崩问题的实现,本讲中将实现搭建redis分片集群来解决缓存雪崩问题。
docker中redis分片集群搭建
配置好配置文件
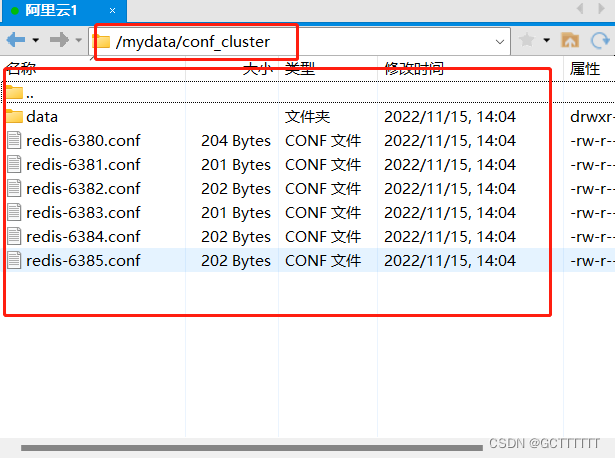
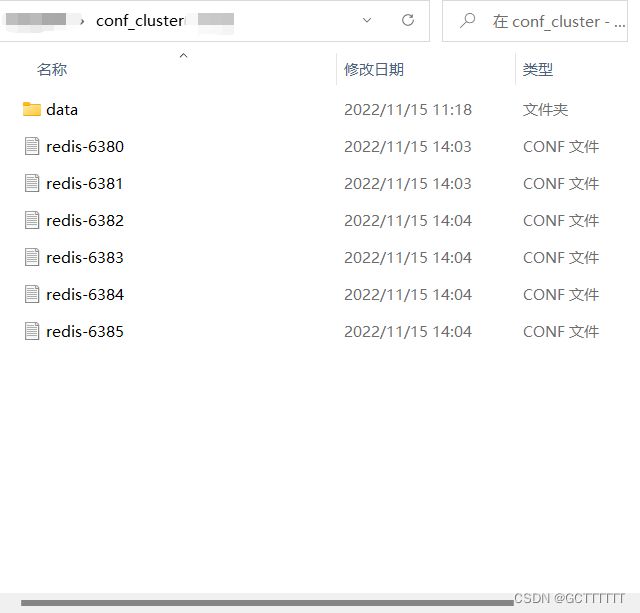
将配置文件和data文件夹都放在一个"conf_cluster"文件夹中,如图:
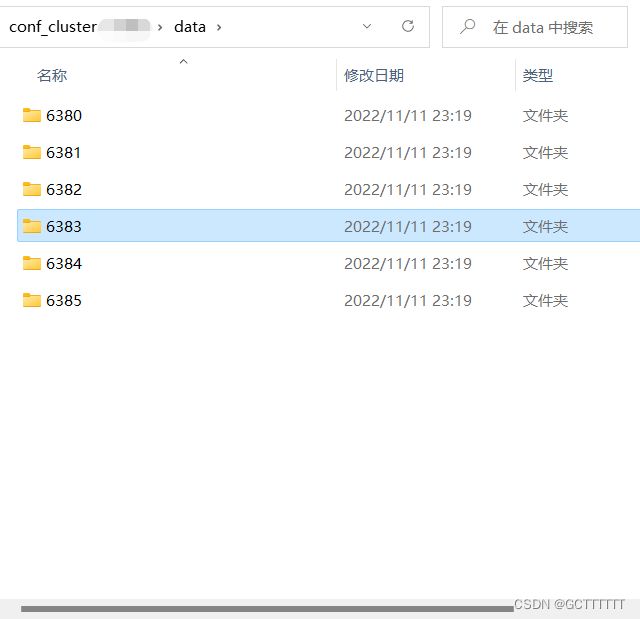
data文件夹中要先新建6380-6385对应的空文件夹:
开始配置文件的配置:
注意
配置文件内容中cluster-announce-ip要根据自己主机的实际ip地址进行配置(下面的配置文件中类似120.25.223.26都要改为自己对应主机的ip)windows系统电脑作为主机可以在cmd命令行窗口中输入
ipconfig查看ip地址
云服务器中搭建则需要设置服务器外网ip
redis-6380.conf
port 6380

cluster-enabled yes
cluster-config-file nodes-6380.conf

cluster-node-timeout 5000

cluster-announce-ip 120.25.223.26
cluster-announce-port 6380
cluster-announce-bus-port 16380
appendonly yes
redis-6381.conf
port 6381

cluster-enabled yes
cluster-config-file nodes-6381.conf

cluster-node-timeout 5000
appendonly yes
cluster-announce-ip 120.25.223.26
cluster-announce-port 6381
cluster-announce-bus-port 16381
redis-6382.conf
port 6382


cluster-enabled yes
cluster-config-file nodes-6382.conf

cluster-node-timeout 5000
appendonly yes
cluster-announce-ip 120.25.223.26
cluster-announce-port 6382
cluster-announce-bus-port 16382
redis-6383.conf
port 6383

cluster-enabled yes
cluster-config-file nodes-6383.conf

cluster-node-timeout 5000
appendonly yes
cluster-announce-ip 120.25.223.26
cluster-announce-port 6383
cluster-announce-bus-port 16383
redis-6384.conf
port 6384


cluster-enabled yes
cluster-config-file nodes-6384.conf

cluster-node-timeout 5000
appendonly yes
cluster-announce-ip 120.25.223.26
cluster-announce-port 6384
cluster-announce-bus-port 16384
redis-6385.conf
port 6385


cluster-enabled yes
cluster-config-file nodes-6385.conf

cluster-node-timeout 5000
appendonly yes
cluster-announce-ip 120.25.223.26
cluster-announce-port 6385
cluster-announce-bus-port 16385
将conf_cluster文件夹移动到对应位置
这里要把conf_cluster文件夹移动到待会docker运行容器时对应的挂载目录,比如我将该文件夹移动到主机(即“宿主机”)的/mydata/路径中,则后面运行docker容器时的挂载目录就如下配置:
-v /mydata/conf_cluster/data/6380:/data
-v /mydata/conf_cluster/redis-6380.conf:/etc/redis/redis-6380.conf
docker中运行对应的redis容器
创建各redis容器的命令
redis_6380:
docker run -id --name redis_6380  -p 6380:6380 -p  16380:16380
--privileged=true
-v /mydata/conf_cluster/data/6380:/data
-v /mydata/conf_cluster/redis-6380.conf:/etc/redis/redis-6380.conf
redis redis-server /etc/redis/redis-6380.conf
redis_6381:
docker run -id --name redis_6381 -p 6381:6381 -p 16381:16381 --privileged=true -v /mydata/conf_cluster/data/6381:/data -v /mydata/conf_cluster/redis-6381.conf:/etc/redis/redis-6381.conf redis redis-server /etc/redis/redis-6381.conf
redis_6382:
docker run -id --name redis_6382 -p 6382:6382 -p 16382:16382 --privileged=true -v /mydata/conf_cluster/data/6382:/data -v /mydata/conf_cluster/redis-6382.conf:/etc/redis/redis-6382.conf redis redis-server /etc/redis/redis-6382.conf
redis_6383:
docker run -id --name redis_6383 -p 6383:6383 -p 16383:16383 --privileged=true -v /mydata/conf_cluster/data/6383:/data -v /mydata/conf_cluster/redis-6383.conf:/etc/redis/redis-6383.conf redis redis-server /etc/redis/redis-6383.conf
redis_6384:
docker run -id --name redis_6384 -p 6384:6384 -p 16384:16384 --privileged=true -v /mydata/conf_cluster/data/6384:/data -v /mydata/conf_cluster/redis-6384.conf:/etc/redis/redis-6384.conf redis redis-server /etc/redis/redis-6384.conf
redis_6385:
docker run -id --name redis_6385 -p 6385:6385 -p 16385:16385 --privileged=true -v /mydata/conf_cluster/data/6385:/data -v /mydata/conf_cluster/redis-6385.conf:/etc/redis/redis-6385.conf redis redis-server /etc/redis/redis-6385.conf
docker中创建分片集群
先加入到某个容器中:
docker exec -it redis_6380 /bin/bash
运行以下命令创建集群:
注意:
这里的“120.25.223.26”也要根据自己主机的ip进行修改
redis-cli --cluster create
120.25.223.26:6380 120.25.223.26:6381 120.25.223.26:6382 120.25.223.26:6383 120.25.223.26:6384  120.25.223.26:6385
--cluster-replicas 1
创建好集群后开启一个redis客户端查看集群状态:
注意要以加“-c”进入到集群中
redis-cli -c -p 6380
查看集群状态:
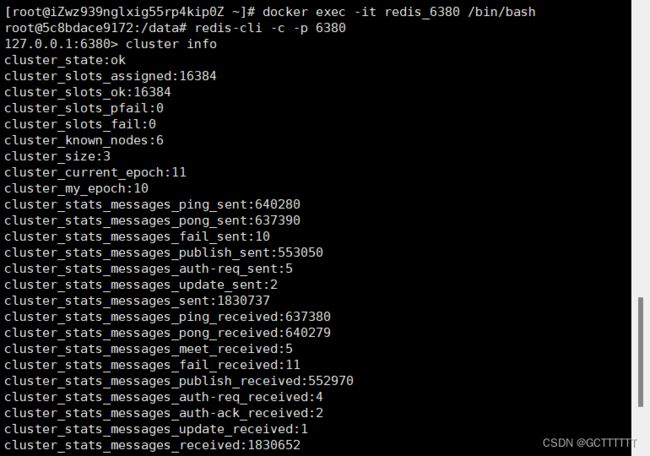
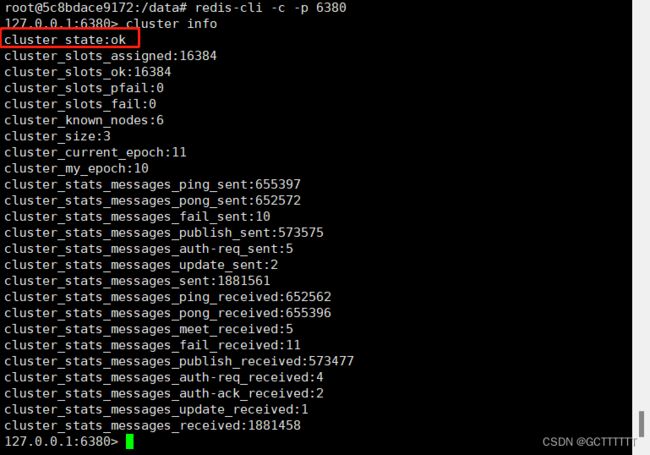
cluster info
cluster_state显示ok则证明集群正常运行
查看节点信息:
cluster nodes
springboot项目访问redis分片集群
项目在上一讲的代码基础上进行修改
配置文件application.yml中关于访问redis分片集群的配置:
注意nodes中对应的主机名要根据自己实际主机ip修改
spring:
  redis:
    #  分片集群配置
        cluster:
          nodes:
            - 120.25.223.26:6380
            - 120.25.223.26:6381
            - 120.25.223.26:6382
            - 120.25.223.26:6383
            - 120.25.223.26:6384
            - 120.25.223.26:6385
          max-redirects: 5
        lettuce:
          pool:
            max-active: 10
            max-idle: 10
            min-idle: 0
            max-wait: 1000
缓存击穿
什么是缓存击穿
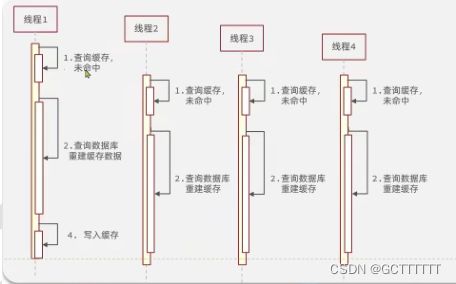
缓存击穿问题也叫 热点 Key 问题,就是一个被高并发访问并且缓存重建业务较复杂的 key 突然失效了,无数的请求访问会在 瞬间给数据库带来巨大的冲击。
缓存击穿问题的特点包括:
解决方案
常用缓存击穿问题的解决方案包括:
- 预先设置热门数据:在 redis 高峰访问之前,把一些热门数据提前存入到 redis里面,加大这些热门数据 key 的时长
- 实时调整:现场监控哪些数据热门,实时调整 key 的过期时长
- 使用 互斥锁:类似于悲观锁
- 逻辑过期:类似于乐观锁
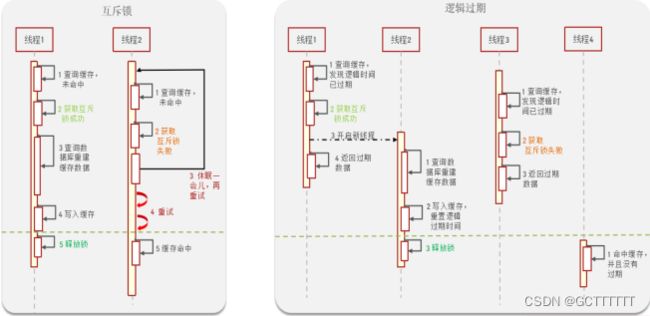
互斥锁机制
互斥锁原理
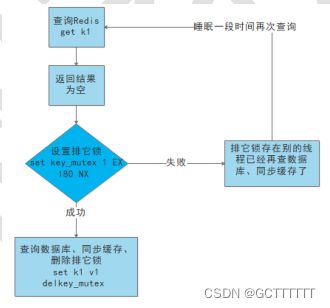
(1) 利用互斥锁处理缓存击穿问题的逻辑流程
(2) 使用redis 的setnx 命令来实现
- 命令格式:
setnx key value - 作用:Setnx( SET if Not eXists) 命令在指定的 key 不存在时,为 key设置指定的值;
- 返回值:设置成功,返回 1 。 设置失败,返回 0 。
- 加锁:该命令执行返回 1 表示申请锁成功,返回 0 表示申请锁失败;
- 释放锁:
del key,删除 key 就表示释放了锁。
互斥锁代码实现
package com.example.service.impl;

import cn.hutool.core.util.BooleanUtil;
import com.example.mapper.UserMapper;
import com.example.pojo.User;
import com.example.service.UserService;
import org.springframework.beans.factory.annotation.Autowired;
import org.springframework.data.redis.core.RedisTemplate;
import org.springframework.stereotype.Service;
import org.springframework.transaction.annotation.Transactional;

import javax.annotation.Resource;
import java.io.IOException;
import java.util.List;
import java.util.concurrent.TimeUnit;

/**
 * description:出来缓存击穿问题,需用的方法
 *方法 1:queryWithLock()--处理缓存击穿问题
 *方法 2: addlock()--申请锁
 *方法 3:unlock()--释放锁
 * author :hj
 * date: 2022/11/10
 */
@Service
public class UserServiceImpl implements UserService {
    @Resource
   // @Autowired
   private UserMapper userMapper;
    @Autowired
    private RedisTemplate redisTemplate;

    //根据id查询user,调用queryWithLock()
    public User findUserById(Long id) throws IOException {
      //热点数据,使用queryWithLock方法
      User user =queryWithLock(id);
      return user;
    }

    //1.处理缓存击穿问题
    public User queryWithLock(Long id) throws IOException {

        String key="user:"+id;

        //1.首先查看Redis缓存中是否有数据
        User user =getUserByRedis(id);
        //2.如果 Redis 中有该用户,则直接返回
        if (user !=null){
            System.out.println("Redis缓存中查询到此用户");
            return user;
        }
        System.out.println("Redis缓存中没有此用户");
        String lockKey = "lock:user:"+id;
        // 3.Redis中没有,表示查询未命中,则需进行加锁和缓存重建(查询mysql)
        try {

            //3.1获取锁
            boolean isLock = addlock(lockKey);
            //3.2 判断锁是否获取成功. 这里判断加锁失败,则休眠,再次执行该方法
            if(!isLock){
                Thread.sleep(50);
                //休眠20毫秒后,再次执行该方法,递归调用,重新查询redis
                return queryWithLock(id);
            }
            System.out.println("Redis申请锁成功!");

            //3.3 如果成功加上了锁,要再次查询 redis 缓存是否有该数据,
            // 因为可能其他应用已重建了该数据的缓存
            if (getUserByRedis(id)!= null){
                System.out.println("再次查询时,Redis缓存中查询到此用户");
                return user;
            }

            // 4. 这里表示,两次查询 Redis,都没有查询到数据未命中,则要到mysql中查询,
            // 如果mysql中也没有,则将空对象写入redis
            user=userMapper.findUserById(id);
            //模拟缓存重建延迟了
            Thread.sleep(200);
            //数据库里也没有,redis中也没有
            if(user==null){
                System.out.println("Mysql中也没有此用户");
                User u=new User();
                u.setId(id);
                saveToRedis(u);
            }
            else{
                System.out.println("Mysql中查询到此用户");
                saveToRedis(user);

            }

        } catch (InterruptedException e) {
            e.printStackTrace();
        }finally {
            unlock(lockKey);
        }

        return user;
    }

    //2.加锁
    private boolean addlock(String key){
        Boolean flag= redisTemplate.opsForValue().setIfAbsent(key,"1",10,
                TimeUnit.SECONDS);
        return BooleanUtil.isTrue(flag) ;
    }

    //3.释放锁
    private void unlock(String key){
        redisTemplate.delete(key);
    }


    //处理:缓存穿透问题
    public User queryWithPassThrough(Long id) throws IOException {
        //1.查看Redis缓存中是否有数据
        User user =getUserByRedis(id);

        //2.如果Redis中有该用户,则返回
        if (user !=null){
            System.out.println("Redis缓存中查询到此用户");
            return user;
        }

        // 3.Redis中没有,则到mysql中查询,
        // 如果mysql中也没有,则将空对象写入redis
        System.out.println("Redis缓存中没有此用户");
        user=userMapper.findUserById(id);
        if(user==null){
            System.out.println("Mysql中也没有此用户");
            User u=new User();
            u.setId(id);
            saveToRedis(u);
        }
        else{
            System.out.println("Mysql中查询到此用户");
            saveToRedis(user);
        }
        return user;
    }

    //从redis中查询User
    public User getUserByRedis(Long id){
        String key="user:"+id;
        if (redisTemplate.hasKey(key)){
            String name=(String) redisTemplate.opsForHash().get(key,"name");
            String pwd= (String) redisTemplate.opsForHash().get(key,"pwd");
            User user=new User();
            user.setId(id);
            user.setUsername(name);
            user.setPassword(pwd);
          //  System.out.print(user);
            return user;
        }
        return null;
    }

    //保存User信息到Redis,使用hash类型
    public void saveToRedis(User user) {
        //设置key: user:ID
        String key="user:"+user.getId();
        //各字段的值都存入Redis
        redisTemplate.opsForHash().put(key,"name",user.getUsername());
        redisTemplate.opsForHash().put(key,"pwd",user.getPassword());

        //修改 1:设置key的过期时间为6分钟
        redisTemplate.expire(key,360, TimeUnit.SECONDS);

    }


    //根据id修改用户信息
    @Transactional   //修改3:开启事务
    public String updateUserById(User user) {
        Long id = user.getId();
        if (id == null) {
            return "用户id不能为空";
        }
        //修改2. 先更新mysql数据库
        userMapper.updateUserById(user);
        //修改2. 后删除缓存
        String key="user:"+id;
        redisTemplate.delete(key);
        return "更新成功";
    }

    //查询用户
    public List<User> getAllUser() {
        return userMapper.getAllUserMap();
    }

    public int addUser(User user) {
        return userMapper.addUser(user);
    }

}
docker中redis哨兵结构搭建
关于哨兵结构
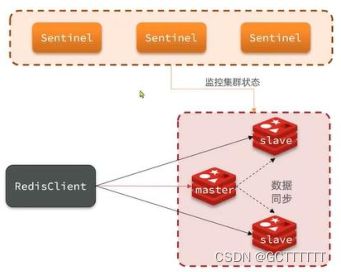
要注意分片集群是自带故障处理机制的,因此分片集群是不需要配置哨兵集群的,因此以下在搭建哨兵集群之前先搭建了一个一主二从的主从结构
而搭建的三个哨兵节点构成哨兵集群监视主从结构的主节点
哨兵结构如图:
配置配置文件
以下配置的哨兵结构为:
6390 主节点
6391 从节点
6392 从节点

26390 哨兵节点1
26391 哨兵节点2
26392 哨兵节点3
redis_6390.conf
port 6390
redis_6391.conf
注意以下配置文件的“120.25.223.26”要根据自己主机ip进行修改
port 6391
slaveof 120.25.223.26 6390
redis_6392.conf
port 6392
slaveof 120.25.223.26 6390
redis_26390.conf
port 26390

# 让sentinel服务后台运行(docker的话需要设置为no,非docker运行设置为yes, 因为docker有个-d属性就是让在后台运行的)
daemonize no

#Sentinel去监视一个名为mymaster的主redis实例
# 投票数设置为2代表哨兵集群中两个或以上哨兵节点判定主节点主观下线则判定该节点下线
sentinel monitor mymaster 120.25.223.26 6390 2
redis_26391.conf
port 26391

# 让sentinel服务后台运行(docker的话需要设置为no,非docker运行设置为yes, 因为docker有个-d属性就是让在后台运行的)
daemonize no

#Sentinel去监视一个名为mymaster的主redis实例
sentinel monitor mymaster 120.25.223.26 6390 2
redis_26392.conf
port 26392

# 让sentinel服务后台运行(docker的话需要设置为no,非docker运行设置为yes, 因为docker有个-d属性就是让在后台运行的)
daemonize no

#Sentinel去监视一个名为mymaster的主redis实例
sentinel monitor mymaster 120.25.223.26 6390 2
把配置文件文件夹移动到对应位置
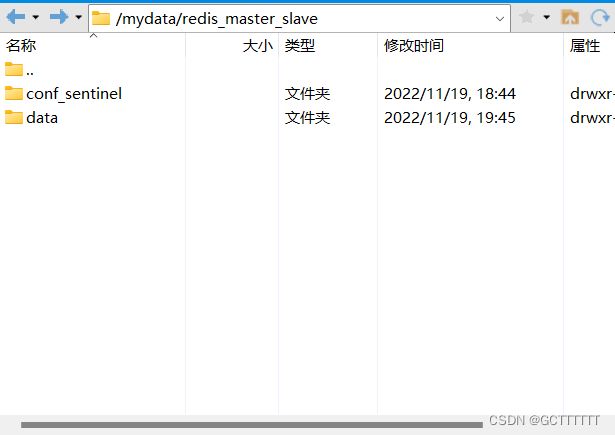
注意文件夹中要先创建一个data空目录用于docker运行主节点容器时data目录的挂载,如图所示:
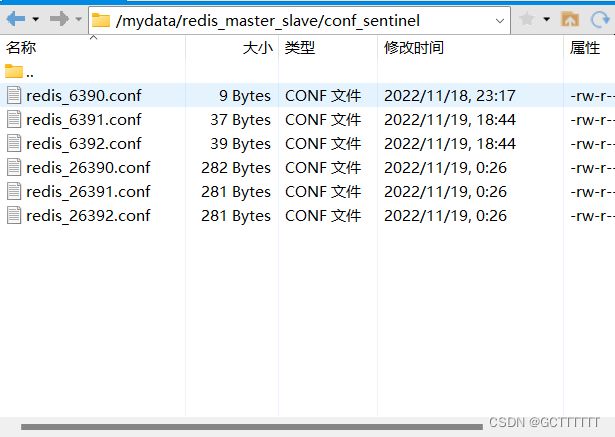
conf_sentinel文件夹用于存放相关的配置文件:
docker中创建主从结构对应容器
启动主节点(redis_master_6390)
注意这里挂载目录要根据实际路径修改
  docker run -id --name redis_master_6390
  -p 6390:6390 --privileged=true
  -v /mydata/redis_master_slave/data:/data
  -v /mydata/redis_master_slave/conf_sentinel/redis_6390.conf:/etc/redis/redis_6390.conf
  redis redis-server /etc/redis/redis_6390.conf
启动从节点1(redis_slave1_6391)
docker run -id --name redis_slave1_6391 -p 6391:6391 --privileged=true -v /mydata/redis_master_slave/conf_sentinel/redis_6391.conf:/etc/redis/redis_6391.conf redis redis-server /etc/redis/redis_6391.conf
启动从节点2(redis_slave2_6392)
docker run -id --name redis_slave2_6392 -p 6392:6392 --privileged=true -v /mydata/redis_master_slave/conf_sentinel/redis_6392.conf:/etc/redis/redis_6392.conf redis redis-server /etc/redis/redis_6392.conf
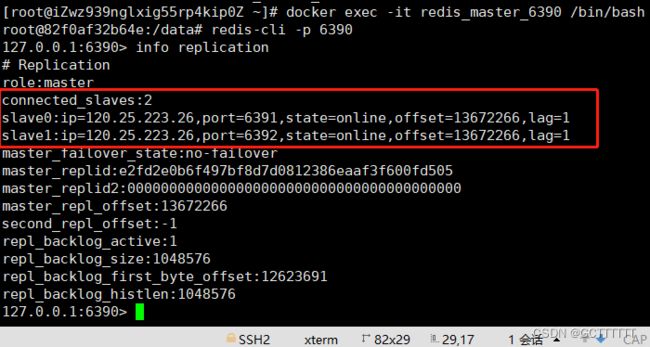
查询主从结构是否成功
进入到主节点容器中:
docker exec -it redis_master_6390 /bin/bash
redis-cli连接:
redis-cli -p 6390
查看主从结构信息:
info replication
docker中创建哨兵结构对应容器
docker创建哨兵结构时若遇到容器闪退问题可以参考下面“三、经验总结和报错处理”中的解决方法
启动哨兵节点1(redis_sentinel1_26390)
docker run --privileged=true -d --name redis_sentinel1_26390
-p 26390:26390
-v /mydata/redis_master_slave/conf_sentinel/redis_26390.conf:/etc/redis/redis_26390.conf
redis redis-sentinel /etc/redis/redis_26390.conf
启动哨兵节点2(redis_sentinel2_26391)
docker run --privileged=true -d --name redis_sentinel2_26391 -p 26391:26391 -v /mydata/redis_master_slave/conf_sentinel/redis_26391.conf:/etc/redis/redis_26391.conf redis redis-sentinel /etc/redis/redis_26391.conf
启动哨兵节点3(redis_sentinel3_26392)
docker run --privileged=true -d --name redis_sentinel3_26392 -p 26392:26392 -v /mydata/redis_master_slave/conf_sentinel/redis_26392.conf:/etc/redis/redis_26392.conf redis redis-sentinel /etc/redis/redis_26392.conf
查询哨兵结构是否搭建成功
进入哨兵结点容器
docker exec -it redis_sentinel1_26390 /bin/bash
redis-cli客户端连接
redis-cli -p 26390
查看哨兵结点信息:
info sentinel
springboot项目访问redis哨兵集群
配置文件配置
在配置文件application.yml中做以下配置:
注意配置中的“master”对应为在哨兵结点配置文件中配置的主节点名称
    #    哨兵结构配置(一主二从 3 哨兵结点)
    #    结构
    #    6390 主结点
    #    6391 从结点
    #    6392 从结点
    #    26390 哨兵1
    #    26391 哨兵2
    #    26392 哨兵3
spring:
  redis:
    sentinel:
      master: mymaster
      nodes:
        - 120.25.223.26:26390
        - 120.25.223.26:26391
        - 120.25.223.26:26392
要注意springboot项目application.yml中不能同时配置分片集群与哨兵结构,不然项目运行时会报错
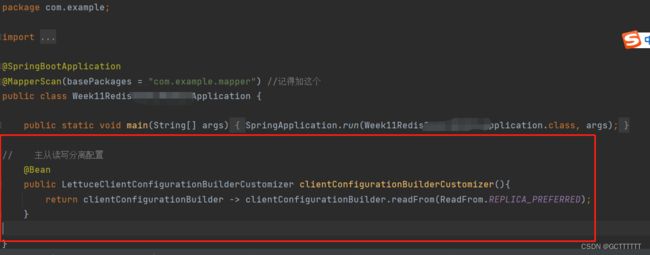
配置主从读写分离(可选)
这个貌似不配也能正常使用
在springboot启动类中配置以下内容:
//    主从读写分离配置
    @Bean
    public LettuceClientConfigurationBuilderCustomizer clientConfigurationBuilderCustomizer(){
        return clientConfigurationBuilder -> clientConfigurationBuilder.readFrom(ReadFrom.REPLICA_PREFERRED);
    }
三、经验总结和报错处理
关于docker启动容器后秒退问题处理
在docker运行哨兵节点过程中,一输入完docker run命令后查看docker ps -a发现容器已经下线,为什么会秒退呢?
使用docker logs 容器名查看秒退容器的日志,发现日志中为如下内容:
“1:X 18 Nov 2022 15:22:49.036 # Sentinel config file /etc/redis/redis_26390.conf is not writable: Permission denied. Exiting...”
从日志内容可以看到显示的是conf文件is not writable,Permission denied,于是就上网搜了一下,但网上各种方法都没用,还是闪退,我不李姐
但最后搞了挺久还是搞好了
可以从以下几个方面排查错误:
1、网上有的说是权限问题,需要在run命令中使用--privileged=true
已经加了还是闪退…
2、有的说要在哨兵结点配置文件(如redis_26390.conf)中加入以下内容
# 让sentinel服务后台运行(docker的话需要设置为no,非docker运行设置为yes, 因为docker有个-d属性就是让在后台运行的)
daemonize no
加了还是没用…
3、有的说是selinux的问题
使用getenforce查看selinux状态

状态是disabled证明没开启,也不是这个原因
以上三种方法都没法解决
以下两种方法对我的闪退管用
4、docker run命令中使用redis redis-sentinel 配置文件代替redis redis-server 配置文件 --sentinel
如在运行哨兵结点26390时命令为:
docker run --privileged=true -d --name redis_sentinel1_26390
-p 26390:26390
-v /mydata/redis_master_slave/conf_sentinel/redis_26390.conf:/etc/redis/redis_26390.conf
redis redis-sentinel /etc/redis/redis_26390.conf
而不是
docker run --privileged=true -d --name redis_sentinel1_26390
-p 26390:26390
-v /mydata/redis_master_slave/conf_sentinel/redis_26390.conf:/etc/redis/redis_26390.conf
redis redis-server /etc/redis/redis_26390.conf --sentinel
5、要注意docker run命令中端口映射要与配置文件中配置相对应!!
老师命令参考里的docker run命令和对应的配置文件中端口配置是不一样的!!
例如
哨兵结点26390的配置文件(.conf)中配置的端口为port 26390,代表该节点会在docker容器中26390端口启动,而docker run命令中-p端口映射左边的端口代表宿主机的端口,右边的端口代表docker容器里面的端口,因此右边的端口要与配置文件(.conf)中配置的端口(如:port 26390)一致!!
如:
哨兵结点26390配置文件中配置的端口为port 26390,则对应的docker run命令中的端口映射就要为docker run -p 26390:26390左边的端口不一定的26390,但右边的一定要与配置文件中配置的端口(即26390)对应!!
关于云服务器端口开放问题
当使用客户端远程连接云服务器主机端口时,要注意对应的端口应开放,不然会连接不上
关于端口开放参考:阿里云轻量应用服务器配置安装运行时的端口开放问题
关于哨兵结构与分片集群
注意分片集群自带故障处理机制,因此不需要在分片集群中再配置哨兵集群
而且springboot中配置文件关于哨兵结构的配置貌似只能配一个master
因此配置哨兵集群前配置了一主二从的主从结构
四、相关代码
项目功能代码与上一讲中代码(传送门)相同
只有配置文件application.yml中有所修改
application.yml
访问分片集群版
spring:
  datasource:
    driver-class-name: com.mysql.cj.jdbc.Driver
    url: jdbc:mysql://localhost:3306/myschool?serverTimezone=Hongkong?characterEncoding=utf8&serverTimezone=GMT%2B8
    username: root
    password: pwd

  redis:
    #  分片集群配置
        cluster:
          nodes:
            - 120.25.223.26:6380
            - 120.25.223.26:6381
            - 120.25.223.26:6382
            - 120.25.223.26:6383
            - 120.25.223.26:6384
            - 120.25.223.26:6385
          max-redirects: 5
        lettuce:
          pool:
            max-active: 10
            max-idle: 10
            min-idle: 0
            max-wait: 1000


    #    哨兵结构配置(一主二从 3 哨兵结点)
    #    结构
    #    6390 主结点
    #    6391 从结点
    #    6392 从结点
    #    26390 哨兵1
    #    26391 哨兵2
    #    26392 哨兵3

#    sentinel:
#      master: mymaster
#      nodes:
#        - 120.25.223.26:26390
#        - 120.25.223.26:26391
#        - 120.25.223.26:26392

mybatis:
  mapper-locations: classpath:com/exmaple/mapper/*.xml    #指定sql配置文件的位置
  type-aliases-package: com.example.pojo      #指定实体类所在的包名
  configuration:
    log-impl: org.apache.ibatis.logging.stdout.StdOutImpl   #输出SQL命令
访问哨兵结构版:
spring:
  datasource:
    driver-class-name: com.mysql.cj.jdbc.Driver
    url: jdbc:mysql://localhost:3306/myschool?serverTimezone=Hongkong?characterEncoding=utf8&serverTimezone=GMT%2B8
    username: root
    password: pwd


  redis:
    #  分片集群配置
#        cluster:
#          nodes:
#            - 120.25.223.26:6380
#            - 120.25.223.26:6381
#            - 120.25.223.26:6382
#            - 120.25.223.26:6383
#            - 120.25.223.26:6384
#            - 120.25.223.26:6385
#          max-redirects: 5
#        lettuce:
#          pool:
#            max-active: 10
#            max-idle: 10
#            min-idle: 0
#            max-wait: 1000


    #    哨兵结构配置(一主二从 3 哨兵结点)
    #    结构
    #    6390 主结点
    #    6391 从结点
    #    6392 从结点
    #    26390 哨兵1
    #    26391 哨兵2
    #    26392 哨兵3

    sentinel:
      master: mymaster
      nodes:
        - 120.25.223.26:26390
        - 120.25.223.26:26391
        - 120.25.223.26:26392


mybatis:
  mapper-locations: classpath:com/exmaple/mapper/*.xml    #指定sql配置文件的位置
  type-aliases-package: com.example.pojo      #指定实体类所在的包名
  configuration:
    log-impl: org.apache.ibatis.logging.stdout.StdOutImpl   #输出SQL命令
com.example.service.impl.StudentServiceImpl
添加对缓存击穿问题的处理
package com.example.service.impl;

import cn.hutool.core.util.BooleanUtil;
import com.example.mapper.StudentMapper;
import com.example.pojo.Student;
import com.example.pojo.User;
import com.example.service.StudentService;
import org.springframework.beans.factory.annotation.Autowired;
import org.springframework.data.redis.core.RedisTemplate;
import org.springframework.stereotype.Service;
import org.springframework.transaction.annotation.Transactional;

import javax.annotation.Resource;
import java.io.IOException;
import java.util.ArrayList;
import java.util.List;
import java.util.Random;
import java.util.concurrent.TimeUnit;

/**
 * @projectName: week11_redis_
 * @package: com.example.service.impl
 * @className: StudentServiceImpl
 * @author: GCT
 * @description:
 *  数据一致性处理:
 *  1.数据写入redis时,设置key的超时时间,
 *  2.修改数据时,先修改mysql,再删除redis缓存
 *  3.开启事务:保证正确事务的提交
 *
 *  缓存穿透和缓存雪崩处理方案:
 *  缓存穿透处理:如果mysql中也没有,则将空对象写入redis进行缓存
 *  缓存雪崩处理 :为存入Redis数据库进行缓存的键值对创建一个随机的Key的有效期
 *
 *  * description:处理缓存击穿问题,需用的方法
 *  *方法 1:queryWithLock()--处理缓存击穿问题
 *  *方法 2: addlock()--申请锁
 *  *方法 3:unlock()--释放锁
 * @date: 2022/11/11 20:39
 * @version: 1.0
 */
@Service
public class StudentServiceImpl implements StudentService {
//    @Resource
     @Autowired
    private StudentMapper studentMapper;
    @Autowired
    private RedisTemplate redisTemplate;


    //根据id查询user,调用queryWithLock()
    public Student findStudentById(Long id) {
//        处理缓存击穿问题
        //热点数据,使用queryWithLock方法
        Student student =queryWithLock(id);
        return student;
    }

    //1.处理缓存击穿问题
    public Student queryWithLock(Long id){

        String key="student:"+id;

        //1.首先查看Redis缓存中是否有数据
        Student student =getStudentByRedis(id);
        //2.如果 Redis 中有该用户,则直接返回
        if (student !=null){
            System.out.println("Redis缓存中查询到此学生");
            return student;
        }
        System.out.println("Redis缓存中没有此学生");
        String lockKey = "lock:student:"+id;
        // 3.Redis中没有,表示查询未命中,则需进行加锁和缓存重建(查询mysql)
        try {

            //3.1获取锁
            boolean isLock = addlock(lockKey);
            //3.2 判断锁是否获取成功. 这里判断加锁失败,则休眠,再次执行该方法
            if(!isLock){
                Thread.sleep(50);
                //休眠20毫秒后,再次执行该方法,递归调用,重新查询redis
                return queryWithLock(id);
            }
            System.out.println("Redis申请锁成功!");

            //3.3 如果成功加上了锁,要再次查询 redis 缓存是否有该数据,
            // 因为可能其他应用已重建了该数据的缓存
            if (getStudentByRedis(id)!= null){
                System.out.println("再次查询时,Redis缓存中查询到此学生");
                return student;
            }

            // 4. 这里表示,两次查询 Redis,都没有查询到数据未命中,则要到mysql中查询,
            // 如果mysql中也没有,则将空对象写入redis
            student=studentMapper.findStudentById(id);
            //模拟缓存重建延迟了
            Thread.sleep(200);
            //数据库里也没有,redis中也没有
            if(student==null){
                System.out.println("Mysql中也没有此学生");
                Student s=new Student();
                s.setId(id);
                saveToRedis(s);
            }
            else{
                System.out.println("Mysql中查询到此学生");
                saveToRedis(student);

            }

        } catch (InterruptedException e) {
            e.printStackTrace();
        }finally {
            unlock(lockKey);
        }

        return student;
    }

    //2.加锁
    private boolean addlock(String key){
        Boolean flag= redisTemplate.opsForValue().setIfAbsent(key,"1",10,
                TimeUnit.SECONDS);
        return BooleanUtil.isTrue(flag) ;
    }

    //3.释放锁
    private void unlock(String key){
        redisTemplate.delete(key);
    }


    //根据id查询学生信息
    //处理:缓存穿透问题
    public Student queryWithPassThrough(Long id){
        //1.查看Redis缓存中是否有数据
        Student student =getStudentByRedis(id);

        //2.如果Redis中有该学生,则返回
        if (student !=null){
            System.out.println("Redis缓存中查询到此学生");
            return student;
        }

        // 3.Redis中没有,则到mysql中查询,
        // 缓存穿透处理:如果mysql中也没有,则将空对象写入redis
        System.out.println("Redis缓存中没有此学生");
        student = studentMapper.findStudentById(id);
        if(student==null){
            System.out.println("Mysql中也没有此学生");
            Student s = new Student();
            s.setId(id);
            saveToRedis(s);
        }
        else{
            System.out.println("Mysql中查询到此学生");
            saveToRedis(student);
        }
        return student;
    }

    //    根据传入的id数据查找出一个或多个学生信息
    /**
     * @param ids:
     * @return List
     * @author GCT
     * @description 根据传入的id数据查找出一个或多个学生信息
     * @date 2022/11/12 11:30
     */
    public List<Student> findStudentByIds(Long[] ids){
        List<Student> studentList = new ArrayList<Student>();
        for (Long id:ids){
//            遍历ids数组,使用findStudentById(id)将
//            返回的Student类型数据添加到studentList集合中
            studentList.add(findStudentById(id));
        }
        return studentList;
    }


    //根据id修改用户信息
    @Transactional   //修改3:开启事务
    public String updateStudentById(Student student) {
        Long id = student.getId();
        if (id == null) {
            return "学生id不能为空";
        }
        //修改2. 先更新mysql数据库
        studentMapper.updateStudentById(student);
        //修改2. 后删除缓存
        String key="student:"+id;
        redisTemplate.delete(key);
        return "更新成功";
    }

    //保存Student信息到Redis,使用hash类型
    public void saveToRedis(Student student) {
        //设置key: student:ID
        String key="student:"+student.getId();
        //各字段的值都存入Redis
        redisTemplate.opsForHash().put(key,"sname",student.getSname()+"");
        redisTemplate.opsForHash().put(key,"dept",student.getDept()+"");
        redisTemplate.opsForHash().put(key,"age",student.getAge()); //!!! Age为Int类型不用+“”

        //修改 1:设置key的过期时间为6分钟
//        redisTemplate.expire(key,360, TimeUnit.SECONDS);

        //缓存雪崩修改 :创建一个随机的KEY 的有效期
        int expiredTime=360+new Random().nextInt(100);
        System.out.println("过期时间: "+expiredTime);
        redisTemplate.expire(key,expiredTime, TimeUnit.SECONDS);
    }

    //从redis中查询Student
    public Student getStudentByRedis(Long id){
        String key="student:"+id;
        if (redisTemplate.hasKey(key)){
            String sname=(String) redisTemplate.opsForHash().get(key,"sname");
            String dept= (String) redisTemplate.opsForHash().get(key,"dept");
            int age = (Integer)redisTemplate.opsForHash().get(key,"age");
            Student student = new Student();
            student.setId(id);
            student.setSname(sname);
            student.setDept(dept);
            student.setAge(age);
            return student;
        }
        return null;
    }


    //查询用户
    public List<Student> getAllStudent() {
        return studentMapper.getAllStudentMap();
    }

    /**
     * @param student:
     * @return int
     * @author GCT
     * @description
     * 缓存穿透处理时对不存在的学生创建了
     * 对应id的空对象存入缓存,因此在新增学生信息时加个判断,
     * 判断新增的学生id是否存在于Redis缓存中,若存在,则删去对应缓存
     * @date 2022/11/12 11:45
     */
    @Transactional   //开启事务
    public int addStudent(Student student) {

        //先在mysql数据库新增数据
        int i = studentMapper.addStudent(student);
        Long studentId = student.getId();
        Student studentByRedis = getStudentByRedis(studentId);
        //后判断,若在缓存中存在对应信息则删除缓存
        if (studentByRedis!=null){
            String key="student:"+studentId;
            redisTemplate.delete(key);//若存在对应的对象,则删除缓存
        }
        System.out.println("id:  "+studentId);

        return i;
    }

    //    根据id删除学生
    /**
     * @param id:
     * @return int
     * @author GCT
     * @description 根据id删除学生
     * 使用事务
     * 先删除Mysql数据库内信息
     * 再删除redis数据库内信息
     * @date 2022/11/11 21:30
     */
    @Transactional   //开启事务
    public String deleteStudentById(Long id){
        if (id == null) {
            return "学生id不能为空!";
        }
        //先更新mysql数据库
        studentMapper.deleteStudentById(id);
        //后删除缓存
        String key="student:"+id;
        redisTemplate.delete(key);
        return "成功删除id为"+id+"的学生!";

    }


}
五、运行结果
1.搭建redis分片集群,并实现springboot对集群的访问
(1)验证redis分片集群搭建成功的截图:
cluster nodes查看各节点信息:
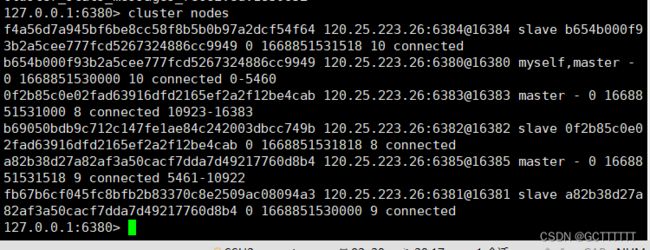
可见redis分片集群搭建成功,集群中有三个主节点,三个从节点,其中6380、6383、6385端口对应节点为分片集群的主节点,6381、6382、6384端口对应节点为分片集群的从节点
(2)SpringBoot访问redis分片集群的application.yml的修改代码截图:
SpringBoot项目配置文件application.yml中对于访问redis分片集群的配置:
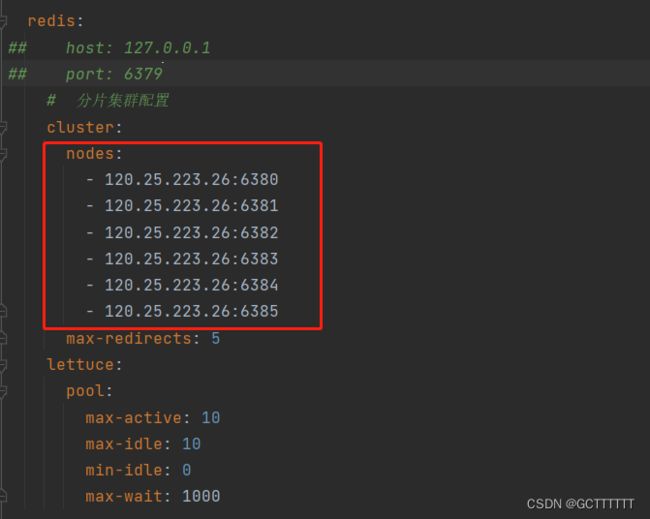
(3)SpringBoot成功访问redis分片集群的结果截图:
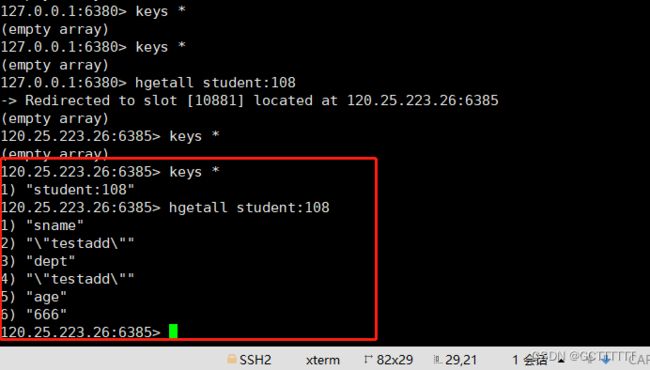
使用接口调试工具调用根据id查询学生信息接口前查看集群中键值对信息可见此时在
redis中没有相关的键值对
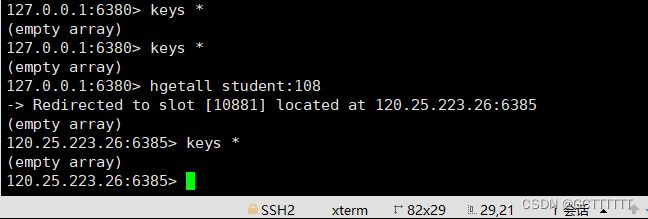
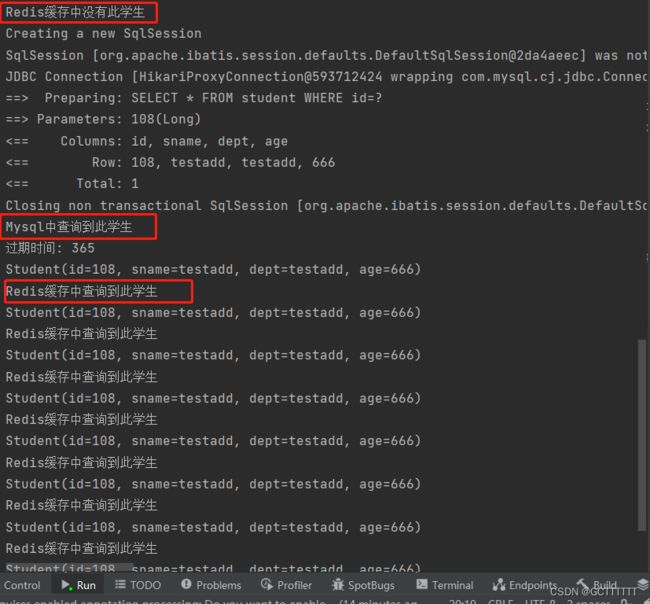
启动springboot项目,使用接口调试工具调用根据id查询学生信息接口:
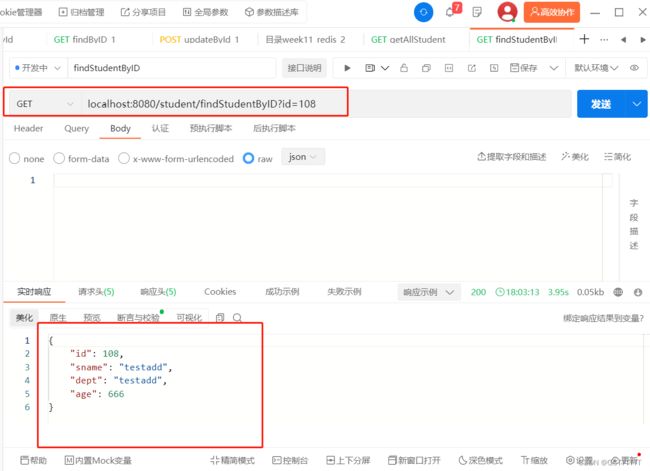
可见成功查询到了id为108的学生信息,此时查看redis集群中键值对信息可以看到对应的学生信息
成功保存到redis分片集群中
后台打印输出:
2.搭建redis哨兵集群,并实现springboot对哨兵集群的访问
(1)验证redis哨兵集群搭建成功的截图:
哨兵集群结构:
先搭建了一主二从的主从结构,并搭建了有三个哨兵结点的哨兵集群监视主从结构中的主节点
其中,主从结构中6390端口对应的结点为主节点,6391,6392端口对应的节点为主节点6390
的从节点,哨兵集群中有26390,26391,26392端口对应的三个节点作为哨兵结点,监视主从
结构中6390端口对应的主节点
在主节点6390中执行info replication查询主从结构是否构建成功:
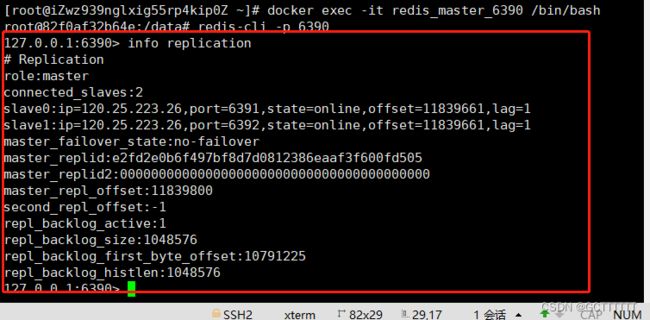
可见主从结构搭建成功。
在哨兵节点26390中执行 info sentinel查询哨兵结构是否搭建成功:
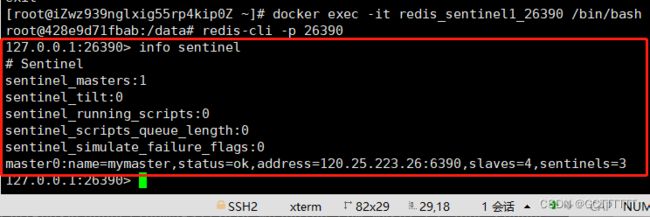
可见哨兵结构搭建成功
(2)SpringBoot访问redis哨兵集群的application.yml的修改代码截图:
SpringBoot项目配置文件application.yml中对于访问redis哨兵结构的配置:
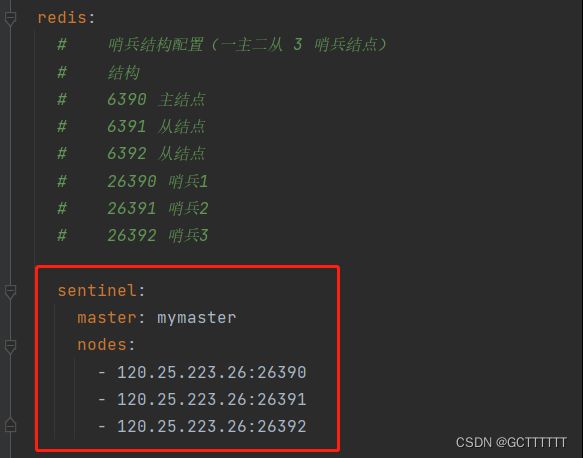
(3)SpringBoot成功访问redis哨兵集群的结果截图:
使用接口调试工具调用根据id查询学生信息接口前查看集群中键值对信息可见此时在
redis中没有相关的键值对

启动springboot项目,使用接口调试工具调用根据id查询学生信息接口:
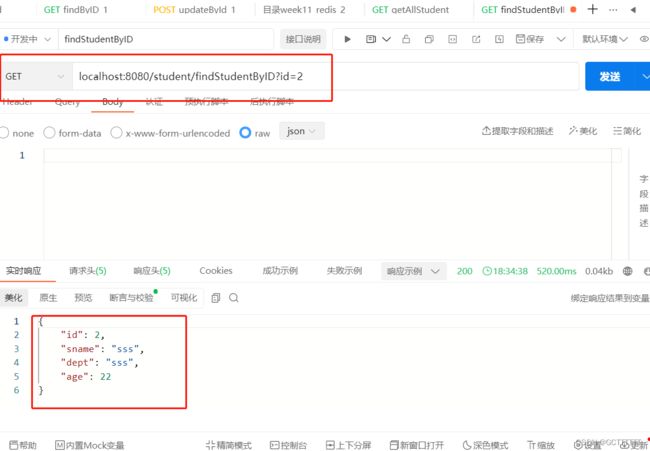
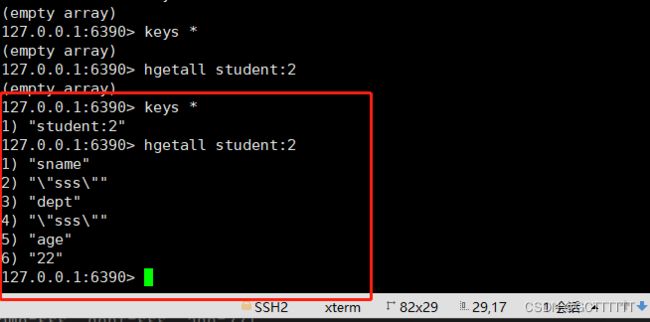
可见成功查询到了id为2的学生信息,此时查看redis6390结点中键值对信息可以看到对应的学生信息
成功保存到redis中
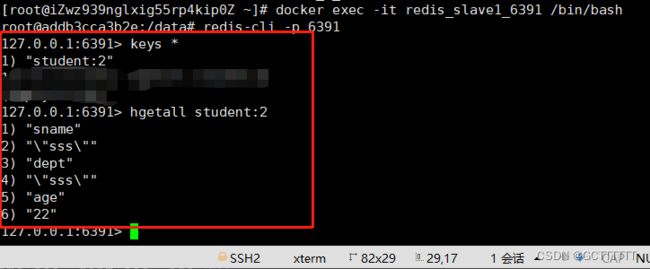
此时进入到从节点6391中,可见从节点中也成功保存了id为2的学生信息:
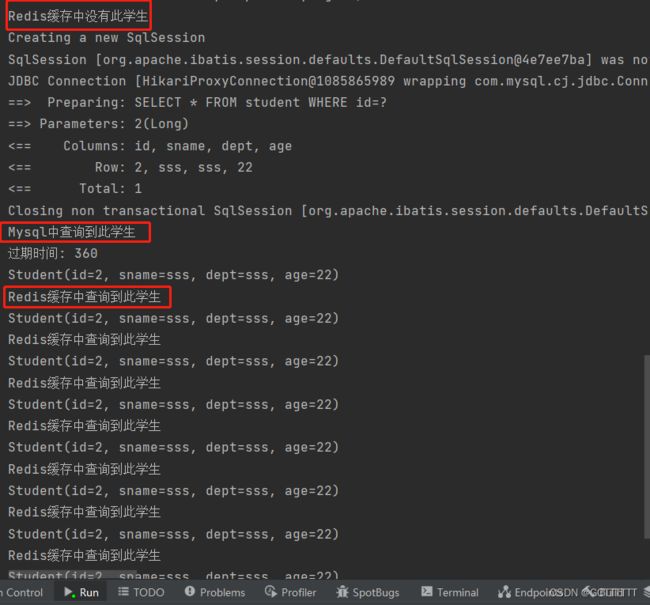
后台打印输出:
