Python使用飞书群机器人发送消息
原创文|Space9
机器人简单介绍
飞书群中的自定义机器人是通过webhook的形式将你要发送的消息即时发送到群聊中
在群聊中添加机器人
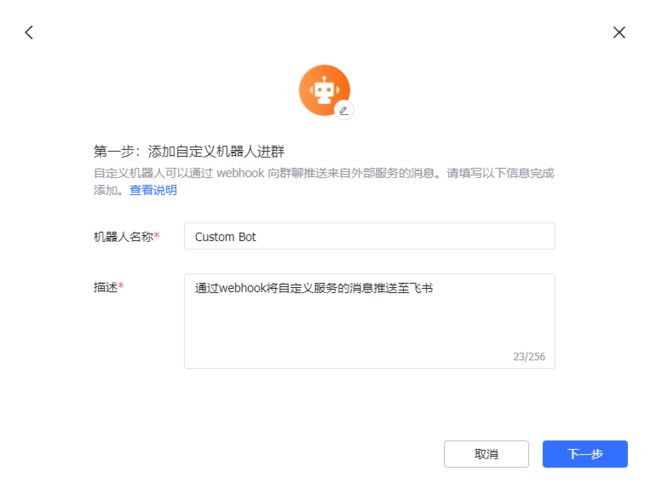
进入群聊,打开群设置,找到群机器人,并点击添加机器人。选择Custom Bot(自定义机器人)加入群聊。
第一步:添加该机器人进群,设置机器人头像、名称和描述,然后点击下一步。

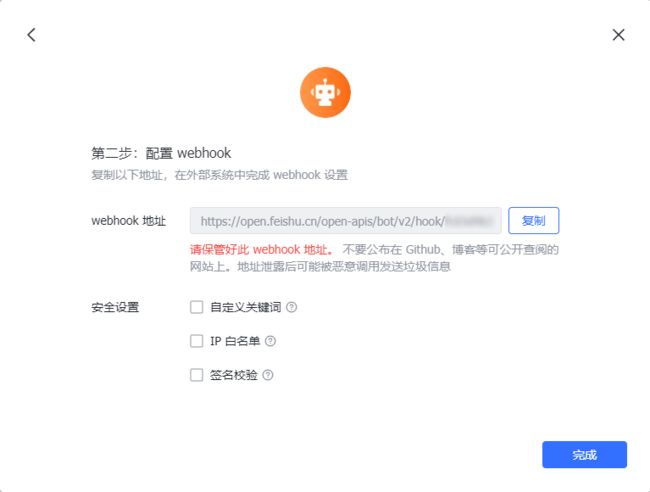
第二步:配置webhook,可根据需求选择一种及以上安全设置的方式,也可不选,复制并保存此页面的参数,最后点击完成。

注意:一个群总共最多可添加 15 个机器人,可以只添加15个Custom Bot(自定义机器人)。
使用机器人发送消息
请保管好 webhook 地址。 不要公布在 Github、博客等可公开查阅的网站上。地址泄露后可能被恶意调用发送垃圾信息
最基本的发送消息
# Python 3.9
import json

import requests

# 你复制的webhook地址
url = "https://open.feishu.cn/open-apis/bot/v2/hook/xxxxxxxxxxxxxxxxx"

payload_message = {
    "msg_type": "text",
    "content": {
        "text": "你要发送的消息"
    }
}
headers = {
    'Content-Type': 'application/json'
}

response = requests.request("POST", url, headers=headers, data=json.dumps(payload_message))

print(response.text)
带有安全设置的发送消息
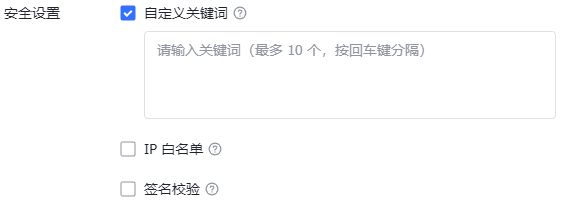
方式一、自定义关键词
最多可以设置10个关键词,消息中至少包含其中1个关键词才可以发送成功。
例如:添加了一个自定义关键词:生日提醒
则这个机器人所发送的消息,必须包含 生日提醒 这个词,才能发送成功。

# Python 3.9
import json

import requests

# 自定义关键词key_word
key_word = "你设置的关键词"

# 你复制的webhook地址
url = "https://open.feishu.cn/open-apis/bot/v2/hook/xxxxxxxxxxxxxxxxx"

payload_message = {
    "msg_type": "text",
    "content": {
        "text": key_word + "你要发送的消息"
    }
}
headers = {
    'Content-Type': 'application/json'
}

response = requests.request("POST", url, headers=headers, data=json.dumps(payload_message))

print(response.text)
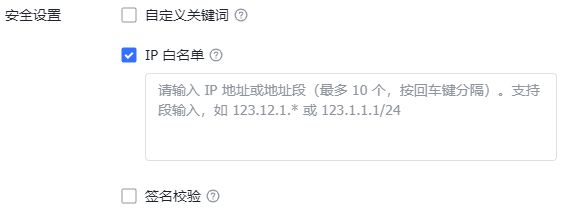
方式二、IP 白名单
最多设置 10 个 IP 地址或地址段。设定后,只有来自IP地址范围内的请求才会被正常处理。支持两种设置方式:IP、IP段,暂不支持IPv6地址白名单,格式如下:
| 格式 | 说明 |
|---|---|
| 123.12.123.123 | 开发者的出口公网地址(非局域网地址) |
| 123.12.1.* 或 123.1.1.1/24 | 用CIDR表示法表示的一个网段 |
方式三、签名校验

!!!注意:飞书的签名校验与其他的群机器人(钉钉、企业微信等)签名校验不同!!!
签名的算法
- 首先获取到的原始参数
| 参数 | 说明 |
|---|---|
| timestamp | 当前时间戳,单位是秒,与请求调用时间误差不超过1小时 |
| secret | 密钥,机器人安全设置页面,签名校验一栏下面显示的字符串 |
- 将原始参数通过计算获得最终的签名
使用 HmacSHA256 算法计算签名,再进行 Base64 编码,得到最终的签名
待签名的字符串(msg):""(空串)
签名所需的密钥(key):timestamp + “\n” + secret
哈希算法(digestmod):sha256
签名计算代码示例(Python)
# Python 3.9
import base64
import hmac
import time
from hashlib import sha256

timestamp = str(round(time.time()))
secret = "你的密钥"

key = f'{timestamp}\n{secret}'
key_enc = key.encode('utf-8')
msg = ""
msg_enc = msg.encode('utf-8')
hmac_code = hmac.new(key_enc, msg_enc, digestmod=sha256).digest()
sign = base64.b64encode(hmac_code).decode('utf-8')
print(timestamp)
print(sign)
# Python 2.7
import base64
import hmac
import time
from hashlib import sha256

timestamp = long(round(time.time()))
secret = "你的密钥"

key = '{}\n{}'.format(timestamp, secret)
key_enc = bytes(key).encode('utf-8')
msg = ""
msg_enc = bytes(msg).encode('utf-8')
hmac_code = hmac.new(key_enc, msg_enc, digestmod=sha256).digest()
sign = base64.b64encode(hmac_code).decode('utf-8')
print(timestamp)
print(sign)
签名计算代码示例(Go)
func GenSign(secret string, timestamp int64) (string, error) {
	stringToSign := fmt.Sprintf("%v", timestamp) + "\n" + secret

	var data []byte
	h := hmac.New(sha256.New, []byte(stringToSign))
	_, err := h.Write(data)
	if err != nil {
		return "", err
	}

	signature := base64.StdEncoding.EncodeToString(h.Sum(nil))
	return signature, nil
}
带签名校验的实现
# Python 3.9
import base64
import hmac
import json
import time
from hashlib import sha256

import requests

timestamp = str(round(time.time()))
secret = "你的密钥"

key = f'{timestamp}\n{secret}'
key_enc = key.encode('utf-8')
msg = ""
msg_enc = msg.encode('utf-8')
hmac_code = hmac.new(key_enc, msg_enc, digestmod=sha256).digest()
sign = base64.b64encode(hmac_code).decode('utf-8')
print(timestamp)
print(sign)

# 你复制的webhook地址
url = "https://open.feishu.cn/open-apis/bot/v2/hook/xxxxxxxxxxxxxxxxx"

payload_message = {
    "timestamp": timestamp,
    "sign": sign,
    "msg_type": "text",
    "content": {
        "text": "你要发送的消息"
    }
}
headers = {
    'Content-Type': 'application/json'
}

response = requests.request("POST", url, headers=headers, data=json.dumps(payload_message))

print(response.text)
带签名校验和自定义关键词的实现
# Python 3.9
import base64
import hmac
import json
import time
from hashlib import sha256

import requests

timestamp = str(round(time.time()))
secret = "你的密钥"

key = f'{timestamp}\n{secret}'
key_enc = key.encode('utf-8')
msg = ""
msg_enc = msg.encode('utf-8')
hmac_code = hmac.new(key_enc, msg_enc, digestmod=sha256).digest()
sign = base64.b64encode(hmac_code).decode('utf-8')
print(timestamp)
print(sign)

# 自定义关键词key_word
key_word = "你设置的关键词"

# 你复制的webhook地址
url = "https://open.feishu.cn/open-apis/bot/v2/hook/xxxxxxxxxxxxxxxxx"

payload_message = {
    "timestamp": timestamp,
    "sign": sign,
    "msg_type": "text",
    "content": {
        "text": key_word + "你要发送的消息"
    }
}
headers = {
    'Content-Type': 'application/json'
}

response = requests.request("POST", url, headers=headers, data=json.dumps(payload_message))

print(response.text)
可发送的消息类型
自定义机器人添加完成后,就能向其 webhook 地址发送 POST 请求,从而在群聊中推送消息了。支持推送的消息格式有文本、富文本、图片消息,也可以分享群名片等。
参数msg_type代表消息类型,可传入:text(文本)/ post(富文本)/ image(图片)/ share_chat(分享群名片)/ interactive(消息卡片)。具体使用方法可查看下文的官方文档。
请求发送后的返回信息汇总
- 消息发送成功:{“Extra”:null,“StatusCode”:0,“StatusMessage”:“success”}
- webhook地址无效:{“code”:19001,“msg”:“param invalid: incoming webhook access token invalid”}
- 关键词校验失败:{“code”:19024,“msg”:“Key Words Not Found”}
- IP校验失败:{“code”:19022,“msg”:“Ip Not Allowed”}
- 签名校验失败:{“code”:19021,“msg”:“sign match fail or timestamp is not within one hour from current time”}
机器人的常见问题
- 自定义机器人的 webhook地址有 V1、V2 版本,如何兼容?
答:请参考帮助文档如何在群聊中使用机器人的附录部分“旧版 webhook (自定义机器人) 使用说明”。同时,推荐使用V2版本的自定义机器人。 - 使用 webhook 的自定义机器人是否可以@单个成员、或者@所有人?
答:V2版本的自定义机器人,支持@单个成员、或者@所有人。 - 配置使用 webhook 的自定义机器人时,参数text是否有长度要求?
答:建议 JSON 的长度不超过 30k,序列化后的 pb 不超过 100k,图片最好小于 10MB。
扩展应用场景
- 服务器监测报警
- 天气情况、生日提醒和新闻资讯等的推送
- 个人开发应用的用户反馈
- 轻量级的埋点统计
官方文档
飞书机器人文档:https://www.feishu.cn/hc/zh-CN/articles/360024984973-%E6%9C%BA%E5%99%A8%E4%BA%BA-%E5%A6%82%E4%BD%95%E5%9C%A8%E7%BE%A4%E8%81%8A%E4%B8%AD%E4%BD%BF%E7%94%A8%E6%9C%BA%E5%99%A8%E4%BA%BA-#source=section
本文仅为个人学习使用,不得用于任何商业用途,否则后果自负!如侵犯到您的权益,请及时通知我,我会及时处理。
![]()
