数字图像处理(入门篇)十四 透视变换
目录
一 透视变换
二 实践
(1)代码
(2)结果图
一 透视变换
现实生活中的空间是三维的,图像中的物体存在近大远小的特征,这种畸变仿射变换不能矫正。因此,我们需要使用到三维空间的变化,就是透视变换。透视变换(Perspective Transformation)的本质是将图像投影到一个新的视平面。
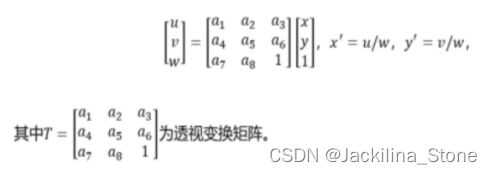
透视变换是非线性变换。透视变换公式如下:
从上述公式可知,变换矩阵有8个参数,因此要确定4个像素点变换前后的对应坐标才能够求出透视变换矩阵。
二 实践
(1)代码
import cv2
import matplotlib.pyplot as plt
import numpy as np
# 获取透视变换的参数矩阵
def cal_perspective_params(img, points):
    offset_x = 300
    offset_y = 0
    img_size = (img.shape[1], img.shape[0])
    src = np.float32(points)
    # 设置俯视图中的对应的四个点
    dst = np.float32([[offset_x, offset_y], [img_size[0] - offset_x, offset_y],
                      [offset_x, img_size[1] - offset_y], [img_size[0] - offset_x, img_size[1] - offset_y]])
    # 原图像转换到俯视图
    M = cv2.getPerspectiveTransform(src, dst)
    # 俯视图到原图像
    M_inverse = cv2.getPerspectiveTransform(dst, src)
    return M, M_inverse


def img_perspect_transform(img, M):
    # 根据参数矩阵完成透视变换
    img_size = (img.shape[1], img.shape[0])
    return cv2.warpPerspective(img, M, img_size)

def dealImageResult(img_path):
    img = cv2.imread(img_path)
    img = cv2.cvtColor(img, cv2.COLOR_BGR2RGB)
    # 几个点是人工选择的,根据情况自己调整
    left_up = [595, 470]
    right_up = [740, 470]
    left_down = [365, 680]
    right_down = [1150, 680]
    points = [left_up, right_up, left_down, right_down]
    img = cv2.line(img, left_up, right_up, (0, 0, 255), 3)
    img = cv2.line(img, right_up, right_down, (0, 0, 255), 3)
    img = cv2.line(img, left_up, left_down, (0, 0, 255), 3)
    img = cv2.line(img, left_down, right_down, (0, 0, 255), 3)
    M, M_inverse = cal_perspective_params(img, points)
    # 这里只针对透视变化功能,相机去畸变的功能跳过
    trasform_img = img_perspect_transform(img, M)
    fig = plt.figure(figsize=(8, 8))
    titles = ["point", "result"]
    images = [img, trasform_img]
    for i in range(2):
        plt.subplot(1, 2, i + 1), plt.imshow(images[i], 'gray')
        plt.title(titles[i])
        plt.xticks([]), plt.yticks([])
    plt.show()
    fig.savefig('test_results.jpg', bbox_inches='tight')
if __name__ == '__main__':
    dealImageResult("test.png")
    pass
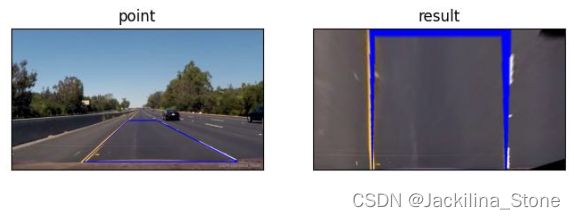
(2)结果图

