【小程序动画合集】10种小程序动画效果实现方法,文章太长建议收藏!
前言
一提小程序与动画,首先想到的是什么?嗯,微信小程序独创了一套动画玩法,官方支持3种动画方案,分别是 createAnimation 、 this.animate 和 CSS3动画 。
1. createAnimation 与 Animation
创建一个动画实例animation。调用实例的方法来描述动画。最后通过动画实例的export方法导出动画数据传递给组件的animation属性。
var animation = wx.createAnimation({
  transformOrigin: "50% 50%",
  duration: 1000,
  timingFunction: "ease",
  delay: 0
})

// step() 表示一组动画的完成,可以在一组动画中调用任意多个动画方法
// 一组动画中的所有动画会同时开始,一组动画完成后才会进行下一组动画
animation.translate(150, 0).rotate(180).step()
animation.opacity(0).scale(0).step()
this.setData({
  animationData: animation.export()
})
2. 关键帧动画 this.animate 接口
从小程序基础库 2.9.0 开始支持一种更友好的动画创建方式,用于代替旧的 wx.createAnimation 。它具有更好的性能和更可控的接口。在页面或自定义组件中,当需要进行关键帧动画时,可以使用 this.animate 接口。
this.animate(selector, keyframes, duration, callback)
官方给出的例子:
this.animate('#container', [
    { opacity: 1.0, rotate: 0, backgroundColor: '#FF0000' },
    { opacity: 0.5, rotate: 45, backgroundColor: '#00FF00'},
    { opacity: 0.0, rotate: 90, backgroundColor: '#FF0000' },
    ], 5000, function () {
      this.clearAnimation('#container', { opacity: true, rotate: true }, function () {
        console.log("清除了#container上的opacity和rotate属性")
      })
  }.bind(this))
3. css3动画
这是界面动画的常见方式,CSS 动画运行效果良好,甚至在低性能的系统上。渲染引擎会使用跳帧或者其他技术以保证动画表现尽可能的流畅。
利用样式实现小程序动画,用法和css用法相似,定义好指定的动画类名后给元素加上即可。
这是一个模仿心跳的动画:
@keyframes heartBeat {
  0% {
    transform: scale(1);
  }

  14% {
    transform: scale(1.3);
  }

  28% {
    transform: scale(1);
  }

  42% {
    transform: scale(1.3);
  }

  70% {
    transform: scale(1);
  }
}

.heartBeat {
  animation-name: heartBeat;
  animation-duration: 1.3s;
  animation-timing-function: ease-in-out;
}
一、购物车商品曲线飞入动画
主要应用到的技术点:
1、小程序wxss布局,以及数据绑定
2、js二次bezier曲线算法
核心算法,写在app.js里
bezier: function (points, times) {

 // 0、以3个控制点为例,点A,B,C,AB上设置点D,BC上设置点E,DE连线上设置点F,则最终的贝塞尔曲线是点F的坐标轨迹。

 // 1、计算相邻控制点间距。

 // 2、根据完成时间,计算每次执行时D在AB方向上移动的距离,E在BC方向上移动的距离。

 // 3、时间每递增100ms,则D,E在指定方向上发生位移, F在DE上的位移则可通过AD/AB = DF/DE得出。

 // 4、根据DE的正余弦值和DE的值计算出F的坐标。

 // 邻控制AB点间距

 var bezier_points = [];

 var points_D = [];

 var points_E = [];

 const DIST_AB = Math.sqrt(Math.pow(points[1]['x'] - points[0]['x'], 2) + Math.pow(points[1]['y'] - points[0]['y'], 2));

 // 邻控制BC点间距

 const DIST_BC = Math.sqrt(Math.pow(points[2]['x'] - points[1]['x'], 2) + Math.pow(points[2]['y'] - points[1]['y'], 2));

 // D每次在AB方向上移动的距离

 const EACH_MOVE_AD = DIST_AB / times;

 // E每次在BC方向上移动的距离

 const EACH_MOVE_BE = DIST_BC / times;

 // 点AB的正切

 const TAN_AB = (points[1]['y'] - points[0]['y']) / (points[1]['x'] - points[0]['x']);

 // 点BC的正切

 const TAN_BC = (points[2]['y'] - points[1]['y']) / (points[2]['x'] - points[1]['x']);

 // 点AB的弧度值

 const RADIUS_AB = Math.atan(TAN_AB);

 // 点BC的弧度值

 const RADIUS_BC = Math.atan(TAN_BC);

 // 每次执行

 for (var i = 1; i <= times; i++) {

 // AD的距离

 var dist_AD = EACH_MOVE_AD * i;

 // BE的距离

 var dist_BE = EACH_MOVE_BE * i;

 // D点的坐标

 var point_D = {};

 point_D['x'] = dist_AD * Math.cos(RADIUS_AB) + points[0]['x'];

 point_D['y'] = dist_AD * Math.sin(RADIUS_AB) + points[0]['y'];

 points_D.push(point_D);

 // E点的坐标

 var point_E = {};

 point_E['x'] = dist_BE * Math.cos(RADIUS_BC) + points[1]['x'];

 point_E['y'] = dist_BE * Math.sin(RADIUS_BC) + points[1]['y'];

 points_E.push(point_E);

 // 此时线段DE的正切值

 var tan_DE = (point_E['y'] - point_D['y']) / (point_E['x'] - point_D['x']);

 // tan_DE的弧度值

 var radius_DE = Math.atan(tan_DE);

 // 地市DE的间距

 var dist_DE = Math.sqrt(Math.pow((point_E['x'] - point_D['x']), 2) + Math.pow((point_E['y'] - point_D['y']), 2));

 // 此时DF的距离

 var dist_DF = (dist_AD / DIST_AB) * dist_DE;

 // 此时DF点的坐标

 var point_F = {};

 point_F['x'] = dist_DF * Math.cos(radius_DE) + point_D['x'];

 point_F['y'] = dist_DF * Math.sin(radius_DE) + point_D['y'];

 bezier_points.push(point_F);

 }

 return {

 'bezier_points': bezier_points

 };

 }
注释很详细,算法的原理其实也很简单。 源码也发出来吧,github地址:github.com/xiongchenf/…
调用方法和用法就不占篇幅了,都是基础的东西。
二、模块移动动画
动画效果:
下图有两组动画,分别为 api 方式(上)与 css3 方式(下)完成的效果,点击move按钮,动画启动。
代码实现
以下分别为 css3 与 api 的核心代码:
css3:
复制代码
// scss
    @mixin movePublic($oldLeft,$oldTop,$left,$top) {
        from {
          transform:translate($oldLeft,$oldTop);
        }
        to {
          transform:translate($left,$top);
        }
    }

    @mixin blockStyle($color,$name) {
        background: $color;
        animation:$name 2s linear infinite alternate;
    }
    .one {
        @include blockStyle(lightsalmon,onemove);
    }

    @keyframes onemove {
        @include movePublic(50rpx,-25rpx,-150rpx,0rpx);
    }

    .two {
        @include blockStyle(lightblue,twomove);
    }

    @keyframes twomove {
        @include movePublic(0rpx,25rpx,-50rpx,0rpx);
    }

    .three {
        @include blockStyle(lightgray,threemove);
    }

    @keyframes threemove {
        @include movePublic(0rpx,25rpx,50rpx,0rpx);
    }

    .four {
        @include blockStyle(grey,fourmove);
    }

    @keyframes fourmove {
        @include movePublic(-50rpx,-25rpx,150rpx,0rpx);
    }
复制代码
// js
    moveFunction(){
        this.setData({
            isMove: true
        })
    }
复制代码
css3 中通过动态改变 class 类名来达到动画的效果,如上代码通过 one 、 two 、 three 、 four 来分别控制移动的距离,通过sass可以避免代码过于冗余的问题。 (纠结如何在小程序中使用 sass 的童鞋请看这里哦: wechat-mina-template )
api:
moveClick(){
        this.move(-75,-12.5,25,'moveOne');
        this.move(-25,12.5, 0,'moveTwo');
        this.move(25, 12.5,0,'moveThree');
        this.move(75, -12.5,-25,'moveFour');
        this.moveFunction(); // 该事件触发css3模块进行移动
    },

    // 模块移动方法
    move: function (w,h,m,ele) {
        let self = this;
        let moveFunc = function () {
        let animation = wx.createAnimation({
            duration: 2000,
            delay: 0,
            timingFunction: "linear",
        });

        animation.translate(w, 0).step()
        self.setData({ [ele]: animation.export() })
        let timeout = setTimeout(function () {
            animation.translate(m, h).step();
            self.setData({
                // [ele] 代表需要绑定动画的数组对象
                [ele]: animation.export()
            })
          }.bind(this), 2000)
        }
        moveFunc();
        let interval = setInterval(moveFunc,4000)
    }
复制代码
效果图可见,模块之间都是简单的移动,可以将他们的运动变化写成一个公共的事件,通过向事件传值,来移动到不同的位置。其中的参数 w,h,m,ele 分别表示发散水平方向移动的距离、聚拢时垂直方向、水平方向的距离以及需要修改 animationData 的对象。
通过这种方法产生的动画,无法按照原有轨迹收回,所以在事件之后设置了定时器,定义在执行动画2s之后,执行另一个动画。同时 动画只能执行一次 ,如果需要循环的动效,要在外层包裹一个重复执行的定时器到。
查看源码,发现 api 方式是通过 js 插入并改变内联样式来达到动画效果,下面这张动图可以清晰地看出样式变化。
打印出赋值的 animationData , animates 中存放了动画事件的类型及参数; options 中存放的是此次动画的配置选项, transition 中存放的是 wx.createAnimation 调用时的配置, transformOrigin 是默认配置,意为以对象的中心为起点开始执行动画,也可在 wx.createAnimation时进行配置。
三、音乐播放动画
上面的模块移动动画不涉及逻辑交互,因此新尝试了一个音乐播放动画,该动画需要实现暂停、继续的效果。
动画效果:
两组不同的动画效果对比,分别为 api (上)实现与 css3 实现(下):
代码实现
以下分别是 css3 实现与 api 实现的核心代码:
css3:
复制代码
// scss
    .musicRotate{
        animation: rotate 3s linear infinite;
    }

    @keyframes rotate{
        from{
            transform: rotate(0deg)
        }
        to{
            transform: rotate(359deg)
        }
    }

    .musicPaused{
        animation-play-state: paused;
    }
复制代码
// js
    playTwo(){
        this.setData({
            playTwo: !this.data.playTwo
        },()=>{
            let back = this.data.backgroundAudioManager;
            if(this.data.playTwo){
                back.play();
            } else {
                back.pause();
            }
        })
    }
复制代码
通过 playTwo 这个属性来判断是否暂停,并控制 css 类的添加与删除。当为 false 时,添加 .musicPaused 类,动画暂停。
api:
复制代码
// js
    play(){
        this.setData({
            play: !this.data.play
        },()=>{
            let back = this.data.backgroundAudioManager;
            if (!this.data.play) {
                back.pause();
               // 跨事件清除定时器
               clearInterval(this.data.rotateInterval);
            } else {
                back.play();
                // 继续旋转,this.data.i记录了旋转的程度
                this.musicRotate(this.data.i);
            }
        })
    },
    musicRotate(i){
        let self = this;
        let rotateFuc = function(){
            i++;
            self.setData({
                i:i++
            });
            let animation = wx.createAnimation({
                duration: 1000,
                delay: 0,
                timingFunction: "linear",
            });
            animation.rotate(30*(i++)).step()
            self.setData({ musicRotate: animation.export() });
        }
        rotateFuc();
        let rotateInterval = setInterval(
            rotateFuc,1000
        );
        // 全局定时事件
        this.setData({
            rotateInterval: rotateInterval
        })
    }
复制代码
通过 api 实现的方式是通过移除 animationData 来控制动画,同时暂停动画也需要清除定时器,由于清除定时器需要跨事件进行操作,所以定了一个全局方法 rotateInterval 。
api 方式定义了旋转的角度,但旋转到该角度之后便会停止,如果需要实现重复旋转效果,需要通过定时器来完成。因此定义了变量i,定时器每执行一次便加1,相当于每1s旋转30°,对 animation.rotate() 中的度数动态赋值。暂停之后继续动画,需要从原有角度继续旋转,因此变量i需要为全局变量。
代码变化
下图可以看出, api 方式旋转是通过不断累加角度来完成,而非 css3 中循环执行。
四、塔罗牌动画
| 目前还有个问题:android上面无卡顿,但是ios直接把微信卡掉! wxml
wxss
js
requestAnimationFrame.js
|
五、列表侧方弹出动画
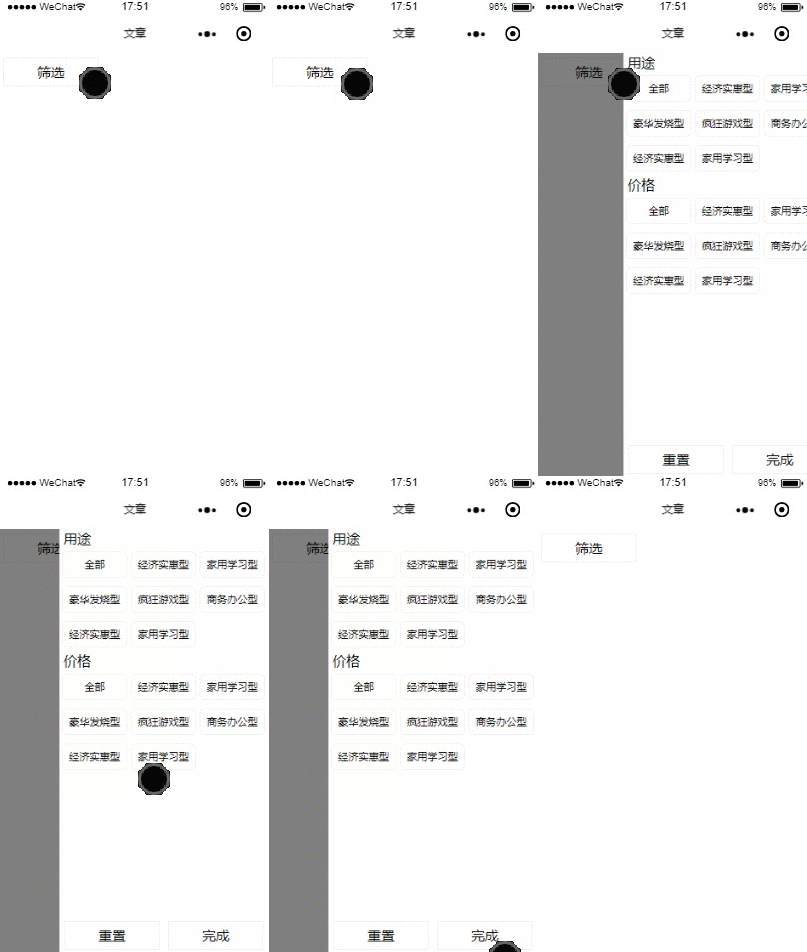
| 微信小程序商品筛选,侧方弹出动画选择页面,在一点点的零碎的时间里面写出来的代码,和前两篇效果结合出来的。点击按钮的同时,要实现这两个功能的叠加。
效果是这样的: demo是这样的:
经济实惠型 家用学习型 豪华发烧型 疯狂游戏型 商务办公型 经济实惠型 家用学习型 价格 全部 经济实惠型 家用学习型 豪华发烧型 疯狂游戏型 商务办公型 经济实惠型 家用学习型 重置 完成 wxss
js
|
六、录音时麦克风动画效果
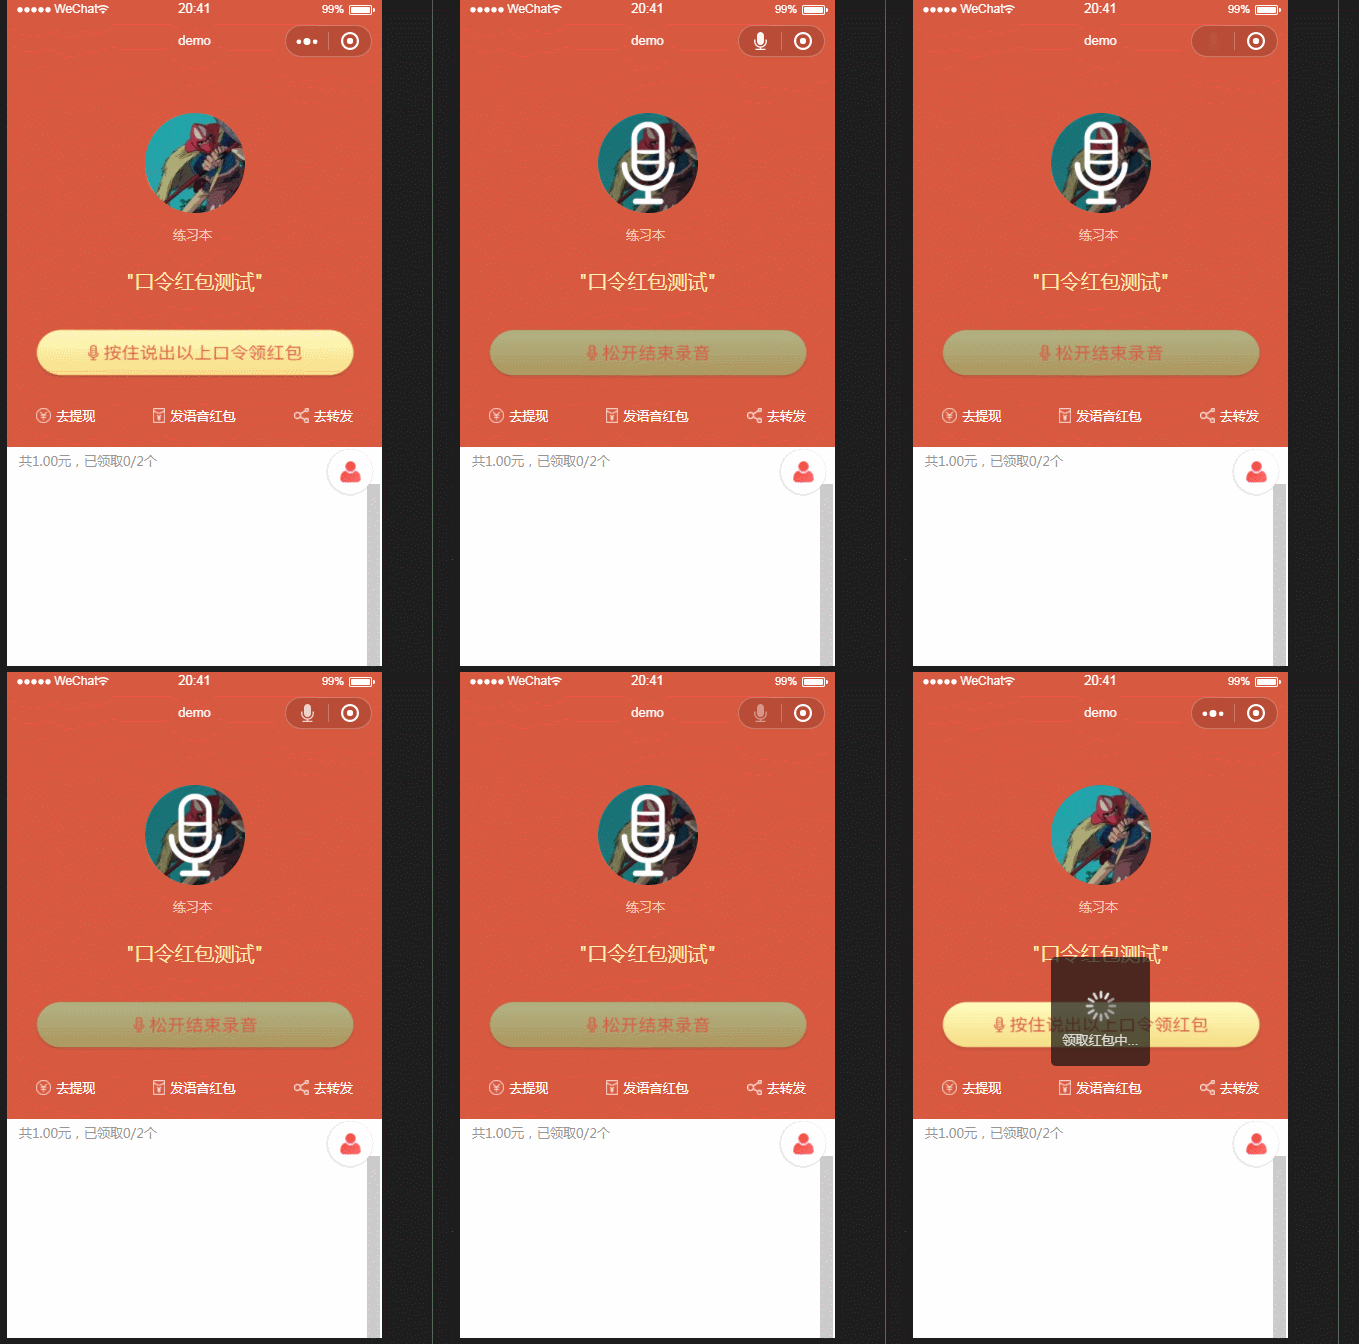
这个简单的麦克风demo的创意是来源于“包你说”中的录音效果,实现的方式其实也并不难,但对于小程序中的简易动画的使用的确很实用。
效果
先来看个demo,gif帧数比较低,实际效果和真机测试的流畅性还是很OK的
#思路 通过setTimeout配合this.sedData来改变image中的src路径来生成动画。动画的播放以及隐藏则通过wx:if绑定一个自定义的参数来控制。下面就直接上代码。
代码
html
复制代码javascript
    var playTalk //录音动画定时器
    Page({
        data:{
            showTalk: false, //显示录音动画
            receiveImg: 3, //按压播放语音动画
            voiceNum: 2, //按压录音时效果图
            config: app.globalData.apiUrl,//demo接口
        },
        //长按读语音
        longPress() {
            var that = this;
            that.setData({
                voiceNum: 1,
                showTalk: true
            });
            that.animationTalk();
            var url = that.data.config;
            wx.startRecord({
                success(res) {
                    const tempFilePath = res.tempFilePath; //录音成功后的文件
                    wx.saveFile({
                        tempFilePath: tempFilePath,  //保存文件到本地并生成临时路径
                        success(res) {
                            wx.uploadFile({         //上传语音文件到服务器
                                url: url,
                                filePath: res.savedFilePath,
                                name: 'file',
                                formData: {
                                    token: that.data.token,
                                    name: 'file'
                                },
                                success(res) {
                                    that.setData({
                                        voiceUrl: JSON.parse(res.data).file_url
                                    })
                                    that.receivePage() //校验语音正确率,此步骤未贴出
                                }
                            })
                        }
                    })
                }
            })
        },
        // 播放录音动画
        animationTalk() {
            var that = this;
            if (!that.data.showTalk) {
                that.setData({
                    receiveImg: 1
                });
                clearTimeout(playTalk)
            } else {
                switch (that.data.receiveImg) {
                    case 1:
                        that.setData({
                            receiveImg: 2
                        })
                        break
                    case 2:
                        that.setData({
                            receiveImg: 3
                        })
                        break
                    case 3:
                        that.setData({
                            receiveImg: 1
                        })
                        break
                }
                setTimeout(function () {
                    that.animationTalk()
                }, 500)
            }
        },
        // 录音结束
        endTouch() {
            var that = this;
            wx.stopRecord();
            that.setData({
                voiceNum: 2,
                showTalk: false,
            })
        },
    })
复制代码
七、渐入渐出动画
在做小程序列表展示的时候,接到了一个需求。需要在列表展示的时候加上动画效果。设计视频效果如下图:
需要在进入列表页的时候,依次展示每一条卡片,在展示完成后需要隐藏掉当天之前的卡片。
实现思路
实现该动画效果,首先需要给每个卡片添加一个css动画。因为每个卡片的显示是有时间间隔的,以及考虑到展示完成后的隐藏效果,所以动画效果需要用js动态去添加。在看了微信开发文档后,发现微信小程序提供了Animation的一个动画对象,具体看了里面的参数后发现,是可以实现需求上的效果的。具体使用如下api:
wx.createAnimation(Object object) 创建一个animation对象。最后通过动画实例的export方法导出动画数据传递给组件的 animation 属性。里面有如下参数:duration(动画持续时间,单位 ms),timingFunction(动画的国度效果),delay(动画延迟)
创建的animation对象,本次实现过程中需要用到如下属性:
Animation.export() 可以导出动画队列,export 方法每次调用后会清掉之前的动画操作。
Animation.step(Object object) 表示一组动画完成。可以在一组动画中调用任意多个动画方法,一组动画中的所有动画会同时开始,一组动画完成后才会进行下一组动画。比如一组动画结束了,就以step()结尾
Animation.translateY(number translation) 在 Y 轴平移的距离,单位为 px
Animation.opacity(number value) 透明度 0-1的取值范围
看到上面这些属性,合理使用的话,那么实现需求提到动画效果那是稳稳的。
实现步骤
封装一个方法,用来创建动画,并方便调用
/**
 * 动画实现
 * @method animationShow
 * @param {that} 当前卡片
 * @param {opacity} 透明度
 * @param {delay} 延迟
 * @param {isUp} 移动方向
 */
  animationShow: function (that,opacity, delay, isUp) {
    let animation = wx.createAnimation({
      duration: 1000,
      timingFunction: 'ease',
      delay: delay
    });

    if (isUp == 'down') {
      animation.translateY(0).opacity(opacity).step().translateY(-80).step();
    } else if (isUp == 'up') {
      animation.translateY(0).opacity(opacity).step().translateY(-140).opacity(0).step()
    } else {
      animation.translateY(0).opacity(opacity).step()
    }
    let params = ''
    params = animation.export()
    return params
  },
复制代码
初始化每个卡片的样式
首先每个卡片的位置相对于自身往Y轴平移80像素,并且把透明度设置为0。这样就可以进入页面的时候再往下平移并且让卡片逐渐显示。
.init{
  opacity: 0;
  transform: translateY(-80px)
}
复制代码
处理数据
循环处理每一条数据,通过调用封装的方法,来获得该卡片应该拥有的动画属性
for (let i = 0; i < transData.length; i++) {
    if (i == 0) {
      transData[i].animation = that.app.slideupshow(that, 1, 0, 'up')
    } else {
      transData[i].animation = that.app.slideupshow(that, 1, (i + 1) * 10, 'down')
    }
  }
复制代码
跟设计视频中的动画风格基本保持一致,美滋滋。
八、文字旋转动画
在小程序中,如果可以用一个动画效果展现一句话或一段文字,会比普通文字呈现更具吸引力,这不仅是体现更多样的文字效果,更是突出这段文字的一个方法。那么接下来就来看一下如何实现一个文字旋转的动画效果吧。
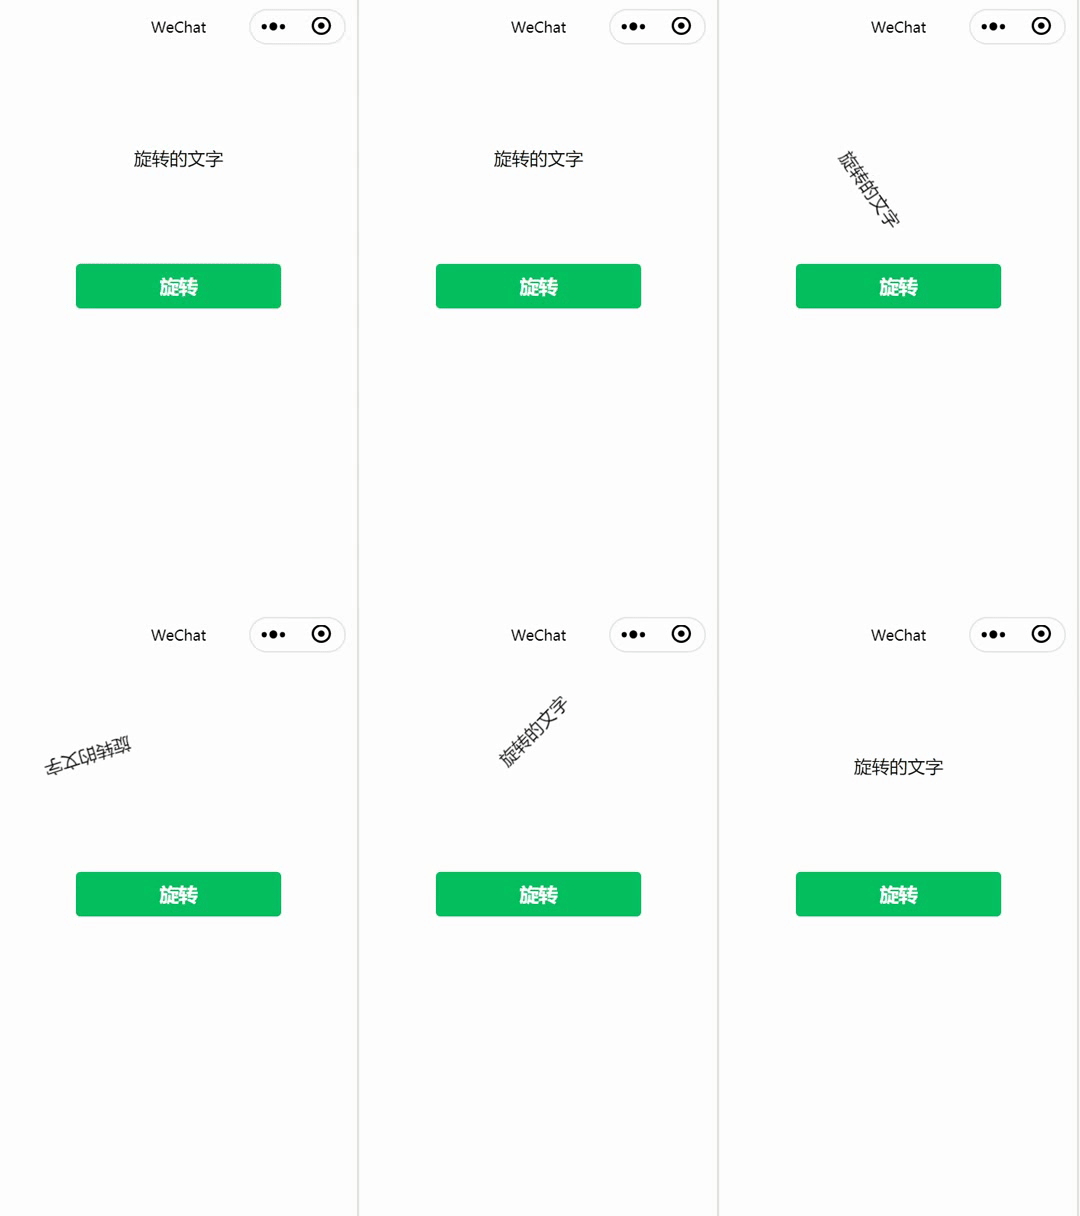
效果图:
解决方案
1 wxml:
这部分很容易实现,只需要设置一个点击旋转标签button以及对一条需要旋转的文字进行数据绑定即可。
| 我在做动画 旋转 |
2 js:
js中需要先了解一个animation的api,其中的参数和方法如下:
(1)duration: 动画持续多少毫秒。
(2)timingFunction:“运动”的方式,本例中的“linear”代表动画以匀速的效果来呈现。
(3)delay:多久后动画开始运行,也就是动画延迟开始的时间translate(100,-100)向X轴移动100的同时向Y轴移动-100。
(4)step():一组动画完成,例如想让本例中的文字旋转,用this.animation.rotate(360).step(),其中360就表示旋转一周360°。
代码如下:
| Page({ data: { text: "Page animation", animation: '' }, onLoad: function (options) { }, onReady: function () { //实例化一个动画 this.animation = wx.createAnimation({ // 动画持续时间,单位ms,默认值 400 duration: 1500, timingFunction: 'linear', // 延迟多长时间开始 delay: 100, transformOrigin: 'left top 0', success: function (res) { console.log(res) } }) }, //旋转 rotate: function () { //顺时针旋转10度 this.animation.rotate(360).step() this.setData({ //输出动画 animation: this.animation.export() }) } }) |
文字的动画效果远不止这一种,它可以实现很多样很丰富的形式,本篇只是一个基础的动画效果演示,后续将介绍更丰富的动画效果,欢迎持续关注。
九、仿微信下拉小程序入口动画
突然发现微信下拉小程序入口动画非常细腻,比较好奇,所以仿照他做了一个,并不是很完美,部分效果还没完成,但总体自我感觉还不错,效果如下:
微信原版
仿照效果
流程分析
自定义ViewGroup
整个布局是通过自定义ViewGroup来管理的,在自定义ViewGroup中,子布局一共有两个,一个是小程序布局,一个是会话列表布局,然后按照上下分别摆放就可以了。
package com.example.kotlindemo.widget.weixin

import android.content.Context
import android.content.res.Resources
import android.util.AttributeSet
import android.util.Log
import android.view.MotionEvent
import android.view.View
import android.view.ViewGroup
import androidx.core.view.ViewCompat
import androidx.customview.widget.ViewDragHelper
import com.example.kotlindemo.R
import java.math.BigDecimal

class WeiXinMainPullViewGroup @JvmOverloads constructor(
    context: Context?,
    attrs: AttributeSet? = null,
    defStyleAttr: Int = 0
) : ViewGroup(context, attrs, defStyleAttr) {

    public var viewDragHelper: ViewDragHelper = ViewDragHelper.create(this, 0.5f, DragHandler());

    var headerMaskView: WeiXinPullHeaderMaskView? = null

    var isOpen: Boolean = false;

    val NAVIGAATION_HEIGHT = 100

    init {

    }

    override fun onLayout(changed: Boolean, l: Int, t: Int, r: Int, b: Int) {

        for (index in 0 until childCount) {
            if (getChildAt(index) != headerMaskView) {
                getChildAt(index).layout(l, paddingTop, r, b)
            }
        }

    }

    override fun computeScroll() {
        if (viewDragHelper.continueSettling(true)) {
            ViewCompat.postInvalidateOnAnimation(this);
        }

    }

    override fun onInterceptTouchEvent(ev: MotionEvent): Boolean {
        Log.i("TAG", "onInterceptTouchEvent: ${ev.action}")
        MotionEvent.ACTION_MOVE
        return true
    }

    override fun onTouchEvent(event: MotionEvent): Boolean {

        viewDragHelper.processTouchEvent(event)
        return true
    }

    override fun onMeasure(widthMeasureSpec: Int, heightMeasureSpec: Int) {
        super.onMeasure(widthMeasureSpec, heightMeasureSpec)
        measureChildren(widthMeasureSpec, heightMeasureSpec)
    }

    fun createMaskView() {
        if (headerMaskView == null) {
            headerMaskView = WeiXinPullHeaderMaskView(context, null, 0)
            addView(headerMaskView)
        }
    }

    inner class DragHandler : ViewDragHelper.Callback() {
        override fun tryCaptureView(child: View, pointerId: Int): Boolean {
            return child is WeiXinMainLayout;
        }

        override fun onViewDragStateChanged(state: Int) {
            super.onViewDragStateChanged(state)
        }

        /**
         * 设置进度,设置遮罩layout
         */
        override fun onViewPositionChanged(
            changedView: View,
            left: Int,
            top: Int,
            dx: Int,
            dy: Int
        ) {
            createMaskView();
            var programView = getChildAt(0)

            var divide = BigDecimal(top.toString()).divide(
                BigDecimal(measuredHeight - NAVIGAATION_HEIGHT),
                4,
                BigDecimal.ROUND_HALF_UP
            )
            divide = divide.multiply(BigDecimal("100"))

            divide = divide.multiply(BigDecimal("0.002"))
            divide = divide.add(BigDecimal("0.8"))

            if (!isOpen) {
                programView.scaleX = divide.toFloat()
                programView.scaleY = divide.toFloat()
            } else {
                programView.top = paddingTop + (-((measuredHeight - NAVIGAATION_HEIGHT) - top))
            }

            headerMaskView!!.maxHeight = measuredHeight / 3
            headerMaskView!!.layout(0, paddingTop, measuredWidth, top)
            headerMaskView!!.setProgress(
                top.toFloat() / ((measuredHeight - (NAVIGAATION_HEIGHT + paddingTop)) / 3) * 100,
                measuredHeight - (NAVIGAATION_HEIGHT + paddingTop)
            )
            if (top == paddingTop) {
                isOpen = false
            }
            if (top == measuredHeight - NAVIGAATION_HEIGHT) {
                isOpen = true
            }

        }

        override fun onViewCaptured(capturedChild: View, activePointerId: Int) {
            super.onViewCaptured(capturedChild, activePointerId)
            var programView = getChildAt(0)
            programView.top = paddingTop;
        }

        /**
         * 释放
         */
        override fun onViewReleased(releasedChild: View, xvel: Float, yvel: Float) {

            /**
             * 如果已经打开或者释放后小于屏幕三分之一,回到原位
             */
            if (isOpen or (releasedChild.top + paddingTop <= measuredHeight / 3)) {
                viewDragHelper.smoothSlideViewTo(releasedChild, 0, paddingTop);
                ViewCompat.postInvalidateOnAnimation(this@WeiXinMainPullViewGroup);
                return
            }
            viewDragHelper.smoothSlideViewTo(releasedChild, 0, measuredHeight - NAVIGAATION_HEIGHT);
            ViewCompat.postInvalidateOnAnimation(this@WeiXinMainPullViewGroup);
        }

        override fun clampViewPositionVertical(child: View, top: Int, dy: Int): Int {
            if (top <= paddingTop) {
                return paddingTop
            }
            return (child.top + dy / 1.3).toInt();
        }

    }
}
复制代码
还要增加一个用来填充状态栏的View,他的高度是动态获取的,整体布局是RelativeLayout,因为可以方便的设置中间View在状态下面和在导航栏上面。
class ViewUtils {
    companion object{
        @JvmStatic
        fun getStatusBarHeight(resources: Resources): Int {
            var result = 0
            val resourceId = resources.getIdentifier("status_bar_height", "dimen", "android")
            if (resourceId > 0) {
                result = resources.getDimensionPixelSize(resourceId)
            }
            return result
        }
    }
}

复制代码
小程序缩放比例值计算
然后要做的就是拖动View,可以借助ViewDragHelper来完成,当拖动会话布局的时候,小程序的布局开始做一个缩放比例动画,这个缩放值我在这是这样做的,因为不可能是从0开始,要从一个基础值开始,这个基础值就是0.8,那么剩下0.2的缩放值,就是从开始下拉算起,到整体的高度的百分比。
比如屏幕高度是1000,下拉到500的时候,那么这个缩放值就是0.1,在加上基础值0.8,计算方式如下,整体高度还要减去导航栏的高度。
   var divide = BigDecimal(top.toString()).divide(BigDecimal(measuredHeight-NAVIGAATION_HEIGHT), 4, BigDecimal.ROUND_HALF_UP)
   divide = divide.multiply(BigDecimal("100"))
   divide = divide.multiply(BigDecimal("0.002" ))
   divide = divide.add(BigDecimal("0.8"))
   if (!isOpen) {
       programView.scaleX = divide.toFloat()
       programView.scaleY = divide.toFloat()
   } else {
       programView.top = paddingTop + (-((measuredHeight - NAVIGAATION_HEIGHT) - top))
   }
复制代码
这里就注意细节了,下拉的时候,小程序布局是通过缩放呈现的,但是上滑关闭的时,小程序布局是和会话布局同时向上走的。
动画遮罩
这是比较麻烦的一步,就是绘制进度动画,也就是那三个圆点。
这个原点有三种状态,一是出现时从小到大,二是到一定大小后,分离出两个固定大小的圆,但是这两个圆比此时中间的要小,并且和下拉进度慢慢向两边扩撒,三是中间的圆开始缩小,直到和其余两个圈同等大小。
这里就要另一波细节了,当还在屏幕的三分之一下拉时,这个头部遮罩布局整体还是不透明的,但是到屏幕的三分之一时,这个布局的透明度开始从255到0运动。并且到达三分之一的时候,还要振动一下,并且只要振动过了,那么在手指未松开时,再次到达屏幕的三分之一时,不会产生振动。
还有一波细节,状态栏由于使用了View填充,所以,从屏幕三份之一后开始,这个View的透明度也要从255-0开始运动。
完整代码如下。
package com.example.kotlindemo.widget.weixin

import android.content.Context
import android.graphics.Canvas
import android.graphics.Color
import android.graphics.Paint
import android.os.VibrationEffect
import android.os.Vibrator
import android.util.AttributeSet
import android.util.Log
import android.view.View
import androidx.core.content.ContextCompat
import com.example.kotlindemo.MainActivity
import com.example.kotlindemo.R


class WeiXinPullHeaderMaskView @JvmOverloads constructor(
    context: Context?,
    attrs: AttributeSet?,
    defStyleAttr: Int
) :
    View(context, attrs, defStyleAttr) {

    var isVibrator: Boolean = false;
    var progress: Int = 0;
    var maxHeight: Int = 0;
    private val CIRCLE_MAX_SIZE = 32;
    var parentHeight=0;
    var paint = Paint()
    private val DEFAULT_CIRCLE_SIZE=8f;
    init {
        setBackgroundColor(Color.argb(255 , 239, 239, 239))
        paint.alpha=255;
        paint.color = ContextCompat.getColor(context!!, R.color.circleColor)
        paint.isAntiAlias = true;
    }

    override fun onDraw(canvas: Canvas) {
        super.onDraw(canvas)

        var value = height.toFloat() / maxHeight

        if (height <= maxHeight / 2) {
            canvas.drawCircle((width / 2).toFloat(), (height / 2).toFloat(), CIRCLE_MAX_SIZE * value, paint)
        } else {
          if (progress<100){
              var diff = (value - 0.5f) * CIRCLE_MAX_SIZE
              canvas.drawCircle(((width / 2).toFloat()-((0.4f-value)*100)), (height / 2).toFloat(), DEFAULT_CIRCLE_SIZE, paint)
              canvas.drawCircle(((width / 2).toFloat()+((0.4f-value)*100)), (height / 2).toFloat(), DEFAULT_CIRCLE_SIZE, paint)
              if ((CIRCLE_MAX_SIZE * 0.5f) - diff<=DEFAULT_CIRCLE_SIZE){
                  canvas.drawCircle((width / 2).toFloat(), (height / 2).toFloat(), DEFAULT_CIRCLE_SIZE, paint)
              }else{
                  canvas.drawCircle((width / 2).toFloat(), (height / 2).toFloat(), (CIRCLE_MAX_SIZE * 0.5f) - diff, paint)
              }

          }else{
              paint.alpha=getAlphaValue();
              canvas.drawCircle((width / 2).toFloat(), (height / 2).toFloat(), DEFAULT_CIRCLE_SIZE, paint)
              canvas.drawCircle((width / 2).toFloat()-((0.4f)*100), (height / 2).toFloat(), DEFAULT_CIRCLE_SIZE, paint)
              canvas.drawCircle((width / 2).toFloat()+(((0.4f)*100)), (height / 2).toFloat(), DEFAULT_CIRCLE_SIZE, paint)
          }
        }

    }
    private fun getAlphaValue():Int{
        val dc=parentHeight/3-ViewUtils.getStatusBarHeight(resources);
        val alpha=((height).toFloat()-dc)/(parentHeight-(dc))
       return 255-(255*alpha).toInt()
    }

    private fun vibrator() {
        var vibrator = context.getSystemService(Context.VIBRATOR_SERVICE) as Vibrator
        if (android.os.Build.VERSION.SDK_INT >= android.os.Build.VERSION_CODES.O) {
            var createOneShot = VibrationEffect.createOneShot(7, 255)
            vibrator.vibrate(createOneShot)
        } else {
            vibrator.vibrate(7)
        }
    }

    fun setProgress(value: Float,parentHeight:Int) {
        this.progress = value.toInt();
        this.parentHeight=parentHeight;
        if (value >= 100 && !isVibrator) {
            vibrator()
            isVibrator = true;
        }
        if (value < 100) {
            isVibrator = false;
        }
        if (progress>=100){
            setBackgroundColor(Color.argb(getAlphaValue() , 239, 239, 239))
            var mainActivity = context as MainActivity
            mainActivity.changeStatusBackgroundAlphaValue(getAlphaValue())
        }else{
            setBackgroundColor(Color.argb(255, 239, 239, 239))
        }
        invalidate()
    }


}
复制代码
还有就是这三个原点是始终位于遮罩View中间的,绘制的时候只需要在中间绘制,遮罩View的高度会被外界View所更改。
MainActivity
import android.graphics.Color
import android.os.Build
import android.os.Bundle
import android.view.View
import android.view.Window
import androidx.appcompat.app.AppCompatActivity
import androidx.databinding.DataBindingUtil
import com.example.kotlindemo.databinding.ActivityMainBinding
import com.example.kotlindemo.widget.weixin.ChatSession
import com.example.kotlindemo.widget.weixin.ChatSessionAdapter
import com.example.kotlindemo.widget.weixin.ViewUtils


class MainActivity : AppCompatActivity() {
    lateinit var binding: ActivityMainBinding;


    fun changeStatusBackgroundAlphaValue(value: Int){
        binding.statusBar.setBackgroundColor(Color.argb(value, 239, 239, 239))
    }
    override fun onCreate(savedInstanceState: Bundle?) {
        super.onCreate(savedInstanceState)
        binding = DataBindingUtil.setContentView(this, R.layout.activity_main);


        var layoutParams = binding.statusBar.layoutParams
        layoutParams.height=ViewUtils.getStatusBarHeight(resources)
        binding.statusBar.layoutParams=layoutParams
        binding.wxMain.setPadding(0, ViewUtils.getStatusBarHeight(resources), 0, 0)

        if (Build.VERSION.SDK_INT >= 21) {
            val window: Window = window
            window.getDecorView().setSystemUiVisibility(
                View.SYSTEM_UI_FLAG_LAYOUT_FULLSCREEN
                        or View.SYSTEM_UI_FLAG_LAYOUT_STABLE or View.SYSTEM_UI_FLAG_LIGHT_STATUS_BAR
            )
            window.setStatusBarColor(Color.TRANSPARENT)
        }


        val chatSessions= mutableListOf()

        for (index in 0 .. 10){
            chatSessions.add(ChatSession("https://img2.baidu.com/it/u=3538084390,1079314259&fm=26&fmt=auto&gp=0.jpg","马云","你来,我把公司给你","上午"))
            chatSessions.add(ChatSession("https://img0.baidu.com/it/u=273576249,1042072491&fm=26&fmt=auto&gp=0.jpg","奥巴马","哥哥在哪呢","上午"))
            chatSessions.add(ChatSession("https://img1.baidu.com/it/u=152902017,4157746361&fm=11&fmt=auto&gp=0.jpg","成龙","马上接你","上午"))
            chatSessions.add(ChatSession("https://img0.baidu.com/it/u=3789809038,289359647&fm=26&fmt=auto&gp=0.jpg","窃瓦辛格","我教你啊","上午"))

        }
        binding.chatList.adapter=ChatSessionAdapter(chatSessions,this)
    }

}
复制代码
十、节拍器指针动画
通过修改设置内选项,对首页内进行更新,推荐学习研究;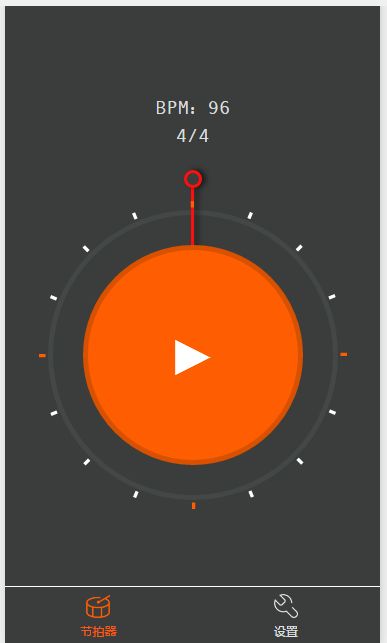

示例代码:
[AppleScript] 纯文本查看 复制代码
?
| 001 002 003 004 005 006 007 008 009 010 011 012 013 014 015 016 017 018 019 020 021 022 023 024 025 026 027 028 029 030 031 032 033 034 035 036 037 038 039 040 041 042 043 044 045 046 047 048 049 050 051 052 053 054 055 056 057 058 059 060 061 062 063 064 065 066 067 068 069 070 071 072 073 074 075 076 077 078 079 080 081 082 083 084 085 086 087 088 089 090 091 092 093 094 095 096 097 098 099 100 101 102 103 104 105 106 107 108 109 110 111 112 113 114 115 116 117 118 119 120 121 122 123 124 125 126 127 128 129 130 131 132 133 134 135 136 137 138 139 140 141 |
|
小程序动画效果合集第一期,以后不定期给大家带来更多合集。
本文章首发知乎账号:极乐君,想要关注更多的前后端技术知识,可以关注下知乎账号,本账号只做小程序相关技术文章更新~。
下期见~


