机器学习课设Part1---天气识别(DenseNet121和ResNet50)
数据集的划分
本次数据集全部存在同一个文件夹下,命名格式如cloud (233).jpeg,最终分为cloud、sun、cloudy三类,仅需划分为70%的训练集和30%的测试集,在TensorFlow中提供了划分训练集和验证集的方式,故此处仅将全部数据集划分为两部分,后续从训练集中再划分出训练集和验证集
import os
import random
import shutil


def DivideDataSet(fileDir, class_name):
    imgpath=os.path.join(fileDir,class_name)#按顺序读取到第一类照片名字
    image_list = os.listdir(imgpath)  # 获取原始图片路径中的所有图片
    image_number = len(image_list)    # 获取原始图片路径中的图片数目
    train_number = int(image_number * train_rate) # 图像数量乘以随机比例得出需要多少张训练图像
    test_number = image_number - train_number    # 剩下的做验证集图像
    print(class_name, "文件夹下有", image_number, "张图片,分为", train_number, "张训练集和", test_number, "张测试集")

    train_sample = random.sample(image_list, train_number)   # 从image_list中随机获取一定比例的图像.
#     test_sample = random.sample(list(set(image_list) - set(train_sample)), test_number)
#     val_sample = list(set(image_list ) - set(train_sample) - set(test_sample))
    test_sample = list(set(image_list) - set(train_sample))  # 仅划分测试集和训练集时注释上面两行

    sample = [train_sample, test_sample] # 生成列表
    # 复制图像到目标文件夹
    for k in range(len(save_dir)): # 地址长度,目前k是两个数,0和1
        tmp_dir = os.path.join(save_dir[k],class_name)
#         print(tmp_dir)
        if os.path.isdir(tmp_dir):# 判断路径是否存在
            for name in sample[k]:# sample[0]为train_sample中的数据,整句是train_sample中的数据循序进行遍历
                shutil.copy(os.path.join(imgpath, name), os.path.join(tmp_dir, name))# join的作用是拼接字符串
        else:
            os.makedirs(tmp_dir)#建立图像路径
#             print(tmp_dir)
            for name in sample[k]:
                shutil.copy(os.path.join(imgpath, name), os.path.join(tmp_dir, name))
程序运行前需要手动将原始数据集的cloud,cloudy,sun的图片放到DataSet的对应目录下,由于划分完全随机,故此程序仅运行一次,不可多次运行,否则会出现训练集和测试集数据混杂,影响最终效果
import time
time_start = time.time()

# 训练集比例
train_rate = 0.7
test_rate = 0.3

# 原始数据集路径
origion_path = './DataSet(resized)/'

# 保存路径
save_train_dir = './TrainDataSet(resized)/'#训练集图片地址
save_test_dir = './TestDataSet(resized)/'#测试集图片地址
save_val_dir = ''  # 验证集图片地址

save_dir = [save_train_dir, save_test_dir]


# 数据集类别及数量
file_list = os.listdir(origion_path)
num_classes = len(file_list)
for i in range(num_classes):
    class_name = file_list[i]
    DivideDataSet(origion_path, class_name)
print('划分完毕!')
time_end = time.time()
print('---------------')
print('训练集和测试集划分共耗时 %.4f s!' % (time_end - time_start))
cloud 文件夹下有 2382 张图片,分为 1667 张训练集和 715 张测试集
cloudy 文件夹下有 4008 张图片,分为 2805 张训练集和 1203 张测试集
sun 文件夹下有 5413 张图片,分为 3789 张训练集和 1624 张测试集
划分完毕!
---------------
训练集和测试集划分共耗时 11.4973 s!
输出TrainDataSet和TrainDataSet下的cloud文件夹前十张验证一下
train_list = os.listdir(os.path.join(save_train_dir, 'cloud'))
print("训练集图片:",len(train_list))
for i in range(10):
    print(train_list[i])
print("-------------------")
test_list = os.listdir(os.path.join(save_test_dir, 'cloud'))
print("测试集图片:",len(test_list))
for i in range(10):
    print(test_list[i])
训练集图片: 1667
cloud (1).jpeg
cloud (10).jpeg
cloud (100).jpeg
cloud (1001).jpeg
cloud (1003).jpeg
cloud (1005).jpeg
cloud (1008).jpeg
cloud (1009).jpeg
cloud (101).jpeg
cloud (1012).jpeg
-------------------
测试集图片: 715
cloud (1000).jpeg
cloud (1002).jpeg
cloud (1004).jpeg
cloud (1006).jpeg
cloud (1007).jpeg
cloud (1010).jpeg
cloud (1011).jpeg
cloud (1019).jpeg
cloud (1021).jpeg
cloud (1023).jpeg
此处的顺序为字符顺序而非数字顺序,但仔细看还是能分辨出来原本相邻的图片被按比例随机分给了两个文件夹
天气识别模型的训练与保存
CNN史上的一个里程碑事件是ResNet模型的出现,ResNet可以训练出更深的CNN模型,从而实现更高的准确度。ResNet模型的核心是通过建立前面层与后面层之间的“短路连接”(shortcuts,skip connection),这有助于训练过程中梯度的反向传播,从而能训练出更深的CNN网络。今天我们要介绍的是 DenseNet(Densely connected convolutional networks) 模型,它的基本思路与ResNet一致,但是它建立的是前面所有层与后面层的密集连接(dense connection),它的名称也是由此而来。DenseNet的另一大特色是通过特征在channel上的连接来实现特征重用(feature reuse)。这些特点让DenseNet在参数和计算成本更少的情形下实现比ResNet更优的性能,DenseNet也因此斩获CVPR 2017的最佳论文奖。
此处使用121层的DenseNet和50层的ResNet进行训练,比较其在天气数据集下的训练结果并加以保存
# 设置使用GPU运行
import tensorflow as tf

gpus = tf.config.list_physical_devices("GPU")

if gpus:
    tf.config.experimental.set_memory_growth(gpus[0], True)  #设置GPU显存用量按需使用
    tf.config.set_visible_devices([gpus[0]],"GPU")

print(gpus)
[PhysicalDevice(name='/physical_device:GPU:0', device_type='GPU')]
测试集已经预先分出(见Divide.ipynb文件),此处使用tf.keras.preprocessing.image_dataset_from_directory直接从总的训练集中进一步划分构建出训练集和验证集
# 设置训练时输入的图像尺寸和一次运算所需的图片数量
img_height = 200
img_width  = 150
batch_size = 20
# 验证集比例为20%
"""
设置训练集
"""
train_ds = tf.keras.preprocessing.image_dataset_from_directory(
    "./TrainDataSet/",
    validation_split=0.2,
    subset="training",
    label_mode = "categorical",
    seed=12,
    image_size=(img_height, img_width),
    batch_size=batch_size)

"""
设置验证集
"""
val_ds = tf.keras.preprocessing.image_dataset_from_directory(
    "./TrainDataSet/",
    validation_split=0.2,
    subset="validation",
    label_mode = "categorical",
    seed=12,
    image_size=(img_height, img_width),
    batch_size=batch_size)

class_names = train_ds.class_names
print(class_names)
Found 7758 files belonging to 3 classes.
Using 6207 files for training.
Found 7758 files belonging to 3 classes.
Using 1551 files for validation.
['cloud', 'cloudy', 'sun']
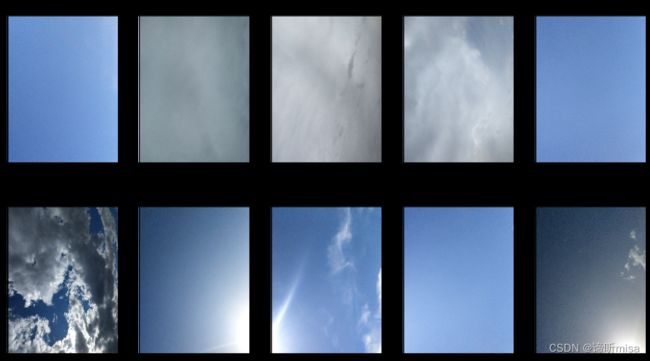
可以看到训练集有三种类型,下面进行预处理并展示几张经预处理的图片(可直接用于模型训练)
import matplotlib.pyplot as plt
import numpy as np
AUTOTUNE = tf.data.experimental.AUTOTUNE

# 归一化
def train_preprocessing(image,label):
    return (image/255.0,label)

train_ds = (
    train_ds.cache()
    .map(train_preprocessing)    # 这里可以设置预处理函数
    .prefetch(buffer_size=AUTOTUNE)
)

val_ds = (
    val_ds.cache()
    .map(train_preprocessing)    # 这里可以设置预处理函数
    .prefetch(buffer_size=AUTOTUNE)
)

plt.figure(figsize=(16, 9))  # 图形总的宽为16高为9

for images, labels in train_ds.take(1):
    for i in range(10):
        plt.subplot(2, 5, i + 1)
        plt.xticks([])
        plt.yticks([])
        plt.grid(False)

        # 显示图片
        plt.imshow(images[2*i])
        plt.title(class_names[np.argmax(labels[2*i])])

plt.show()
评估指标用于衡量深度学习算法模型的质量,评估深度学习算法模型对于任何项目都是必不可少的。在深度学习中,有许多不同类型的评估指标可用于衡量算法模型,此处使用accuracy、precision、recall、auc
metrics = [
    tf.keras.metrics.CategoricalAccuracy(name='accuracy'),
    tf.keras.metrics.Precision(name='precision'),
    tf.keras.metrics.Recall(name='recall'),
    tf.keras.metrics.AUC(name='auc')
]
引入功能包,训练代数为9代
from tensorflow.keras import layers, models, Input
from tensorflow.keras.models import Model
from tensorflow.keras.layers import Conv2D, MaxPooling2D, Dense, Flatten, Dropout,BatchNormalization,Activation
epochs = 9
# 加载预训练模型DenseNet121
DenseNet121_base_model = tf.keras.applications.densenet.DenseNet121(weights='imagenet',
                                                            include_top=False,
                                                            input_shape=(img_height, img_width, 3),
                                                            pooling='max')
for layer in DenseNet121_base_model.layers:
    layer.trainable = True

X = DenseNet121_base_model.output
# X = Dropout(0.3)(X)

output = Dense(len(class_names), activation='softmax')(X)
DenseNet121_model = Model(inputs=DenseNet121_base_model.input, outputs=output)

DenseNet121_model.compile(optimizer=tf.keras.optimizers.Adam(1e-4),
                loss='categorical_crossentropy',
                metrics= metrics)
# model.summary()
开始训练
DenseNet121_history = DenseNet121_model.fit(train_ds, epochs=epochs, verbose=1, validation_data=val_ds)
Epoch 1/9
311/311 [==============================] - 815s 3s/step - loss: 0.7374 - accuracy: 0.8682 - precision: 0.8709 - recall: 0.8674 - auc: 0.9386 - val_loss: 0.2616 - val_accuracy: 0.9265 - val_precision: 0.9305 - val_recall: 0.9233 - val_auc: 0.9827
Epoch 2/9
311/311 [==============================] - 78s 251ms/step - loss: 0.0639 - accuracy: 0.9830 - precision: 0.9839 - recall: 0.9830 - auc: 0.9971 - val_loss: 0.0594 - val_accuracy: 0.9813 - val_precision: 0.9813 - val_recall: 0.9813 - val_auc: 0.9980
Epoch 3/9
311/311 [==============================] - 78s 251ms/step - loss: 0.0250 - accuracy: 0.9911 - precision: 0.9911 - recall: 0.9909 - auc: 0.9996 - val_loss: 0.0220 - val_accuracy: 0.9942 - val_precision: 0.9942 - val_recall: 0.9942 - val_auc: 0.9989
Epoch 4/9
311/311 [==============================] - 78s 251ms/step - loss: 0.0055 - accuracy: 0.9990 - precision: 0.9990 - recall: 0.9990 - auc: 1.0000 - val_loss: 0.0259 - val_accuracy: 0.9916 - val_precision: 0.9916 - val_recall: 0.9916 - val_auc: 0.9989
Epoch 5/9
311/311 [==============================] - 78s 252ms/step - loss: 0.0028 - accuracy: 0.9991 - precision: 0.9991 - recall: 0.9991 - auc: 1.0000 - val_loss: 0.0206 - val_accuracy: 0.9948 - val_precision: 0.9948 - val_recall: 0.9948 - val_auc: 0.9990
Epoch 6/9
311/311 [==============================] - 79s 254ms/step - loss: 2.7997e-04 - accuracy: 1.0000 - precision: 1.0000 - recall: 1.0000 - auc: 1.0000 - val_loss: 0.0186 - val_accuracy: 0.9929 - val_precision: 0.9929 - val_recall: 0.9929 - val_auc: 0.9999
Epoch 7/9
311/311 [==============================] - 79s 254ms/step - loss: 6.0650e-05 - accuracy: 1.0000 - precision: 1.0000 - recall: 1.0000 - auc: 1.0000 - val_loss: 0.0184 - val_accuracy: 0.9929 - val_precision: 0.9929 - val_recall: 0.9929 - val_auc: 0.9999
Epoch 8/9
311/311 [==============================] - 79s 253ms/step - loss: 4.3440e-05 - accuracy: 1.0000 - precision: 1.0000 - recall: 1.0000 - auc: 1.0000 - val_loss: 0.0183 - val_accuracy: 0.9936 - val_precision: 0.9936 - val_recall: 0.9936 - val_auc: 0.9999
Epoch 9/9
311/311 [==============================] - 79s 254ms/step - loss: 3.3949e-05 - accuracy: 1.0000 - precision: 1.0000 - recall: 1.0000 - auc: 1.0000 - val_loss: 0.0181 - val_accuracy: 0.9936 - val_precision: 0.9936 - val_recall: 0.9936 - val_auc: 0.9999
# 加载预训练模型ResNet50
ResNet50_base_model = tf.keras.applications.resnet50.ResNet50(weights='imagenet',
                                                            include_top=False,
                                                            input_shape=(img_height, img_width, 3),
                                                            pooling='max')
for layer in ResNet50_base_model.layers:
    layer.trainable = True

X = ResNet50_base_model.output
# X = Dropout(0.3)(X)

output = Dense(len(class_names), activation='softmax')(X)
ResNet50_model = Model(inputs=ResNet50_base_model.input, outputs=output)

# optimizer = tf.keras.optimizers.Adam(lr_schedule)

ResNet50_model.compile(optimizer=tf.keras.optimizers.Adam(1e-4),
                loss='categorical_crossentropy',
                metrics= metrics)
# resnet50_model.summary()
开始训练
ResNet50_history = ResNet50_model.fit(train_ds, epochs=epochs, verbose=1, validation_data=val_ds)
Epoch 1/9
311/311 [==============================] - 93s 278ms/step - loss: 0.7328 - accuracy: 0.9549 - precision: 0.9550 - recall: 0.9548 - auc: 0.9821 - val_loss: 5.3862 - val_accuracy: 0.3681 - val_precision: 0.3681 - val_recall: 0.3681 - val_auc: 0.5261
Epoch 2/9
311/311 [==============================] - 83s 268ms/step - loss: 0.1765 - accuracy: 0.9739 - precision: 0.9739 - recall: 0.9733 - auc: 0.9916 - val_loss: 3.3345 - val_accuracy: 0.3707 - val_precision: 0.3712 - val_recall: 0.3707 - val_auc: 0.6293
Epoch 3/9
311/311 [==============================] - 83s 268ms/step - loss: 0.0650 - accuracy: 0.9887 - precision: 0.9887 - recall: 0.9887 - auc: 0.9970 - val_loss: 0.9180 - val_accuracy: 0.8279 - val_precision: 0.8310 - val_recall: 0.8272 - val_auc: 0.9322
Epoch 4/9
311/311 [==============================] - 87s 281ms/step - loss: 0.0434 - accuracy: 0.9921 - precision: 0.9921 - recall: 0.9921 - auc: 0.9979 - val_loss: 0.1035 - val_accuracy: 0.9890 - val_precision: 0.9890 - val_recall: 0.9890 - val_auc: 0.9946
Epoch 5/9
311/311 [==============================] - 86s 276ms/step - loss: 0.0926 - accuracy: 0.9862 - precision: 0.9862 - recall: 0.9862 - auc: 0.9954 - val_loss: 1.1727 - val_accuracy: 0.9710 - val_precision: 0.9710 - val_recall: 0.9710 - val_auc: 0.9814
Epoch 6/9
311/311 [==============================] - 85s 273ms/step - loss: 0.1357 - accuracy: 0.9879 - precision: 0.9879 - recall: 0.9879 - auc: 0.9948 - val_loss: 0.2146 - val_accuracy: 0.9723 - val_precision: 0.9723 - val_recall: 0.9723 - val_auc: 0.9861
Epoch 7/9
311/311 [==============================] - 85s 272ms/step - loss: 0.0570 - accuracy: 0.9908 - precision: 0.9908 - recall: 0.9908 - auc: 0.9972 - val_loss: 0.0754 - val_accuracy: 0.9936 - val_precision: 0.9936 - val_recall: 0.9936 - val_auc: 0.9971
Epoch 8/9
311/311 [==============================] - 83s 268ms/step - loss: 0.0317 - accuracy: 0.9965 - precision: 0.9965 - recall: 0.9965 - auc: 0.9986 - val_loss: 0.0219 - val_accuracy: 0.9936 - val_precision: 0.9936 - val_recall: 0.9936 - val_auc: 0.9985
Epoch 9/9
311/311 [==============================] - 83s 267ms/step - loss: 0.0136 - accuracy: 0.9963 - precision: 0.9963 - recall: 0.9963 - auc: 0.9995 - val_loss: 0.0687 - val_accuracy: 0.9923 - val_precision: 0.9923 - val_recall: 0.9923 - val_auc: 0.9980
# 可视化展示两个模型的accuracy和loss的变化趋势
loss_trend_graph_path = r"loss.jpg"
acc_trend_graph_path = r"acc.jpg"
import matplotlib.pyplot as plt

# summarize history for accuracy
plt.figure(figsize=(20, 6))  # 图形的宽为20高为6
plt.subplot(1, 2, 1)
plt.plot(DenseNet121_history.history["accuracy"])
plt.plot(DenseNet121_history.history["val_accuracy"])
plt.title("DenseNet accuracy")
plt.ylabel("accuracy")
plt.xlabel("epoch")
plt.legend(["train", "test"], loc="upper left")
plt.savefig(acc_trend_graph_path)

plt.subplot(1, 2, 2)
plt.plot(ResNet50_history.history["accuracy"])
plt.plot(ResNet50_history.history["val_accuracy"])
plt.title("ResNet accuracy")
plt.ylabel("accuracy")
plt.xlabel("epoch")
plt.legend(["train", "test"], loc="upper left")
plt.savefig(acc_trend_graph_path)

# summarize history for loss
plt.figure(figsize=(20, 6))  # 图形的宽为20高为6
plt.subplot(1, 2, 1)
plt.plot(DenseNet121_history.history["loss"])
plt.plot(DenseNet121_history.history["val_loss"])
plt.title("DenseNet loss")
plt.ylabel("loss")
plt.xlabel("epoch")
plt.legend(["train", "test"], loc="upper left")
plt.savefig(loss_trend_graph_path)

plt.subplot(1, 2, 2)
plt.plot(ResNet50_history.history["loss"])
plt.plot(ResNet50_history.history["val_loss"])
plt.title("ResNet loss")
plt.ylabel("loss")
plt.xlabel("epoch")
plt.legend(["train", "test"], loc="upper left")
plt.savefig(loss_trend_graph_path)
保存训练结果
DenseNet121_model.save('my_model_DesNet.h5')
ResNet50_model.save('my_model_ResNet.h5')
模型检测
使用刚刚训练好的模型来进行检测
# 设置使用GPU运行
import tensorflow as tf

gpus = tf.config.list_physical_devices("GPU")

if gpus:
    tf.config.experimental.set_memory_growth(gpus[0], True)  #设置GPU显存用量按需使用
    tf.config.set_visible_devices([gpus[0]],"GPU")

print(gpus)
[PhysicalDevice(name='/physical_device:GPU:0', device_type='GPU')]
此处同样使用tf.keras.preprocessing.image_dataset_from_directory从测试集导入数据,不需要进行进一步划分,在Train&Save.ipynb里的参数validation_split(验证集比例)、subset(数据集类型)和seed(随机划分种子)均不必再设置
img_height = 200
img_width  = 150
batch_size = 9

"""
设置测试集
"""
test_ds = tf.keras.preprocessing.image_dataset_from_directory(
    "./TestDataSet/",
    label_mode = "categorical",
    image_size=(img_height, img_width),
    batch_size=batch_size)
class_names = test_ds.class_names
print(class_names)
Found 3326 files belonging to 3 classes.
['cloud', 'cloudy', 'sun']
# 导入预先训练好的模型
from  tensorflow.keras.models import load_model
Des_classifier=load_model("my_model_DesNet.h5")
Res_classifier=load_model("my_model_ResNet.h5")
# 测试一下准确率
from PIL import Image
import os
import numpy as np
test_dir = "./TestDataSet/"
test_dirs = os.listdir(test_dir)

i,j,k = 0, 0, 0
for images, labels in test_ds:
    for img, label in zip(images, labels):
        i = i+1
        if i%300 == 0 :
            print("已检测%.2f"%(i/33.26),"%的数据")
        image = tf.image.resize(img, [img_height, img_width])/255.0
        # 测试前需要给图片增加一个维度
        img_array = tf.expand_dims(image, 0)

        prediction1 = Des_classifier.predict(img_array)
        prediction2 = Res_classifier.predict(img_array)
        if class_names[np.argmax(prediction1)] == class_names[np.argmax(label)]:
            j=j+1
        if class_names[np.argmax(prediction2)] == class_names[np.argmax(label)]:
            k=k+1

print("共",i,"张测试图,DenseNet正确识别",j,"张,RenseNet正确识别",k,"张")
print("DenseNet正确率: %.2f"%(j/i*100),"%    ","RenseNet正确率:%.2f"%(k/i*100),"%")
已检测9.02 %的数据
已检测18.04 %的数据
已检测27.06 %的数据
已检测36.08 %的数据
已检测45.10 %的数据
已检测54.12 %的数据
已检测63.14 %的数据
已检测72.16 %的数据
已检测81.18 %的数据
已检测90.20 %的数据
已检测99.22 %的数据
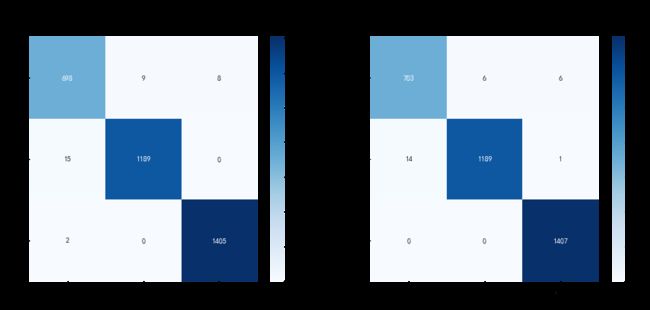
共 3326 张测试图,DenseNet正确识别 3292 张,RenseNet正确识别 3299 张
DenseNet正确率: 98.98 %     RenseNet正确率:99.19 %
from sklearn.metrics import confusion_matrix
import seaborn as sns
import pandas as pd
import matplotlib.pyplot as plt

# 定义一个绘制混淆矩阵图的函数
def plot_cm(labels1, predictions1,labels2, predictions2):

    # 生成混淆矩阵
    conf_numpy1 = confusion_matrix(labels1, predictions1)
    conf_numpy2 = confusion_matrix(labels2, predictions2)
    # 将矩阵转化为 DataFrame
    conf_df1 = pd.DataFrame(conf_numpy1, index=class_names ,columns=class_names)
    conf_df2 = pd.DataFrame(conf_numpy2, index=class_names ,columns=class_names)

    plt.figure(figsize=(15,6))
    plt.rcParams['font.sans-serif'] = ['SimHei']
    plt.subplot(1,2,1)
    sns.heatmap(conf_df1, annot=True, fmt="d", cmap="Blues")
    plt.suptitle('混淆矩阵')

    plt.title('DenseNet121',fontsize=15)
    plt.ylabel('真实值',fontsize=14)
    plt.xlabel(' 预测值',fontsize=14)
    plt.subplot(1,2,2)
    sns.heatmap(conf_df2, annot=True, fmt="d", cmap="Blues")

    plt.title('ResNet50',fontsize=15)
    plt.ylabel('真实值',fontsize=14)
    plt.xlabel('预测值',fontsize=14)

val_pre1   = []
val_label1 = []
val_pre2   = []
val_label2 = []

for images, labels in test_ds:#这里可以取部分验证数据(.take(1))生成混淆矩阵
    for img, label in zip(images, labels):
        image = tf.image.resize(img, [img_height, img_width])/255.0
        # 测试前需要给图片增加一个维度
        img_array = tf.expand_dims(image, 0)

        prediction1 = Des_classifier.predict(img_array)
        prediction2 = Res_classifier.predict(img_array)

        val_pre1.append(np.argmax(prediction1))
        val_label1.append([np.argmax(one_hot)for one_hot in [label]])
        val_pre2.append(np.argmax(prediction2))
        val_label2.append([np.argmax(one_hot)for one_hot in [label]])
plot_cm(val_label1, val_pre1,val_label2, val_pre2)


