python svm 实例_Python支持向量机(SVM)实例
SVM(Support Vector Machine)指的是支持向量机,是常见的一种判别方法。在机器学习领域,是一个有监督的学习模型,通常用来进行模式识别、分类以及回归分析。
Matlab中有林智仁编写的libsvm工具包可以很好地进行进行SVM训练。Python中我们有sklearn工具包来进行机器学习算法训练,Scikit-Learn库已经实现了所有基本机器学习的算法。
下面以以Iris兰花数据集为例子:
由于从UCI数据库中下载的Iris原始数据集的样子是这样的,前四列为特征列,第五列为类别列,分别有三种类别Iris-setosa, Iris-versicolor, Iris-virginica。
需要使用numpy对其进行分割操作。
下载iris.data即可。
Python3代码:
Python
from sklearn import svm
import numpy as np
import matplotlib.pyplot as plt
import matplotlib as mpl
from matplotlib import colors
from sklearn.model_selection import train_test_split
def iris_type(s):
it = {b'Iris-setosa': 0, b'Iris-versicolor': 1, b'Iris-virginica': 2}
return it[s]
path = 'C:\\Users\\dell\\desktop\\iris.data' # 数据文件路径
data = np.loadtxt(path, dtype=float, delimiter=',', converters={4: iris_type})
x, y = np.split(data, (4,), axis=1)
x = x[:, :2]
x_train, x_test, y_train, y_test = train_test_split(x, y, random_state=1, train_size=0.6)
# clf = svm.SVC(C=0.1, kernel='linear', decision_function_shape='ovr')
clf = svm.SVC(C=0.8, kernel='rbf', gamma=20, decision_function_shape='ovr')
clf.fit(x_train, y_train.ravel())
print(clf.score(x_train, y_train)) # 精度
y_hat = clf.predict(x_train)
print(clf.score(x_test, y_test))
y_hat2 = clf.predict(x_test)
x1_min, x1_max = x[:, 0].min(), x[:, 0].max() # 第0列的范围
x2_min, x2_max = x[:, 1].min(), x[:, 1].max() # 第1列的范围
x1, x2 = np.mgrid[x1_min:x1_max:200j, x2_min:x2_max:200j] # 生成网格采样点
grid_test = np.stack((x1.flat, x2.flat), axis=1) # 测试点
mpl.rcParams['font.sans-serif'] = [u'SimHei']
mpl.rcParams['axes.unicode_minus'] = False
cm_light = mpl.colors.ListedColormap(['#A0FFA0', '#FFA0A0', '#A0A0FF'])
cm_dark = mpl.colors.ListedColormap(['g', 'r', 'b'])
grid_hat = clf.predict(grid_test) # 预测分类值
grid_hat = grid_hat.reshape(x1.shape) # 使之与输入的形状相同
alpha = 0.5
plt.pcolormesh(x1, x2, grid_hat, cmap=cm_light) # 预测值的显示
plt.plot(x[:, 0], x[:, 1], 'o', alpha=alpha, color='blue', markeredgecolor='k')
plt.scatter(x_test[:, 0], x_test[:, 1], s=120, facecolors='none', zorder=10) # 圈中测试集样本
plt.xlabel(u'花萼长度', fontsize=13)
plt.ylabel(u'花萼宽度', fontsize=13)
plt.xlim(x1_min, x1_max)
plt.ylim(x2_min, x2_max)
plt.title(u'SVM分类', fontsize=15)
plt.show()
1
2
3
4
5
6
7
8
9
10
11
12
13
14
15
16
17
18
19
20
21
22
23
24
25
26
27
28
29
30
31
32
33
34
35
36
37
38
39
40
41
42
43
44
45
46
47
48
49
50
51
52
53
54
fromsklearnimportsvm
importnumpyasnp
importmatplotlib.pyplotasplt
importmatplotlibasmpl
frommatplotlibimportcolors
fromsklearn.model_selectionimporttrain_test_split
defiris_type(s):
it={b'Iris-setosa':0,b'Iris-versicolor':1,b'Iris-virginica':2}
returnit[s]
path='C:\\Users\\dell\\desktop\\iris.data'# 数据文件路径
data=np.loadtxt(path,dtype=float,delimiter=',',converters={4:iris_type})
x,y=np.split(data,(4,),axis=1)
x=x[:,:2]
x_train,x_test,y_train,y_test=train_test_split(x,y,random_state=1,train_size=0.6)
# clf = svm.SVC(C=0.1, kernel='linear', decision_function_shape='ovr')
clf=svm.SVC(C=0.8,kernel='rbf',gamma=20,decision_function_shape='ovr')
clf.fit(x_train,y_train.ravel())
print(clf.score(x_train,y_train))# 精度
y_hat=clf.predict(x_train)
print(clf.score(x_test,y_test))
y_hat2=clf.predict(x_test)
x1_min,x1_max=x[:,0].min(),x[:,0].max()# 第0列的范围
x2_min,x2_max=x[:,1].min(),x[:,1].max()# 第1列的范围
x1,x2=np.mgrid[x1_min:x1_max:200j,x2_min:x2_max:200j]# 生成网格采样点
grid_test=np.stack((x1.flat,x2.flat),axis=1)# 测试点
mpl.rcParams['font.sans-serif']=[u'SimHei']
mpl.rcParams['axes.unicode_minus']=False
cm_light=mpl.colors.ListedColormap(['#A0FFA0','#FFA0A0','#A0A0FF'])
cm_dark=mpl.colors.ListedColormap(['g','r','b'])
grid_hat=clf.predict(grid_test)# 预测分类值
grid_hat=grid_hat.reshape(x1.shape)# 使之与输入的形状相同
alpha=0.5
plt.pcolormesh(x1,x2,grid_hat,cmap=cm_light)# 预测值的显示
plt.plot(x[:,0],x[:,1],'o',alpha=alpha,color='blue',markeredgecolor='k')
plt.scatter(x_test[:,0],x_test[:,1],s=120,facecolors='none',zorder=10)# 圈中测试集样本
plt.xlabel(u'花萼长度',fontsize=13)
plt.ylabel(u'花萼宽度',fontsize=13)
plt.xlim(x1_min,x1_max)
plt.ylim(x2_min,x2_max)
plt.title(u'SVM分类',fontsize=15)
plt.show()
1. split(数据,分割位置,轴=1(水平分割) or 0(垂直分割))。
2. x = x[:, :2]是为方便后期画图更直观,故只取了前两列特征值向量训练。
3. sklearn.model_selection.train_test_split随机划分训练集与测试集。train_test_split(train_data,train_target,test_size=数字, random_state=0)
参数解释:
train_data:所要划分的样本特征集
train_target:所要划分的样本结果
test_size:样本占比,如果是整数的话就是样本的数量
random_state:是随机数的种子。
随机数种子:其实就是该组随机数的编号,在需要重复试验的时候,保证得到一组一样的随机数。比如你每次都填1,其他参数一样的情况下你得到的随机数组是一样的。但填0或不填,每次都会不一样。随机数的产生取决于种子,随机数和种子之间的关系遵从以下两个规则:种子不同,产生不同的随机数;种子相同,即使实例不同也产生相同的随机数。
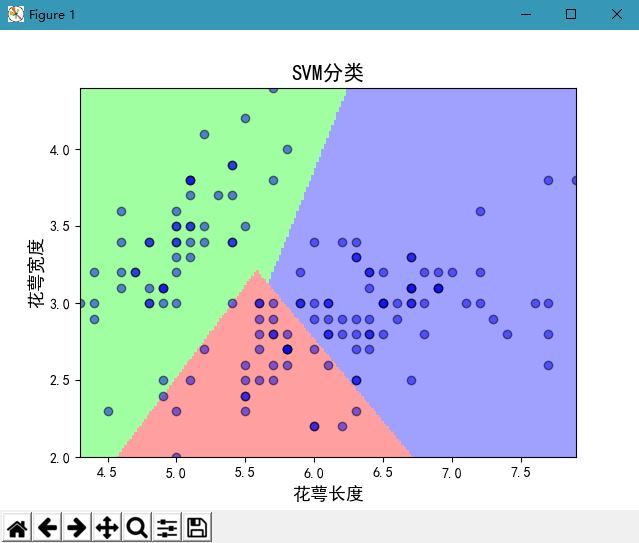
kernel=’linear’时,为线性核,C越大分类效果越好,但有可能会过拟合(defaul C=1)。
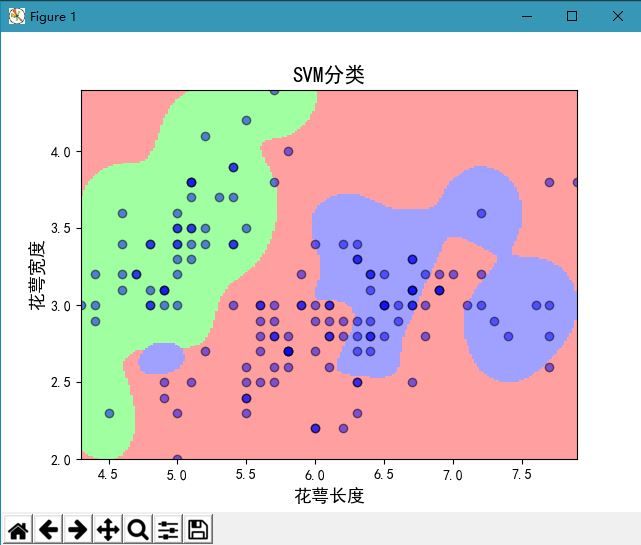
kernel=’rbf’时(default),为高斯核,gamma值越小,分类界面越连续;gamma值越大,分类界面越“散”,分类效果越好,但有可能会过拟合。
线性分类结果:
rbf核函数分类结果:
精确度:


