【语义分割】——SUN_RGBD数据集解析
地址:http://rgbd.cs.princeton.edu/
简介:
虽然RGB-D传感器已经在一些视觉任务上实现了重大突破,比如3D重建,但我们还没有在高级场景理解上实现类似的性能飞跃。造成这种情况的主要原因之一可能是缺乏一个具有合理大小的基准,其中包括用于培训的3D注释和用于评估的3D度量标准。在本文中,我们提出了一个RGB-D基准套件,目的是为了在所有主要场景理解任务中推进最新的技术水平。我们的数据集由四个不同的传感器捕获,包含10,000张RGB-D图像,其规模与PASCAL VOC类似。整个数据集被密集地注释,包括146,617个2D多边形和58,657个具有精确对象方向的3D边框,以及一个3D房间布局和场景类别。这个数据集使我们能够训练需要大量数据的算法来完成场景理解任务,使用直接和有意义的3D度量来评估它们,避免对小测试集进行过拟合,并研究交叉传感器的偏差。
这里我们主要解析其语义分割的部分
1. 语义标注解析
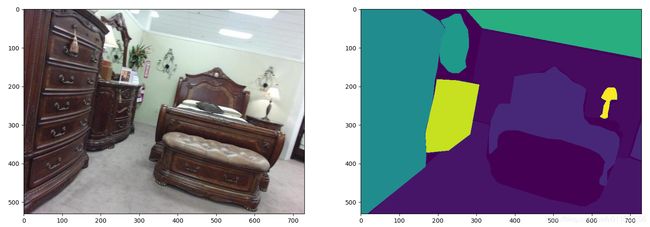
这里我们主要解析其语义分割的部分。目标是得到原始图像,语义label图像,语义可视化图像,类别label.txt文件。
Code(参考自:prepare_dataset.py):
import os
import os.path as osp
import shutil
from PIL import Image
from scipy.io import loadmat
import matplotlib.pyplot as plt
import numpy as np
import random
from tqdm import tqdm
import h5py
import scipy

imgpath = './SUNRGBD'
SUNRGBDMeta_dir = './SUNRGBDtoolbox/Metadata/SUNRGBDMeta.mat'
SUNRGBD2Dseg_dir = './SUNRGBDtoolbox/Metadata/SUNRGBD2Dseg.mat'
labeltxt   = "./label.txt"
imagepath = './images'
labelpath = './labels'
visualpath = './visual'
for path in [imagepath, labelpath, visualpath]:
    if not osp.exists(path):
        os.makedirs(path)

bin_colormap = np.random.randint(0, 255, (256, 3))      # 可视化的颜色
bin_colormap = bin_colormap.astype(np.uint8)

labels = []
processed = []
# load the data from the matlab file
SUNRGBD2Dseg = h5py.File(SUNRGBD2Dseg_dir, mode='r', libver='latest')
SUNRGBDMeta = scipy.io.loadmat(SUNRGBDMeta_dir, squeeze_me=True,
                                struct_as_record=False)['SUNRGBDMeta']
seglabel = SUNRGBD2Dseg['SUNRGBD2Dseg']['seglabel']

# classlabels
seg37list = SUNRGBD2Dseg['seg37list']
for i in range(seg37list.size):
    classstring = np.array(SUNRGBD2Dseg[seg37list[i][0]]).tostring().decode('utf-8')
    classstring = classstring.replace("\x00", "")
    print(classstring)
    labels.append(classstring)

with open(labeltxt, 'w') as f:
    content = ','.join(labels)
    f.write(content)

for i, meta in tqdm(enumerate(SUNRGBDMeta)):
    meta_dir = '/'.join(meta.rgbpath.split('/')[:-2])
    real_dir = meta_dir.split('/n/fs/sun3d/data/SUNRGBD/')[1]
    rgb_path = os.path.join(real_dir, 'image/' + meta.rgbname)

    # rgbimage
    srcname = osp.join(imgpath, rgb_path)
    t = "sun_{}".format(meta.rgbname)
    dstname = osp.join(imagepath, t)
    shutil.copy(srcname, dstname)
    rgbimg = Image.open(srcname)


    # labelimage
    label = np.array(
        SUNRGBD2Dseg[seglabel[i][0]][:].transpose(1, 0)).\
        astype(np.uint8)
    labelname = osp.join(labelpath, t.replace(".jpg", ".png"))
    labelimg = Image.fromarray(label, 'L')
    labelimg.save(labelname)

    # debug show
    # plt.subplot(1, 2, 1)
    # plt.imshow(rgbimg)
    # plt.subplot(1, 2, 2)
    # plt.imshow(labelimg)
    # plt.show()

    # visualimage
    visualname = osp.join(visualpath, t.replace(".jpg", ".png"))
    visualimg  = Image.fromarray(label, "P")
    palette = bin_colormap          #long palette of 768 items
    visualimg.putpalette(palette)
    visualimg.save(visualname, format='PNG')
wall,floor,cabinet,bed,chair,sofa,table,door,window,bookshelf,picture,counter,blinds,desk,shelves,curtain,dresser,pillow,mirror,floor_mat,clothes,ceiling,books,fridge,tv,paper,towel,shower_curtain,box,whiteboard,person,night_stand,toilet,sink,lamp,bathtub,bag
2. 关键点解析
2.1 h5py数据的解析
要先索引到,然后再从总的数据中读取SUNRGBD2Dseg[]
np.array(SUNRGBD2Dseg[seglabel[i][0]][:].transpose(1, 0))
2.2 PIL灰度图以platte保存成彩图
关键是用:putpalette(palette)指定颜色
bin_colormap = np.random.randint(0, 255, (256, 3))      # 可视化的颜色
bin_colormap = bin_colormap.astype(np.uint8)
visualimg  = Image.fromarray(label, "P")
palette = bin_colormap          #long palette of 768 items
visualimg.putpalette(palette)
visualimg.save(visualname, format='PNG')
