pyTorch入门(三)——GoogleNet和ResNet训练
学更好的别人,
做更好的自己。
——《微卡智享》
本文长度为2748字,预计阅读8分钟
前言
这是Minist训练的第三篇了,本篇主要是把GoogleNet和ResNet的模型写出来做一个测试,再就是train.py里面代码加入了图例显示。
GoogleNet
微卡智享
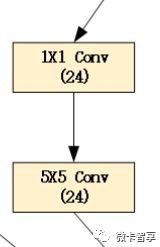
GoogLeNet是google推出的基于Inception模块的深度神经网络模型,Inception就是把多个卷积或池化操作,放在一起组装成一个网络模块,设计神经网络时以模块为单位去组装整个网络结构,如图:
通过Inception的模块化,针对图像的不同尺寸,使用不同的卷积核进行操作,让网络自己去选择,在网络在训练的过程中通过调节参数自己去选择使用。
根据上面的Inceptiion,直接设置网络结构
直接上源码
ModelGoogleNet.py
import torch
import torch.nn as nn
import torch.nn.functional as F


class Inception(nn.Module):
    def __init__(self, in_channels):
        super(Inception, self).__init__()
        ##Branch的池化层,用卷积1X1来处理,1X1的卷积可以直接将Channel层数
        self.branch_pool = nn.Sequential(
            nn.AvgPool2d(kernel_size=3, stride=1, padding=1),
            nn.Conv2d(in_channels, 24, kernel_size=1)
        )

        ##Branch1X1层
        self.branch1x1 = nn.Sequential(
            nn.Conv2d(in_channels, 16, kernel_size=1)
        )


        ##Branch5x5层, 5X5保持原图像大小需要padding为2,像3x3的卷积padding为1即可
        self.branch5x5 = nn.Sequential(
            nn.Conv2d(in_channels, 16, kernel_size=1),
            nn.Conv2d(16, 24, kernel_size=5, padding=2)
        )


        ##Branch3x3层
        self.branch3x3 = nn.Sequential(
            nn.Conv2d(in_channels, 16, kernel_size=1),
            nn.Conv2d(16, 24, kernel_size=3, padding=1),
            nn.Conv2d(24, 24, kernel_size=3, padding=1)
        )


    def forward(self, x):
        ##池化层
        branch_pool = self.branch_pool(x)
        ##branch1X1
        branch1x1 = self.branch1x1(x)
        ##Branch5x5
        branch5x5 = self.branch5x5(x)
        ##Branch3x3
        branch5x5 = self.branch3x3(x)


        ##然后做拼接
        outputs = [branch_pool, branch1x1, branch5x5, branch5x5]
        ##dim=1是为了将channel通道数进行统一, 正常是 B,C,W,H  batchsize,channels,width,height
        ##输出通道数这里计算,branch_pool=24, branch1x1=16, branch5x5=24, branch3x3=24
        ##计算结果就是 24+16+24+24 = 88,在下面Net训练时就知道输入是88通道了
        return torch.cat(outputs, dim=1)


class GoogleNet(nn.Module):
    def __init__(self):
        super(GoogleNet, self).__init__()
        ##训练的图像为1X28X28,所以输入通道为1,图像转为10通道后再下采样,再使用用Inception
        self.conv1 = nn.Sequential(
            nn.Conv2d(1, 10, kernel_size=5),
            nn.MaxPool2d(2),
            nn.ReLU(),
            Inception(10)
        )


        ##训练的通道由上面的Inception输出,上面计算的输出通道为88,所以这里输入通道就为88
        self.conv2 = nn.Sequential(
            nn.Conv2d(88, 20, kernel_size=5),
            nn.MaxPool2d(2),
            nn.ReLU(),
            Inception(20)
        )


        ##全链接层,1408是结过上面的网络全部计算出来的,不用自己算,可以输入的时候看Error来修改
        self.fc = nn.Sequential(
            nn.Linear(1408, 10)
        )


        ##定义损失函数
        self.criterion = torch.nn.CrossEntropyLoss()


    def forward(self, x):
        in_size = x.size(0)
        x = self.conv1(x)
        x = self.conv2(x)


        x = x.view(in_size, -1)
        x = self.fc(x)
        return x
在GoogleNet层里面是做了两遍5X5的卷积,池化,ReLU激活,然后调用Inception,最后再做一个全连接完成,接下来我们直接训练看看效果。
训练结果
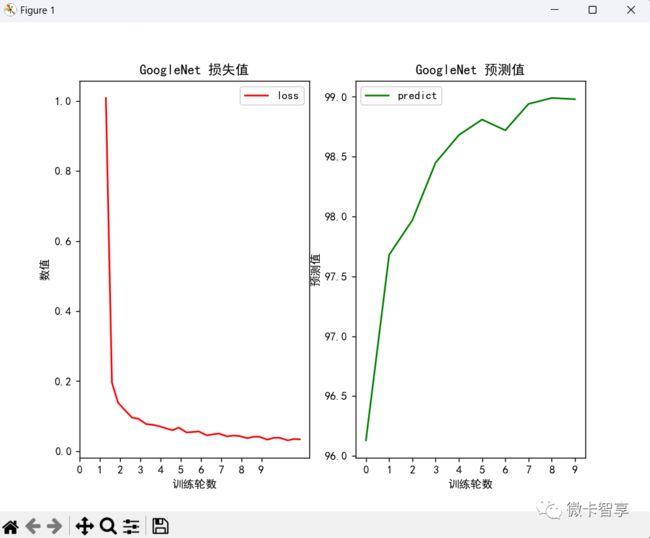
上图中可以看到,用GoogleNet的训练,预测率达到了98%了,由于模型的网络结构比较复杂,相应的训练时间也花了29分41秒。
在train.py中加入了训练的图像显示,左边是loss的曲线,右边是预测率的曲线。
ResNet
微卡智享
ResNet是一种残差网络,一般来说,网络越深,特征就会越在学,但随着网络的加深,可能会造成梯度爆炸和梯度消失,从而使得优化效果反而越差,测试数据和训练数据的准确率反而降低了。
ResNet的核心结构图如下:
(ResNet block有两种,一种两层结构,一种三层结构)
接下来我们就实现第一种ResNet block。
ModelResNet.py
import torch
import torch.nn as nn
import torch.nn.functional as F


class ResidualBolck(nn.Module):
    def __init__(self, in_channels):
        super(ResidualBolck, self).__init__()


        self.channels = in_channels
        ##确保输入层和输出层一样图像大小,所以padding=1
        self.conv1 = nn.Sequential(
            nn.Conv2d(in_channels, in_channels, kernel_size=3, padding=1),
            nn.ReLU()
        )
        ##第二层只有一个卷积,所以不用nn.Sequential了
        self.conv2 = nn.Conv2d(in_channels, in_channels, kernel_size=3, padding=1)


    def forward(self, x):
        ##求出第一层
        y = self.conv1(x)
        ##求出第二层
        y = self.conv2(y)
        ##通过加上原来X后再用激活,防止梯度归零
        y = F.relu(x+y)
        return y


class ResNet(nn.Module):
    def __init__(self):
        super(ResNet, self).__init__()
        ##第一层
        self.conv1 = nn.Sequential(
            nn.Conv2d(1, 16, kernel_size=5),
            nn.ReLU(),
            nn.MaxPool2d(2),
            ResidualBolck(16)
        )
        ##第二层
        self.conv2 = nn.Sequential(
            nn.Conv2d(16, 32, kernel_size=5),
            nn.ReLU(),
            nn.MaxPool2d(2),
            ResidualBolck(32)
        )
        ##全连接层
        self.fc = nn.Linear(512, 10)
        ##定义损失函数
        self.criterion = torch.nn.CrossEntropyLoss()


    def forward(self, x):
        in_size = x.size(0)
        x = self.conv1(x)
        x = self.conv2(x)


        x = x.view(in_size, -1)
        x = self.fc(x)
        return x
训练效果
从上面两张图可以看出来,ResNet的训练时间要比GoogleNet的训练时间少了一半多,只用了10分零5秒,并且预测率达到了99%多,效果也要比GoogleNet的效果好。
train.py的修改
上图中都是train.py中修改过的部分,完整的代码如下:
import torch
import time
from torchvision import transforms
from torchvision import datasets
from torch.utils.data import DataLoader
import torch.optim as optim
import matplotlib.pyplot as plt
from pylab import mpl
from ModelLinearNet import LinearNet
from ModelConv2d import Conv2dNet
from ModelGoogleNet import GoogleNet
from ModelResNet import ResNet


##训练轮数
epoch_times = 10


batch_size = 64
##设置本次要训练用的模型
train_name = 'ResNet'
print("train_name:" + train_name)
##设置模型保存名称
savemodel_name = train_name + ".pt"
print("savemodel_name:" + savemodel_name)
##设置初始预测率,用于判断高于当前预测率的保存模型
toppredicted = 0.0
##设置学习率
learnrate = 0.01
##设置动量值,如果上一次的momentnum与本次梯度方向是相同的,梯度下降幅度会拉大,起到加速迭代的作用
momentnum = 0.5


##生成图用的数组
##预测值
predict_list = []
##训练轮次值
epoch_list = []
##loss值
loss_list = []


transform = transforms.Compose([
    transforms.ToTensor(),
    transforms.Normalize(mean=(0.1307,), std=(0.3081,))
]) ##Normalize 里面两个值0.1307是均值mean, 0.3081是标准差std,计算好的直接用了


##训练数据集位置,如果不存在直接下载
train_dataset = datasets.MNIST(
    root = '../datasets/mnist',
    train = True,
    download = True,
    transform = transform
)
##读取训练数据集
train_dataloader = DataLoader(
    dataset= train_dataset,
    shuffle=True,
    batch_size=batch_size
)
##测试数据集位置,如果不存在直接下载
test_dataset = datasets.MNIST(
    root= '../datasets/mnist',
    train= False,
    download=True,
    transform= transform
)
##读取测试数据集
test_dataloader = DataLoader(
    dataset= test_dataset,
    shuffle= True,
    batch_size=batch_size
)


##设置选择训练模型,因为python用的是3.9,用不了match case语法
def switch(train_name):
    if train_name == 'LinearNet':
        return LinearNet()
    elif train_name == 'Conv2dNet':
        return Conv2dNet()
    elif train_name == 'GoogleNet':
        return GoogleNet()
    elif train_name == 'ResNet':
        return ResNet()


##定义训练模型
class Net(torch.nn.Module):
    def __init__(self, train_name):
        super(Net, self).__init__()
        self.model = switch(train_name= train_name)
        self.criterion = self.model.criterion


    def forward(self, x):
        x = self.model(x)
        return x


model = Net(train_name)
##加入判断是CPU训练还是GPU训练
device = torch.device("cuda:0" if torch.cuda.is_available() else "cpu")
model.to(device)


##优化器
optimizer = optim.SGD(model.parameters(), lr= learnrate, momentum= momentnum)
# optimizer = optim.NAdam(model.parameters(), lr= learnrate)


##训练函数
def train(epoch):
    running_loss = 0.0
    current_train = 0.0
    model.train()
    for batch_idx, data in enumerate(train_dataloader, 0):
        inputs, target = data
        ##加入CPU和GPU选择
        inputs, target = inputs.to(device), target.to(device)


        optimizer.zero_grad()


        #前馈,反向传播,更新
        outputs = model(inputs)
        loss = model.criterion(outputs, target)
        loss.backward()
        optimizer.step()


        running_loss += loss.item()
        ##计算每300次打印一次学习效果
        if batch_idx % 300 == 299:
            current_train = current_train + 0.3
            current_epoch = epoch + 1 + current_train
            epoch_list.append(current_epoch)
            current_loss = running_loss / 300
            loss_list.append(current_loss)


            print('[%d, %5d] loss: %.3f' % (current_epoch, batch_idx + 1, current_loss))
            running_loss = 0.0


def test():
    correct = 0
    total = 0
    model.eval()
    ##with这里标记是不再计算梯度
    with torch.no_grad():
        for data in test_dataloader:
            inputs, labels = data
            ##加入CPU和GPU选择
            inputs, labels = inputs.to(device), labels.to(device)


            outputs = model(inputs)
            ##预测返回的是两列,第一列是下标就是0-9的值,第二列为预测值,下面的dim=1就是找维度1(第二列)最大值输出
            _, predicted = torch.max(outputs.data, dim=1)


            total += labels.size(0)
            correct += (predicted == labels).sum().item()

    currentpredicted = (100 * correct / total)
    ##用global声明toppredicted,用于在函数内部修改在函数外部声明的全局变量,否则报错
    global toppredicted
    ##当预测率大于原来的保存模型
    if currentpredicted > toppredicted:
        toppredicted = currentpredicted
        torch.save(model.state_dict(), savemodel_name)
        print(savemodel_name+" saved, currentpredicted:%d %%" % currentpredicted)


    predict_list.append(currentpredicted)
    print('Accuracy on test set: %d %%' % currentpredicted)


##开始训练
timestart = time.time()
for epoch in range(epoch_times):
    train(epoch)
    test()
timeend = time.time() - timestart
print("use time: {:.0f}m {:.0f}s".format(timeend // 60, timeend % 60))


##设置画布显示中文字体
mpl.rcParams["font.sans-serif"] = ["SimHei"]
##设置正常显示符号
mpl.rcParams["axes.unicode_minus"] = False


##创建画布
fig, (axloss, axpredict) = plt.subplots(nrows=1, ncols=2, figsize=(8,6))


#loss画布
axloss.plot(epoch_list, loss_list, label = 'loss', color='r')
##设置刻度
axloss.set_xticks(range(epoch_times)[::1])
axloss.set_xticklabels(range(epoch_times)[::1])


axloss.set_xlabel('训练轮数')
axloss.set_ylabel('数值')
axloss.set_title(train_name+' 损失值')
#添加图例
axloss.legend(loc = 0)


#predict画布
axpredict.plot(range(epoch_times), predict_list, label = 'predict', color='g')
##设置刻度
axpredict.set_xticks(range(epoch_times)[::1])
axpredict.set_xticklabels(range(epoch_times)[::1])
# axpredict.set_yticks(range(100)[::5])
# axpredict.set_yticklabels(range(100)[::5])


axpredict.set_xlabel('训练轮数')
axpredict.set_ylabel('预测值')
axpredict.set_title(train_name+' 预测值')
#添加图例
axpredict.legend(loc = 0)


#显示图像
plt.show()
完
![]()
往期精彩回顾
pyTorch入门(二)——常用网络层函数及卷积神经网络训练
pyTorch入门(一)——Minist手写数据识别训练全连接网络
超简单的pyTorch训练->onnx模型->C++ OpenCV DNN推理(附源码地址)


