opencv项目实战(二)——文档扫描OCR识别
- 一、项目描述
- 二、代码详解
-
- 2.1 预定义参数
- 2.2 辅助函数
- 2.3 文档矫正
- 2.4 文档识别
- 三、项目完整代码
一、项目描述
-
目的
将图片中的文档矫正,并识别文档内容 -
输入与输出

-
方法流程
核心思想:采用tesseract-ocr进行文档识别。具体流程如下:- 定位图像中文档区域
- 对图像中文档区域进行透视变换等操作,凸显文档内容
- 采用pytesseract进行文档识别
二、代码详解
2.1 预定义参数
-
导包
import os import cv2 import argparse import pytesseract import numpy as np from PIL import Image -
设置参数
def parse():
    """设置自己的参数"""
    parser = argparse.ArgumentParser(description="set your identity parameters")
    parser.add_argument("-i", "--image", default="./images/receipt.jpg", type=str,
                        help="Path to the image to be scanned")

    opt = parser.parse_args()
    # opt = vars(opt)   # 可用于返回参数的‘字典对’对象
    return opt
2.2 辅助函数
-
绘图
def cv_show(name, img): """绘图,避免重复造轮子""" cv2.imshow(name, img) cv2.waitKey(0) cv2.destroyAllWindows() -
缩放图像尺寸
def resize(image, width=None, height=None, inter=cv2.INTER_AREA): """根据自定的宽/高进行等比例缩放图像""" dim = None # 缩放后的图像尺寸 h, w = image.shape[:2] # 原始图像尺寸 if width is None and height is None: return image if width is None: r = height / float(h) dim = (int(w * r), height) else: r = width / float(w) dim = (width, int(h * r)) resized = cv2.resize(image, dim, interpolation=inter) return resized -
对四边形四个顶点排序:左上,右上,右下,左下
def order_points(pts): """对4个坐标点进行排序:左上,右上,右下,左下""" rect = np.zeros((4, 2), dtype="float32") # 计算左上,右下;左上特点:x+y最小,右下特点:x+y最大 s = pts.sum(axis=1) # 计算每一个点的 x+y rect[0] = pts[np.argmin(s)] # 得到左上点 rect[2] = pts[np.argmax(s)] # 得到右下点 # 计算右上和左下;右上特点:y-x最小,左下特点:y-x最大 diff = np.diff(pts, axis=1) rect[1] = pts[np.argmin(diff)] # 得到右上点 rect[3] = pts[np.argmax(diff)] # 得到左下点 return rect -
根据四组对应点进行透视变换
def four_point_transform(image, pts):
    """根据4组对应点进行透视变换"""
    # 1. 获取输入坐标点
    rect = order_points(pts)    # 对坐标点进行排序
    tl, tr, br, bl = rect       # 依次对应:左上,右上,右下,左下;即A,B,C,D

    # 2. 计算输入的w和h值
    widthA = np.sqrt(((br[0] - bl[0]) ** 2) + ((br[1] - bl[1]) ** 2))   # 计算CD的长度
    widthB = np.sqrt(((tr[0] - tl[0]) ** 2) + ((tr[1] - tl[1]) ** 2))   # 计算AB的长度
    maxWidth = max(int(widthA), int(widthB))

    heightA = np.sqrt(((tr[0] - br[0]) ** 2) + ((tr[1] - br[1]) ** 2))  # 计算BC的长度
    heightB = np.sqrt(((tl[0] - bl[0]) ** 2) + ((tl[1] - bl[1]) ** 2))  # 计算AD的长度
    maxHeight = max(int(heightA), int(heightB))

    # 3. 定义变换后对应坐标位置
    dst = np.array([
        [0, 0],
        [maxWidth - 1, 0],
        [maxWidth - 1, maxHeight - 1],
        [0, maxHeight - 1]], dtype="float32")

    # 4. 透视变换
    M = cv2.getPerspectiveTransform(rect, dst)                      # 根据4组对应点,计算投射变换矩阵
    warped = cv2.warpPerspective(image, M, (maxWidth, maxHeight))   # 透视变换

    return warped
2.3 文档矫正
-
流程:
- 读取待识别图像进行预处理(缩放)
image = cv2.imread(opt.image)       # 读取图像
ratio = image.shape[0] / 500.0      # 高度调整到500需要的比例
orig = image.copy()                 # 原始图像
image = resize(orig, height=500)    # 缩放图像
2. 转换为灰度图,进行边缘检测gray = cv2.cvtColor(image, cv2.COLOR_BGR2GRAY) # 转换为灰度图 gray = cv2.GaussianBlur(gray, (5, 5), 0) # 高斯滤波 edged = cv2.Canny(gray, 75, 200) # 边缘检测
- 进行轮廓检测,对轮廓按面积大小排序,找到最外层轮廓(包含所有文档区域
cnts, hierarchy = cv2.findContours(edged.copy(), cv2.RETR_LIST, cv2.CHAIN_APPROX_SIMPLE) # 查找轮廓 cnts = sorted(cnts, key=cv2.contourArea, reverse=True)[:5] # 对轮廓按面积从大到小排序 need = cnts[0]- 将最外层轮廓近似为四边形
peri = cv2.arcLength(need, True) # 获取最外层轮廓的周长 approx = cv2.approxPolyDP(cnts[0], 0.02 * peri, True)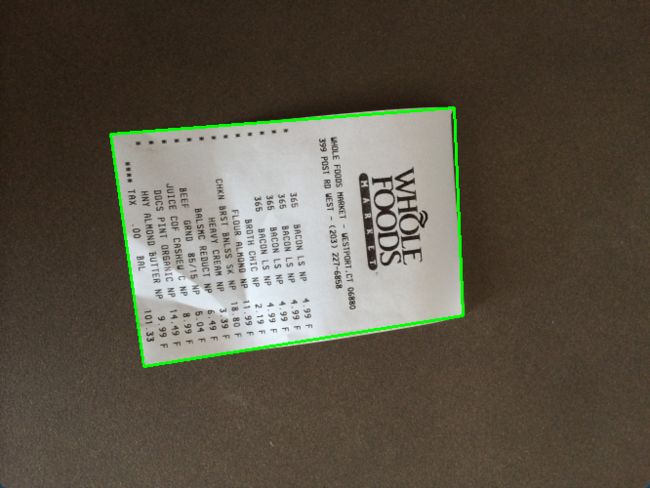
5. 进行透视变换将文档矫正,二值化凸显内容# 3. 透视变换——关键所在 warped = four_point_transform(orig, approx.reshape(4, 2) * ratio) # 4. 二值处理——凸显结果 warped = cv2.cvtColor(warped, cv2.COLOR_BGR2GRAY) ref = cv2.threshold(warped, 100, 255, cv2.THRESH_BINARY)[1] cv2.imwrite('scan.jpg', ref)
2.4 文档识别
-
方法
利用tesseract-ocr进行文本识别 -
安装tesseract-ocr
- 下载安装包 tesseract-ocr-setup-x.xx.xxdev.exe
- 配置环境变量
- 系统变量
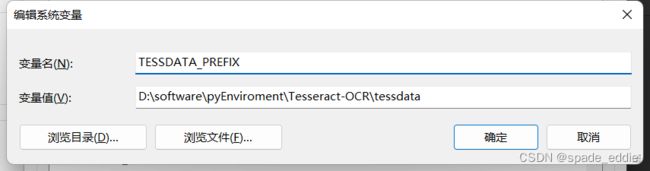
- 路径变量:如 D:\software\pyEnviroment\Tesseract-OCR
- 测试
tesseract -v tesseract XXX.png result -
安装pytesseract
pip install pytesseract若后续有相关报错,可尝试:
修改安装包中的tesseract_cmd 路径:
\Anaconda3\envs\YOUR_ENVS_NAME\Lib\site-packages\pytesseract\pytesseract.py
原:tesseract_cmd = ‘tesseract’
现:tesseract_cmd = ‘D:\software\pyEnviroment\Tesseract-OCR\tesseract.exe’ -
识别代码
gray = cv2.medianBlur(ref, 3) # 对图像进行中值滤波
filename = "{}.png".format(os.getpid())
cv2.imwrite(filename, gray) # 保存滤波结果
text = pytesseract.image_to_string(Image.open(filename)) # 文档识别
with open("result.txt", 'w') as f:
f.write(text) # 将结果写入文档
os.remove(filename)
cv_show("output", gray) # 显示中值滤波后的图片

三、项目完整代码
import os
import cv2
import argparse
import pytesseract
import numpy as np
from PIL import Image
def parse():
"""设置自己的参数"""
parser = argparse.ArgumentParser(description="set your identity parameters")
parser.add_argument("-i", "--image", default="./images/receipt.jpg", type=str,
help="Path to the image to be scanned")
opt = parser.parse_args()
# opt = vars(opt) # 可用于返回参数的‘字典对’对象
return opt
def cv_show(name, img):
"""绘图,避免重复造轮子"""
cv2.imshow(name, img)
cv2.waitKey(0)
cv2.destroyAllWindows()
def order_points(pts):
"""对4个坐标点进行排序:左上,右上,右下,左下"""
rect = np.zeros((4, 2), dtype="float32")
# 计算左上,右下;左上特点:x+y最小,右下特点:x+y最大
s = pts.sum(axis=1) # 计算每一个点的 x+y
rect[0] = pts[np.argmin(s)] # 得到左上点
rect[2] = pts[np.argmax(s)] # 得到右下点
# 计算右上和左下;右上特点:y-x最小,左下特点:y-x最大
diff = np.diff(pts, axis=1)
rect[1] = pts[np.argmin(diff)] # 得到右上点
rect[3] = pts[np.argmax(diff)] # 得到左下点
return rect
def four_point_transform(image, pts):
"""根据4组对应点进行透视变换"""
# 1. 获取输入坐标点
rect = order_points(pts) # 对坐标点进行排序
tl, tr, br, bl = rect # 依次对应:左上,右上,右下,左下;即A,B,C,D
# 2. 计算输入的w和h值
widthA = np.sqrt(((br[0] - bl[0]) ** 2) + ((br[1] - bl[1]) ** 2)) # 计算CD的长度
widthB = np.sqrt(((tr[0] - tl[0]) ** 2) + ((tr[1] - tl[1]) ** 2)) # 计算AB的长度
maxWidth = max(int(widthA), int(widthB))
heightA = np.sqrt(((tr[0] - br[0]) ** 2) + ((tr[1] - br[1]) ** 2)) # 计算BC的长度
heightB = np.sqrt(((tl[0] - bl[0]) ** 2) + ((tl[1] - bl[1]) ** 2)) # 计算AD的长度
maxHeight = max(int(heightA), int(heightB))
# 3. 定义变换后对应坐标位置
dst = np.array([
[0, 0],
[maxWidth - 1, 0],
[maxWidth - 1, maxHeight - 1],
[0, maxHeight - 1]], dtype="float32")
# 4. 透视变换
M = cv2.getPerspectiveTransform(rect, dst) # 根据4组对应点,计算投射变换矩阵
warped = cv2.warpPerspective(image, M, (maxWidth, maxHeight)) # 透视变换
return warped
def resize(image, width=None, height=None, inter=cv2.INTER_AREA):
"""根据自定的宽/高进行等比例缩放图像"""
dim = None # 缩放后的图像尺寸
h, w = image.shape[:2] # 原始图像尺寸
if width is None and height is None:
return image
if width is None:
r = height / float(h)
dim = (int(w * r), height)
else:
r = width / float(w)
dim = (width, int(h * r))
resized = cv2.resize(image, dim, interpolation=inter)
return resized
if __name__ == '__main__':
# =================== 参数预处理 ===================
opt = parse()
# ================== 图像文档矫正 ===================
# 0. 图像预处理
image = cv2.imread(opt.image) # 读取图像
ratio = image.shape[0] / 500.0 # 高度调整到500需要的比例
orig = image.copy() # 原始图像
image = resize(orig, height=500) # 缩放图像
# 1. Canny边缘检测
gray = cv2.cvtColor(image, cv2.COLOR_BGR2GRAY)  # 转换为灰度图
gray = cv2.GaussianBlur(gray, (5, 5), 0)        # 高斯滤波
edged = cv2.Canny(gray, 75, 200)                # 边缘检测
# 展示预处理结果
print("STEP 1: 边缘检测")
cv2.imshow("Image", image)
cv_show("Edged", edged)
# 2. 轮廓检测 —— 需要的是最外侧轮廓,其特点:周长/面积最大
cnts, hierarchy = cv2.findContours(edged.copy(), cv2.RETR_LIST, cv2.CHAIN_APPROX_SIMPLE)    # 查找轮廓
cnts = sorted(cnts, key=cv2.contourArea, reverse=True)[:5]                                  # 对轮廓按面积从大到小排序
need = cnts[0] # 最外层轮廓
peri = cv2.arcLength(need, True) # 获取最外层轮廓的周长
# ----------------------------------------------------------
# cv2.approxPolyDP(): 主要功能是把一个连续光滑曲线折线化,对图像轮廓点进行多边形拟合。
# 参数:
# curve:表示输入的点集
# epsilon:表示从原始轮廓到近似轮廓的最大距离,它是一个准确度参数
# closed:表示是否封闭,True表示封闭的
# ----------------------------------------------------------
approx = cv2.approxPolyDP(cnts[0], 0.02 * peri, True) # 轮廓拟合成四边形
# 展示轮廓检测结果
print("STEP 2: 获取轮廓")
print("轮廓的角点个数:", len(approx))
cv2.drawContours(image, [approx], -1, (0, 255, 0), 2)
cv_show("Outline", image)
# 3. 透视变换——关键所在
warped = four_point_transform(orig, approx.reshape(4, 2) * ratio)

# 4. 二值处理——凸显结果
warped = cv2.cvtColor(warped, cv2.COLOR_BGR2GRAY)
ref = cv2.threshold(warped, 100, 255, cv2.THRESH_BINARY)[1]
cv2.imwrite('scan.jpg', ref)
# 展示结果
print("STEP 3: 变换")
cv2.imshow("Original", resize(orig, height=650))
cv_show("Scanned", resize(ref, height=650))
# 5. 文档识别
    gray = cv2.medianBlur(ref, 3)           # 对图像进行中值滤波

    filename = "{}.png".format(os.getpid())
    cv2.imwrite(filename, gray)             # 保存滤波结果

    text = pytesseract.image_to_string(Image.open(filename))    # 文档识别
    with open("result.txt", 'w') as f:
        f.write(text)                       # 将结果写入文档
    os.remove(filename)
    cv_show("output", gray)                 # 显示中值滤波后的图片