IPCam网络摄像头
文章目录
- 软件安装及编译环境搭建及代码获取
-
- 1、于VirtualBoxVM安装Ubuntu
- 2、Ubuntu开机设定
- 3、MobaXterm安装及开发板连接
- 4、套件安装以及SDK编译
- 5、 如何获取代码
- 6、如何更新代码
- IPCam网络摄像头
-
- 7、如何编译IPcam
- 8、配置板端资源以及环境
- 9、参数配置及运行效果
-
- 9.1参数配置文件
- 9.2运行效果
- 10. 相关链接
软件安装及编译环境搭建及代码获取
点击下载 Virtualbox VM 和 Ubuntu 20.04 LTS
1、于VirtualBoxVM安装Ubuntu
建立新的VM,并加以命名
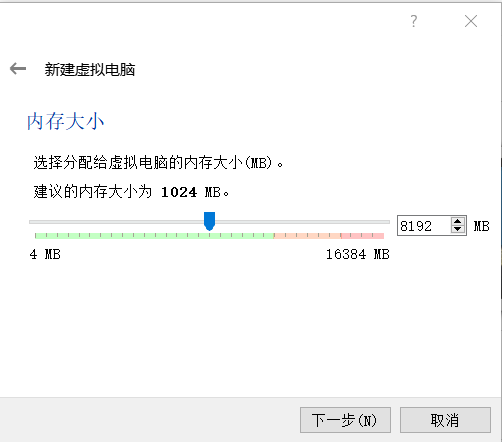
规划8GB内存供VM使用。
预留200GB硬盘空间,供后续存放SDK用。
2、Ubuntu开机设定
第一次开机需要挂载安装光盘ISO挡案
开始安装
(如需在虚拟机上使用共享剪贴板和共享文件夹等提升使用体验,请自行搜索方法,此处不再赘述)
3、MobaXterm安装及开发板连接
官网地址:
https://mobaxterm.mobatek.net/
将开发板上通过串口转TTL板与电脑连接
注意板端的RX脚接
usb-ttl的TX脚,板端TX脚接usb-ttl的RX脚
使用mobaxterm配置串口终端
终端显示
[root@cvitek]~#
4、套件安装以及SDK编译
在编译SDK之前,Ubuntu需要安装以下套件:
sudo apt-get update
sudo apt-get install -y build-essential
sudo apt-get install -y ninja-build
sudo apt-get install -y automake
sudo apt-get install -y autoconf
sudo apt-get install -y libtool
sudo apt-get install -y wget
sudo apt-get install -y curl
sudo apt-get install -y git
sudo apt-get install -y gcc
sudo apt-get install -y libssl-dev
sudo apt-get install -y bc
sudo apt-get install -y slib
sudo apt-get install -y squashfs-tools
sudo apt-get install -y android-sdk-libsparse-utils
sudo apt-get install -y android-sdk-ext4-utils
sudo apt-get install -y jq
sudo apt-get install -y cmake
sudo apt-get install -y python3-distutils
sudo apt-get install -y tclsh
sudo apt-get install -y scons
sudo apt-get install -y parallel
sudo apt-get install -y ssh-client
sudo apt-get install -y tree
sudo apt-get install -y python3-dev
sudo apt-get install -y python3-pip
sudo apt-get install -y device-tree-compiler
sudo apt-get install -y libssl-dev
sudo apt-get install -y ssh
sudo apt-get install -y cpio
sudo apt-get install -y squashfs-tools
sudo apt-get install -y fakeroot
sudo apt-get install -y libncurses5
sudo apt-get install -y flex
sudo apt-get install -y bison
检查cmake版本
cmake --version
如果小于版本号3.16则需要更新cmake,以3.16.5为例
# 注意先删除低版本cmake
sudo apt autoremove cmake

wget https://cmake.org/files/v3.16/cmake-3.16.5.tar.gz
tar zxvf cmake-3.16.5.tar.gz
cd cmake-3.16.5/
./configure
make
sudo make install
获取SDK源码
git clone https://github.com/sophgo/sophpi-huashan.git
编译
1.cd mmf-sdk/
2.source build/cvisetup.sh 				# 配置编译环境
3.defconfig cv1812h_wevb_0007a_emmc
4.build_all								# 编译SDK
编译成功
生成的镜像在install/soc_cv1812h_wevb_0007a_emmc下
5、 如何获取代码
进入源码网址
通过git clone + github地址

git clone https://github.com/sophgo/sophpi-huashan.git
6、如何更新代码
在sophpi-huashan的repo路径下打开终端

git pull origin master		# 从origin远程仓库拉取master分支
note:使用前请确保配置好相关环境,未配置见《软件安装编译环境搭建》
IPCam网络摄像头
7、如何编译IPcam
# 配置编译环境
1.cd mmf-sdk/
2.source build/cvisetup.sh
3.defconfig cv1812h_wevb_0007a_emmc
4.build_all								# 编译sdk
8、配置板端资源以及环境
1.通过NFS或者sd卡把下面内容拷贝到板端/data/mnt/
  mmf-sdk/middleware/v2/sample/ipcam/mars/ipcam_mars
  mmf-sdk/middleware/v2/sample/ipcam/parameter/mars/param_config_ai.ini
  mmf-sdk/middleware/v2/sample/ipcam/resource/ai_models/mars
  并且把mars 目录名改成ai_models:
  mv mars ai_models
2.连接网线并且配置板端网路:
  ifconfig eth0 192.168.1.3 netmask 255.255.255.0
  并且把PC端的网络配置成 在同一网段。
3.运行IPCam
  ./ipcam_mars -i param_config_ai.ini &
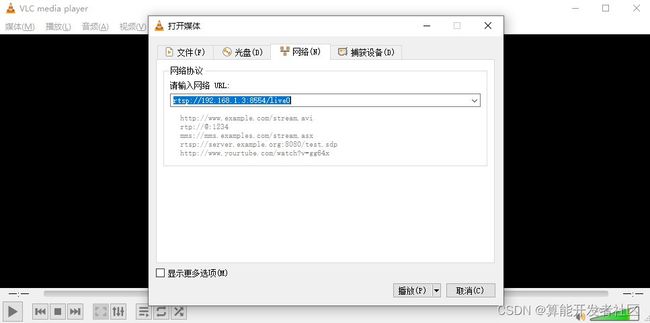
4.通过PC端的VLC连接板端的rtsp 看视频流
  连接地址为:
   rtsp://192.168.1.3:8554/live0 # 大码流
   rtsp://192.168.1.3:8554/live1 # 小码流
windows下VLC播放器设置
9、参数配置及运行效果
9.1参数配置文件
打开文件param_config_ai.ini,部分配置如下,默认即可
屏幕显示对象配置
......

[osdc_objs_info]
cnt        = 3			; 绘制对象数目

[osdc_obj_info0]
bShow           = 1		; 显示使能
type            = 0 ; 0: rect, 1: bitmap, 2: line, 3: buff
                    ; 显示元素类型 0:矩形 1:位图 2:线 3:缓冲区
color           = 0xff00ffff	; 颜色
x1           	  = 500						; 显示区域的左上角点坐标(横轴)
y1          	  = 500						; 显示区域的左上角点坐标(纵轴)
width        	  = 100						; 显示区域宽度
height        	= 100					  ; 显示区域高度
filled        	= 0						  ; 是否填充
thickness       = 4						  ; 显示边线粗细

[osdc_obj_info1]
bShow           = 1
type            = 2 ; 0: rect, 1: bitmap, 2: line, 3: buff
color           = 0xff00ffff
x1           	= 800
y1          	= 800
x2              = 1000
y2              = 1000
thickness       = 4

[osdc_obj_info2]
bShow           = 1
type            = 0 ; 0: rect, 1: bitmap, 2: line, 3: buff
color           = 0xff00ffff
x1           	= 1000
y1          	= 1000
width        	= 200
height        	= 200
filled        	= 1
thickness       = 4

......
屏幕显示元素配置
......

; osd config
[osd_config]
osd_enable_all  = 1			; 是;否使能所有显示元素
osd_cnt         = 12		; 屏;显示元素数目

; osd attach to main streaming
[osd0]
show            = 1			; 显示使能
handle          = 0			; 句柄号
type            = 2 ; 0:TYPE_PICTURE, 1: TYPE_STRING, 2:TYPE_TIME
					; 0:图片类型	   1:字符类型	    2:实时时间类型

mod_id          = 6 ; 6: CVI_ID_VPSS	; 模块号
dev_id          = 0						; 设备号
chn_id          = 0						; 通道号
s32x            = 20					; 显示区域起始点坐标
s32y            = 20
rec_width       = 24					; 显示区域宽度
rec_heigh       = 24					; 显示区域高度

[osd1]
show            = 1
handle          = 1
type            = 1 ; 0:TYPE_PICTURE, 1: TYPE_STRING, 2:TYPE_TIME
mod_id          = 6 ; 6: CVI_ID_VPSS
dev_id          = 0
chn_id          = 0
s32x            = 20
s32y            = 60
rec_width       = 24
rec_heigh       = 24
str             = "cvitek main streaming demo"		; 字符内容

[osd2]
show            = 1
handle          = 2
type            = 1 ; 0:TYPE_PICTURE, 1: TYPE_STRING, 2:TYPE_TIME
mod_id          = 6 ; 6: CVI_ID_VPSS
dev_id          = 0
chn_id          = 0
s32x            = 20
s32y            = 100
rec_width       = 24
rec_heigh       = 24
str             = "北京晶视智能科技有限公司"

......
配置模型参数(以face_detection为例)
......

[ai_fd_config]
fd_enable        = 1		; 人脸检测使能
fr_enable        = 1		; 人脸识别使能
mask_enable      = 0		; 口罩使能
capture_enable    = 1		; 捕获使能(开启的话需要挂载sd卡到/mnt/sd,系统检测到人脸一定时间会保存图片到sd卡)
face_ae_enable   = 0		;
vpss_grp         = 4		; 视频处理子系统组号
vpss_chn         = 0		; 通道号
fd_poolid        = 6		;
grp_width        = 960		;
grp_height       = 540		;
model_width      = 768		; 模型宽度
model_height     = 432		; 模型高度
vpssPreProcSkip  = 0		; 跳过视频处理预处理使能
threshold_fd     = 0.7		; 人脸检测阈值
threshold_fr     = 0.7		; 人脸识别阈值
threshold_mask   = 0.7		; 戴口罩人脸检测阈值
model_id_fd      = 30 ;0:CVI_AI_SUPPORTED_MODEL_RETINAFACE;30:CVI_AI_SUPPORTED_MODEL_FACEMASKDETECTION
model_id_fr      = 6 ;3:CVI_AI_SUPPORTED_MODEL_FACERECOGNITION
model_id_mask    = 7 ;7:CVI_AI_SUPPORTED_MODEL_MASKCLASSIFICATION
model_path_fd    = "/mnt/data/ai_models/retinaface_mask.cvimodel"		; 模型路径
model_path_fr    = "/mnt/data/ai_models/cviface-v5-s.cvimodel"
model_path_mask  = "/mnt/data/ai_models//mask_classifier.cvimodel"

; 检测框设置
color_r          = 7.0
color_g          = 10.0
color_b          = 230.0
color_size       = 4

......
9.2运行效果
该系统实现了人脸检测和识别、运动检测、行人检测等功能
note:以人脸检测为例,图中红色为人脸检测绘制框,蓝色框为屏幕显示元素
10. 相关链接
样例开源仓库:https://github.com/sophon-ai-algo/examples
BM1684 BMNNSDK文档:https://developer.sophgo.com/site/index/document/6/all.html
编译工具用户开发手册: https://doc.sophgo.com/docs/2.7.0/docs_latest_release/nntc/html/index.html
量化工具用户开发手册: https://doc.sophgo.com/docs/2.7.0/docs_latest_release/calibration-tools/html/index.html
算能量化工具介绍及使用说明:https://www.bilibili.com/video/BV1DA4y1S75p?spm_id_from=333.999.0
官网视频教程:https://developer.sophgo.com/site/index/course/all/all.html
官网文档中心:https://developer.sophgo.com/site/index/document/all/all.html
官网下载中心:https://developer.sophgo.com/site/index/material/all/all.html
官网论坛:https://developer.sophgo.com/forum/view/43.html
算丰学院:https://www.sophgo.com/curriculum/index.html


