ffmpeg源码编译
1. 开发环境
机器:阿里云ecs服务器
系统:Ubuntu 18.04.2 LTS
建议:c++开发的同学建议使用Ubuntu,我之前使用的centos,各种问题,所以就换了系统,当前阿里云提供的Ubuntu最新公共镜像是18.04,因此选择了最新的版本进行安装。
root账户登录机器。
2. 下载ffmpeg源码
ffmpeg下载地址:http://www.ffmpeg.org/download.html
- 新建一个文件夹ffmpeg
- 命令行:wget https://ffmpeg.org/releases/ffmpeg-4.2.1.tar.bz2,进行下载
- 解压,tar xvf ffmpeg-4.2.1.tar.bz2
3. 编译
3.1 配置apt-get源
- 备份源文件
cp /etc/apt/sources.list /etc/apt/sources.list.bak
- 编辑源文件列表
vim /etc/apt/sources.list
- 将原来的内容删除,增加以下清华大学源
# 默认注释了源码镜像以提高 apt update 速度,如有需要可自行取消注释
deb https://mirrors.tuna.tsinghua.edu.cn/ubuntu/ bionic main restricted universe multiverse
# deb-src https://mirrors.tuna.tsinghua.edu.cn/ubuntu/ bionic main restricted universe multiverse
deb https://mirrors.tuna.tsinghua.edu.cn/ubuntu/ bionic-updates main restricted universe multiverse
# deb-src https://mirrors.tuna.tsinghua.edu.cn/ubuntu/ bionic-updates main restricted universe multiverse
deb https://mirrors.tuna.tsinghua.edu.cn/ubuntu/ bionic-backports main restricted universe multiverse
# deb-src https://mirrors.tuna.tsinghua.edu.cn/ubuntu/ bionic-backports main restricted universe multiverse
deb https://mirrors.tuna.tsinghua.edu.cn/ubuntu/ bionic-security main restricted universe multiverse
# deb-src https://mirrors.tuna.tsinghua.edu.cn/ubuntu/ bionic-security main restricted universe multiverse
# 预发布软件源,不建议启用
# deb https://mirrors.tuna.tsinghua.edu.cn/ubuntu/ bionic-proposed main restricted universe multiverse
# deb-src https://mirrors.tuna.tsinghua.edu.cn/ubuntu/ bionic-proposed main restricted universe multiverse
- 更新源
apt-get update
参考:https://blog.csdn.net/tuzi20062007/article/details/86547673#_22
3.2 编译ffmpeg
- 配置编译参数
进入源码文件夹,执行命令:./configure --prefix=buildout --enable-gpl --enable-nonfree --enable-libfdk-aac --enable-libx264 --enable-filter=delogo --enable-debug --disable-optimizations --enable-libspeex --enable-shared --enable-pthreads --enable-version3 --enable-hardcoded-tables --host-cflags= --host-ldflags=
这时系统会报错,需要安装几个库,root登录
1、安装yasm,命令行:apt-get install yasm
2、安装libx264
apt install aptitude
aptitude install libx264-dev
3、安装speex,这个库比较特殊,不能通过apt-get命令安装,需要手动下载,编译安装。
下载地址:https://www.speex.org/downloads/,退出ffmpeg源码目录,新建文件夹,下载解压,之后进入代码目录,执行命令:
./configure
make && make install
4、安装需要的库后,重新执行前面的configure命令。
- 编译
configure命令执行成功后,在源码目录下执行:
make
make install
其中,make命令执行时间较长,等待编译完成即可。
编译完成后,会生成bin、include、lib、share四个文件夹,
- 验证
进入bin目录,运行ffmpeg
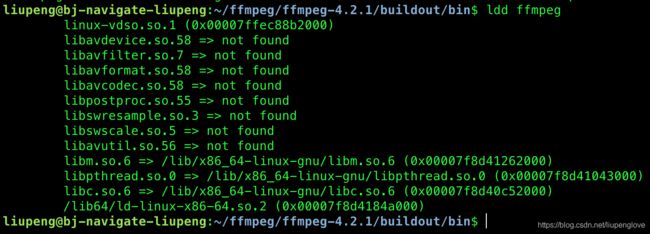
有报错,提示找不到库文件,执行命令ldd ffmpeg查看依赖的库文件
发现ffmpeg依赖的多个库文件都没有找到,原因是,通过源码安装的库,都没有设置环境变量,需要手动设置一下,两个方法:
1、export LD_LIBRARY_PATH=$LD_LIBRARY_PATH:/home/liupeng/ffmpeg/ffmpeg-4.2.1/buildout/lib
2、将第一步命令行放到.profile文件中,执行命令source .profile,推荐这种方法。
命令添加到该文件。
之后重新在bin目录下,执行./ffmpeg命令,打印出ffmpeg版本后,代表安装成功了。
4. 源码验证
在buildout文件夹下,即bin、lib、include、share同级目录下,新建文件,hello_world.cpp文件,代码如下(copy的其他博友):
#include

#define __STDC_CONSTANT_MACROS

#ifdef __cplusplus
extern "C"
{
#endif
#include "libavcodec/avcodec.h"
#include "libavformat/avformat.h"
#include "libavfilter/avfilter.h"
#ifdef __cplusplus
};
#endif


/**
 * AVFormat Support Information
 */
char * avformatinfo(){

    char *info=(char *)malloc(40000);
    memset(info,0,40000);

    av_register_all();

    AVInputFormat *if_temp = av_iformat_next(NULL);
    AVOutputFormat *of_temp = av_oformat_next(NULL);
    //Input
    while(if_temp!=NULL){
        sprintf(info, "%s[In ] %10s\n", info, if_temp->name);
        if_temp=if_temp->next;
    }
    //Output
    while (of_temp != NULL){
        sprintf(info, "%s[Out] %10s\n", info, of_temp->name);
        of_temp = of_temp->next;
    }
    return info;
}

/**
 * AVCodec Support Information
 */
char * avcodecinfo()
{
    char *info=(char *)malloc(40000);
    memset(info,0,40000);

    av_register_all();

    AVCodec *c_temp = av_codec_next(NULL);

    while(c_temp!=NULL){
        if (c_temp->decode!=NULL){
            sprintf(info, "%s[Dec]", info);
        }
        else{
            sprintf(info, "%s[Enc]", info);
        }
        switch (c_temp->type){
        case AVMEDIA_TYPE_VIDEO:
            sprintf(info, "%s[Video]", info);
            break;
        case AVMEDIA_TYPE_AUDIO:
            sprintf(info, "%s[Audio]", info);
            break;
        default:
            sprintf(info, "%s[Other]", info);
            break;
        }

        sprintf(info, "%s %10s\n", info, c_temp->name);

        c_temp=c_temp->next;
    }
    return info;
}

/**
 * AVFilter Support Information
 */
char * avfilterinfo()
{
    char *info=(char *)malloc(40000);
    memset(info,0,40000);

    avfilter_register_all();

    AVFilter *f_temp = (AVFilter *)avfilter_next(NULL);

    while (f_temp != NULL){
        sprintf(info, "%s[%15s]\n", info, f_temp->name);
        f_temp=f_temp->next;
    }
    return info;
}

/**
 * Configuration Information
 */
char * configurationinfo()
{
    char *info=(char *)malloc(40000);
    memset(info,0,40000);

    av_register_all();

    sprintf(info, "%s\n", avcodec_configuration());

    return info;
}

int main(int argc, char* argv[])
{
    char *infostr=NULL;
    infostr=configurationinfo();
    printf("\n<>\n%s",infostr);
    free(infostr);

    infostr=avformatinfo();
    printf("\n<>\n%s",infostr);
    free(infostr);

    infostr=avcodecinfo();
    printf("\n<>\n%s",infostr);
    free(infostr);

    infostr=avfilterinfo();
    printf("\n<>\n%s",infostr);
    free(infostr);

    return 0;
}
之后编译代码,执行命令:
g++ -I include/ hello_world.cpp -o hello_world -Llib/ -lavcodec -lavdevice -lavfilter -lavformat -lavutil
运行可执行文件,则可以看到代码打印,编译、运行成功。
以上就为全部内容,希望对大家有所帮助。
觉着这篇文章对自己有益的土豪朋友可以扫描屏幕下方二维码金额随意,感谢大家支持,增加写作动力。
![]()


