TVM安装编译指南
本文参考: TVM 官网安装指南
文章目录
-
- 1. mac从源码形式安装tvm实操
- 2.使用TVMC命令行进行模型优化编译和运行
- 2.使用pyhton高级接口进行模型优化编译和运行
- 遇到的问题
1. mac从源码形式安装tvm实操
- 使用brew安装的llvm地址:
/usr/local/Cellar/llvm@9/9.0.1_4/bin/bin/llvm-config
# you can find it on here too!
/usr/local/opt/llvm
- 开启LLVM
set(USE_LLVM "/usr/local/Cellar/llvm@9/9.0.1_4/bin/llvm-config --link-static")
set(HIDE_PRIVATE_SYMBOLS ON)
- 准备编译代码
mkdir build
cd build
cp cmake/config.cmake build
# 这里需要做一些配置,不建议打开USE_RELAY_DEBUG,容易报错,官网文档有问题。
#set(USE_RELAY_DEBUG OFF)
cmake ..
make -j 20

- 测试python环境
(tvm-build) ➜  bin python
Python 3.7.9 (default, Aug 31 2020, 07:22:35)
[Clang 10.0.0 ] :: Anaconda, Inc. on darwin
Type "help", "copyright", "credits" or "license" for more information.
>>> import tvm
>>> print(tvm.__version__)
0.9.dev0
- 安装python包
pip3 install --user onnx onnxoptimizer
2.使用TVMC命令行进行模型优化编译和运行
TVMC : tvm的命令行工具,用来完成TVM的模型导入,编译,优化等操作。
属于python工具
- 本章节目标:
1、为 TVM 运行时编译预训练的 ResNet-50 v2 模型。
2、通过编译的模型运行真实图像,并解释输出和模型性能。
3、使用 TVM 在 CPU 上调整模型。
4、用 TVM 收集的调整数据重新编译优化模型。
5、通过优化模型运行图像,并比较输出和模型性能。
下来进行实操:
1、 模型下载
wget https://github.com/onnx/models/raw/main/vision/classification/resnet/model/resnet50-v2-7.onnx
2、 使用TVM运行时编译ONNX模型


```shell

# This may take several minutes depending on your machine
tvmc compile \
--target "llvm" \
--output resnet50-v2-7-tvm.tar \
resnet50-v2-7.onnx
通过上述命令会生成:resnet50-v2-7-tvm.tar
让我们解压看一下:
mkdir model
tar -xvf resnet50-v2-7-tvm.tar -C model
ls model
-
mod.sois the model, represented as a C++ library, that can be loaded by the TVM runtime. -
mod.jsonis a text representation of the TVM Relay computation graph. -
mod.paramsis a file containing the parameters for the pre-trained model.
3 . 使用TVM运行刚刚编译的模型
我们需要准备2件东西:
	1. 刚刚编译生成的tar文件
	2. 模型的输入
为了确保模型输入的使用,我们需要对图像进行预处理,可以使用下面这段代码进行:
#!python ./preprocess.py
from tvm.contrib.download import download_testdata
from PIL import Image
import numpy as np

img_url = "https://s3.amazonaws.com/model-server/inputs/kitten.jpg"
img_path = download_testdata(img_url, "imagenet_cat.png", module="data")

# Resize it to 224x224
resized_image = Image.open(img_path).resize((224, 224))
img_data = np.asarray(resized_image).astype("float32")

# ONNX expects NCHW input, so convert the array
img_data = np.transpose(img_data, (2, 0, 1))

# Normalize according to ImageNet
imagenet_mean = np.array([0.485, 0.456, 0.406])
imagenet_stddev = np.array([0.229, 0.224, 0.225])
norm_img_data = np.zeros(img_data.shape).astype("float32")
for i in range(img_data.shape[0]):
      norm_img_data[i, :, :] = (img_data[i, :, :] / 255 - imagenet_mean[i]) / imagenet_stddev[i]

# Add batch dimension
img_data = np.expand_dims(norm_img_data, axis=0)

# Save to .npz (outputs imagenet_cat.npz)
np.savez("imagenet_cat", data=img_data)
这样我们就有了模型,还有了输入的数据,然后我们就可以运行这个模型了:
tvmc run \
--inputs imagenet_cat.npz \
--output predictions.npz \
resnet50-v2-7-tvm.tar
输出参数可视化代码段:
#!python ./postprocess.py
import os.path
import numpy as np

from scipy.special import softmax

from tvm.contrib.download import download_testdata

# Download a list of labels
labels_url = "https://s3.amazonaws.com/onnx-model-zoo/synset.txt"
labels_path = download_testdata(labels_url, "synset.txt", module="data")

with open(labels_path, "r") as f:
    labels = [l.rstrip() for l in f]

output_file = "predictions.npz"

# Open the output and read the output tensor
if os.path.exists(output_file):
    with np.load(output_file) as data:
        scores = softmax(data["output_0"])
        scores = np.squeeze(scores)
        ranks = np.argsort(scores)[::-1]

        for rank in ranks[0:5]:
            print("class='%s' with probability=%f" % (labels[rank], scores[rank]))
- 记录上述的运行时间,现在我们开始使用自动优化
使用自动优化需要我们提供:
1. 具体准备运行模型的设备型号
2. 存储最终自动优化记录的文件路径
3. 需要被优化的模型路径
# The default search algorithm requires xgboost, see below for further
# details on tuning search algorithms
pip install xgboost

tvmc tune \
--target "llvm" \
--output resnet50-v2-7-autotuner_records.json \
resnet50-v2-7.onnx
这一步骤特别的满,最后生成的文件长成这个样子:

- 使用自动优化数据进行优化编译模型
上一步中我们获取了一个文件名为:resnet50-v2-7-autotuner_records.json
,这个文件有二个作用:
1. 近一步优化模型
2. 作为编译器的输入
编译器将使用自动优化数据进行生成高性能的运行代码。
我们这时候使用TVM优化在编译一次:
tvmc compile \
--target "llvm" \
--tuning-records resnet50-v2-7-autotuner_records.json  \
--output resnet50-v2-7-tvm_autotuned.tar \
resnet50-v2-7.onnx

# 对比上一次没有使用优化的编译代码
tvmc compile \
--target "llvm" \
--output resnet50-v2-7-tvm.tar \
resnet50-v2-7.onnx
编译之后我们就可以使用优化后的模型,再次进行一次验证:
tvmc run \
--inputs imagenet_cat.npz \
--output predictions.npz \
resnet50-v2-7-tvm_autotuned.tar
对比一下优化前后的差距:
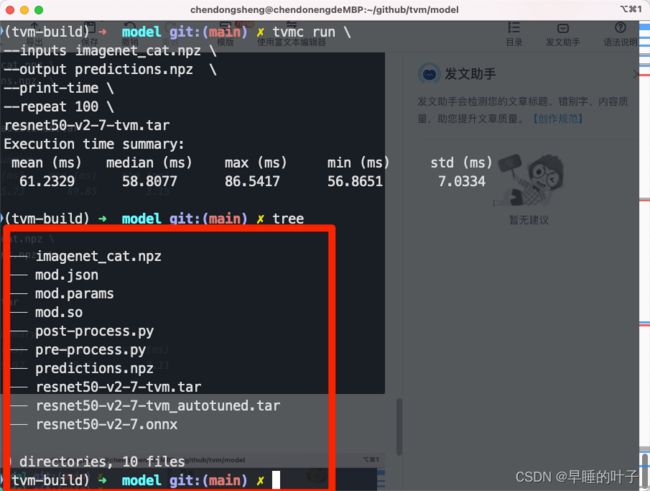
TVMC提供了基础的性能基础:集成在TVMC的指令里:
tvmc run \
--inputs imagenet_cat.npz \
--output predictions.npz  \
--print-time \
--repeat 100 \
resnet50-v2-7-tvm_autotuned.tar

# Execution time summary:
# mean (ms)   max (ms)    min (ms)    std (ms)
#     92.19     115.73       89.85        3.15

tvmc run \
--inputs imagenet_cat.npz \
--output predictions.npz  \
--print-time \
--repeat 100 \
resnet50-v2-7-tvm.tar

# Execution time summary:
# mean (ms)   max (ms)    min (ms)    std (ms)
#    193.32     219.97      185.04        7.11

- 我的结果

2.使用pyhton高级接口进行模型优化编译和运行
- 准备工作
mkdir myscripts
cd myscripts
wget https://github.com/onnx/models/raw/main/vision/classification/resnet/model/resnet50-v2-7.onnx
mv resnet50-v2-7.onnx my_model.onnx
touch tvmcpythonintro.py
- 导入库
from tvm.driver import tvmc
# 1. 导入模型
# If you’d like to see the Relay, you can run: model.summary()
model = tvmc.load('my_model.onnx') #Step 1: Load
这一步就想模型转化为relay的表达模式
- 编译
make Relay into a lower-level language that the target machine can understand
package = tvmc.compile(model, target="llvm") #Step 2: Compile
- 支持的平台:
- cuda (Nvidia GPU)
- llvm (CPU)
- llvm -mcpu=cascadelake (Intel CPU)
- 运行
result = tvmc.run(package, device="cpu") #Step 3: Run
- 优化
比较推荐,优化可以提速。
tvmc.tune(model, target="llvm") #Step 1.5: Optional Tune
其他:
- 存储模型
# 1. 存储模型
model = tvmc.load('my_model.onnx') #Step 1: Load
model.save(desired_model_path)


# 2. 存储编译后的模型
tvmc.compile(model, target="llvm", package_path="whatever") #Step 2: Compile

new_package = tvmc.TVMCPackage(package_path="whatever")
result = tvmc.run(new_package, device="cpu") #Step 3: Run


# 使用自动优化
tvmc.tune(model, target="llvm", enable_autoscheduler = True)

# 保存优化结果
log_file = "hello.json"

# Run tuning
tvmc.tune(model, target="llvm", tuning_records=log_file)

...

# Later run tuning and reuse tuning results
tvmc.tune(model, target="llvm",tuning_records=log_file)
遇到的问题
在刚刚下载玩模型进行编译的时候,日志的登记设置不对会报错,这个是因为tvm官方文档的问题,进行如下修改就好了。
-
TVMError: TVM_LOG_DEBUG ill-formed, invalid level
官方论坛
GitHub-源码-日志登记设置
在进行模型优化编译的时候,会下砸什么东西,总是失败,可以参考:
- WARNING:root:Failed to download tophub package for llvm:
官方论坛