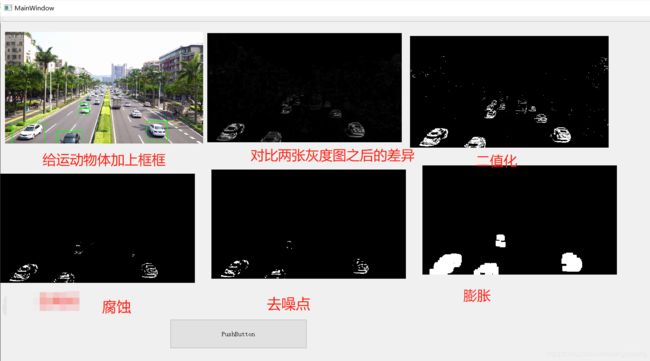
在Qt平台下使用opencv对运动物体进行监测的简单运用
一、基础函数
1、opencv读图片和写图片
(1)读图片函数imread()
Mat imread(const string& filename, int flags=1 );	//函数原型
Mat image= imread("C://Users//hasee//Desktop//1911//car.png");	//读绝对路径图片
Mat image= imread("car.png");	//读相对路径图片
参数 filename 是被读取的图像文件名(一般使用绝对路径);在 imread() 函数中, flag 参数值有三种情况:
- 当flag>0,该函数返回 3 通道图像,如果磁盘上的图像文件是单通道的灰 度图像,则会被强制转为 3 通道;
- flag=0,该函数返回单通道图像,如果磁盘的图像文件是多通道图像,则会被强制转为单通道;
- flag<0,则函数不对图像进行通道转换。
imread()函数返回的是 Mat 对象,如果读取文件失败,则会返回一个空矩阵, 即为 NULL。执行 imread()之后,需要检查文件是否成功读入,防止后续操作对一个空矩阵进行,可以使用 empty() 函数进行检查。
(2)写图片函数imwrite()
bool imwrite(const string& filename, InputArray image, const vector<int>& params=vector<int>());
Mat img;
imwrite("car.png",img);
并不是所有的 Mat 对象都可以存为图像文件,目前支持的格式只有 8U 类型 的单通道和 3 通道(颜色顺序为 BGR)矩阵。在保存文件的时候,若文件已经训在,则会自动覆盖。
2、对视频进行读取及调用摄像头
VideoCapture::VideoCapture();
VideoCapture::VideoCapture(const string& filename);
VideoCapture::VideoCapture(int device);
参数:
filename – 打开的视频文件名。
device – 打开的视频捕获设备id ,如果只有一个摄像头可以填0,表示打开默认的摄像头。
VideoCapture使用到的方法
bool VideoCapture::isOpened();	//判断视频读取或者摄像头调用是否成功,成功则返回true。
bool VideoCapture::read(Mat& image);	//获取一帧图片
3、图片格式转换
(1)转RGB格式
cvtColor(BGR_img,RGB_img,COLOR_BGR2RGB);
(2)转灰度
cvtColor(BGR_img,GRAY_img,COLOR_RGB2GRAY);
4、计算帧间差异
absdiff(GRAY_img_1,GRAY_img_2,GRAY_diff);
5、二值化
double threshold(InputArray src, OutputArray dst, double thresh, double maxval, int type);	//函数原型
threshold(GRAY_diff,thres_img,25,255,THRESH_BINARY);
第一个参数,InputArray类型的src,输入数组,填单通道 , 8或32位浮点类型的Mat即可。
第二个参数,OutputArray类型的dst,函数调用后的运算结果存在这里,即这个参数用于存放输出结果,且和第一个参数中的Mat变量有一样的尺寸和类型。
第三个参数,double类型的thresh,阈值的具体值。
第四个参数,double类型的maxval,当第五个参数阈值类型type取 THRESH_BINARY 或THRESH_BINARY_INV阈值类型时的最大值.
第五个参数,int类型的type,阈值类型,。
第五参数有以下几种类型
0: THRESH_BINARY 当前点值大于阈值时,取Maxval,也就是第四个参数,下面再不说明,否则设置为0
1: THRESH_BINARY_INV 当前点值大于阈值时,设置为0,否则设置为Maxval
2: THRESH_TRUNC 当前点值大于阈值时,设置为阈值,否则不改变
3: THRESH_TOZERO 当前点值大于阈值时,不改变,否则设置为0
4: THRESH_TOZERO_INV 当前点值大于阈值时,设置为0,否则不改变
6、获取常用的结构元素的形状
Mat getStructuringElement(int shape, //核的形状  0:矩形  1:十字交叉形  2: 椭圆
						  Size ksize,//核大小
						  Point anchor=Point(-1,-1) //核中心位置,默认位于形状中心处

Mat elm = getStructuringElement(MORPH_RECT,Size(h,w),Point(-1,-1));
7、膨胀和腐蚀
膨胀—图像膨胀的过程类似于一个卷积的过程,假设有图像矩阵A以及结构元素B(注意,B的形状、尺寸没有限制),B在A矩阵上依次移动,每个位置上B所覆盖元素的最大值替换B的中心位置值(即锚点处),即为膨胀的过程。
腐蚀—腐蚀的过程与膨胀一致,区别在于用最小值替换中心位置值。
erode(input_img,erode_img,elm_1);
dilate(input_img,dilate_img,elm_2);
7、使用中值滤波器来平滑图像
medianBlur(input_img,median_img,5);
二、在Qt平台下使用opencv对运动物体进行监测的简单运用
h文件
#ifndef MAINWINDOW_H
#define MAINWINDOW_H
#include cpp文件
#include "mainwindow.h"
#include "ui_mainwindow.h"

MainWindow::MainWindow(QWidget *parent) :
    QMainWindow(parent),
    ui(new Ui::MainWindow)
{
    ui->setupUi(this);
}

MainWindow::~MainWindow()
{
    delete ui;
}

void MainWindow::on_pushButton_clicked()
{
    Mat img;
    Mat img_2;
    VideoCapture cap("C://Users//hasee//Desktop//1911//carMove.mp4");    //打开摄像头  0默认摄像头
    while(1){
        if(!cap.read(img)){
            cout<<"视频读取结束"<<endl;
            exit(1);
        }
        if(!cap.read(img_2)){
            cout<<"视频读取结束"<<endl;
            exit(1);
        }
        checkImage(img,img_2);
        qApp->processEvents();
    }
}

void MainWindow::checkImage(Mat &img,Mat &img_2)
{
    Mat result = img.clone();//复制备份一个图像彩色对象  最后显示方框用

    //在label中显示
//    BGR2RGB(img,img_color);
//    showImage(img_color,QImage::Format_RGB888,ui->label);

    //转灰度
    RGB2GRAY(img,gray_1);
    RGB2GRAY(img_2,gray_2);

    //取两张灰度图片不一样的地方
    GRATabsdiff(gray_1,gray_2,diff_img);
    showImage(diff_img,QImage::Format_Grayscale8,ui->label_2);

    //二值化(黑白)
    MatThreshold(diff_img,thres_img);
    showImage(thres_img,QImage::Format_Grayscale8,ui->label_3);

    //腐蚀-》去毛边
    Mat_getStructuringElement(elm_1,3,3);
    erode(thres_img,erode_img,elm_1);
    showImage(erode_img,QImage::Format_Grayscale8,ui->label_4);

    //去噪点
    medianBlur(erode_img,median_img,5);
    showImage(median_img,QImage::Format_Grayscale8,ui->label_5);

    //膨胀
    Mat_getStructuringElement(elm_2,25,25);
    dilate(median_img,dilate_img,elm_2);
    showImage(dilate_img,QImage::Format_Grayscale8,ui->label_6);

    //找轮廓
    vector<vector<Point> > contours;
    Mat_findContours(dilate_img,contours);
    //把contours.size进行循环,画轮廓
    vector<vector<Point> > contours_poly(contours.size());
    vector<Rect> boundRect(contours.size());
    int x0=0,y0=0,w0=0,h0=0;
    for(int i = 0; i< contours.size();i++){
        //图像轮廓点进行多边形拟合
        approxPolyDP(Mat(contours[i]),contours_poly[i],5,true);
        //计算轮廓的垂直边界最小矩形
        boundRect[i]=boundingRect(Mat(contours_poly[i]));
        x0 = boundRect[i].x;
        y0 = boundRect[i].y;
        w0 = boundRect[i].width;
        h0 = boundRect[i].height;
        //画矩形
        draw_rectangle(result,x0,y0,h0,w0);
        BGR2RGB(result,img_color);
        showImage(img_color,QImage::Format_RGB888,ui->label);
    }
}

//Mat格式转qimage
void MainWindow::BGR2RGB(Mat &BGR_img,Mat &RGB_img)
{
    cvtColor(BGR_img,RGB_img,COLOR_BGR2RGB);
}

//转灰度
void MainWindow::RGB2GRAY(Mat &BGR_img,Mat &GRAY_img)
{
    cvtColor(BGR_img,GRAY_img,COLOR_RGB2GRAY);
}

//比较两个灰度的不同
void MainWindow::GRATabsdiff(Mat &GRAY_img_1, Mat &GRAY_img_2, Mat &GRAY_diff)
{
    absdiff(GRAY_img_1,GRAY_img_2,GRAY_diff);
}

//二值化
void MainWindow::MatThreshold(Mat &GRAY_diff, Mat &thres_img_)
{
    threshold(GRAY_diff,thres_img_,25,255,THRESH_BINARY);
}


void MainWindow::Mat_getStructuringElement(Mat &elm,int h, int w)
{
    elm = getStructuringElement(MORPH_RECT,Size(h,w),Point(-1,-1));
}

//找轮廓
void MainWindow::Mat_findContours(Mat &img, vector<vector<Point> > &contours)
{
    findContours(img,contours,CV_RETR_EXTERNAL,CV_CHAIN_APPROX_SIMPLE,Point(0,0));
}

//画长方形
void MainWindow::draw_rectangle(Mat &img, int x, int y, int h, int w)
{
    rectangle(img,Point(x,y),Point(x+w,y+h),Scalar(0,255,0),2,8,0);
}

//在label显示
void MainWindow::showImage(Mat &img, QImage::Format fro, QLabel *label)
{
    QImage img_lab = QImage((const unsigned char*)img.data,img.cols,img.rows,fro);
    label->setPixmap(QPixmap::fromImage(img_lab.scaled(label->size(),Qt::KeepAspectRatio)));
}
