CNN 图像分类
CNN实现对FashionMNIST图像分类
卷积神经网络相对于全连接神经网络的优势:
- 参数少 -> 权值共享
因为全连接神经网络输入的图片像素较大, 所以参数较多
而卷积神经网络的参数主要在于核上, 而且核的参数可以共享给其他通道 - 全连接神经网络会将输入的图片拉直, 这样就会使图片损失原来的效果,从而导致效果不佳
而卷积神经网络不会将图片拉直,用步长去移动核 - 可以手动选取特征,训练好权重,特征分类效果比全连接神经网络的效果好
CNN过程: 
conolution层: 实现对feature map局部采样(相似于感受野)
pooling层: 增加感受野
dense层: 也就是全连接层
大概思路
- 加载数据集
- 构建CNN模型
- 训练函数
- 训练模型
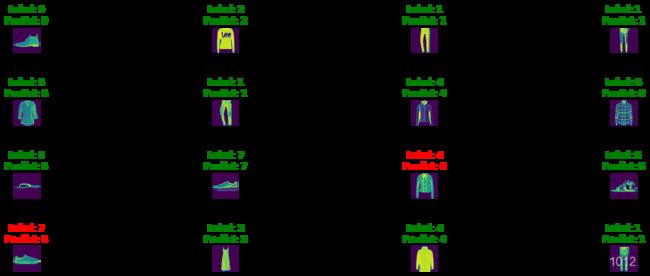
- 可视化效果
使用pytorch实现CNN
使用的是Fashimnist数据集, 和以前的线性回归加载数据集的方式一样
日常导入需要用到的python库
import torch
import torch.nn as nn
import torch.optim as optim
import torch.functional as F
import torchvision
import torchvision.transforms as transforms
import numpy as np

import matplotlib.pyplot as plt
加载数据集
与线性回归一样, 就不再阐述
# 加载数据集
train_data = torchvision.datasets.FashionMNIST("/home/kesci/input/FashionMNIST2065",
                train=True,
                transform=transforms.ToTensor(),
                download=False)

test_data = torchvision.datasets.FashionMNIST("/home/kesci/input/FashionMNIST2065",
                train=False,
                transform=transforms.ToTensor(),
                download=False)

# 批量加载数据
train_iter = torch.utils.data.DataLoader(train_data, batch_size=64,
                shuffle=True,
                num_workers=4)
test_iter = torch.utils.data.DataLoader(train_data, batch_size=64,
                shuffle=False,
                num_workers=4)
构建模型
与上面的图片相似
简述一下第一层卷积层, 第二次卷积层原理一样
输入通道为1( 因为我们输入的图片是灰度图)
输出通道为6
使用5 * 5 的核
并在图片边缘各加两行两列的全0填充
使用默认的步长1
卷积的计算公式
Input(N_batch, C_inchannel, H_inheight, W_inweight)
Output(N_batch, C_inchannel, H_outheight, W_outweight)
H_outheight = (H_inheight + 2 * padding - (kernel_h - 1) - 1) / s + 1
W_outweight = (W_outweight + 2 * padding - (kernel_w - 1) - 1) / s + 1
第一层卷积:
输入(batch_size, 1, 28, 28)
h_out = (28 + 2 * 2 - (5 - 1) - 1) / 1 + 1 = 28
w_out = (28 + 2 * 2 - (5 - 1) - 1) / 1 + 1 = 28
输出(batch_size, 6, 28, 28)
第一层池化层:
输入(batch_size, 6, 28, 28)
输出(batch_size, 6, 14, 14)
第二层卷积:
输入(batch_size, 6, 14, 14)
输出(batch_size, 16, 10, 10)
第二层池化层:
输入(batch_size, 16, 10, 10)
输出(batch_size, 16, 5, 5)
全连接层:
(batch_size, 16 * 5 * 5) -> (batch_size, 120)-> (batch_size, 84)-> (batch_size, 10)
# 构建模型
from collections import OrderedDict
class Model(nn.Module):
    def __init__(self):
        super(Model, self).__init__()
        self.conv1 = nn.Sequential(OrderedDict([
                # (28 + 2 * 2 - (5 - 1) - 1) / 1 + 1 = 28
                ("conv", nn.Conv2d(1, 6, 5, padding=2)),
                ("relu", nn.ReLU()),
                ("pool", nn.MaxPool2d(2, 2)),
            ]))

        self.conv2 = nn.Sequential(OrderedDict([
                # (14 - (5 - 1) - 1) / 1 + 1 = 10
                ("conv", nn.Conv2d(6, 16, 5)),
                ("relu", nn.ReLU()),
                ("pool", nn.MaxPool2d(2, 2)),
            ]))

        self.fc = nn.Sequential(OrderedDict([
                ("flatten", nn.Flatten()),
                ("fc1", nn.Linear(400, 120)),
                ("dropout1", nn.Dropout(.4)),
                ("fc2", nn.Linear(120, 84)),
                ("dropout2", nn.Dropout(.4)),
                ("fc_out", nn.Linear(84, 10))
            ]))

    def forward(self, x):
        x = self.conv1(x)
        x = self.conv2(x)
        x = self.fc(x)

        return x
训练函数
基本思路
def train(net, lr=.01, epochs=20):
    opt = optim.Adam(net.parameters(), lr=lr)
    loss = nn.CrossEntropyLoss()
    for epoch in range(1, epochs + 1):
        train_loss = 0
        test_loss = 0
        for x, y in train_iter:
            out = net(x)
            l = loss(out, y)

            net.zero_grad()
            l.backward()
            opt.step()

            train_loss += l.item()

        acc = 0.0
        if epoch % 4 == 0:
            for x, y in train_iter:
                out = net(x)
                l = loss(out, y)
                test_loss += l.item()

                acc += (out.argmax(1) == y).float().mean().item()

            print(f"Epoch: {epoch}: \n"
                    f"Train Loss: {train_loss / len(train_iter) :.3f}\t"
                    f"Test Loss: {test_loss / len(test_iter) :.3f}\t"
                    f"Accuracy: {acc / len(test_iter) :.3f}\n")
训练模型和可视化
model = Model()
train(model)
结果:
Epoch: 4:
Train Loss: 0.541 Test Loss: 0.538 Accuracy: 0.811
Epoch: 8:
Train Loss: 0.545 Test Loss: 0.512 Accuracy: 0.824
Epoch: 12:
Train Loss: 0.545 Test Loss: 0.548 Accuracy: 0.806
Epoch: 16:
Train Loss: 0.560 Test Loss: 0.549 Accuracy: 0.819
Epoch: 20:
Train Loss: 0.577 Test Loss: 0.568 Accuracy: 0.795
感觉是有点训练过头了
接着可视化
data = []
for i in range(16):
    data.append(test_data[i])
   plt.figure(figsize=(16, 6))

plt.subplots_adjust(wspace = 2, hspace=2)
for i in range(16):
    out = model(data[i][0].view(1, 1, 28, 28)).argmax(1).item()
    ax = plt.subplot(4, 4, i + 1)
    ax.imshow(data[i][0].view(28, 28).numpy())
    ax.set_title(f"Label: {data[i][1]}\nPredict: {out}", color="g" if out == data[i][1] else "r")
    ax.axis("off")
plt.show()
OK, 到这里也对CNN也有些了解了。
更多可以参考CNN的一些进阶模型, AlexNet、VGG、NiN、GoogLeNet等
