SpringCache整合Redis实现项目缓存解决方案
前言
说实话,在写这一篇文章之前我一直没有搞懂一个问题。明明我们项目中使用最多的缓存技术就是Redis,用Redis就完全就可以搞定缓存的问题了,为什么还有一个SpringCache,以及SpringCache和Redis之间的区别。
一、 为什么要使用缓存
- 缓存是将数据直接存入内容中,读取效率比数据库的更高
- 缓存可以有效地降低数据库压力,为数据库减轻负担
二、 常见的缓存中间件
Redis、Memcached、Guava、Caffeine,其中Redis和Memcached使用的较多,各自也有不同的优缺点,可参考博客:https://blog.csdn.net/galen2016/article/details/81673870
三、 为什么要使用SpringCache
先看一下我们使用缓存步骤:
- 查寻缓存中是否存在数据,如果存在则直接返回结果
- 如果不存在则查询数据库,查询出结果后将结果存入缓存并返回结果
- 数据更新时,先更新数据库
- 然后更新缓存,或者直接删除缓存
此时我们会发现一个问题,所有我们需要使用缓存的地方都必须按照这个步骤去书写,这样就会出现很多逻辑上相似的代码。并且我们程序里面也需要显示的去调用第三方的缓存中间件的API,如此一来就大大的增加了我们项目和第三方中间件的耦合度。就以Redis为列,如下图所示:

图中代码所示,就是我们上面描述的使用Redis作为缓存中间件来进行缓存的实列,我们不难发现,我们的查询和存储时都是使用到了SpringBoot整合Redis后的相关API的,并且项目中所有的使用缓存的地方都会如此使用,这样子提升了代码的复杂度,我们程序员更应该关注的是业务代码,因此我们需要将查询缓存和存入缓存这类似的代码封装起来用框架来替我们实现,让我们更好的去处理业务逻辑。
那么我们如何让框架去帮我们自动处理呢,这不就是典型的AOP思想吗?
是的,Spring Cache就是一个这样的框架。它利用了AOP,实现了基于注解的缓存功能,并且进行了合理的抽象,业务代码不用关心底层是使用了什么缓存框架,只需要简单地加一个注解,就能实现缓存功能了。而且Spring Cache也提供了很多默认的配置,用户可以3秒钟就使用上一个很不错的缓存功能。
使用了Spring Cache框架后使用缓存实列,如下图所示:

我们只需要将我们的方法添加一个注解就可以将方法返回结果直接存入缓存,并不需要手动去进行设置,是不是大大的简化了代码。
三、 SpringBoot整合Redis
1.导入jar包
 <dependency>
     <groupId>org.springframework.bootgroupId>
     <artifactId>spring-boot-starter-data-redisartifactId>
 dependency>
2.添加配置文件(直接复制得话,检查下格式哟)
spring.redis.host = 192.168.2.57
spring.redis.port = 6379
spring.redis.database = 10
spring.redis.timeout = 1800
3.配置Redis的value序列化方式(Redis默认使用JdkSerializationRedisSerializer序列化方式)
创建MyRedisConfig类并添加@Configuration注解,类中添加如下方法:
  /** 自定义序列化方式 */
  @Bean
  public RedisTemplate redisTemplate(JedisConnectionFactory connectionFactory) {
    RedisTemplate template = new RedisTemplate();
    template.setConnectionFactory(connectionFactory);
    template.setKeySerializer(new StringRedisSerializer());
    template.setValueSerializer(new GenericJackson2JsonRedisSerializer());
    template.setHashValueSerializer(new StringRedisSerializer());
    return template;
  }
4.配置Jedis连接池(选配,可以不配置)
①、添加jedis的相关jar包
 <dependency>
     <groupId>redis.clientsgroupId>
     <artifactId>jedisartifactId>
     <version>2.9.0version>
 dependency>
②、Redis配置类中进行调整,添加如下内容
  @Value("${spring.redis.host}")
  private String redisHost;
  @Value("${spring.redis.port}")
  private Integer redisPort;
  @Value("${spring.redis.database}")
  private Integer database;
  @Value("${spring.redis.timeout}")
  private Integer timeout;
  @Bean
  public RedisStandaloneConfiguration standaloneConfig() {
    RedisStandaloneConfiguration configuration = new RedisStandaloneConfiguration();
    configuration.setHostName(redisHost);
    configuration.setPort(redisPort);
    configuration.setDatabase(database);
    return configuration;
  }
  @Bean
  public JedisPoolConfig poolConfig() {
    JedisPoolConfig poolConfig = new JedisPoolConfig();
    poolConfig.setMinIdle(300);
    poolConfig.setMaxIdle(500);
    poolConfig.setMaxTotal(5000);
    poolConfig.setMaxWaitMillis(1000);
    poolConfig.setTestOnBorrow(true);
    poolConfig.setTestOnReturn(true);
    poolConfig.setTestWhileIdle(true);
    return poolConfig;
  }
  @Bean
  public JedisConnectionFactory connectionFactory(RedisStandaloneConfiguration standaloneConfig) {
    JedisConnectionFactory factory = new JedisConnectionFactory(standaloneConfig);
    // 添加redis连接池
    factory.setPoolConfig(poolConfig());
    factory.setUsePool(true);
    return factory;
  }
4.测试Redis是否整合成功(输出不为null,说明整合成功)
@RunWith(SpringRunner.class)
@SpringBootTest
public class RedisIstributedLockApplicationTests {
  @Autowired private StringRedisTemplate redisTemplate;
  @Test
  public void testSelect() {
    System.out.println(redisTemplate);
  }
}
四、 SpringBoot整合SpringCache
1.引入jar包
 <dependency>
     <groupId>org.springframework.bootgroupId>
     <artifactId>spring-boot-starter-cacheartifactId>
 dependency>
2.添加配置文件
#设置缓存组件类型
spring.cache.type=redis
#设置缓存过期时间
spring.cache.redis.time-to-live=3600000
#指定默认前缀,如果此处我们指定了前缀则使用我们指定的前缀,推荐此处不指定前缀
#spring.cache.redis.key-prefix=CACHE_
#是否开始前缀,建议开启
spring.cache.redis.use-key-prefix=true
#是否缓存空值,防止缓存穿透
spring.cache.redis.cache-null-values=true
3.添加配置类,设置序列化方式
@Configuration
@EnableCaching // 开始springCache
@EnableConfigurationProperties(CacheProperties.class) // 加载缓存配置类
public class MyRedisCacheConfig {

  @Bean
  public RedisCacheConfiguration redisCacheConfiguration(CacheProperties cacheProperties) {
    RedisCacheConfiguration config = RedisCacheConfiguration.defaultCacheConfig();
    // 设置缓存key的序列化方式
    config =
        config.serializeKeysWith(
            RedisSerializationContext.SerializationPair.fromSerializer(
                new StringRedisSerializer()));
    // 设置缓存value的序列化方式(JSON格式)
    config =
        config.serializeValuesWith(
            RedisSerializationContext.SerializationPair.fromSerializer(
                new GenericJackson2JsonRedisSerializer()));
    CacheProperties.Redis redisProperties = cacheProperties.getRedis();
    if (redisProperties.getTimeToLive() != null) {
      config = config.entryTtl(redisProperties.getTimeToLive());
    }
    if (redisProperties.getKeyPrefix() != null) {
      config = config.prefixKeysWith(redisProperties.getKeyPrefix());
    }
    if (!redisProperties.isCacheNullValues()) {
      config = config.disableCachingNullValues();
    }
    if (!redisProperties.isUseKeyPrefix()) {
      config = config.disableKeyPrefix();
    }
    return config;
  }
}
4.简单使用SpringCache(在需要使用缓存的业务方法上添加@Cacheable)
  @Override
//  @Cacheable(value = "category", key = "'getLevel1Categorys'")
  @Cacheable(value = {"category"}, key = "#root.methodName")
  public List<CategoryEntity> getLevel1Categorys() {
    log.info("getLevel1Categorys方法查询成功");
    List<CategoryEntity> parentCid =
        this.baseMapper.selectList(new QueryWrapper<CategoryEntity>().eq("parent_cid", 0));
    return parentCid;
  }
五、 SpringCache详解
按照如上步骤,大家已经完成了SpringCache和Redis的整合了,在我们添加MyRedisCacheConfig中配置了redis缓存配置相关内容,比如key和value的序列化方式以及设置过期时间、前缀等等。那么接下来就讲一讲SpringCache的相关用法。
1.SpringCache的常用注解
@Cacheable注解:
这个注解一般用在查询方法上, @Cacheble注解表示这个方法有了缓存的功能,方法的返回值会被缓存下来,下一次调用该方法前,会去检查是否缓存中已经有值,如果有就直接返回,不调用方法。如果没有,就调用方法,然后把结果缓存起来。
@Cacheable注解的常见属性如下:
- value、cacheNames:标明该缓存的的片区(两个属性一样的作用)
- key:标明该缓存的key值,该值是Spel表达式,不是普通的字符串,如果我们要手动显示指定的话,必须用小括号才可以正常使用,如下所示:
@Cacheable(value = “category”, key = “‘getLevel1Categorys’”),框架为我们默认设置了一套规 则,常见的有:
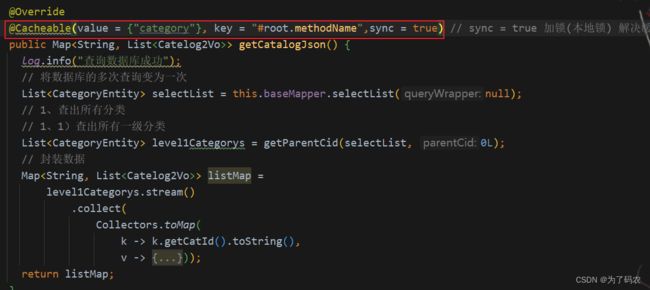
key = “#root.methodName”、 key = "#root.args[1]"等,可参考官网说明 - sync:当值为true时,相当于添加了本地锁,可以有效地解决缓存击穿问题
使用示例: @Cacheable(value = {“category”}, key = “#root.methodName”,sync = true)
@CacheEvict注解:
使用了CacheEvict注解的方法,会清空指定缓存。「一般用在更新或者删除的方法上」
使用示例: @CacheEvict(value = {“category”},key="‘getLevel1Categorys’")
同时删除多个缓存方法:
方法一:
@Caching(evict = {
@CacheEvict(value = {“category”},key="‘getLevel1Categorys’"),
@CacheEvict(value = {“category”},key="‘getCatalogJson’")
})
方法二:
@CacheEvict(value = {“category”},allEntries = true)
@CachePut注解:
使用了@CachePut注解的方法,会把方法的返回值put到缓存里面缓存起来,供其它地方使用。它「通常用在新增方法上」
@Caching注解:
Java注解的机制决定了,一个方法上只能有一个相同的注解生效。那有时候可能一个方法会操作多个缓存(这个在删除缓存操作中比较常见,在添加操作中不太常见),看源码便可理接该注解作用。
@Target({ElementType.TYPE, ElementType.METHOD})
@Retention(RetentionPolicy.RUNTIME)
@Inherited
@Documented
public @interface Caching {
	Cacheable[] cacheable() default {};
	CachePut[] put() default {};
	CacheEvict[] evict() default {};
}
@CacheConfig注解:
前面提到的四个注解,都是Spring Cache常用的注解,它们通常都是作用在方法上的,而有些配置可能又是一个类通用的,这种情况就可以使用@CacheConfig了,它是一个类级别的注解,可以在类级别上配置cacheNames、keyGenerator、cacheManager、cacheResolver等。
2.SpringCache的使用注意事项
- @CacheEvict注解中的allEntries = true属性会将当前片区中的所有缓存数据全部清除,请谨慎使用
- @CacheEvict注解适用用于失效模式,也即更新完数据库数据后删除缓存数据
- @CachePut注解用于适用于双写模式,更新完数据库后写入到缓存中
- SpringCache不是只能和Redis中间件进行整和,和其他缓存中间件也可以整合实现缓存管理
- Redis的作用也不仅仅是用作缓存,也可以用于功能实现,实现分布式锁,注意区分redis分布式锁和SpringCache
- 配置文件中spring.cache.redis.key-prefix的配置一般不进行设置
- 配置文件中spring.cache.redis.cache-null-values=true一般需要设置(null值缓存),可以有效的防止缓存穿透
- …
3.SpringCache的不足
SpringCache只对读模式下的缓存失效进行了处理,对于写模式下的缓存失效没有相应的处理,需要我们自己采取其他方式来处理。
缓存中常见的失效场景及解决方案:
- 缓存穿透:查询一个null数据 解决方案:缓存空数据
- 缓存击穿:大量并发同时查询一个刚好过期的数据,解决方案:加锁
- 缓存雪崩:大量的key同时过期,解决方案:所有key都添加上随机的过期时间
读模式下的缓存失效处理方案:
- 缓存穿透:cache-null-values: true,允许写入空值
- 缓存击穿:@Cacheable(sync = true),加锁
- 缓存雪崩:time-to-live:xxx,设置不同的过期时间
提示:
1、对于常规数据(读多写少,及时性、一致性要求不高的数据)完全可以使用 Spring Cache
2、对于特殊数据(比如要求高一致性)则需要特殊处理
六、 小结
以上文章就是我对SpringCache和Redis的见解,当然也有可能存在有误的地方噢,欢迎大家指出,一起学习一起进步。大家只需记住一点就可区分开两者的关系,SpringCache是Spring全家桶中的一员,是Spring为了业务和缓存的解耦而研发出的一个简便使用缓存的框架。而Redis只是一个缓存中间件(缓存数据库),可以有很多产品替代它,只不过目前Redis比较受欢迎,使用度更加广泛而已。对于有些项目里面有可能只是用到了Redis,而没有用到SpringCache,那么里面Redis作为缓存使用的话只能像我文章前面说的那种通过传统的代码式(调用API显示的书写缓存查询和存储)去使用。更推荐大家使用SpringCache哟,毕竟注解可以大大的简化我们的开发。