uni-clould常用笔记
一,云函数
定义:
// hellocf云函数index.js入口文件代码
'use strict';
exports.main = async (event, context) => {
	//event为客户端上传的参数
	let c = event.a + event.b
	return {
		sum: c
	} // 通过return返回结果给客户端
}
调用:
// 客户端调用云函数并传递参数
uniCloud.callFunction({
    name: 'hellocf',
    data: {a:1,b:2}
  })
  .then(res => {});
二,云对象
定义:
module.exports = {
	_before: function () { // 通用预处理器

	},
   async getAccessToken(){
	   const APPID='xxx'
	   const APPSECRET='xxx'
	   const URL = `https://api.weixin.qq.com/cgi-bin/token?grant_type=client_credential&appid=${APPID}&secret=${APPSECRET}`
	   const requestOptions = {
	   	method: 'GET',
	   	dataType: 'json'
	   }
	   const res = await uniCloud.httpclient.request(URL,requestOptions)
	   return res
   }
}
调用
			async getWeixinCode() { // 注意异步
				const _this=this
				const user = uniCloud.importObject('user') // 导入云对象
				try {
					const res = await user.getAccessToken() //导入云对象后就可以直接调用该对象的sum方法了,注意使用异步await
					console.log("调用接口返回",res.data.access_token)
				} catch (e) {
					console.log(e)
				}
			},
两者的区别:
云对象其实是云函数的封装简化。
三,公共模块
这个公共模块其实就是公用库,可以是自己写的公用模块,也可以是第三方sdk库。安装使用npm。
1,在cloudfunctions目录下创建common目录
2,在common目录右键创建公用模块目录(本例中为hello-common),会自动创建入口index.js文件和package.json,不要修改此package.json的name字段
3,在hello-common右键上传公用模块
4,在要引入公用模块的云函数目录(本例中为use-common)执行npm init -y生成package.json文件
5,在use-common目录执行npm install ../common/hello-common引入hello-common模块
编写:
// common/hello-common/index.js
function getVersion() {
  return '0.0.1'
}
module.exports = {
  getVersion,
  secret: 'your secret'
}
在云对象中引入调用:
const {
  secret,
  getVersion
} = require('hello-common')
module.exports = {
	_before: function () { // 通用预处理器

	},
   async getAccessToken(){
	   console.log('res', res)
	   let version=getVersion()
	   // 此处省略a和b的有效性校验
	   return {
		   secret,
			version
	   }
   }
}
四,云数据库基本操作
1,初始化介绍
在web控制台新建一个数据表,一个数据表有三种查看模式:数据、索引、表结构。
【数据】:就是这个表中有的值
【索引】:分为唯一型索引和非唯一型索引,在通过该字段查询(where)或排序(orderBy)时可以获得更快的查询速度。
【表结构】:定义表的结构,每个字段的键的名字和值的类型
2,新建数据库操作
第一种是在web控制台进行新建。这种很简单,不再赘述。主要讲第二种,通过代码新建数据库。
const db = uniCloud.database();
db.createCollection("mytestTable")
在云对象中执行之后,就可以在web控制台看到对应生成的数据库了。
3,获取集合的引用
const db = uniCloud.database();
const collection = db.collection('mytestTable');
这样一来,collection就是这个集合的引用,后续要对表做什么,就使用这个collection。
4,增操作
await collection.add({username:"dmhsq",test:'测试'})
5,计数操作
let res = await collection.count()
6,查操作
await collection.get()
这三个,是获取到整个表的引用进行操作的。而更多的时候,我们是会有选择性地筛选出某几个记录来操作。这就要从整个表进行筛选。如果不筛选,那就是整个表。
7,筛选
collection.where({
	username: "匹配的值"
})
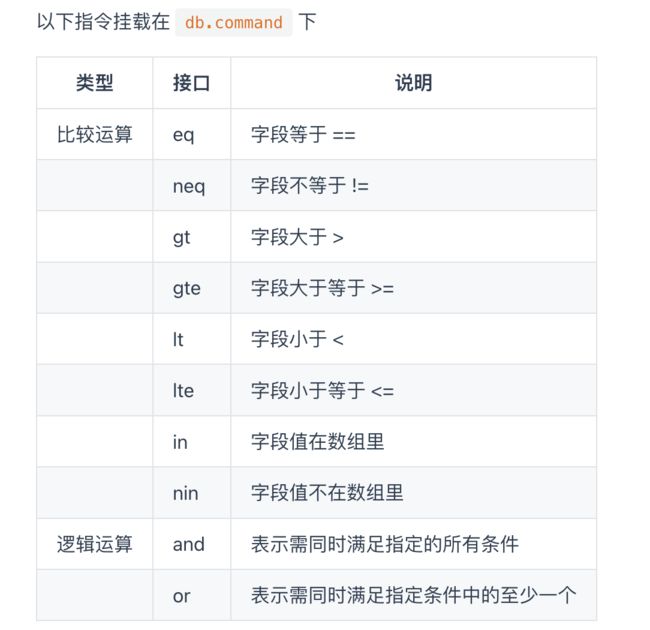
不仅如此,筛选还可以依据指令进行。这些指令存储在db.command对象中。

const dbCmd = db.command
let res = await collection.where({
	username:dbCmd.eq("匹配的值")
}).get()
它返回的依旧是记录的集合。
await collection.where({age:'20'}).get()
5,删操作
await collection.doc('af44222c639017f2002eebc13996ac1d').remove()
这样子明显就是指定id来删除记录,也可以结合数据库的选择语句来找到目标记录加以删除。
await collection.where({age:"20"}).remove()
6,改操作
// 更新数据 update或者set  set如果没找到id 则会新增一条数据
await collection.doc('eee691ac63901abc010f67d77f271fec').update(
	{
		username:"科比",
		age:"20",
		No:"24",
		test:"洛杉矶湖人"
	}
)
当然,也可以利用选择语句加以更新。
  await collection.where({username:"dmhsq"}).update(
	{
		username:"科比",
		age:"20",
		No:"24",
		test:"洛杉矶湖人"
	}
)
7,数据分页的实现
let pages = event.p; //页数
let nums = event.n; //每页个数
let res = await collection.skip((pages-1)*nums).limit(nums).get()
console.log("当前页数为"+pages)
8,排序的实现
collection.orderBy("字段名","升序/降序").get()
升序为asc
降序desc
9,指定要返回的参数
let res = await collection.field({"_id":true}).get()