k8s 的etcd备份、CoreDNS和dashboard安装,集群升级,yaml详解
前言:本文k8s环境搭建是采用kubeasz 3.2.0方式二进制部署的,这个种部署方式是经过CNCF(云原生基金会)认证的,可以用在生产上,本演示环境已装好k8s和calico
安装包链接:https://github.com/easzlab/kubeasz/releases
一、在kubernetes内部署coredns和官方dashboard
1.安装CoreDNS
将下载好的kubernetes-server-linux-amd64.tar.gz传到/usr/local/src下
[root@k8s-master1 yaml]# cd /usr/local/src/

##解压server包
[root@k8s-master1 src]# tar -xf kubernetes-server-linux-amd64.tar.gz
[root@k8s-master1 ~]# cd /usr/local/src/kubernetes
[root@k8s-master1 kubernetes]# tar -xf kubernetes-src.tar.gz

##寻找CoreDNS yaml模板文件
[root@k8s-master1 kubernetes]# cd  cluster/addons/dns/coredns/\
[root@k8s-master1 coredns]# mkdir /root/yaml
[root@k8s-master1 coredns]# mv coredns.yaml.sed /root/yaml/
[root@k8s-master1 coredns]# cd /root/yaml
[root@k8s-master1 yaml]# mv coredns.yaml.sed coredns.yaml

[root@k8s-master1 yaml]# vim  coredns.yaml
# Warning: This is a file generated from the base underscore template file: coredns.yaml.base

apiVersion: v1
kind: ServiceAccount
metadata:
  name: coredns
  namespace: kube-system
  labels:
      kubernetes.io/cluster-service: "true"
      addonmanager.kubernetes.io/mode: Reconcile
---
apiVersion: rbac.authorization.k8s.io/v1
kind: ClusterRole
metadata:
  labels:
    kubernetes.io/bootstrapping: rbac-defaults
    addonmanager.kubernetes.io/mode: Reconcile
  name: system:coredns
rules:
- apiGroups:
  - ""
  resources:
  - endpoints
  - services
  - pods
  - namespaces
  verbs:
  - list
  - watch
- apiGroups:
  - ""
  resources:
  - nodes
  verbs:
  - get
- apiGroups:
  - discovery.k8s.io
  resources:
  - endpointslices
  verbs:
  - list
  - watch
---
apiVersion: rbac.authorization.k8s.io/v1
kind: ClusterRoleBinding
metadata:
  annotations:
    rbac.authorization.kubernetes.io/autoupdate: "true"
  labels:
    kubernetes.io/bootstrapping: rbac-defaults
    addonmanager.kubernetes.io/mode: EnsureExists
  name: system:coredns
roleRef:
  apiGroup: rbac.authorization.k8s.io
  kind: ClusterRole
  name: system:coredns
subjects:
- kind: ServiceAccount
  name: coredns
  namespace: kube-system
---
apiVersion: v1
kind: ConfigMap
metadata:
  name: coredns
  namespace: kube-system
  labels:
      addonmanager.kubernetes.io/mode: EnsureExists
data:
  Corefile: |
    .:53 {
        errors
        health {
            lameduck 5s
        }
        ready
        kubernetes cluster.local. in-addr.arpa ip6.arpa {
            pods insecure
            fallthrough in-addr.arpa ip6.arpa
            ttl 30
        }
        prometheus :9153
        forward . 192.168.10.101 {   #直接指向外部dns地址
            max_concurrent 1000
        }
        cache 30
        loop
        reload
        loadbalance
    }
---
apiVersion: apps/v1
kind: Deployment
metadata:
  name: coredns
  namespace: kube-system
  labels:
    k8s-app: kube-dns
    kubernetes.io/cluster-service: "true"
    addonmanager.kubernetes.io/mode: Reconcile
    kubernetes.io/name: "CoreDNS"
spec:
  # replicas: not specified here:
  # 1. In order to make Addon Manager do not reconcile this replicas parameter.
  # 2. Default is 1.
  # 3. Will be tuned in real time if DNS horizontal auto-scaling is turned on.
  strategy:
    type: RollingUpdate
    rollingUpdate:
      maxUnavailable: 1
  selector:
    matchLabels:
      k8s-app: kube-dns
  template:
    metadata:
      labels:
        k8s-app: kube-dns
    spec:
      securityContext:
        seccompProfile:
          type: RuntimeDefault
      priorityClassName: system-cluster-critical
      serviceAccountName: coredns
      affinity:
        podAntiAffinity:
          preferredDuringSchedulingIgnoredDuringExecution:
          - weight: 100
            podAffinityTerm:
              labelSelector:
                matchExpressions:
                  - key: k8s-app
                    operator: In
                    values: ["kube-dns"]
              topologyKey: kubernetes.io/hostname
      tolerations:
        - key: "CriticalAddonsOnly"
          operator: "Exists"
      nodeSelector:
        kubernetes.io/os: linux
      containers:
      - name: coredns
        image: registry.aliyuncs.com/google_containers/coredns:v1.8.6
        imagePullPolicy: IfNotPresent
        resources:
          limits:
            cpu: 300m
            memory: 200Mi
          requests:
            cpu: 100m
            memory: 70Mi
        args: [ "-conf", "/etc/coredns/Corefile" ]
        volumeMounts:
        - name: config-volume
          mountPath: /etc/coredns
          readOnly: true
        ports:
        - containerPort: 53
          name: dns
          protocol: UDP
        - containerPort: 53
          name: dns-tcp
          protocol: TCP
        - containerPort: 9153
          name: metrics
          protocol: TCP
        livenessProbe:
          httpGet:
            path: /health
            port: 8080
            scheme: HTTP
          initialDelaySeconds: 60
          timeoutSeconds: 5
          successThreshold: 1
          failureThreshold: 5
        readinessProbe:
          httpGet:
            path: /ready
            port: 8181
            scheme: HTTP
        securityContext:
          allowPrivilegeEscalation: false
          capabilities:
            add:
            - NET_BIND_SERVICE
            drop:
            - all
          readOnlyRootFilesystem: true
      dnsPolicy: Default
      volumes:
        - name: config-volume
          configMap:
            name: coredns
            items:
            - key: Corefile
              path: Corefile
---
apiVersion: v1
kind: Service
metadata:
  name: kube-dns
  namespace: kube-system
  annotations:
    prometheus.io/port: "9153"
    prometheus.io/scrape: "true"
  labels:
    k8s-app: kube-dns
    kubernetes.io/cluster-service: "true"
    addonmanager.kubernetes.io/mode: Reconcile
    kubernetes.io/name: "CoreDNS"
spec:
  selector:
    k8s-app: kube-dns
  clusterIP: 10.100.0.2 #修改成service网络第二个地址
  ports:
  - name: dns
    port: 53
    protocol: UDP
  - name: dns-tcp
    port: 53
    protocol: TCP
  - name: metrics
    port: 9153
    protocol: TCP

#############配置注解#########
errors: 错误信息标准输出,如kubectl logs   coredns-xxxx-xxx   -n kube-system所看到日志,没error信息代表正常
health: 在CoreDNS的 http://localhost:8080/health 端口提供CoreDNS服务的健康报告
ready: 监听8181端口,当CoreDNS的插件都已经就绪时,访问该接口会返回200 OK
kubernetes:Coredns 将基于kubernetes service name 进行dns查询并返回查询记录给客户端
prometheus: Coredns 的度量指标数据以Prometheus的key-value的格式在http://localhost:9153/metrics URI上提供
forward:转发域名查询到上游dns服务器
cache: 启用service解析缓存,单位为秒。
loop: 检测域名解析是否死循环,如corends转发给内网服务器,而内网DNS服务器又转发给Coredns,如果发现死循环,则强制中止coredns进程(kubernetes会重建)
reload:检测corefile是否更改,在重新编辑后configmap配置后,默认2分钟后会优雅的自动加载
loadbalance:轮询DNS域名解析,如果一个域名存在多个记录轮询解析。
[root@k8s-master1 yaml]# kubectl apply -f coredns.yaml
[外链图片转存失败,源站可能有防盗链机制,建议将图片保存下来直接上传(img-RhzOI53D-1652025842384)(C:\Users\Administrator\AppData\Roaming\Typora\typora-user-images\image-20220425215420803.png)]
验证CoreDNS的功能
[root@k8s-master1 ~]# kubectl get pod
NAME     READY   STATUS    RESTARTS        AGE
centos   1/1     Running   3 (4h21m ago)   7h22m
nginx    1/1     Running   1 (10h ago)     10h
[root@k8s-master1 ~]# kubectl exec -it centos -- /bin/bash
[root@centos /]# nslookup www.baidu.com
;; Truncated, retrying in TCP mode.
Server:		10.100.0.2
Address:	10.100.0.2#53

www.baidu.com	canonical name = www.a.shifen.com.
Name:	www.a.shifen.com
Address: 163.177.151.110
Name:	www.a.shifen.com
Address: 163.177.151.109

[root@centos /]# nslookup kubernetes.default.svc.cluster.local
Server:		10.100.0.2
Address:	10.100.0.2#53

Name:	kubernetes.default.svc.cluster.local
Address: 10.100.0.1
解析外部和内部域名都没问题,功能正常
成功跑起来的CoreDNS pod 只有一个,可以给它建多一个副本

[root@k8s-master1 yaml]# kubectl get deployment -n kube-system
NAME                      READY   UP-TO-DATE   AVAILABLE   AGE
calico-kube-controllers   1/1     1            1           8d
coredns                   1/1     1            1           27m
[root@k8s-master1 yaml]# kubectl edit deployment coredns -n kube-system -o yaml

[root@k8s-master1 yaml]# kubectl get pod -n kube-system
NAME                                       READY   STATUS    RESTARTS       AGE
calico-kube-controllers-754966f84c-fg4rg   1/1     Running   0              10h
calico-node-6s22k                          1/1     Running   13 (11h ago)   8d
calico-node-fqltt                          1/1     Running   25 (11h ago)   8d
calico-node-rk6gk                          1/1     Running   11 (11h ago)   8d
calico-node-smbxl                          1/1     Running   13 (11h ago)   8d
coredns-5f6db67669-2qgt5                   1/1     Running   0              32m
coredns-5f6db67669-bcst7                   1/1     Running   0              53s
可以看到增加一个coredns副本了
2、安装dashborad
dashborad官方地址: https://github.com/kubernetes/dashboard/releases
KubernetesDashboard是用于Kubernetes集群的前端UI组件,允许用户管理集群中运行的应用程序并对其
进行故障排除,以及管理集群本身。
本人是k8s 1.23版本,所以找一个兼容1.23版本的dashboradd.

下载对应版本的dashboard yaml
[root@k8s-master1 yaml]# wget https://raw.githubusercontent.com/kubernetes/dashboard/v2.5.1/aio/deploy/recommended.yaml
[root@k8s-master1 yaml]# mv dashboard.yaml dashboard-v2.5.1.yaml
[root@k8s-master1 yaml]# vim dashboard-v2.5.1.yaml
# Copyright 2017 The Kubernetes Authors.
#
# Licensed under the Apache License, Version 2.0 (the "License");
# you may not use this file except in compliance with the License.
# You may obtain a copy of the License at
#
#     http://www.apache.org/licenses/LICENSE-2.0
#
# Unless required by applicable law or agreed to in writing, software
# distributed under the License is distributed on an "AS IS" BASIS,
# WITHOUT WARRANTIES OR CONDITIONS OF ANY KIND, either express or implied.
# See the License for the specific language governing permissions and
# limitations under the License.

apiVersion: v1
kind: Namespace
metadata:
  name: kubernetes-dashboard

---

apiVersion: v1
kind: ServiceAccount
metadata:
  labels:
    k8s-app: kubernetes-dashboard
  name: kubernetes-dashboard
  namespace: kubernetes-dashboard

---

kind: Service
apiVersion: v1
metadata:
  labels:
    k8s-app: kubernetes-dashboard
  name: kubernetes-dashboard
  namespace: kubernetes-dashboard
spec:
  type: NodePort
  ports:
    - port: 443
      targetPort: 8443
      nodePort: 30004
  selector:
    k8s-app: kubernetes-dashboard

---

apiVersion: v1
kind: Secret
metadata:
  labels:
    k8s-app: kubernetes-dashboard
  name: kubernetes-dashboard-certs
  namespace: kubernetes-dashboard
type: Opaque

---

apiVersion: v1
kind: Secret
metadata:
  labels:
    k8s-app: kubernetes-dashboard
  name: kubernetes-dashboard-csrf
  namespace: kubernetes-dashboard
type: Opaque
data:
  csrf: ""

---

apiVersion: v1
kind: Secret
metadata:
  labels:
    k8s-app: kubernetes-dashboard
  name: kubernetes-dashboard-key-holder
  namespace: kubernetes-dashboard
type: Opaque

---

kind: ConfigMap
apiVersion: v1
metadata:
  labels:
    k8s-app: kubernetes-dashboard
  name: kubernetes-dashboard-settings
  namespace: kubernetes-dashboard

---

kind: Role
apiVersion: rbac.authorization.k8s.io/v1
metadata:
  labels:
    k8s-app: kubernetes-dashboard
  name: kubernetes-dashboard
  namespace: kubernetes-dashboard
rules:
  # Allow Dashboard to get, update and delete Dashboard exclusive secrets.
  - apiGroups: [""]
    resources: ["secrets"]
    resourceNames: ["kubernetes-dashboard-key-holder", "kubernetes-dashboard-certs", "kubernetes-dashboard-csrf"]
    verbs: ["get", "update", "delete"]
    # Allow Dashboard to get and update 'kubernetes-dashboard-settings' config map.
  - apiGroups: [""]
    resources: ["configmaps"]
    resourceNames: ["kubernetes-dashboard-settings"]
    verbs: ["get", "update"]
    # Allow Dashboard to get metrics.
  - apiGroups: [""]
    resources: ["services"]
    resourceNames: ["heapster", "dashboard-metrics-scraper"]
    verbs: ["proxy"]
  - apiGroups: [""]
    resources: ["services/proxy"]
    resourceNames: ["heapster", "http:heapster:", "https:heapster:", "dashboard-metrics-scraper", "http:dashboard-metrics-scraper"]
    verbs: ["get"]

---

kind: ClusterRole
apiVersion: rbac.authorization.k8s.io/v1
metadata:
  labels:
    k8s-app: kubernetes-dashboard
  name: kubernetes-dashboard
rules:
  # Allow Metrics Scraper to get metrics from the Metrics server
  - apiGroups: ["metrics.k8s.io"]
    resources: ["pods", "nodes"]
    verbs: ["get", "list", "watch"]

---

apiVersion: rbac.authorization.k8s.io/v1
kind: RoleBinding
metadata:
  labels:
    k8s-app: kubernetes-dashboard
  name: kubernetes-dashboard
  namespace: kubernetes-dashboard
roleRef:
  apiGroup: rbac.authorization.k8s.io
  kind: Role
  name: kubernetes-dashboard
subjects:
  - kind: ServiceAccount
    name: kubernetes-dashboard
    namespace: kubernetes-dashboard

---

apiVersion: rbac.authorization.k8s.io/v1
kind: ClusterRoleBinding
metadata:
  name: kubernetes-dashboard
roleRef:
  apiGroup: rbac.authorization.k8s.io
  kind: ClusterRole
  name: kubernetes-dashboard
subjects:
  - kind: ServiceAccount
    name: kubernetes-dashboard
    namespace: kubernetes-dashboard

---

kind: Deployment
apiVersion: apps/v1
metadata:
  labels:
    k8s-app: kubernetes-dashboard
  name: kubernetes-dashboard
  namespace: kubernetes-dashboard
spec:
  replicas: 1
  revisionHistoryLimit: 10
  selector:
    matchLabels:
      k8s-app: kubernetes-dashboard
  template:
    metadata:
      labels:
        k8s-app: kubernetes-dashboard
    spec:
      securityContext:
        seccompProfile:
          type: RuntimeDefault
      containers:
        - name: kubernetes-dashboard
          image: kubernetesui/dashboard:v2.5.1
          imagePullPolicy: IfNotPresent
          ports:
            - containerPort: 8443
              protocol: TCP
          args:
            - --auto-generate-certificates
            - --namespace=kubernetes-dashboard
            # Uncomment the following line to manually specify Kubernetes API server Host
            # If not specified, Dashboard will attempt to auto discover the API server and connect
            # to it. Uncomment only if the default does not work.
            # - --apiserver-host=http://my-address:port
          volumeMounts:
            - name: kubernetes-dashboard-certs
              mountPath: /certs
              # Create on-disk volume to store exec logs
            - mountPath: /tmp
              name: tmp-volume
          livenessProbe:
            httpGet:
              scheme: HTTPS
              path: /
              port: 8443
            initialDelaySeconds: 30
            timeoutSeconds: 30
          securityContext:
            allowPrivilegeEscalation: false
            readOnlyRootFilesystem: true
            runAsUser: 1001
            runAsGroup: 2001
      volumes:
        - name: kubernetes-dashboard-certs
          secret:
            secretName: kubernetes-dashboard-certs
        - name: tmp-volume
          emptyDir: {}
      serviceAccountName: kubernetes-dashboard
      nodeSelector:
        "kubernetes.io/os": linux
      # Comment the following tolerations if Dashboard must not be deployed on master
      tolerations:
        - key: node-role.kubernetes.io/master
          effect: NoSchedule

---

kind: Service
apiVersion: v1
metadata:
  labels:
    k8s-app: dashboard-metrics-scraper
  name: dashboard-metrics-scraper
  namespace: kubernetes-dashboard
spec:
  ports:
    - port: 8000
      targetPort: 8000
  selector:
    k8s-app: dashboard-metrics-scraper

---

kind: Deployment
apiVersion: apps/v1
metadata:
  labels:
    k8s-app: dashboard-metrics-scraper
  name: dashboard-metrics-scraper
  namespace: kubernetes-dashboard
spec:
  replicas: 1
  revisionHistoryLimit: 10
  selector:
    matchLabels:
      k8s-app: dashboard-metrics-scraper
  template:
    metadata:
      labels:
        k8s-app: dashboard-metrics-scraper
    spec:
      securityContext:
        seccompProfile:
          type: RuntimeDefault
      containers:
        - name: dashboard-metrics-scraper
          image: kubernetesui/metrics-scraper:v1.0.7
          imagePullPolicy: IfNotPresent
          ports:
            - containerPort: 8000
              protocol: TCP
          livenessProbe:
            httpGet:
              scheme: HTTP
              path: /
              port: 8000
            initialDelaySeconds: 30
            timeoutSeconds: 30
          volumeMounts:
          - mountPath: /tmp
            name: tmp-volume
          securityContext:
            allowPrivilegeEscalation: false
            readOnlyRootFilesystem: true
            runAsUser: 1001
            runAsGroup: 2001
      serviceAccountName: kubernetes-dashboard
      nodeSelector:
        "kubernetes.io/os": linux
      # Comment the following tolerations if Dashboard must not be deployed on master
      tolerations:
        - key: node-role.kubernetes.io/master
          effect: NoSchedule
      volumes:
        - name: tmp-volume
          emptyDir: {}

##注意,要修改成nodePort类型,因为它默认是clusterIP类型外部是无法访问的

创建dashboard的命名空间
[root@k8s-master1 yaml]# kubectl create ns kubernetes-dashboard

[root@k8s-master1 yaml]# kubectl apply -f dashboard.yaml
[root@k8s-master1 yaml]# kubectl get pod -n kubernetes-dashboard
NAME                                         READY   STATUS    RESTARTS   AGE
dashboard-metrics-scraper-799d786dbf-6cnb7   1/1     Running   0          46m
kubernetes-dashboard-6f8c86dcbc-jtsj2        1/1     Running   0          46m
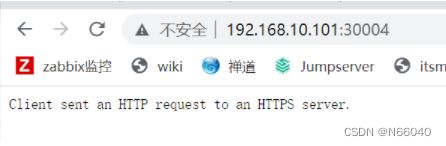
上图是需要https才能访问dashboard,可以在代理配地址重写,http 重写成https

在kubernetes-dashboard 命名空间创建一个超级管理员admin-user 用户,做个serviceAccount token
[root@k8s-master1 yaml]# vim admin-user.yaml
apiVersion: v1
kind: ServiceAccount
metadata:
  name: admin-user
  namespace: kubernetes-dashboard

---
apiVersion: rbac.authorization.k8s.io/v1
kind: ClusterRoleBinding
metadata:
  name: admin-user
roleRef:
  apiGroup: rbac.authorization.k8s.io
  kind: ClusterRole
  name: cluster-admin
subjects:
- kind: ServiceAccount
  name: admin-user
  namespace: kubernetes-dashboard

[root@k8s-master1 yaml]# kubectl apply -f admin-user.yaml
serviceaccount/admin-user created
clusterrolebinding.rbac.authorization.k8s.io/admin-user created

[root@k8s-master1 yaml]# kubectl get secrets admin-user-token-zb4sf -n kubernetes-dashboard
NAME                     TYPE                                  DATA   AGE
admin-user-token-zb4sf   kubernetes.io/service-account-token   3      10m
[root@k8s-master1 yaml]# kubectl describe secrets admin-user-token-zb4sf -n kubernetes-dashboard
Name:         admin-user-token-zb4sf
Namespace:    kubernetes-dashboard
Labels:
Annotations:  kubernetes.io/service-account.name: admin-user
              kubernetes.io/service-account.uid: cbc35330-3d1c-4095-9f76-e7fe0b4cc980

Type:  kubernetes.io/service-account-token

Data
====
ca.crt:     1302 bytes
namespace:  20 bytes
token:      eyJhbGciOiJSUzI1NiIsImtpZCI6IkN6WE0xN1VTbDVIRUdSUWh3dWNkVlRLWnBSZlhDbDBIUVpOaUhnYlVBdEkifQ.eyJpc3MiOiJrdWJlcm5ldGVzL3NlcnZpY2VhY2NvdW50Iiwia3ViZXJuZXRlcy5pby9zZXJ2aWNlYWNjb3VudC9uYW1lc3BhY2UiOiJrdWJlcm5ldGVzLWRhc2hib2FyZCIsImt1YmVybmV0ZXMuaW8vc2VydmljZWFjY291bnQvc2VjcmV0Lm5hbWUiOiJhZG1pbi11c2VyLXRva2VuLXpiNHNmIiwia3ViZXJuZXRlcy5pby9zZXJ2aWNlYWNjb3VudC9zZXJ2aWNlLWFjY291bnQubmFtZSI6ImFkbWluLXVzZXIiLCJrdWJlcm5ldGVzLmlvL3NlcnZpY2VhY2NvdW50L3NlcnZpY2UtYWNjb3VudC51aWQiOiJjYmMzNTMzMC0zZDFjLTQwOTUtOWY3Ni1lN2ZlMGI0Y2M5ODAiLCJzdWIiOiJzeXN0ZW06c2VydmljZWFjY291bnQ6a3ViZXJuZXRlcy1kYXNoYm9hcmQ6YWRtaW4tdXNlciJ9.he48mwqIWyjqjRp6gZlkV_nM8QZOpTmybl2vkwi5MFZVeoOs0TP1pL5BAeEreERdm8Dyv2Uq5XgI0HsfLlzfcBcJBh-CObGb86ahk6fcsOB-llTnctDn6-RSw-QlCdHARlyVMgWCz3xahiVTB0Uqi7FWgzaiYVuxktEPiU7txfVbzKVd-6jUMzfmEpaHEXTy-KGL8LONbli3-0QpdNJdfE8rsg4SB44NwRmgKO4GZDmscL3entHsJHMgc7CxFNBcYQm2fBNJvvjRBJcsra6ShlgM4KNLYvJmhjMwpjYRvrk58xp2tpNeEz4g92Qaa09jgEidbFc8GWFdNsJU4sKSTw
用token认证方式登录,复制secrets admin-user-token-zb4sf 这个token值,粘贴到登录界面

k8s还支持第三方dashdoard,如rancher,kuboard, kubesphere
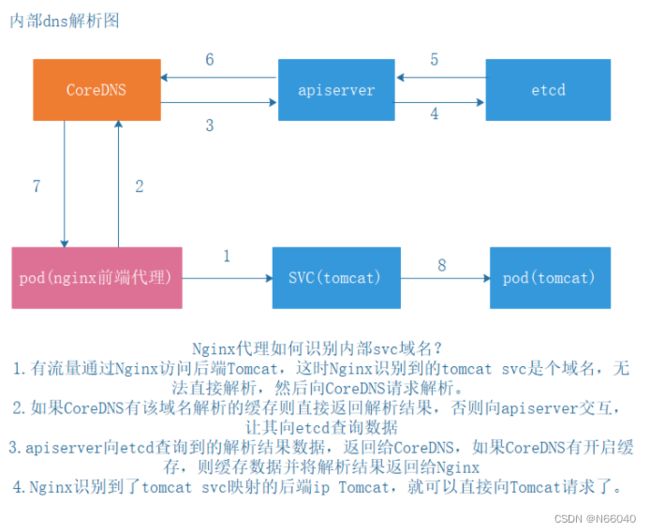
二、kubernetes中的域名解析流程
1.内部dns解析流程图
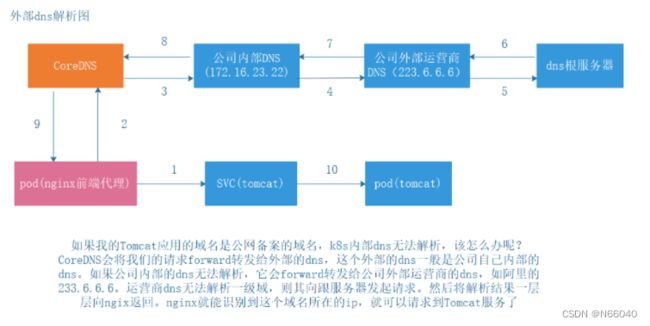
2.外部dns解析流程图
三、kubtctl命令使用
##get 的资源对象可以是pod, svc, deployment, rs, daemonset, secrets等等资源,-n 可以指定命名空间
kubectl get node -o wide ##查看node节点详细信息,
kubectl get pod -n kube-system ## 查看kube-system命名空间的pod,如果不指定命名空间,默认是default空间的资源
kubectl get pod -A ##查看所有命名空间的pod,
kubectl get svc #查看default命名空间的service网络规则,service 简称svc
kubectl cordon 192.168.10.101 ## 使192.168.10.101node节点不可被调度,但daemoset任务除外
kubectl uncordon 192.168.10.101 ##使192.168.10.101node节点取消不可被调度,能被调度任务
kubectl logs pod Nginx ##查看Nginx pod 的日志
kubectl describe pod Nginx ##nginx pod 被创建时的过程。
kubectl apply -f xxx.yaml ##创建yaml里定义的资源,可以实现动态更新配置
kubectl delete -f xxx.yaml ##删除yaml里定义的资源
kubectl create -f xxx.yaml ## 创建yaml里定义的资源,不可以实现动态更新配置
kubectl exec -it nginx – /bin/bash ##进入Nginx内部bash
kubectl exec -it centos – ps aux ## 直接调用centos 内部的ps aux 命令
kubectl exex -it net-test1 -c container2 sh ##一个pod里有多个容器的情况下,可以通过-c指定进入的容器
kubectl explain service ## explain资源解释
kubectl api-resources ##查看所有支持的资源列表
四、etcdctl的命令客户端使用
1.碎片整理:
[root@k8s-etcd1 ~]# ETCDCTL_API=3 /usr/local/bin/etcdctl defrag --cluster --endpoints="https://192.168.10.106:2379,https://192.168.10.107.108:2379" --cacert=/etc/kubernetes/ssl/ca.pem --cert=/etc/kubernetes/ssl/etcd.pem --key=/etc/kubernetes/ssl/etcd-key.pem
2.查看各个etcd 成员的健康状态
[root@k8s-etcd1 ~]#  export NODE_IPS="192.168.10.106  192.168.10.107  192.168.10.108"
[root@k8s-etcd1 ~]# for ip in ${NODE_IPS}; do   ETCDCTL_API=3 /usr/local/bin/etcdctl   --endpoints=https://${ip}:2379    --cacert=/etc/kubernetes/ssl/ca.pem   --cert=/etc/kubernetes/ssl/etcd.pem   --key=/etc/kubernetes/ssl/etcd-key.pem   endpoint health; done

3、查看etcd集群的详细信息,添加–write-out=table ,以表格形式输出结果
[root@k8s-etcd1 ~]# export NODE_IPS="192.168.10.106  192.168.10.107  192.168.10.108"
[root@k8s-etcd1 ~]#  for ip in ${NODE_IPS}; do   ETCDCTL_API=3 /usr/local/bin/etcdctl --write-out=table   --endpoints=https://${ip}:2379    --cacert=/etc/kubernetes/ssl/ca.pem   --cert=/etc/kubernetes/ssl/etcd.pem   --key=/etc/kubernetes/ssl/etcd-key.pem   endpoint status; done

一般主要用来看etcd leader
4.列出etcd集群的成员
[root@k8s-etcd1 ~]# etcdctl member list
71745e1fe53ea3d2, started, etcd-192.168.10.107, https://192.168.10.107:2380, https://192.168.10.107:2379, false
a3ca1146c2b07fe1, started, etcd-192.168.10.106, https://192.168.10.106:2380, https://192.168.10.106:2379, false
b3497c3662525c94, started, etcd-192.168.10.108, https://192.168.10.108:2380, https://192.168.10.108:2379, false
5.查看dashboard 的key的目录
root@k8s-etcd1 ~]# etcdctl get / --prefix --keys-only ##以路径的方式查询所有key信息
[root@k8s-etcd1 ~]# etcdctl get / --prefix --keys-only | grep dashboard

6.从etcd查看一个pod的信息
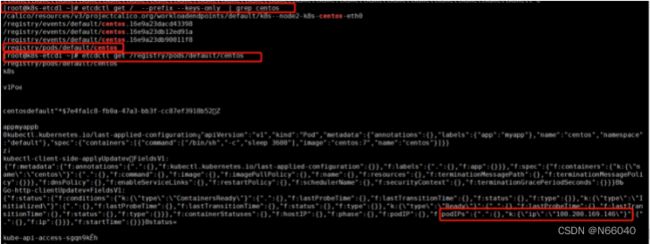
可以看到centos pod的ip从etcd中查看和我们kubectl get pod -o wide 看到的ip是一样的
7.查看namespace信息
[root@k8s-etcd1 ~]# etcdctl get / --prefix --keys-only | grep namespace

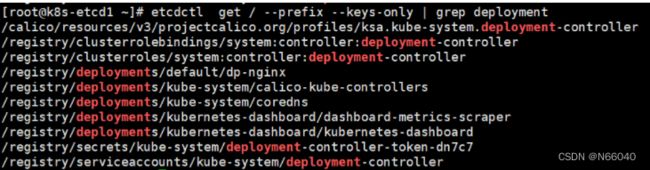
8.查看控制器信息
[root@k8s-etcd1 ~]# etcdctl get / --prefix --keys-only | grep deployment
9.etcd的增删改查数据
#添加数据
[root@k8s-etcd1 ~]# etcdctl put /name "tom"
OK

#查询数据
[root@k8s-etcd1 ~]# etcdctl get /name
/name
tom

#改动数据
[root@k8s-etcd1 ~]# etcdctl put /name "jack"
OK
#验证数据
[root@k8s-etcd1 ~]# etcdctl get /name
/name
jack

#删除数据
[root@k8s-etcd1 ~]# etcdctl del /name
1
[root@k8s-etcd1 ~]# etcdctl get /name
五、etcd实现数据备份与恢复
1、V3版本备份的数据:
etcd V3 API版本数据备份与恢复:
WAL 是write ahead log的缩写,顾名思义,也就是执行真正的写操作之前先写一个日志,预写日志。
wal: 存放预写日志,最大的作用是记录了整个数据变化的全部过程。 在etcd中,所有的数据修改在提交前,都要先写入到WAL中。
[root@k8s-etcd1 data]# ETCDCTL_API=3 etcdctl snapshot save /data/snapshot.db_date +%F_%H-%M-%S
{“level”:“info”,“ts”:1651658750.847236,“caller”:“snapshot/v3_snapshot.go:68”,“msg”:“created temporary db file”,“path”:“/data/snapshot.db_2022-05-04_18-05-50.part”}
{“level”:“info”,“ts”:1651658750.8484445,“logger”:“client”,“caller”:“v3/maintenance.go:211”,“msg”:“opened snapshot stream; downloading”}
{“level”:“info”,“ts”:1651658750.8484821,“caller”:“snapshot/v3_snapshot.go:76”,“msg”:“fetching snapshot”,“endpoint”:“127.0.0.1:2379”}
{“level”:“info”,“ts”:1651658750.902632,“logger”:“client”,“caller”:“v3/maintenance.go:219”,“msg”:“completed snapshot read; closing”}
{“level”:“info”,“ts”:1651658750.90648,“caller”:“snapshot/v3_snapshot.go:91”,“msg”:“fetched snapshot”,“endpoint”:“127.0.0.1:2379”,“size”:“4.8 MB”,“took”:“now”}
{“level”:“info”,“ts”:1651658750.9065433,“caller”:“snapshot/v3_snapshot.go:100”,“msg”:“saved”,“path”:“/data/snapshot.db_2022-05-04_18-05-50”}
Snapshot saved at /data/snapshot.db_2022-05-04_18-05-50
[root@k8s-etcd1 data]# pwd
/data
[root@k8s-etcd1 data]# ll
total 4736
-rw------- 1 root root 4845600 May 4 18:05 snapshot.db_2022-05-04_18-05-50
2、V3版本恢复数据:
#模拟将数据恢复到一个新的不存在数据的目录中
[root@k8s-etcd1 ~]#mkdir /tmp/etcd_testdir/

[root@k8s-etcd1 ~]# ETCDCTL_API=3 etcdctl snapshot restore  /data/snapshot.db_2022-05-04_18-05-50 --data-dir=/tmp/etcd_testdir/

[root@k8s-etcd1 etcd_testdir]# ls
member
[root@k8s-etcd1 etcd_testdir]# cd member/
[root@k8s-etcd1 member]# ls
snap  wal
3、定时备份数据任务
##建备份目录
[root@k8s-etcd1 data]# mkdir -p /data/etcd-backup-dir
##建备份脚本目录
[root@k8s-etcd1 ~]# mkdir /root/crontab-script
[root@k8s-etcd1 ~]#cd /root/crontab-script
[root@k8s-etcd1 crontab-script]#vim etcd-script.sh
#!/bin/bash
###执行备份任务
source /etc/profile
DATE=`date  +%F_%H-%M-%S`
etcdctl_bin=`/usr/local/bin/etcdctl`
etcd_backup_dir=/data/etcd-backup-dir
ETCDCTL_API=3 ${etcdctl_bin}   snapshot save  ${etcd_backup_dir}/etcd-snapshot-${DATE}.db >>${etcd_backup_dir}/etcd-backup.log
###只保留最近的4份,超出则删掉
sum=4
while [ `ls -lt ${etcd_backup_dir} | grep etcd-snapshot | wc -l` -gt $sum ]
do
  cd ${etcd_backup_dir} && rm -rf `ls -lt ${etcd_backup_dir} | tail -n 1 | awk '{print $NF}'`
done
添加定时任务,每周二,四的凌晨2点,etcd全备一次
[root@k8s-etcd1 crontab-script]# crontab -e
0 2 * * 2,4 /usr/bin/sh /root/crontab-script/etcd-script.sh &>/dev/null
查看备份文件的快照状态
[root@k8s-etcd1 etcd-backup-dir]# etcdctl --write-out=table snapshot status etcd-snapshot-2022-05-04_21-59-37.db
Deprecated: Use etcdutl snapshot status instead.
±---------±---------±-----------±-----------+
| HASH | REVISION | TOTAL KEYS | TOTAL SIZE |
±---------±---------±-----------±-----------+
| 38ec0f99 | 49775 | 1170 | 4.8 MB |
±---------±---------±-----------±-----------+
4、kubeasz 安装的 etcd 集群v3版本数据自动备份与恢复
[root@k8s-master1 playbooks]# pwd
/etc/kubeasz/playbooks
[root@k8s-master1 playbooks]# cat 94.backup.yml
# cluster-backup playbook
# read the guide: 'op/cluster_restore.md'

- hosts:
  - localhost
  tasks:
  # step1: find a healthy member in the etcd cluster
  - name: set NODE_IPS of the etcd cluster
    set_fact: NODE_IPS="{% for host in groups['etcd'] %}{{ host }} {% endfor %}"

  - name: get etcd cluster status
    shell: 'for ip in {{ NODE_IPS }};do \
              ETCDCTL_API=3 {{ base_dir }}/bin/etcdctl \
              --endpoints=https://"$ip":2379 \
              --cacert={{ cluster_dir }}/ssl/ca.pem \
              --cert={{ cluster_dir }}/ssl/etcd.pem \
              --key={{ cluster_dir }}/ssl/etcd-key.pem \
              endpoint health; \
            done'
    register: ETCD_CLUSTER_STATUS
    ignore_errors: true

  - debug: var="ETCD_CLUSTER_STATUS"

  - name: get a running ectd node
    shell: 'echo -e "{{ ETCD_CLUSTER_STATUS.stdout }}" \
             "{{ ETCD_CLUSTER_STATUS.stderr }}" \
             |grep "is healthy"|sed -n "1p"|cut -d: -f2|cut -d/ -f3'
    register: RUNNING_NODE

  - debug: var="RUNNING_NODE.stdout"

  - name: get current time
    shell: "date +'%Y%m%d%H%M'"
    register: timestamp

  # step2: backup data on the healthy member
  - name: make a backup on the etcd node
    shell: "mkdir -p /etcd_backup && cd /etcd_backup && \
        ETCDCTL_API=3 {{ bin_dir }}/etcdctl snapshot save snapshot_{{ timestamp.stdout }}.db"
    args:
      warn: false
    delegate_to: "{{ RUNNING_NODE.stdout }}"

  - name: fetch the backup data
    fetch:
      src: /etcd_backup/snapshot_{{ timestamp.stdout }}.db
      dest: "{{ cluster_dir }}/backup/"
      flat: yes
    delegate_to: "{{ RUNNING_NODE.stdout }}"

  - name: update the latest backup
    shell: 'cd {{ cluster_dir }}/backup/ && /bin/cp -f snapshot_{{ timestamp.stdout }}.db snapshot.db'
运行 ./ezctl backup k8s-cluster1将会执行94.backup.yml 这个脚本
[root@k8s-master1 kubeasz]# ./ezctl backup k8s-cluster1

这个ansible备份etcd脚本根据其运行的输出信息,得知其备份在192.168.10.106上
[root@k8s-etcd1 etcd-backup]# ls /etcd_backup
snapshot_202205042332.db
[root@k8s-etcd1 etcd-backup]# ip a | grep 192
    inet 192.168.10.106/24 brd 192.168.10.255 scope global eth0
[root@k8s-etcd1 etcd-backup]#

根据脚本可知会将etcd备份传到执行ansible的所在节点的/etc/kubeasz/clusters/k8s-cluster1/backup目录,snapshot.db文件代表最新的备份,默认是用snapshot.db这份去恢复数据的
/etc/kubeasz/clusters/k8s-cluster1/backup
[root@k8s-master1 backup]# ls
snapshot_202205042332.db  snapshot.db
恢复数据
##先删除一个pod,然后再用备份恢复
[root@k8s-master1 backup]# kubectl  get pod
NAME                        READY   STATUS    RESTARTS      AGE
centos                      1/1     Running   8 (28m ago)   29h
dp-nginx-7568844dcd-26m99   1/1     Running   1 (10h ago)   29h
dp-nginx-7568844dcd-xwjmp   1/1     Running   1 (10h ago)   29h
[root@k8s-master1 backup]# kubectl delete pod centos
pod "centos" deleted
[root@k8s-master1 backup]# kubectl  get pod
NAME                        READY   STATUS    RESTARTS      AGE
dp-nginx-7568844dcd-26m99   1/1     Running   1 (10h ago)   29h
dp-nginx-7568844dcd-xwjmp   1/1     Running   1 (10h ago)   29h
运行 ./ezctl  backup k8s-cluster1将会执行95.restore.yml 这个脚本。
# cluster-restore playbook
# read the guide: 'op/cluster_restore.md'
# https://kubernetes.io/docs/tasks/administer-cluster/configure-upgrade-etcd/#restoring-an-etcd-cluster

- hosts: kube_master
  tasks:
  - name: stopping kube_master services
    service: name={{ item }} state=stopped
    with_items:
    - kube-apiserver
    - kube-controller-manager
    - kube-scheduler

- hosts:
  - kube_master
  - kube_node
  tasks:
  - name: stopping kube_node services
    service: name={{ item }} state=stopped
    with_items:
    - kubelet
    - kube-proxy

- hosts: etcd
  roles:
  - cluster-restore

- hosts: kube_master
  tasks:
  - name: starting kube_master services
    service: name={{ item }} state=started enabled=yes
    with_items:
    - kube-apiserver
    - kube-controller-manager
    - kube-scheduler

- hosts:
  - kube_master
  - kube_node
  tasks:
  - name: starting kube_node services
    service: name={{ item }} state=started enabled=yes
    with_items:
    - kubelet
    - kube-proxy

#################
  [root@k8s-master1 tasks]# pwd
/etc/kubeasz/roles/cluster-restore/tasks
[root@k8s-master1 tasks]# cat main.yml
- name: 停止ectd 服务
  service: name=etcd state=stopped

- name: 清除etcd 数据目录
  file: name={{ ETCD_DATA_DIR }}/member state=absent

- name: 生成备份目录
  file: name=/etcd_backup state=directory

- name: 准备指定的备份etcd 数据
  copy:
    src: "{{ cluster_dir }}/backup/{{ db_to_restore }}"
    dest: "/etcd_backup/snapshot.db"

- name: 清理上次备份恢复数据
  file: name=/etcd_backup/etcd-{{ inventory_hostname }}.etcd state=absent

- name: etcd 数据恢复
  shell: "cd /etcd_backup && \
	ETCDCTL_API=3 {{ bin_dir }}/etcdctl snapshot restore snapshot.db \
	--name etcd-{{ inventory_hostname }} \
	--initial-cluster {{ ETCD_NODES }} \
	--initial-cluster-token etcd-cluster-0 \
	--initial-advertise-peer-urls https://{{ inventory_hostname }}:2380"

- name: 恢复数据至etcd 数据目录
  shell: "cp -rf /etcd_backup/etcd-{{ inventory_hostname }}.etcd/member {{ ETCD_DATA_DIR }}/"

- name: 重启etcd 服务
  service: name=etcd state=restarted

- name: 以轮询的方式等待服务同步完成
  shell: "systemctl is-active etcd.service"
  register: etcd_status
  until: '"active" in etcd_status.stdout'
  retries: 8
  delay: 8
执行恢复命令
[root@k8s-master1 kubeasz]# ./ezctl restore k8s-cluster1
验证pod
[root@k8s-master1 kubeasz]# kubectl get pod
NAME                        READY   STATUS    RESTARTS      AGE
centos                      1/1     Running   0             29h
dp-nginx-7568844dcd-26m99   1/1     Running   1 (10h ago)   29h
dp-nginx-7568844dcd-xwjmp   1/1     Running   1 (10h ago)   29h
被删掉的centos pod 用备份恢复回来了
5、ETCD数据恢复流程
当etcd集群宕机数量超过节点数的一半以上的时候(如总数为三台宕机两台),就会导致个集群崩溃不可用,后期需要重新恢复数据,则恢复流程如下:
1、恢复服务器系统
2、重新部署ETCD集群
3、停止kube-apiserver/controller-manager/scheduler/kubelet/kube-proxy
4、停止ETCD集群
5、各ETCD节点恢复同一份备份数据
6、启动各个节点并验证ETCD集群
7、启动kube-apiserver/controller-manager/scheduler/kubelet/kube-proxy
8、验证k8s master 状态及pod数据
6、ETCD集群节点添加与删除
##添加etcd节点
[root@k8s-master1 kubeasz]# ./ezctl add-etcd k8s-cluster1 192.168.10.103

[root@k8s-etcd1 ~]#  export NODE_IPS="192.168.10.106  192.168.10.107  192.168.10.108 192.168.10.103"

[root@k8s-etcd1 ~]# for ip in ${NODE_IPS}; do   ETCDCTL_API=3 /usr/local/bin/etcdctl --write-out=table   --endpoints=https://${ip}:2379    --cacert=/etc/kubernetes/ssl/ca.pem   --cert=/etc/kubernetes/ssl/etcd.pem   --key=/etc/kubernetes/ssl/etcd-key.pem   endpoint status; done

##删除etcd节点
[root@k8s-master1 kubeasz]# ./ezctl del-etcd k8s-cluster1 192.168.10.103
六、掌握对kubernetes集群实现版本升级、添加和删除mster与node节点
1.升级集群
注:这里演示将k8s 1.23.1版本集群升级到1.23.5

##将下载好的1.23.5传到/usr/local/src下
[root@k8s-master1 yaml]# cd /usr/local/src/
[root@k8s-master1 src]# ll
total 480296
-rw-r--r-- 1 root root 341423907 Apr 21 23:12 kubernetes-server-linux-amd64.tar.gz
##解压server包
[root@k8s-master1 src]# tar -xf kubernetes-server-linux-amd64.tar.gz

[root@k8s-master1 src]# ls
kubernetes  kubernetes-server-linux-amd64.tar.gz
[root@k8s-master1 src]# cd /usr/local/src/kubernetes/server/bin
##注意在多master生产环境中要一个一个节点的升级,正在升级的master节点要在lb中剔除该apiserver的代理,以免被调用。(这里不演示这步)
停止二进制服务
[root@k8s-master1 bin]# systemctl stop kube-apiserver.service
[root@k8s-master1 bin]# systemctl stop kube-controller-manager.service
[root@k8s-master1 bin]# systemctl stop kube-scheduler.service

替换master二进制组件
[root@k8s-master1 bin]# which kube-apiserver  kube-controller-manager kube-scheduler
/usr/local/bin/kube-apiserver
/usr/local/bin/kube-controller-manager
/usr/local/bin/kube-scheduler
[root@k8s-master1 bin]#  cp kube-apiserver kube-scheduler kube-controller-manager  kubectl /usr/local/bin/

如果master 节点也装了kubelet和kube-proxy,则也需替换node二进制组件,若无则无需做
[root@k8s-master1 bin]# systemctl stop kubelet
[root@k8s-master1 bin]# systemctl stop kube-proxy
[root@k8s-master1 bin]# cp kube-proxy kubelet /usr/local/bin/

替换好后启动k8s组件
[root@k8s-master1 bin]# systemctl start kube-apiserver
[root@k8s-master1 bin]# systemctl start kube-proxy
[root@k8s-master1 bin]# systemctl start kubelet
[root@k8s-master1 bin]# systemctl start kube-controller-manager.service
[root@k8s-master1 bin]# systemctl start kube-scheduler.service
查看master1 node状态,如图已经发现版本已升级。

接下的升级其它master、node都参考上述做法,替换二进制版本即可。

这里小版本二进制升级,如果是涉及大版本升级,需要三思。大版本升级会到导致集群环境某些apiVersion功能不可用。
将高版本二进制替换kubeasz的二进制,这样以后安装出来的就是升级后版本了
[root@k8s-master1 bin]# pwd
/usr/local/src/kubernetes/server/bin
[root@k8s-master1 bin]# cp -rp kube-apiserver kube-scheduler kube-controller-manager  kubectl  kube-proxy kubelet   /etc/kubeasz/bin/
##集群添加master节点
[root@k8s-master1 kubeasz]# ./ezctl -h
Usage: ezctl COMMAND [args]
-------------------------------------------------------------------------------------
Cluster setups:
    list		             to list all of the managed clusters
    checkout                to switch default kubeconfig of the cluster
    new                     to start a new k8s deploy with name 'cluster'
    setup             to setup a cluster, also supporting a step-by-step way
    start                   to start all of the k8s services stopped by 'ezctl stop'
    stop                    to stop all of the k8s services temporarily
    upgrade                 to upgrade the k8s cluster
    destroy                 to destroy the k8s cluster
    backup                  to backup the cluster state (etcd snapshot)
    restore                 to restore the cluster state from backups
    start-aio		             to quickly setup an all-in-one cluster with 'default' settings

Cluster ops:
    add-etcd            to add a etcd-node to the etcd cluster
    add-master          to add a master node to the k8s cluster
    add-node            to add a work node to the k8s cluster
    del-etcd            to delete a etcd-node from the etcd cluster
    del-master          to delete a master node from the k8s cluster
    del-node            to delete a work node from the k8s cluster

[root@k8s-master1 kubeasz]# pwd
/etc/kubeasz
[root@k8s-master1 kubeasz]# [root@k8s-master1 kubeasz]# ./ezctl add-master  k8s-cluster1  192.168.10.103
2.集群删除master节点
[root@k8s-master1 kubeasz]# ./ezctl del-master k8s-cluster1 192.168.10.103
3.集群添加node节点
[root@k8s-master1 kubeasz]# ./ezctl add-node k8s-cluster1 192.168.10.113
4.集群删除node节点
[root@k8s-master1 kubeasz]# ./ezctl del-node k8s-cluster1 192.168.10.113
七、yaml文件的基本编写格式和注解
[root@k8s-master1 yaml]# cat nginx.yaml
kind: Deployment  #类型,是deployment控制器,kubectl explain  Deployment
#apiVersion: extensions/v1beta1  #API版本,# kubectl explain  Deployment.apiVersion
metadata: #pod的元数据信息,kubectl explain  Deployment.metadata
  labels: #自定义pod的标签,# kubectl explain  Deployment.metadata.labels
    app: linux36-nginx-deployment-label #标签名称为app值为linux36-nginx-deployment-label,后面会用到此标签
  name: linux36-nginx-deployment #pod的名称
  namespace: linux36 #pod的namespace,默认是defaule
spec: #定义deployment中容器的详细信息,kubectl explain  Deployment.spec
  replicas: 1 #创建出的pod的副本数,即多少个pod,默认值为1
  selector: #定义标签选择器
    matchLabels: #定义匹配的标签,必须要设置
      app: linux36-nginx-selector #匹配的目标标签,
  template: #定义模板,必须定义,模板是起到描述要创建的pod的作用
    metadata: #定义模板元数据
      labels: #定义模板label,Deployment.spec.template.metadata.labels
        app: linux36-nginx-selector #定义标签,等于Deployment.spec.selector.matchLabels
    spec: #定义pod信息
      containers:#定义pod中容器列表,可以多个至少一个,pod不能动态增减容器
      - name: linux36-nginx-container #容器名称
        image: harbor.magedu.net/linux36/nginx-web1:v1 #镜像地址
        #command: ["/apps/tomcat/bin/run_tomcat.sh"] #容器启动执行的命令或脚本
        #imagePullPolicy: IfNotPresent
        imagePullPolicy: Always #拉取镜像策略
        ports: #定义容器端口列表
        - containerPort: 80 #定义一个端口
          protocol: TCP #端口协议
          name: http #端口名称
        - containerPort: 443 #定义一个端口
          protocol: TCP #端口协议
          name: https #端口名称
        env: #配置环境变量
        - name: "password" #变量名称。必须要用引号引起来
          value: "123456" #当前变量的值
        - name: "age" #另一个变量名称
          value: "18" #另一个变量的值
        resources: #对资源的请求设置和限制设置
          limits: #资源限制设置,上限
            cpu: 500m  #cpu的限制,单位为core数,可以写0.5或者500m等CPU压缩值
            memory: 2Gi #内存限制,单位可以为Mib/Gib,将用于docker run --memory参数
          requests: #资源请求的设置
            cpu: 200m #cpu请求数,容器启动的初始可用数量,可以写0.5或者500m等CPU压缩值
            memory: 512Mi #内存请求大小,容器启动的初始可用数量,用于调度pod时候使用


---
kind: Service #类型为service
apiVersion: v1 #service API版本, service.apiVersion
metadata: #定义service元数据,service.metadata
  labels: #自定义标签,service.metadata.labels
    app: linux36-nginx #定义service标签的内容
  name: linux36-nginx-spec #定义service的名称,此名称会被DNS解析
  namespace: linux36 #该service隶属于的namespaces名称,即把service创建到哪个namespace里面
spec: #定义service的详细信息,service.spec
  type: NodePort #service的类型,定义服务的访问方式,默认为ClusterIP, service.spec.type
  ports: #定义访问端口, service.spec.ports
  - name: http #定义一个端口名称
    port: 80 #service 80端口
    protocol: TCP #协议类型
    targetPort: 80 #目标pod的端口
    nodePort: 30001 #node节点暴露的端口
  - name: https #SSL 端口
    port: 443 #service 443端口
    protocol: TCP #端口协议
    targetPort: 443 #目标pod端口
    nodePort: 30043 #node节点暴露的SSL端口
  selector: #service的标签选择器,定义要访问的目标pod
    app: linux36-nginx #将流量路到选择的pod上,须等于Deployment.spec.selector.matchLabels