win10配置opencv contrib
win10配置opencv-contrib环境
- 准备
- 编译Opencv contrib
- 配置环境
- 测试
视觉项目需要使用SIFT, SURF等,平民版opencv不满足需求。
准备
windows10,网络环境通畅
opencv3.4.8源码,不要编译好的
opencv-contrib3.4.8源码
cmake3.20.1
vs2019
本文主要参考了1和2两篇文章,补充了本人遇到的问题
编译Opencv contrib
解压opencv和对应版本的contrib压缩包,并创建mybuild文件夹,如图所示
以管理员身份运行CMake-gui(我之前没有以管理员身份运行,遇到了各种问题)
填写where is the source code 和where to build binaries,如图所示

注意source code是opencv源码目录,不是contrib源码目录!然后点击configure,出现的对话框中应该选择已经安装的visual studio 版本(本文选择visual studio 16 2019),x64,finish

稍等片刻,出现一片红。找到OPENCV_ENABLE_NONFREE,打勾。在他下边有个OPENCV_EXTRA_MODULES_PATH,在Value栏中点击后面的"…"按钮选择opencv-contrib源码的存放路径
![]()
再次点击configure,然后点击generate

在mybuild文件夹中就能找到OpenCV.sln文件,用VS打开它。首先在Debug x64模式下按F7生成。生成过程漫长,可以先去午休。
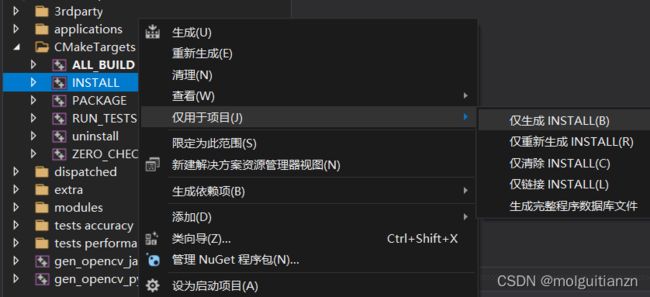
完成之后右键点击INSTALL,仅用于项目,仅生成Install

然后再切换到Release x64模式下F7生成,午休等待。。。右键仅生成INSTALL。
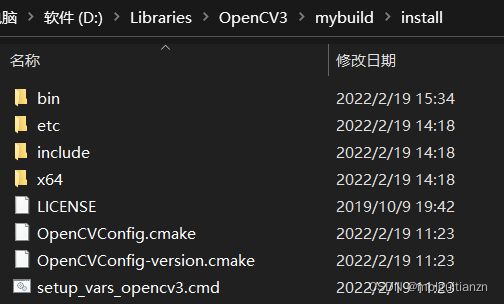
现在编译好的库文件就位于mybuild的install目录下。

配置环境
现在已经有opencv和contrib的库文件了。接下来需要在vs2019中进行相关配置,我们就能在代码中使用contrib的函数了。
- 打开环境变量,在PATH中新建一个,浏览到你刚才生成的mybuild\install\x64\vc16\bin目录
- 新建一个vs项目,右键点击项目名,打开属性,首先选择Release x64

(我的用Debug模式就没法使用xfeatures2d里的函数。。。)
点击配置属性->调试,在环境中写上dll的存放目录,我的是
PATH=D:\Libraries\OpenCV3\mybuild\install\x64\vc16\bin;%PATH%
点击VC++目录,在包含目录中写上头文件的存放目录,我的是
D:\Libraries\OpenCV3\mybuild\install\include
同样在VC++目录页面下,库目录中写上lib文件的存放目录,我的是
D:\Libraries\OpenCV3\mybuild\install\x64\vc16\lib
切换到链接器->输入,找到附加依赖项,写上你lib文件夹中的那几个lib库文件名,我的是
opencv_img_hash348.lib
opencv_img_hash348d.lib
opencv_world348.lib
opencv_world348d.lib
点击应用,确定。
测试
现在用以下代码测试
#include"iostream"
#include"opencv2/opencv.hpp"
#include"opencv2/highgui.hpp"
#include"opencv2/xfeatures2d.hpp"
using namespace cv;
using namespace std;

int main()
{
    Mat imageL0 = imread(图1);
    Mat imageR0 = imread(图2);
    if (!imageL0.data || !imageR0.data)
    {
        printf("no image input!\r\n");
        return 0;
    }
    Mat imageL1, imageR1;
    GaussianBlur(imageL0, imageL1, Size(3, 3), 0.5);
    GaussianBlur(imageR0, imageR1, Size(3, 3), 0.5);
    Ptr<Feature2D>f2d = xfeatures2d::SURF::create();
    vector<KeyPoint> keyPoint1, keyPoint2;
    f2d->detect(imageL1, keyPoint1);
    f2d->detect(imageR1, keyPoint2);
    drawKeypoints(imageL1, keyPoint1, imageL1, Scalar::all(-1), DrawMatchesFlags::DRAW_RICH_KEYPOINTS);
    drawKeypoints(imageR1, keyPoint2, imageR1, Scalar::all(-1), DrawMatchesFlags::DRAW_RICH_KEYPOINTS);
    namedWindow("KeyPoints of imageL", 0);
    namedWindow("KeyPoints of imageR", 0);
    imshow("KeyPoints of imageL", imageL1);
    imshow("KeyPoints of imageR", imageR1);
    Mat descriptors_1, descriptors_2;
    f2d->compute(imageL1, keyPoint1, descriptors_1);
    f2d->compute(imageR1, keyPoint2, descriptors_2);
    BFMatcher matcher;
    vector<DMatch>matches;
    matcher.match(descriptors_1, descriptors_2, matches);
    Mat imageOutput;
    drawMatches(imageL1, keyPoint1, imageR1, keyPoint2, matches, imageOutput);
    namedWindow("picture of matching", 0);
    imshow("picture of matching", imageOutput);
    waitKey(0);
    return 0;
}
